user manual Cooker EKC60752
electrolux Electrolux. Thinking of you. Share more of our thinking at www.electrolux.com Contents Safety instructions Description of appliance Before first use Operating the ceramic hob Operating the Touchpanel Operating the oven Tips, tables and advice Cleaning and care 2 4 6 8 9 14 20 23 What to do if... Technical Data Installation Environmental Information Guarantee/Customer Service European Guarantee www.electrolux.
electrolux 3 • Switch off the power supply to the cooker and contact Service for repairs. How to avoid damage to the appliance • Never use a cracked ceramic glass plate. Liquids could, if they boil over, or during cleaning, penetrate down into the live electrical components. • Never place metal objects such as lids, knives and spoons on the hob. They become hot if a heating zone is switched on by mistake. • Never leave a deep fat fryer, melting fat, paraffin or other easily flammable substance unattended.
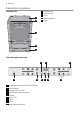
electrolux Description of appliance 1 2 3 4 5 General view 1 2 Ceramic hob Control panel Oven Storage drawer Plinth 3 4 5 Operating panel overview 1 4 1 2 3 4 5 6 7 8 9 5 Cooking zone indicators/Timer function Timer display Double zone is in use On/Off with power indicator Display Stop + Go Timer Lock Heat setting selection 6 2 7 3 8 9
electrolux 5 Accessories Hob overview 1 2 5 Clean the accessories before using them for the first time. Wash the shelves, roasting pan, etc. in hot water and washing-up liquid. Rinse and dry. 3 4 Baking tray For cakes and biscuits. 1 2 3 4 5 Ø 140 mm Ø 120 mm Ø 180 mm Ø 140 mm Ø 210 mm Oven equipment 1 10 2 Drip pan (with a non-stick surface) For baking and roasting or as a tray to catch fat.
electrolux Telescopic runners Make sure that the cooker anti-tip guard is fitted. The telescopic runners consist of two rails that can be pulled out. The shelves, the roasting pan and the grid are laid on top of the rails. A locating pin keeps the shelf in position (see the illustration). Using of the telescopic runners facilitates cooking. For example, when steak or chips are to be basted, the roasting pan is easily pulled out on the rails. pan is inserted.
electrolux 7 1. Press or to set the right time. 2. To change time already set, press On/Off . Then press until flashes Follow the instructions in alternative 1. After about 5 seconds the clock stops flashing and the time is shown in the display. The appliance is now ready to use. The time can only be modified, if the child safety device is deactivated, none of the clock functions Countdown , Cook time or End time nor any oven functions are set. 3. Leave the oven at this setting for about one hour. 4.
electrolux to the right, then lift the left-hand edge of the button. Connecting the lock Move the lock to the right and down. The door lock The door lock makes it more difficult for children to open the door. The lock is engaged when the cooker is delivered, but can be disconnected as necessary. To open the door Move the lock to the right when you want to open the door.
electrolux 9 • The residual heat can be used to melt foodstuffs or to hold food warm. • Important! There is risk of burns as long as the residual heat warner is alight. • Important! In the event of a power cut, the symbol goes out and thereby the residual heat warning. There is still the risk of burns. Burns can be avoided by being observant. Choice of pan/frying pan A cooker with a ceramic glass plate makes greater demands on your pots and pans that a cooker with heating plates.
electrolux Selection of heat retention All four cooking zones are fitted with a heat retention setting . Use area to set the heat retention position . Cooking/roasting with Automax This is how you activate the function. Note! This must be done each time you wish to use the automatic system. 1. Set the function Automax , A appears in the display. 2. Then make the desired setting for cooking/roasting. It takes about 5 seconds before A lights up in the indication area. The heater zone display shows A.
electrolux 11 1 2 5 4 Cooking with Automax Porridge (oats, rye) 3 Portions Zone Setting 2 1, 2, 4 3 4 3 3 Potatoes 2-4 1, 2, 4 3-4 Rice 2 1, 2, 4 2 4 1, 2, 4 3 4-6 3 3 4-8 3 4-5 Melting butter 1, 2, 4 1 Melting block chocolate 1, 2, 4 1 Root vegetables Roasting with Automax Entrecôte Pork chops Meat balls Pancakes Potatoes, raw Eggs Zone 3/4 decilitre Setting 3 7-8 5 7-8 3 6 5 6 3 6-7 5 6-7 3 7 5 7 3 6 5 6 3 6-7 5 6-7 Switching off a cookin
electrolux ~ 3 sec. Using the hob with activated locking function Even if the function lock is activated, the hob can be used, but the next time that the hob is switched on, the function lock is again activated. 1. Switch on the cooking zones. If the function lock is activated, this is shown: ~ 2 sec. 2. Press at the same time on two optional areas for the heating positions and for about 1 second and . A signal sounds as confirmation.
electrolux 13 ~ 1 sec. Press repeatedly on the Timer area to select the next active cooking zone. 2. While the control lamp flashes rapidly, set the area Timer setting or for this cooking zone and the desired time until the automatic safety switch-off (for example 15 minutes). The control lamp now flashes more slowly and the remaining cooking time is shown during the process in the display.
electrolux ~ 1 sec. ~ 1 sec. The display shows during locking and later shows the setting again. is shown again if attempts are made to change set values when the cooking zone area is locked. 2. To remove the function lock again, press “Function lock” again for about one second. The symbol goes out and the earlier heating setting is shown again. If the hob is switched off, the function lock is automatically disengaged.
electrolux 15 Oven functions Application Heating element/ fan Pie/pizza function For baking on one oven level Lower element, annular element dishes that require more intensive and fan browning and a crispy base. Set the oven temperatures 20-40 °C lower than when using Conventional. Low temperature roasting For food that is suitable for cook- Annular element and fan (120°C ing at low temperature for a longer or 150°C for 10 minutes and then time, about 4-5 hours.
electrolux The oven function can be changed while the oven is in operation. Changing the oven temperature Press or to increase or decrease temperature. Switch off the oven function Before switching off the oven, press or until no oven function is shown in the display. Switch off the oven Switch off the oven by pressing the button . Heat indicator Heating up When the oven function has been selected, the indicator starts to flash how much the oven has heated up.
electrolux 17 3. Select the desired time by pressing the or buttons (max. 09.59 hours). The remaining time is shown after about 5 seconds. The signal clock lights up. A signal is heard when 90% of the time has passed. The signal sounds for one minute when the set time is reached “00.00” and flash. Press one of the buttons to switch off the signal and the symbol in the display. Cooking time Use this function to determine how long you want the food to be in the oven. 1. Press . The lamp lights up. 2.
electrolux 2. Select oven function and temperature. Press and choose Cooking time and set the desired cooking time (for example 1 hour). 3. Use the time. and buttons to select stop 3. Press and choose Stop time to set the desired finishing time when you want the food to be ready (for example 2.05 p.m.). Stop time lights up and the time is shown in the display. Cooking time and Stop time light up in the display. The oven starts automatically after the pre-set time (for example 1.05 p.m.
electrolux 19 Other functions Oven safety switch-off If the oven not switched off after a certain time, or if the temperature is not modified, it switches off automatically. The last temperature set appears in the temperature display. The oven switches itself off when the oven temperature is: • 30 - 120oC after 12.5 hours • 120 - 200oC after 8.5 hours • 200 - 250oC after 5.5 hours • 250 - maxoC after 3.0 hours Using the appliance after a safety cutout: Switch the oven off completely.
electrolux When the desired temperature in the meat is reached, a signal sounds and the oven switches off. 6. To switch off the sound, press one of the buttons. Within a few minutes a provisional end time is calculated, at which the core temperature set will be reached. This time is constantly recalculated and updated in the display.
electrolux 21 Temperature oC Conventional Type of baking Oven level Temperature oC Hot air Minutes Oven level Bread Tin loaf 190-210 1 30-40 170-190 2 Loaf 175-225 2 35-45 180-190 1+4 Swedish teacake 220-225 3 12-18 180-190 1+4 Buns 225-250 2 7-10 180-190 1+4 Bun ring/flat long-shaped bun 180-200 2 20-30 170-180 3 Potato gratin 200 1 45-50 180-190 1 Batter pudding 200-225 2 20-35 180-190 3 Pan-pizza 210-220 1 16-20 180-200 1+4 White bread Oven dishes T
electrolux Baking result Cakes/oven dishes are pale in colour. Possible cause Remedy Food positioned too high in the oven is receiving too much top heating, when using top and bottom heating, and the opposite effect when placed too low. Check in the table or recipe that you have chosen the correct position. Aluminium foil, a tray or a roasting pan on the bottom of the oven is blocking the bottom heating. Make sure that there is nothing in the bottom of the oven.
electrolux 23 Type of meat Whole salmon. ca. 1 kg Temperature oC Conventional 210 Oven level 2 Minutes 20-25 oC Temp.
electrolux 2. Use a plastic pad designed for non-stick saucepans with cream cleaner for removal of more stubborn stains. To remove burnt on foodstuff We strongly recommend the use of a Ceramic Hob Scraper (incorporating a single edge razor blade) to remove spillage on the hob, in particular sugar solutions, which if not removed can cause permanent damage. 1. Make sure the ceramic glass is cool. 2. Use a ceramic hob scraper with care at an angle of 30o to remove as much foodstuff as possible.
electrolux 25 3. Close the door. Set the oven at 100°C with conventional heating for about 10 minutes. 4. When the oven has cooled down, rinse it with clean water or, if necessary, rub carefully with a soap pad. Wipe dry. 2. Insert the hinge unit in the slot on the door. Press down until the assembly spring clicks into position. The oven door The oven door can be removed for cleaning. When the oven door opens, the lamps light and the hot air fan stops. Removing the door: 1.
electrolux 2 2 1 Removing the central glass in the door 1. Grasp the central glass pane at its lower edge and push it towards the oven door handle, until it is free at the bottom (1). 2. Lift up the pane slightly at the bottom and pull it out (2). 3. Clean the glass. 1 Fitting the upper glass in the door 1. Insert the upper glass diagonally from above into the glass retainer on the handle side (1). 2. Lower the glass plate.
electrolux 27 Wash the accessories thoroughly in hot water and washing-up liquid before using them for the first time. • Use tools made of plastic or wood instead of metal, which can damage the plate. • Remember that pots and pans with rough surfaces can damage the accessories. • Clean the accessories with a soft sponge or a dish-brush in hot water, and a little washing-up liquid. Never use the dishwasher. • Never use wire wool or sharp objects when cleaning.
electrolux Order the replacement lamp from your local service centre (see section "Service/ Customer Service"). Always touch the halogen lamp using a cloth to avoid oil burning. 1. Take off the glass cover by turning it anticlockwise and clean it. 2. If necessary: Replace with oven lamp, 25 Watt, 230 V, 300 °C heat-resistant. 3. Re-fit the glass cover. Replacing the side oven light bulb/ Cleaning the glass cover 1. Take out the side rails on the left. 4. Re-fit the glass cover. 5.
electrolux 29 Problem Remedy The oven does not work Set the clock It takes too long to boil/fry Check that you have selected a suitable pan with good heat conductivity The oven light does not work Replace oven bulb The door lock does not work Activate the lock function The oven thermometer does not work Check that the roasting thermometer is properly connected in the oven; take it out and then re-connect it.
electrolux the top behind the hood), the cooker must not be pushed in under a tiled edge or similar. There must be a clear surface of at least 40 cm on both sides of the cooker. Make sure that the cooker cable does not get crushed when moving the cooker. Adjusting the height of the base If you wish to adjust the height, please read the following points before you start. 1. Lay down the cooker gently (See illustration).
electrolux 31 NOTE! If the space between the bench cupboards is greater than the width of the cooker, then you must adjust the side measurement if you want to centre the cooker. Electrical connections Warning! Any work required on the cooker must be carried out by a qualified expert. Any work carried out by nonqualified people can mean poorer cooker performance and result in personal injury and/or damage to property.
electrolux The symbol on the product or on its packaging indicates that this product may not be treated as household waste. Instead it should be taken to the appropriate collection point for the recycling of electrical and electronic equipment. By ensuring this product is disposed of correctly, you will help prevent potential negative consequences for the en- vironment and human health, which could otherwise be caused by inappropriate waste handling of this product.
electrolux 33 the consumer, the defective appliance may be replaced with another appliance of the same value. In this event, we reserve the right to ask for a financial contribution calculated according to the length of time it has been used. 13. A repair under guarantee does not mean that the normal guarantee period will be extended nor that a new guarantee period begins. 14. We give a twelve month guarantee for repairs, limited to the same defect. 15.
electrolux • The appliance is installed and used in accordance with instructions issued by Electrolux and is only used within the home, i.e. is not used for commercial purposes. • The appliance is installed in accordance with all relevant regulations in force within your new country of residence. The provisions of this European Guarantee do not affect any of the rights granted to you by law. www.electrolux.com Albania +35 5 4 261 450 Rr. Pjeter Bogdani Nr.
electrolux 35 Romania +40 21 451 20 30 Str. Garii Progresului 2, S4, 040671 RO Schweiz - Suisse - Svizzera +41 62 88 99 111 Industriestrasse 10, CH-5506 Mägenwil Slovenija +38 61 24 25 731 Gerbičeva ulica 98, 1000 Ljubljana Slovensko +421 2 43 33 43 22 Electrolux Slovakia s.r.o., Electrolux Domáce spotrebiče SK, Seberíniho 1, 821 03 Bratislava Suomi www.electrolux.
www.electrolux.