EKC6430AOW EKC6430AOX EN Cooker User Manual
www.electrolux.com CONTENTS 1. SAFETY INFORMATION....................................................................................3 2. SAFETY INSTRUCTIONS..................................................................................5 3. PRODUCT DESCRIPTION................................................................................ 8 4. BEFORE FIRST USE......................................................................................... 8 5. HOB - DAILY USE.................................
ENGLISH 1. 3 SAFETY INFORMATION Before the installation and use of the appliance, carefully read the supplied instructions. The manufacturer is not responsible for any injuries or damages that are the result of incorrect installation or usage. Always keep the instructions in a safe and accessible location for future reference. 1.1 Children and vulnerable people safety WARNING! Risk of suffocation, injury or permanent disability.
www.electrolux.com • • • • • • • • • • • • • • • This appliance is not intended to be used on a ships, boats or vessels. Do not install the appliance behind a decorative door in order to avoid overheating. Do not install the appliance on a platform. Do not operate the appliance by means of an external timer or separate remote-control system. WARNING: Unattended cooking on a hob with fat or oil can be dangerous and may result in fire.
ENGLISH • • • • • • 5 Ensure that the appliance is switched off before replacing the lamp to avoid the possibility of electric shock. If the mains power supply cable is damaged, it must be replaced by the manufacturer, its Authorised Service Centre or similarly qualified persons to avoid an electrical hazard. Be careful when you touch the storage drawer. It can get hot. To remove the shelf supports first pull the front of the shelf support and then the rear end away from the side walls.
www.electrolux.com 2.2 Electrical Connection • WARNING! Risk of fire and electrical shock. • • • • • • • • • • • • • • All electrical connections should be made by a qualified electrician. The appliance must be earthed. Make sure that the parameters on the rating plate are compatible with the electrical ratings of the mains power supply. Always use a correctly installed shockproof socket. Do not use multi-plug adapters and extension cables.
ENGLISH • • • • • • • • • Discoloration of the enamel or stainless steel has no effect on the performance of the appliance. Use a deep pan for moist cakes. Fruit juices cause stains that can be permanent. Do not keep hot cookware on the control panel. Do not let cookware boil dry. Be careful not to let objects or cookware fall on the appliance. The surface can be damaged. Do not activate the cooking zones with empty cookware or without cookware.
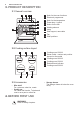
www.electrolux.com 3. PRODUCT DESCRIPTION 3.1 General overview 1 2 3 4 5 6 10 5 4 3 2 1 7 8 9 1 2 3 4 5 6 7 8 9 10 Knob for the oven functions Electronic programmer Knob for the temperature Power lamp / symbol Knobs for the hob Heating element Lamp Shelf support, removable Fan Shelf positions 3.2 Cooking surface layout 1 2 145 mm 180 mm 210 mm 6 3 145 mm 5 4 3.
ENGLISH 4.1 Initial Cleaning Remove all accessories and removable shelf supports from the appliance. Refer to "Care and cleaning" chapter. Clean the appliance and the accessories before first use. Put the accessories and the removable shelf supports back to their initial position. 4.2 Setting the time You must set the time before you operate the oven. The flashes when you connect the appliance to the electrical supply, when there was a power cut or when the timer is not set.
www.electrolux.com 5.2 Residual heat indicator WARNING! There is a risk of burns from residual heat. The indicator comes on when a cooking zone is hot. 6. HOB - HINTS AND TIPS WARNING! Refer to Safety chapters. 6.2 Examples of cooking applications The data in the table is for guidance only. 6.1 Cookware The bottom of the cookware must be as thick and flat as possible. Cookware made of enamelled steel and with aluminium or copper bottoms can cause the colour change on the glassceramic surface.
ENGLISH 11 Heat setting Use to: Time (min) Hints 7-8 Heavy fry, hash browns, loin steaks, steaks. 5 - 15 Turn halfway through. 9 Boil water, cook pasta, sear meat (goulash, pot roast), deep-fry chips. 7. HOB - CARE AND CLEANING WARNING! Refer to Safety chapters. 7.1 General information • • • • • Clean the hob after each use. Always use cookware with clean bottom. Scratches or dark stains on the surface have no effect on how the hob operates.
www.electrolux.com Symbol Oven function Application Bottom heat To bake cakes with crispy bottom and to pre‐ serve food. Defrost This function can be used for defrosting frozen foods, such as vegetables and fruits. The de‐ frosting time depends on the amount and size of the frozen food. Grilling To grill flat food and to toast bread. Light Cooking To bake in tins and dry on one shelf level at a low temperature.
ENGLISH • • 13 All accessories have small indentations at the top of the right and left side to increase safety. The indentations are also anti-tip devices. The high rim around the shelf is a device which prevents cookware from slipping. 9. OVEN - CLOCK FUNCTIONS 9.1 Display A B C A. Function indicators B. Time display C. Function indicator 9.2 Buttons Button Function Description MINUS To set the time. CLOCK To set a clock function. PLUS To set the time. 9.
www.electrolux.com 9.4 Setting the DURATION 4. Press . 1. Set an oven function and temperature. 5. Press END. or again and again until 2. Press starts to flash. 6. Press to confirm. Appliance turns on automatically later on, works for the set DURATION time and stops at the set END time. At the set time an acoustic signal sounds. 7. The appliance deactivates automatically. Press any button to stop the signal. 8.
ENGLISH The temperature and baking times in the tables are guidelines only. They depend on the recipes and the quality and quantity of the ingredients used. Always preheat an empty oven at the temperature required for the food for 20 minutes before you start cooking. 10.1 Baking • Your oven may bake or roast differently to the appliance you had before. Adapt your usual settings such as temperature, cooking time and shelf position to the values in the tables.
www.electrolux.com Baking results Possible cause Remedy The cake is not ready in the baking time given. The oven temperature is too low. The next time you bake, set a slightly higher oven temperature. • 10.3 Light Cooking • Bake only one tin or tray at a time. Use the function to bake in tins and dry on one shelf level at a low temperature.
ENGLISH 17 Food Temperature (°C) Time (min) Shelf position Fruit flans (made with yeast dough / sponge mixture)1) 150 35 - 55 3 Fruit flans made with short pastry 160 - 170 40 - 80 3 Food Temperature (°C) Time (min) Shelf position Short pastry biscuits 150 - 160 10 - 20 3 Short bread / Pastry Stripes 140 20 - 35 3 Biscuits made with sponge mixture 150 - 160 15 - 20 3 Pastries made with egg white, mer‐ 80 - 100 ingues 120 - 150 3 Macaroons 100 - 120 30 - 50 3 Biscuits mad
www.electrolux.com Biscuits / small cakes / pastries / rolls Food Temperature (°C) Time (min) Shelf position 2 positions Short pastry biscuits 150 - 1601) 20 - 40 2/4 Short bread / Pastry Stripes 140 20 - 45 2/4 Biscuits made with sponge mixture 160 - 170 25 - 45 2/4 Biscuits made with egg white, mer‐ 80 - 100 ingues 130 - 170 2/4 Macaroons 100 - 120 40 - 80 2/4 Biscuits made with yeast dough 160 - 170 30 - 60 2/4 Puff pastries 170 - 180 30 - 50 2/4 1) Preheat the oven.
ENGLISH 19 Food Temperature (°C) Time (min) Shelf posi‐ tion Cream puffs / Eclairs 190 - 2101) 20 - 35 3 Swiss roll 180 - 2001) 10 - 20 3 Cake with crumble topping (dry) 160 - 180 20 - 40 3 Buttered almond cake / Sugar cakes 190 - 2101) 20 - 30 3 Fruit flans (made with yeast dough / sponge mixture)2) 170 35 - 55 3 Fruit flans made with short pastry 170 - 190 40 - 60 3 Yeast cakes with delicate toppings (e.g.
www.electrolux.com Bakes and gratins table Food Temperature (°C) Time (min) Shelf posi‐ tion Pasta bake 180 - 200 45 - 60 1 Lasagne 180 - 200 35 - 50 1 Vegetables au gratin 180 - 2001) 15 - 30 1 Baguettes topped with melted cheese 200 - 2201) 15 - 30 1 Sweet bakes 180 - 200 40 - 60 1 Fish bakes 180 - 200 40 - 60 1 Stuffed vegetables 180 - 200 40 - 60 1 1) Preheat the oven. 10.6 Roasting • • • • • • Use heat-resistant ovenware to roast.
ENGLISH 21 Pork Food Quantity Temperature Time (min) (°C) Shelf po‐ sition Shoulder, neck, ham joint 1 - 1.5 kg 210 - 220 90 - 120 1 Chop, spare rib 1 - 1.5 kg 180 - 190 60 - 90 1 Meat loaf 750 g - 1 kg 170 - 190 50 - 60 1 Pork knuckle (precooked) 750 g - 1 kg 200 - 220 90 - 120 1 Food Quantity Temperature Time (min) (°C) Shelf po‐ sition Roast veal1) 1 kg 210 - 220 90 - 120 1 Knuckle of veal 1.5 - 2 kg 200 - 220 150 - 180 1 Veal 1) Use a closed roasting dish.
www.electrolux.com Food Quantity Tempera‐ ture (°C) Time (min) Shelf po‐ sition Duck 1.5 - 2 kg 210 - 220 80 - 100 1 Goose 3.5 - 5 kg 200 - 210 150 - 180 1 Turkey 2.5 - 3.5 kg 200 - 210 120 - 180 1 Turkey 4 - 6 kg 180 - 200 180 - 240 1 Food Quantity Tempera‐ ture (°C) Time (min) Shelf po‐ sition Whole fish 1 - 1.5 kg 210 - 220 40 - 70 1 Fish 10.
ENGLISH 23 Lamb Food Quantity Tempera‐ ture (°C) Time (min) Shelf po‐ sition Leg of lamb, roast lamb 1 - 1.5 kg 150 - 170 100 - 120 1 Saddle of lamb 1 - 1.5 kg 160 - 180 40 - 60 1 Food Quantity Tempera‐ ture (°C) Time (min) Shelf po‐ sition Poultry portions 200 - 250 g each 200 - 220 30 - 50 1 Half chicken 400 - 500 g each 190 - 210 35 - 50 1 Chicken, poulard 1 - 1.5 kg 190 - 210 50 - 70 1 Duck 1.5 - 2 kg 180 - 200 80 - 100 1 Goose 3.
www.electrolux.com 10.11 Preserving - Bottom heat • • • • • Use only preserve jars of the same dimensions available on the market. Do not use jars with twist-off and bayonet type lids, or metal tins. Use the first shelf from the bottom for this function. Put no more than six one-litre preserve jars on the baking tray. Fill the jars up to the same level and close with a clamp. • • • The jars cannot touch each other.
ENGLISH Food Quantity Defrosting time (min) Further Comments defrosting time (min) Chicken 1 kg 100 - 140 20 - 30 Put the chicken on an up‐ turned saucer in a big plate. Turn halfway through. Meat 1 kg 100 - 140 20 - 30 Turn halfway through. Meat 500 g 90 - 120 20 - 30 Turn halfway through.
www.electrolux.com 3. Close the door until the slider locks. 4. Remove the door. To remove the door, pull the door outwards first from one side, and then the other. When the cleaning procedure is completed, insert the oven door in the opposite sequence. Make sure that you hear a click when you insert the door. Use force if necessary. 2. Pull the rear end of the shelf support away from the side wall and remove it. 1 11.
ENGLISH 11.6 Replacing the lamp Put a cloth on the bottom of the interior of the appliance. It prevents damage to the lamp glass cover and the cavity. WARNING! Danger of electrocution! Disconnect the fuse before you replace the lamp. The lamp and the lamp glass cover can be hot. 27 The drawer below the oven can be removed for cleaning. 1. Pull the drawer out until it stops. 2 1 1. Deactivate the appliance. 2. Remove the fuses from the fuse box or deactivate the circuit breaker.
www.electrolux.com 12.1 What to do if... Problem Possible cause Remedy You cannot activate the appliance. The appliance is not con‐ Check if the appliance is nected to an electrical sup‐ correctly connected to the ply or it is connected incor‐ electrical supply. rectly. You cannot activate the appliance. The fuse is blown. Residual heat indicator does not come on. The zone is not hot be‐ If the zone operated suffi‐ cause it operated only for a ciently long to be hot, short time.
ENGLISH 13. INSTALLATION WARNING! Refer to Safety chapters. 13.1 Technical data Use small feet on the bottom of appliance to set the appliance top surface level with other surfaces. 13.4 Anti-tilt protection Dimensions Height 847 - 867 mm Width 596 mm Depth 600 mm 13.2 Location of the appliance You can install your freestanding appliance with cabinets on one or two sides and in the corner. CAUTION! Install the anti-tilt protection to prevent the appliance from falling under incorrect loads.
www.electrolux.com 1. Set the correct height and area for the appliance before you attach the anti-tilt protection. 2. Install the anti-tilt protection 77 mm down from the top surface of the appliance and 49 mm from the left side of the appliance into the circular hole on the bracket. See the illustration. Screw it into the solid material or use applicable reinforcement (wall). 3. You can find the hole on the left side at the back of the appliance. See the illustration.
ENGLISH Energy consumption per cooking zone (EC electric cooking) Left front Left rear Right front Right rear 182.3 Wh/kg 181.8 Wh/kg 181.8 Wh/kg 182.1 Wh/kg Energy consumption of the hob (EC electric hob) EN 60350-2 - Household electric cooking appliances - Part 2: Hobs - Methods for measuring performance. • 14.2 Hob - Energy saving • You can save energy during everyday cooking if you follow below hints. • • • • When you heat up water, use only the amount you need.
www.electrolux.com 14.4 Oven - Energy saving to minimum 3 - 10 minutes before the end of the cooking time, depending on the duration of the cooking. The residual heat inside the oven will continue to cook. The appliance contains features which help you save energy during everyday cooking. General hints Make sure that the oven door is closed properly when the appliance operates and keep it closed as much as possible during the cooking. Use metal dishes to improve energy saving.
ENGLISH 33
www.electrolux.
ENGLISH 35
867319973-B-032017 www.electrolux.