EKC6461AEW ................................................ .............................................
www.electrolux.com CONTENTS 1. 2. 3. 4. 5. 6. 7. 8. 9. 10. 11. 12. 13. 14. 15. SAFETY INFORMATION . . . . . . . . . . . . . . . . . . . . . . . . . . . . . . . . . . . . . . . . . . . . . . . . . . . 3 SAFETY INSTRUCTIONS . . . . . . . . . . . . . . . . . . . . . . . . . . . . . . . . . . . . . . . . . . . . . . . . . . 4 PRODUCT DESCRIPTION . . . . . . . . . . . . . . . . . . . . . . . . . . . . . . . . . . . . . . . . . . . . . . . . . 7 BEFORE FIRST USE . . . . . . . . . . . . . . . . . . . . . . .
ENGLISH 3 1. SAFETY INFORMATION Before the installation and use of the appliance, carefully read the supplied instructions. The manufacturer is not responsible if an incorrect installation and use causes injuries and damages. Always keep the instructions with the appliance for future reference. 1.1 Children and vulnerable people safety WARNING! Risk of suffocation, injury or permanent disability.
www.electrolux.com • Never try to extinguish a fire with water, but switch off the appliance and then cover flame e.g. with a lid or a fire blanket. • Do not store items on the cooking surfaces. • Do not use a steam cleaner to clean the appliance. • Metallic objects such as knives, forks, spoons and lids should not be placed on the hob surface since they can get hot.
ENGLISH • The appliance must be earthed. • Make sure that the electrical information on the rating plate agrees with the power supply. If not, contact an electrician. • Always use a correctly installed shockproof socket. • Do not use multi-plug adapters and extension cables. • Make sure not to cause damage to the mains plug and to the mains cable. Contact the Service or an electrician to change a damaged mains cable.
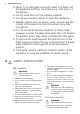
www.electrolux.com • Do not try to extinguish a fire with water. Disconnect the appliance and cover the flame with a lid or a fire blanket. WARNING! Risk of damage to the appliance. • To prevent damage or discoloration to the enamel: – Do not put ovenware or other objects in the appliance directly on the bottom. – Do not put aluminium foil directly on the bottom of the appliance. – do not put water directly into the hot appliance.
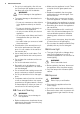
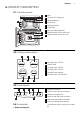
ENGLISH 7 3. PRODUCT DESCRIPTION 3.1 General overview 9 1 2 3 4 3 2 1 Hob 2 Air vents for cooling fan 3 Heating element 4 Oven lamp 5 Heating element 1 6 Oven lamp 7 Fan and heating element 8 5 6 5 4 8 Shelf positions of the main oven 9 Shelf positions of the top oven 7 3 2 1 3.
www.electrolux.com For cookware, cake tins, roasts. • Roasting pan grid To put in the deep roasting pan. • Oven shelf 4. BEFORE FIRST USE WARNING! Refer to the Safety chapters. To change the time, press again and again until the indicator for the Time of Day function flashes. You must not set the Duration or End function at the same time. 4.1 Initial Cleaning • Remove all accessories and removable shelf supports (if applicable). • Clean the appliance before first use.
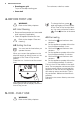
ENGLISH 5.1 Heat settings Control knob Function 1. 2. Double zone switch 0 1-9 1. 2. Off position Heat settings (1 = lowest heat setting; 9 = highest heat setting) Turn the control knob to a necessary heat setting. To complete the cooking process, turn the control knob to the “0” position. 3. 9 Turn the control knob to the right - to position "9". Turn the control knob slowly to symbol until you can hear a click. At this time the two cooking zones are on.
www.electrolux.
ENGLISH 11 8. OVEN - DAILY USE WARNING! Refer to the Safety chapters. 2. 8.1 Cooling fan When the appliance operates, the cooling fan switches on automatically to keep the surfaces of the appliance cool. If you switch off the appliance, the cooling fan continues to operate until the appliance cools down. The temperature indicator comes on while the temperature in the appliance increases. To deactivate the appliance, turn the knob for the top / main oven functions to the Off position. 8.
www.electrolux.com Oven function Application Thermaflow® The fan function is particularly suitable for cooking larger quantities of food. Set the oven temperatures 20-40 °C lower than when using Conventional. Thermal Grilling For roasting larger joints of meat or poultry on one level. The function is also suitable for gratinating and browning. Fan cooking To roast or roast and bake the food that requires the same cooking temperature, using more than one shelf, without flavour transference.
ENGLISH 13 To roast larger pieces of meat or poultry on one level: 1. Put the roasting pan grid in the deep roasting pan. The supports of the roasting pan grid must point up. 2. Put the deep roasting pan in the appliance and on the necessary shelf level. To grill flat dishes in large quantities and to toast: 1. Put the roasting pan grid in the deep roasting pan. The supports of the roasting pan grid must point down. 2. Put the deep roasting pan in the appliance and on the necessary shelf level. 9.
www.electrolux.com Clock function Minute Minder Duration End Application To set a countdown time. This function has no effect on the operation of the oven. To set how long the appliance must operate. To set when the appliance must be deactivated. You can use Duration and End at the same time to set the time when the appliance must be activated and then deactivated. First set Duration, then End. The display shows the indicator for the clock function you set.
ENGLISH 10.3 Baking General instructions • Your new oven may bake or roast differently to the appliance you had before. Adapt your usual settings (temperature, cooking times) and shelf levels to the values in the tables. • With longer baking times, the oven can be switched off about 10 minutes before the end of baking time, to use the residual heat. When you use frozen food, the trays in the oven can twist during baking. When the trays get cold again, the distortion will be gone.
www.electrolux.
ENGLISH Food Shelf Position Temperature [°C] Approx Cook Time (mins) Shortcrusts: Meat Pies 2 190 - 210 25 - 35 Shortcrusts: Quiche, Tarts, Flans 2 180 - 200 25 - 50 Scones 3 220 - 230 8 - 12 Shepard`s Pie 2 190 - 200 30 - 40 Souffles 2 170 - 180 20 - 30 Vegetables: Baked Jacket Potatos 2 180 - 190 60 - 90 Vegetables: Roast Potatos 2 180 - 190 60 - 90 Yorkshire Pudding Large 2 220 - 210 25 - 40 Yorkshire Pudding Individual 2 210 - 220 15 - 25 Roasting Meat, Poultry
www.electrolux.com Temperature [°C] Approx Cook Time (mins) Shelf Position Fruit Pies, Crumbles 170 - 180 30 - 50 3 Milk Puddings 140 - 160 60 - 90 3 Pastry: Choux 180 - 190 30 - 40 3 Pastry: Shortcrust 180 - 190 25 - 35 3 Pastry: Flaky 180 - 190 30 -40 3 Food Pastry: Puff Follow manufacturer`s instructions.
ENGLISH Meat 19 Temperature [°C] Cooking Time 170 -190 35-40 minutes per 0.5 kb (1 lb) and 35-40 minutes over 170 - 190 20 minutes per 0.5 kb (1 lb) and 20minutes over Pheasant Rabbit 10.8 Grilling Always use the grilling function with maximum temperature setting Always grill with the oven door closed Always pre-heat the empty oven with the grill functions for 5 minutes. • Set the grilling set in the shelf level as recommended in the grilling table. • Grill only flat pieces of meat or fish. 10.
www.electrolux.com • Put the oven shelf in the first shelf level from the bottom. Type of food Shel f Time in minutes Final defrosting mins Comments Chicken, 1000 g 2 120-140 20-30 Place the chicken on an upturned saucer on a larger plate. Turn half way through. Meat, 1000g 2 100-140 20-30 Turn half way through. Meat, 500g 2 90-120 20-30 Turn half way through.
ENGLISH WARNING! Do not attempt to clean catalytic surface with oven sprays, abrasive cleaners, soap or other cleaning agents. This will damage the catalytic surface. 21 11.2 Shelf supports You can remove the shelf supports to clean the side walls. Discolouration of the catalytic surface has no effect on catalytic properties. Removing the shelf supports 1 1. Pull the front of the shelf support away from the side wall. 2. Pull the rear end of the shelf support away from the side wall and remove it.
www.electrolux.com To replace the glass panels, do the above steps in the opposite sequence. Before you lower the trim, attach the A trim part to the door. Refer to the diagram. 1 2 11.5 Oven lamp WARNING! There is a danger of electrical shock! 1 To replace the glass obey the procedure in opposite sequence. Before you change the oven lamp: • Switch off the oven. • Remove the fuses in the fuse box or switch off the circuit breaker. 11.
ENGLISH Problem Possible cause 23 Remedy The hob does not operate The heat setting is not set Set the heat setting The oven does not heat up The oven is not switched on Switch on the oven The oven does not heat up The clock is not set Set the clock The oven does not heat up The necessary settings are not set Control the settings The oven does not heat up The fuse in the fuse box is released Control the fuse. If the fuse is released more than one time, refer to a qualified electrician.
www.electrolux.com 13.2 Location of the appliance You can install your freestanding appliance with cabinets on one or two sides and in the corner. Dimension mm B 685 13.
ENGLISH 25 13.4 The anti-tilt protection WARNING! You must install the anti-tilt protection (A+B). If you do not install it, the appliance can tilt. B Before you install the anti-tilt protection, adjust the appliance to the correct height. 50 mm 77 mm A The anti-tilt protection has two components (A+B). You can find the first component (B) on the rear wall of the appliance. It is on the right or left side of this wall. (See the first illustration).
www.electrolux.com Make sure that the cover is securely fastened. To open the cover of terminal board obey the procedure in opposite sequence. L L N N N 13.7 Terminal board Make sure that the links are fitted as shown. Do not remove blanking plates. 14. GB IE GREAT BRITAIN & IRELAND - GUARANTEE/ CUSTOMER SERVICE 14.
ENGLISH Custom- Tel: (Calls may be reer Care corded for training purDepart- poses) ment, Electrolux 08445 613 613 AEG08445 611 611 Electrolux Zanussi- 08445 612 612 Electrolux 27 For Customer Service in The Republic of Ireland please contact us at the address below: Electrolux Group (Irl) Ltd, Long Mile Road, Dublin 12, Republic of Ireland Tel: +353 (0)1 4090751, Email: service.eid@electrolux.ie 15.
www.electrolux.com España +34 902 11 63 88 Carretera M-300, Km. 29,900 Alcalá de Henares Madrid France 08 92 68 24 33 (0.34€/min) www.electrolux.fr Great Britain +44 8445 616 616 Addington Way, Luton, Bedfordshire LU4 9QQ Hellas +30 23 10 56 19 70 4, Limnou Str.
ENGLISH Россия 8-800-200-3589 129090 Москва, Олимпийский проспект, 16, БЦ "Олимпик" Україна +380 44 586 20 60 04074 Київ, вул.Автозаводська, 2а, БЦ "Алкон" 29 17. ENVIRONMENT CONCERNS Recycle the materials with the symbol . Put the packaging in applicable and electronic appliances. Do not dispose appliances marked with the symbol containers to recycle it. Help protect the environment and human health and to recycle waste of electrical with the household waste.
www.electrolux.
ENGLISH 31
892957433-A-062013 www.electrolux.