EKC6562AOX EN Cooker User Manual
www.electrolux.com CONTENTS 1. SAFETY INFORMATION....................................................................................3 2. SAFETY INSTRUCTIONS..................................................................................5 3. PRODUCT DESCRIPTION................................................................................ 8 4. BEFORE FIRST USE......................................................................................... 9 5. HOB - DAILY USE.................................
ENGLISH 1. 3 SAFETY INFORMATION Before the installation and use of the appliance, carefully read the supplied instructions. The manufacturer is not responsible for any injuries or damages that are the result of incorrect installation or usage. Always keep the instructions in a safe and accessible location for future reference. 1.1 Children and vulnerable people safety WARNING! Risk of suffocation, injury or permanent disability.
www.electrolux.com • • • • • • • • • • • • • • • This appliance is not intended to be used on a ships, boats or vessels. Do not install the appliance behind a decorative door in order to avoid overheating. Do not install the appliance on a platform. Do not operate the appliance by means of an external timer or separate remote-control system. WARNING: Unattended cooking on a hob with fat or oil can be dangerous and may result in fire.
ENGLISH • • • • • • 5 Ensure that the appliance is switched off before replacing the lamp to avoid the possibility of electric shock. If the mains power supply cable is damaged, it must be replaced by the manufacturer, its Authorised Service Centre or similarly qualified persons to avoid an electrical hazard. Use only the food sensor (core temperature sensor) recommended for this appliance.
www.electrolux.com 2.2 Electrical Connection • WARNING! Risk of fire and electrical shock. • • • • • • • • • • • • • • All electrical connections should be made by a qualified electrician. The appliance must be earthed. Make sure that the parameters on the rating plate are compatible with the electrical ratings of the mains power supply. Always use a correctly installed shockproof socket. Do not use multi-plug adapters and extension cables.
ENGLISH • • • • • • • • • Discoloration of the enamel or stainless steel has no effect on the performance of the appliance. Use a deep pan for moist cakes. Fruit juices cause stains that can be permanent. Do not keep hot cookware on the control panel. Do not let cookware boil dry. Be careful not to let objects or cookware fall on the appliance. The surface can be damaged. Do not activate the cooking zones with empty cookware or without cookware.
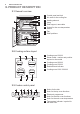
www.electrolux.com 3. PRODUCT DESCRIPTION 3.1 General overview 8 1 2 3 4 5 3 2 1 3 4 5 4 3 2 Control panel and hob Air vents for the cooling fan Heating element Lamp Shelf support, removable Socket for the core temperature sensor 7 Fan 8 Shelf positions 1 2 3 4 5 6 6 5 1 7 3.
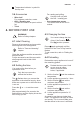
ENGLISH 9 7 Temperature indicator / symbol for the top oven 3.4 Accessories For roasting and grilling. • Use the trivet only with the Grill- / roasting pan. Core temperature sensor To measure how far the food is cooked. • • Wire shelf For cookware, cake tins, roasts. Grill- / Roasting pan To bake and roast or as pan to collect fat. Trivet • 4. BEFORE FIRST USE WARNING! Refer to Safety chapters. 4.1 Initial Cleaning Remove all accessories and removable shelf supports from the appliance.
www.electrolux.com 5. HOB - DAILY USE WARNING! Refer to Safety chapters. 5.1 Heat setting Sym‐ bols Function Off position Double zone 1-9 Heat settings Use the residual heat to decrease energy consumption. Deactivate the cooking zone approximately 5 - 10 minutes before the cooking process is completed. Turn the knob to a necessary heat setting. To complete the cooking process, turn the knob to the off position. 5.
ENGLISH 11 Heat setting Use to: Time (min) 1 Keep cooked food warm. as nec‐ Put a lid on the cookware. essary 1-2 Hollandaise sauce, melt: but‐ 5 - 25 ter, chocolate, gelatine. Mix from time to time. 1-2 Solidify: fluffy omelettes, baked eggs. 10 - 40 Cook with a lid on. 2-3 Simmer rice and milkbased dishes, heating up readycooked meals. 25 - 50 Add the minimum twice as much liquid as rice, mix milk dishes part procedure through. 3-4 Steam vegetables, fish, meat.
www.electrolux.com 8. OVEN - DAILY USE WARNING! Refer to Safety chapters. 8.1 Top oven functions Symbol 100 - 250 Oven function Application Off position The appliance is off. Oven Lamp To activate the lamp without a cooking function. Conventional Cook‐ ing To bake and roast food on one shelf position. Dual Circuit Grill To grill food items in medium quantities in the middle of the shelf. To make toasts. Full Grill To grill flat food and to toast bread. 8.
ENGLISH Symbol 13 Oven function Application Bottom Heat To bake cakes with crispy bottom and to pre‐ serve food. Defrost This function can be used for defrosting frozen foods, such as vegetables and fruits. The de‐ frosting time depends on the amount and size of the frozen food. 8.3 Activating and deactivating the top / main oven It depends on the model if your appliance has knob symbols, indicators or lamps: • The indicator comes on when the oven heats up.
www.electrolux.com Remove the meat from the appliance. If the meat is not cooked to your satisfaction, do the above steps again and set a higher core temperature. • You can change the temperature at any time during the cooking. Press to change the set core temperature. WARNING! Be careful when you remove the tip and plug of the core temperature sensor. The core temperature sensor is hot. There is a risk of burns. 8.
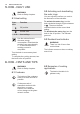
ENGLISH 2. Put the deep pan into the oven on the necessary shelf position. 9. OVEN - CLOCK FUNCTIONS 9.1 Display The electronic programmer works only with the main oven. A B A. B. C. D. Function indicators Time display Function indicator Core temperature sensor indicator C D 9.2 Buttons Button Function Description MINUS To set the time. CLOCK To set a clock function. PLUS To set the time. 9.
www.electrolux.com Clock function Application MINUTE MIND‐ ER To set countdown time. This function has no effect on the operation of the appliance. You can set the MINUTE MINDER at any time, also when the appliance is off. 9.4 Setting the DURATION 1. Set an oven function and temperature. 3. Press or DURATION. to set the time for 4. Press . again and again until 2. Press starts to flash. 5. Press END. or 3. Press time. to confirm. 6.
ENGLISH 17 10. OVEN - HINTS AND TIPS WARNING! Refer to Safety chapters. The temperature and baking times in the tables are guidelines only. They depend on the recipes and the quality and quantity of the ingredients used. Always preheat an empty oven at the temperature required for the food for 20 minutes before you start cooking. 10.3 Baking • • • • 10.1 Top oven The top oven is the smaller of the two ovens. It has 3 shelf positions. Use it to cook smaller quantities of food.
www.electrolux.com Baking results Possible cause Remedy The cake is too dry. The baking time is too long. The next time you bake, set a shorter baking time. The cake browns uneven‐ ly. The oven temperature is too high and the baking time is too short. Set a lower oven tempera‐ ture and a longer baking time. The cake browns uneven‐ ly. The mixture is unevenly distributed. Spread the mixture evenly on the baking tray. The cake is not ready in the baking time given.
ENGLISH Food Temperature (°C) Time (min) Shelf posi‐ tion Pasta Lasagne etc.
www.electrolux.com Food Temperature (°C) Time (min) Shelf posi‐ tion Milk Puddings 150 - 170 60 - 90 3 Pastry: Choux 180 - 190 30 - 40 3 Pastry: Shortcrust 190 - 200 25 - 35 3 Pastry: Flaky 190 - 210 30 - 40 3 Choux Pastry 6 30 - 35 3 Pastry: Puff Follow manufacturer`s instructions. Reduce the temperature for Fan oven by 20 °C.
ENGLISH 21 Food Temperature (°C) Time (min) Shelf posi‐ tion Fruit Pies, Crumbles 170 - 180 30 - 50 3 Milk Puddings 140 - 160 60 - 90 3 Pastry: Choux 180 - 190 30 - 40 3 Pastry: Shortcrust 180 - 190 25 - 35 3 Pastry: Flaky 180 - 190 30 - 40 3 Pastry: Puff Follow manufacturer`s instructions. Reduce the temperature for Fan oven by 20 °C.
www.electrolux.com 10.10 Thermaflow® or Conventional Cooking - Main Oven Roasting Food Temperature (°C) Time (min) Beef / Beef boned 170 - 190 20 - 35 minutes per 0.5 kg (1 lb) and 20 - 30 minutes over Mutton / Lamb 170 - 190 20 - 35 minutes per 0.5 kg (1 lb) and 25 - 35 minutes over Pork / Veal / Ham 170 - 190 30 - 40 minutes per 0.5 kg (1 lb) and 30 - 40 minutes over Chicken 180 - 200 20 - 25 minutes per 0.
ENGLISH Pork Food Food core temperature Shelf position (°C) Roast pork 80 2-3 Neck fillets 75 - 80 2-3 Ham 70 - 75 1-2 Poultry Food Food core temperature Shelf position (°C) Turkey breast 75 - 80 10.12 Grilling in general 2-3 • Grill only flat pieces of meat or fish. WARNING! Always grill with the oven door closed. • • • Always grill with the maximum temperature setting. Set the shelf into the shelf position as recommended in the grilling table.
www.electrolux.com Food Time (min) Shelf position Toasted Sandwiches 3-4 3 10.14 Defrost • • Remove the food packaging. Put the food on a plate. Do not cover it with a bowl or a plate. This can extend the defrost time. • Use the first shelf position. The one on the bottom. 11. OVEN - CARE AND CLEANING WARNING! Refer to Safety chapters. 11.1 Notes on cleaning • • • • • • Clean the front of the appliance with a soft cloth with warm water and a cleaning agent.
ENGLISH 2. Set the function. 3. Set the oven temperature to 250 °C and let the oven operate for 1 hour. 4. When the appliance is cool, clean it with a soft and moist sponge. 11.5 Removing and cleaning the door glasses - top oven The door glass in your product can be different in type and shape from the examples you see in the image. The number of glasses can also be different. 11.4 Removing the shelf supports To clean the oven, remove the shelf supports. 1.
www.electrolux.com WARNING! Danger of electrocution! Disconnect the fuse before you replace the lamp. The lamp and the lamp glass cover can be hot. A 1. Deactivate the appliance. 2. Remove the fuses from the fuse box or deactivate the circuit breaker. 2 1 The back lamp The lamp glass cover is at the back of the cavity. 2. Pull up the trim. 3. Remove the glass panels. To replace the glass panels, do the same steps in reverse. Before you lower the trim, attach the A trim part to the door.
ENGLISH Problem Possible cause Residual heat indicator does not come on. The zone is not hot be‐ If the zone operated suffi‐ cause it operated only for a ciently long to be hot, short time. speak to an Authorised Service Centre. You cannot activate the outer ring. 27 Remedy Activate the inner ring first. The oven does not heat up. The oven is deactivated. Activate the oven. The oven does not heat up. The clock is not set. Set the clock. The oven does not heat up.
www.electrolux.com 13.4 Electrical installation 13.1 Technical data WARNING! The manufacturer is not responsible if you do not follow the safety precautions from Safety chapters. Dimensions Height 894 - 912 mm Width 600 mm Depth 600 mm 13.2 Location of the appliance You can install your freestanding appliance with cabinets on one or two sides and in the corner. This appliance is supplied without a main plug or a main cable. Applicable types of cables for different phases: Phase Min.
ENGLISH • Make sure that the cover is securely fastened. 29 Make sure that the links are fitted as shown. To open the cover of terminal board obey the procedure in opposite sequence. 13.6 Terminal board L L N N N Do not remove blanking plates. 14. ENERGY EFFICIENCY 14.
www.electrolux.com Model identification EKC6562AOX Energy Efficiency Index Top oven: 105.6 Main oven: 105.9 Energy efficiency class Top oven: A Main oven: A Energy consumption with a standard load, con‐ ventional mode Top oven: 0.75 kWh/cycle Main oven: 0.95 kWh/cycle Energy consumption with a standard load, fanforced mode Top oven: not applicable Main oven: 0.
ENGLISH 31
867337009-C-152017 www.electrolux.