user manual Cooker EKD60760
electrolux Electrolux. Thinking of you. Share more of our thinking at www.electrolux.com Contents Safety instructions Description of appliance Before first use Operating the induction hob Operating the Touchpanel Operating the oven Tips, tables and advice Cleaning and care 2 4 7 8 9 14 21 24 What to do if... Technical Data Installation Environmental Information Guarantee/Customer Service European Guarantee www.electrolux.
electrolux 3 • Using ingredients containing alcohol in the oven may create an alcohol-air mixture that is easily ignited. In this case, open the door carefully. Do not have embers, sparks or naked flames in the vicinity when opening the door.
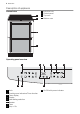
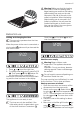
electrolux Description of appliance 1 2 3 4 General view 1 2 Induction hob Control panel Top oven Bottom oven 3 4 Operating panel overview 1 9 1 2 3 4 5 6 7 8 8 Lock Cooking zone indicators/Timer function Timer display Display Heat setting selection Booster Timer Stop + Go 2 3 4 5 6 7 9 On/Off with power indicator
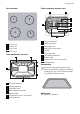
electrolux 5 Oven equipment, bottom oven Hob overview 1 1 2 10 2 3 4 5 6 5 4 3 2 1 7 8 4 3 9 1 2 3 4 3 1 2 3 4 5 6 7 8 9 10 4 Accessories Ø 145 mm Ø 180 mm Ø 145 mm Ø 210 mm Oven equipment, top oven 1 2 7 5 Top heat element Heating element Oven light bulb Meat probe connection Fat filter Oven light bulb Fan heating elements Bottom heat Oven shelf runners, removable Shelf positions Clean the accessories before using them for the first time. Wash the shelves, roasting pan, etc.
electrolux Drip pan (with a non-stick surface) For baking and roasting or as a tray to catch fat. Warning! The rails must be pushed in when the oven door is closed. Meat probe For determining the exact degree of cooking for pieces of meat. Oven grid For cookware, cake tins, roasts and food to be grilled. Telescopic runners Make sure that the cooker anti-tip guard is fitted. The telescopic runners consist of two rails that can be pulled out.
electrolux 7 Warning! Make sure that the locating pin hooks in under the baking plate edge/roasting pan and that the baking plate/roasting pan rests on the rails, otherwise it can fall off the rails in the pulled-out position. When the baking plate/roasting pan is removed in the pulled-out position, the rails must be pushed back again so that the oven door can be closed. Use oven gloves because the rails are hot.
electrolux by using and . The oven door must be closed. 5. Leave the oven at this setting for about 30 minutes. 6. Switch off the cooker . 7. Then leave the oven door open for about two hours and air out the kitchen. 8. Clean the oven, the door and the ovenstep units with hot water and washing-up liquid. Dry the oven. The first time an oven is used, there may still be a slight smell. This will not affect the food in any way and is not a health-hazard.
electrolux 9 of the other zones must be reduced (this is done automatically). It is possible to use both zones at the same time, even with one set on booster. BUT REMEMBER that one zone has a reduced effect, which means a longer cooking time. In the case of other settings, you will not notice any great difference, no zone has priority over the others. A certain sound can occur when using certain pans. A simple induction principle When a current passes through a coil, it creates a magnetic field.
electrolux Control panel To decrease Touch To switch off Touch Indicator to and at the same time The keep warm setting lies between and . It is used to keep food warm. Locking/unlocking the control panel The control panel, with the exception of the “On/Off” sensor field, can be locked at any time to prevent the change of settings. Control panel Switch on Touch Switch off Touch When you switch the appliance off, the locking function is automatically switched off.
electrolux 11 ting 1 is suitable. But, as usual, you must experiment to find the setting and heating zone that is best for you and your pots and pans. Here is a little advice concerning the right heating setting and suitable heating zone. Each zone corresponds to a number in the tables (See illustration). 9 8 7 6 5 4 MIN. 3 2 2 1 1 0 1 2 3 4 5 6 7 8 9 TEMP. When the time has expired, there is automatic switch-over to the set value and the letter A is no longer shown.
electrolux Roasting with Automax Eggs Zone Setting 4 6 2 6-7 4 6-7 Using the child safety device The child safety device prevents unintentional use of the appliance. Switching on the child safety device Step Control panel Display/Signal 1. Switch on appliance. (Do not set a heat setting.) 2. Touch for 4 seconds The child safety device is switched on. Switching off the child safety device Step Control panel Display/Signal 1. Switch on appliance. (Do not set a heat setting.
electrolux 13 Selecting a cooking zone Step Control panel 1. Touch once 2. Touch once Display Pilot light of the first cooking zone flashes Pilot light of the second cooking zone flashes 3. Touch once Pilot light of the third cooking zone flashes 4. Touch once Pilot light of the fourth cooking zone flashes If a heat setting is set on this cooking zone in addition to a countdown timer, the cooking zone is switched off after the time set has elapsed.
electrolux Displaying the time remaining for a cooking zone Step 1. Control panel Press Indicator Pilot light of the cooking zone selected flashes faster. The time remaining is displayed for the cooking zone After a few seconds the pilot light flashes more slowly. Switching off the acoustic signal Step 1.
electrolux 15 fectively, and this generally means that you can use a lower oven temperature than with upper and lower heating. Lower the temperature by 15- 20% if the recipe says that you should use a temperature of between 160 and 225°C. The higher the temperature, the greater the decrease. At temperatures over 225°C it is better to use upper and lower heating.
electrolux Oven functions, bottom oven Application Heating element/ fan Max. Grill For grilling flat foodstuffs placed in the middle of the grill and for toasting. Grill element and upper heating element Heat retention setting To keep food warm. Upper element and lower heating elements. (Pre-set at 80°C) Thawing/drying setting For thawing frozen food. Bottom heating element and fan (From 30°C) Thawing When thawing meat, fish and Lighting and fan.
electrolux 17 Switch off the oven function or Before switching off the oven, press until no oven function is shown in the display. Switch off the oven Switch off the oven by pressing the button . Heat indicator Heating up When the oven function has been selected, the indicator starts to flash how much the oven has heated up. Switching off When the oven functions have been switched off, the indicator lights up to show that there is residual heat in the oven.
electrolux When the time reaches “00.00” and Cooking time flashes, a signal sounds for 2 minutes. The oven is automatically switched off. The signal sounds for one minute when the set time is reached “00.00” and flash. Press one of the buttons to switch off the signal and the symbol in the display. Cooking time Use this function to determine how long you want the food to be in the oven. 1. Press . The lamp lights up. 2. Choose oven . 3. Select the oven function and temperature. 4. Press until flashes.
electrolux 19 Stop time lights up and the time is shown in the display. When the time reaches “00.00” and Stop time flashes a signal sounds for 2 minutes. The oven is switched off automatically. In order to switch of the sound and the symbol in the display, press one of the buttons. Cooking time and Stop time Cooking time and Stop time can be used simultaneously. 1. Press . The lamp lights up. 2. Choose oven 3. Select oven function and temperature. 4.
electrolux As soon as the oven is switched on again, the display comes on automatically. When the appliance is switched off again, the cock display goes out again. To have the clock display on permanently again, you must set the clock again. Switching on the clock display 1. If required, switch off the appliance using the On/Off button. 2. Press the Selection button and button at the same time until the display is visible again.
electrolux 21 6. To switch off the sound, press one of the buttons. Within a few minutes a provisional end time is calculated, at which the core temperature set will be reached. This time is constantly recalculated and updated in the display. For the system to work it is essential that the meat probe is in the meat and the socket at the start of the cooking process and that it is not removed during the cooking process.
electrolux Type of baking Pastries made with butter, flour, sugar (egg) Temperature oC Conventional Oven level (bottom oven) Oven level (top oven) Minutes Temperature oC Hot air Oven level 170-180 3 2 20-30 150-160 1+4 Short pastry biscuits 170-180 3 2 10-15 150-160 1+4 Gingerbread biscuit 190-200 3 2 8-12 170-190 1+4 Puff pastries 180-200 3 2 20-30 160-180 1+4 Tin loaf 190-210 1 1 30-40 170-190 2 Loaf 175-225 2 1 35-45 180-190 1+4 Swedish teacake 220-225
electrolux 23 Baking result Possible cause Remedy If the fat/liquid mixture is too hot, The correct temperature of the it ruins the effect of the yeast. liquid for fresh yeast is 37°, concerning dry yeast see the recommendations on the packet. Bread/yeasted doughs and sponge cakes turn out dry. Cakes/oven dishes are too brown. Cakes/oven dishes are pale in colour. Not enough liquid, too much flour, or the wrong type of flour can result in dry bread.
electrolux Type of meat Temperature oC Conventional Oven level (bottom oven) Oven level (top oven) Min. oC Temp. oC Hot air Oven level - medium 170 2 1 90 160 70 2 - well done 170 1 1 105 160 75 2 Chicken, poulard 190 2 1 50-60 180 85 2 Chicken/turkey fillet 220 3 2 35-50 200 75 2 Turkey, poulard or half 170 1 1 45-55 160 90 2 Duck 160 2 1 40-55 150 2 Goose 160 1-2 1 40-55 150 2 Boiling of fish 100-110 2 2 50-70 Trout.
electrolux 25 less steel surfaces is by using a soft cloth and the clean agent (only supplied to stainless steel appliances). Any spillage on the stainless steel finish must be wiped off immediately. You can also try window cleaning agents. If the surface is very dirty, you can try spirit such as technical spirit. Warning! Note that the anti-tip guard does not function when you have pulled out the cooker in order to clean behind it.
electrolux Cleaning the oven Warning! When cleaning, no oven functions must be selected and the oven must have cooled down. In order to facilitate cleaning, the side rails should be removed. When the oven door opens, the lamps light and the hot air fan stops. Removing the door: 1. Open the oven door about one-third of the way (parking position). Catalytic enamel The catalytic enamel on the oven walls and top is porous and has a certain self-cleaning effect.
electrolux 27 2 1 3. Close the oven door. The oven door glass Warning! Do not use the oven door as a foot-rest. The oven door is made up of two parts with heat reflecting glass to give a lower surface temperature. The inner glass panes can be removed for cleaning. Cleaning between the glass panes Warning! Take care that you do not damage the door glass. Formation of cracks at the edges could cause it to break after being heated a few times.
electrolux 2 1 Fitting the upper glass in the door 1. Insert the upper glass diagonally from above into the glass retainer on the handle side (1). 2. Lower the glass plate. Lay the pane against spring pressure on the handle side in front of the retaining profile on the lower edge of the door and push it under the retaining profile (2). The glass pane must be firmly in position! Wash the accessories thoroughly in hot water and washing-up liquid before using them for the first time.
electrolux 29 To insert the rail first engage again at the back (1) and then insert in the front and press into place (2). 1 1. Take off the glass cover by turning it anticlockwise and clean it. 2. If necessary: Replace with oven lamp, 25 Watt, 230 V, 300 °C heat-resistant. 3. Re-fit the glass cover. Replacing the side oven light bulb/ Cleaning the glass cover 1. Take out the side rails on the left.
electrolux 4. Re-fit the glass cover. 5. Replace the side rails. What to do if... Never do anything to the cooker that could cause injury to people or damage the product. Below you will find suggestions as to what you can do yourself if there is a problem. If you need help - contact Service.
electrolux 31 Problem Remedy F11 lights up in the oven display The meat probe contact is not properly inserted into the outlet in the oven Error code lights up in the oven display (starts with F) Contact your local service centre Technical Data Product width 596 mm Oven Rating Product depth 595 mm Top Heating Element 1000 W Product height 900 mm Bottom Heating Element 1000 W Grill Heating Element 1600 W Energy Efficiency Class Top Oven A Ring Heating Element 1400 W Bottom Oven A Ind
electrolux 1. Before fitting the anti-tip guard, make sure that the cooker has been adjusted to the correct height and is standing level. 2. The attachment (B) is fitted to the left side when delivered. Measure out where the anti-tip guard (A) is to be located, 60 mm down from the edge of the hob and 50 mm from the wall (cupboard). Screw it firmly into solid material or use suitable reinforcement. The entire anti-tip guard (A +B) can also be located on the right-hand side (See fig. 1).
electrolux 33 For cookers with plug: Make sure that the plug is completely pushed into the mains socket. Environmental Information Deactivate the door lock so that children cannot be locked inside the oven. The packaging can be recycled. Contact your local council for more information on recycling facilities in your area. Save Energy! • Use a lid and you halve energy consumption. • Steaming and pressure cooking also save energy.
electrolux 9. 10. 11. 12. outside of our responsibility. Nor will the guarantee cover those caused by inadequate installation or assembly, lack of maintenance or failure to respect the assembly instructions or directions for use. Defects that result from repairs or measures carried out by people who are not qualified or expert or defects that result from the addition of non-original accessories or spare parts are not covered by the guarantee.
electrolux 35 E-mail: consumer-service.luxembourg@electrolux.lu European Guarantee This appliance is guaranteed by Electrolux in each of the countries listed at the back of this user manual, for the period specified in the appliance guarantee or otherwise by law.
electrolux Luxembourg +352 42 431 301 Rue de Bitbourg, 7, L-1273 Hamm Magyarország +36 1 252 1773 H-1142 Budapest XIV, Erzsébet királyné útja 87 Nederland +31 17 24 68 300 Vennootsweg 1, 2404 CG - Alphen aan den Rijn Norge +47 81 5 30 222 Risløkkvn. 2 , 0508 Oslo Österreich +43 18 66 400 Herziggasse 9, 1230 Wien Polska +48 22 43 47 300 ul.
electrolux 37
electrolux
electrolux 39
www.electrolux.