
User manual


Installation
22
Installation
Work on the cooker must be carried out by a
QUALIFIED
ELECTRICIAN
. The cooker is heavy.
Certain edges and corners which will not nor-
mally be exposed may be sharp.
USE
GLOVES
when moving the cooker.
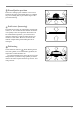
Before installing the cooker, you should check that its
dimensions correspond to the rest of your kitchen units.
Measure the height of the worktop from floor to top sur-
face of the worktop, and the plinth depth from the wall
to the front edge of the plinth
(
SEE
PICTURE
)
. The cooker
may also be installed adjoining one wall, or one tall unit.
When delivered, the cooker plinth is adjusted to
suit a worktop height of 90 cm and a plinth depth of 55
cm. Where necessary, you can alter the height of the
plinth to make the cooker suitable for a worktop height
of 85 or 88 cm (see below). Check the cooker cable is
not trapped when moving the cooker.
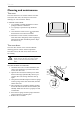
To adjust the plinth height
1
Carefully lay the cooker on its front
(
SEE
PICTURE
)
.
Use some of the packaging material to cushion
the cooker on the floor surface.
2
Take care: there are sharp edges on the under-
side of the cooker. Unscrew screw A (1 screw)
in the centre rear of the plinth and the side
screws B (4 screws,
SEE
PICTURE
)
.
3
Push the plinth in to the required height setting,
90, 88 or 85 cm
(
SEE
PICTURE
)
.
4
Screw in screws A and B again.
Levelling the cooker
The cooker must be level, for example to ensure that
oil in frying pans is of even depth. To check whether
the cooker is level, use a spirit level on the hob sur-
round (but not on the hotplates themselves). Check the
level first front to back and then side to side.
If necessary, you can lower (-6 mm) or raise (+12
mm) the wheels and feet, working from the front of the
cooker. Use a screwdriver to adjust the rear wheels,
and adjustable pliers for the front feet.
90
88
85
55
B
B
A
B
B
85
88
90