user manual Cooker Oven Cooker EEKG5048 EKC6046 EKG5049 EKC6047
We were thinking of you when we made this product
electrolux welcome 3 Welcome to the world of Electrolux You’ve chosen a first class product from Electrolux, which hopefully will provide you with lots of pleasure in the future. Electrolux ambition is to offer a wide variety of quality products that would make your life even more comfortable. You can look at some examples on the cover in this manual. But now it’s time to study this manual and start using and enjoying the benefits from your new machine. We promise that it’ll make your life a little easier.
electrolux contents Contents Safety information Product description Before using the appliance Operation Cooking charts Hints and tips Care and cleaning Troubleshooting Technical data Installation instructions Connecting to the gas supply Environment Guarantee conditions 5 7 8 10 17 21 23 27 28 30 32 36 36 The following symbols are used in this user manual: Important information concerning your personal safety and information on how to avoid damaging the appliance.
electrolux important safety information 5 Important safety information These warnings are provided in the interests of your safety. Ensure that you understand them all before installing or using the appliance. Your safety is of paramount importance. If you are unsure about any of the meanings of these warnings please contact customer care. Installation The appliance must be installed according to the instructions supplied.
electrolux important safety information When you are lighting any burner check that it is lit before you leave the appliance. When turning off a burner, do not leave the appliance until the flame has gone out. Never place plastic or any other material, which may melt in or on the oven. (Natural gas models only) Do not leave the grill pan handle in position when grilling, as it will become hot. (Natural gas models only) Always use oven gloves to remove and replace the grill pan handle when grilling.
electrolux product description 7 Product description Control panel Top oven / Grill Main oven Controls and their functions Hob controls Ignition switch Main oven temperature control Top oven/Grill control Hob controls
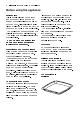
electrolux before using the appliance Before using the appliance Rating plate This is usually situated on the front frame of the appliance and can be seen upon opening either the main or top oven door. Alternatively the rating plate may also be found on the back or top of some models (where applicable). The appliance must be protected by a suitably rated fuse or circuit breaker. The rating of the appliance is given on the rating plate.
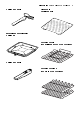
electrolux before using the appliance 9 1 grill pan handle All models 1 grill pan grid Natural gas models only 1 grill pan 1 straight shelf (For grilling and top oven cooking) 1 grill pan handle 2 straight shelves (For main oven cooking)
electrolux operation Operation The hob The gas hob has different burner sizes to suit different types of cooking. To ensure maximum burner efficiency only use pots and pans with flat bases appropriate to the burner size used. The largest pan, which you should use on any burner, is 230mm (9") and the smallest pan should not measure less than 100mm (4"). Ensure the pan supports are correctly fitted before using the hob. To light the hob burners The hob ignition works by means of a battery.
electrolux operation 11 Place pans on the centre of the burners. Position pans so the handles cannot be accidentally knocked or overhang the appliance. Lift pans on and off the pan supports. Do not slide them across the hob. The shelf should be fitted with the straight rods uppermost on the frame and the forms towards the back of the oven. If not fitted correctly the anti-tilt and safety stop mechanism will be affected. Take care to avoid burns and scalds when reaching across the hotplate.
electrolux operation The grill door must be left open when grilling. Things to note • • Some smoke from fat splashes may be evident as the grill cleans itself. The shelf in the grill/top oven is different from the shelves in the main oven. Only use the shelf with the large solid metal plate in the grill/top oven. • • To Remove. Press the button on the handle with the thumb and pivot the handle slightly upwards and towards the right to remove from the bracket.
electrolux operation 13 To fit the grill pan and handle (LPG gas models) The grill pan has a removable handle. Attach and remove as described. • • To attach. Place the wirework under the cut out in the pan so that the metal plate hooks over the top of the grill pan. Slide the handle to the left and over the central bump on the grill pan. Place the grill pan on the shelf so that the pan is positioned centrally beneath the grill. The top oven The top oven is the smaller of the two ovens.
electrolux operation Do not close the door until the burner is showing large flames. To turn the top oven off • Turn the control knob to the off position. This is shown by a dot. Do not place dishes, tins and trays directly on the oven base as it becomes very hot and damage will occur. Do not place cookware and cooking pots with rough bases e.g. cast iron on the oven door as damage to the glass may occur.
electrolux operation 15 Using the main oven • • • • • Open the oven door. Push in the control knob and turn it to gas mark 9. When the burner has lit release the control knob. There will only be small flames at first. When the burner is showing large flames, adjust the setting as required. Do not close the door until the burner is showing large flames. To turn the main oven off • Push in and turn the control knob to the off position. This is shown by a dot.
electrolux operation Food preparation – slow cooking Joints of meat and poultry • • • • • • • • • • Do not cook meat joints over 2.7kg (6lb). Do not cook poultry over 2 kg (4lb 8oz). Cook on the middle shelf of the oven or above. Cook stuffing separately. Cook for at least six hours. Only cook joints of pork if you can make sure, by using a meat thermometer, that the temperature inside the joint is at least 88°C. For good air circulation always stand joints on a rack in a roasting tin or casserole.
electrolux cooking charts 17 Grilling chart FOOD Bacon Rashers Beef Burgers Chicken Joints Lamb Chops Pork Chops Whole Trout/Mackerel Plaice/Cod Fillets Kebabs Kidneys – Lamb/Pig Liver – Lamb/Pig Sausages Steak – Rare Steak – Medium Steak – Well Done Toasted Sandwiches GRILL TIME (mins in total) 5-6 10 - 15 30 - 40 15 - 20 20 - 30 15 - 25 10 - 15 20 - 30 8 - 12 10 - 20 20 - 30 6 - 12 12 - 16 14 - 20 3-4 The times quoted above are given as a guide and should be adjusted to suit personal taste.
electrolux cooking charts Oven cooking chart The oven temperatures are intended as a guide only. It may be necessary to increase or decrease the temperatures by to suit individual preferences and requirements.
electrolux cooking charts 19 Oven cooking chart continued Food Choux Pastry Main oven Gas Pos mark 6 2 Top oven Gas mark Pos 6 2 Approximate cook time (m) 30 - 35 Éclairs / Profiteroles 5 2 5 2 20 - 30 Flaky Pastry 6 2 6 2 25 - 40 Mince Pies 5 2+4 5 2 15 - 20 Pasta Lasagne etc.
electrolux cooking charts Roasting chart Meat Gas mark Cooking time Beef/ Beef boned 5 20-35 minutes per ½kg (1lb) and 20-35 minutes over Mutton/Lamb 5 25-35 minutes per ½kg (1lb) and 25-35 minutes over Pork/Veal/Ham 5 30-40 minutes per ½kg (1lb) and 30-40 minutes over Chicken 5 20-25 minutes per ½kg (1lb) and 20 minutes over Turkey/Goose 5 20-25 minutes per ½kg (1lb) up to 3½kg (7lb) then 10 minutes per ½kg (1lb) over 3½kg (7lb) Duck 5 25-35 minutes per ½kg (1lb) and 25-30 minutes o
electrolux hints and tips 21 Hints and tips Hints and tips when using the hob Do not overfill pans or they will boil over. Do not use pans with very heavy handles, which cause the pan to tip. The hob surface should be allowed to cool before closing the lid. Any spillage should be removed from the lid before opening. Do not leave accidental spillage on the hob or removable parts.
electrolux hints and tips Ensure that food is placed centrally on the shelf and there is sufficient room around the baking tray/dish to allow for maximum circulation. Do not push dishes too far back as food will burn if it overhangs the burner flame. Stand dishes on a suitably sized baking tray on the shelf to prevent spillage onto the oven base and to help reduce cleaning. The material and finish of the baking tray and dishes used affect base browning.
electrolux care and cleaning 23 Care and cleaning Cleaning materials Cleaning the hob Clean the hob using a mild abrasive. Take care not to damage the spark electrodes. If the spark electrodes are damaged the burners will not light. You can remove the pan supports, burner caps and burner crowns to clean them. Again take care not to damage the spark electrodes. Clean the burner crowns and pan supports by soaking them in very hot Cleaning the outside of the soapy water.
electrolux care and cleaning 3. Check for ignition. If a burner will not Cleaning inside the grill and oven compartments light then you need to check the The sides and back of the grill/top oven crown and cap positions. and main oven compartments are coated with a special Stay-clean coating. They should not be cleaned manually. The vitreous enamel main oven base Pan support and grill compartment base can be cleaned using normal oven cleaners Cap with care.
electrolux care and cleaning 25 Use minimal, if any, extra oil or fat when roasting meat, potatoes only require brushing with fat before cooking. Extra fat in the oven during roasting will increase splashing and staining of the cavity. It is not necessary to add water to a meat tin when roasting. The water and the fat juices from the joint create excessive splattering during cooking – even at normal temperatures, as well as causing condensation.
electrolux care and cleaning 5. Clean the outer and inner glass using hot soapy water or hob cleaner may be used. Do not use hob cleaner on the Stainless Steel or painted finishes. Do not try to clean the foil, which is inside the door. The foil is there to help keep the door cool, if it is damaged it will not work. Ensure that all parts are well rinsed and thoroughly dried before attempting to replace the outer door.
electrolux troubleshooting 27 Troubleshooting • • • Maintenance must only be carried out by a competent/qualified person. Do not try to alter/modify the appliance yourself, as this could be dangerous. We recommend that your appliance has an annual gas safety check carried out by our approved service organisation. Please carry out the following checks on your appliance before calling a Service Engineer. It may be that the problem is a simple one that you can PROBLEM The grill and ovens do not work.
electrolux technical data PROBLEM The flame colour is orange/yellow. The burner is not igniting or only partially lighting. The burner sounds noisy. The burner is emitting a popping sound. Noise. POSSIBLE SOLUTION Due to the design of the burner the flame can appear to be orange/yellow (flame disturbance) in certain areas of the burner this is a natural occurrence. Check that the burner is dry and that food spillage or cleaning fluids are not present on the burner.
electrolux technical data 29 Technical data Hob Heat input Injector marking Natural Gas R.H.F. 1.0kW (3412 Btu/h) 070 LPG Gas Heat input Injector marking R.H.F. 1.0kW (71.8g/h) 050 R.H.R. 1.9kW (6483 Btu/h) 096 L.H.R. 1.9kW (6483 Btu/h) 096 L.H.F. 2.9kW (9895 Btu/h) 119 R.H.R. 1.9kW (136.5g/h) 071 L.H.R. 1.9kW (136.5g/h) 071 L.H.F. 2.8kW (194.
electrolux installation instructions Installation instructions Important – safety requirements Where applicable Natural Gas and LPG Gas versions of this appliance are available. Check that this model is suitable for the type of supply available. This appliance must be installed and/or serviced by a competent person in accordance with the Gas Safety (Installation and Use) Regulations Current Editions and the I.E.E. Wiring Regulations.
electrolux installation instructions 31 For your safety • Do not try to disconnect the appliance from the gas supply if the supply pipe does not have a bayonet connection, as described in the installation instructions. If this is the case contact the person who installed the appliance. Location of appliance This appliance must not be installed in a bed-sitting room of volume less than 20m3 or in a bathroom, shower room or garage. It is essential that the appliance is positioned as shown.
electrolux installation instructions 650mm LPG cookers MUST NOT be installed below ground level i.e. in a basement or aboard any boat yacht or other vessel. Adjustment to suit floor conditions or height is obtained by rotating clockwise or anti clockwise the feet at the front and rear of the appliance. A spirit level should be placed on one of the shelves to confirm the appliance is correctly leveled.
electrolux installation instructions 33 Fitting the stability bracket locate the front edge of the lower bracket. Fix lower bracket (with two fixing holes) to the floor then measure the height from floor level to engagement edge on back of appliance, dimension 'C'. It is recommended that if the appliance is to be installed with a flexible supply pipe, a stability bracket be fitted and is available from your supplier (see Important Safety Requirements).
electrolux installation instructions 4. Turn off the taps, disconnect the pressure gauge and replace oven burner and cover, ensuring that the F.S.D phial is correctly located into the bracket on the burner. 5. Check operation of the oven. Checking the grill 4. Close the lid of the battery holder. Pressure testing 1. The oven injector is used as a pressure test point. Remove the oven furniture. Remove oven burner box retaining clips (one spring clip from each side) and remove box front cover.
electrolux installation instructions 35 Checking the top oven 1. Turn the top oven thermostat control knob to Mk.1 and press the ignition button. As soon as the burner is alight the button can be released. 2. When the oven burner lights up there should be a low gas rate at first to the oven burner, which is the F.S.D. bypass rate. 3. When the F.S.D. phial has heated up it opens the F.S.D. valve and the main gas stream flows to the burner. 4.
electrolux guarantee / customer care Environment After installation please dispose of the packaging with due regard for safety and the environment. Your local authority can arrange this. At the end of the appliances life The symbol on the product or on its packaging indicates that this product may not be treated as household waste. Instead it shall be handed over to the applicable collection point for the recycling of electrical and electronic equipment.
electrolux guarantee / customer care 37 Exclusions • • • • Damage or calls resulting from transportation, improper use or neglect, the replacement of any light bulbs or removable parts of glass or plastic. Costs incurred for calls to put right an appliance which is improperly installed or calls to appliances outside the United Kingdom. Appliances found to be in use within a commercial environment, plus those which are subject to rental agreements.
electrolux notes
www.electrolux.com www.electrolux.co.