EKG51105OX EN Cooker User Manual
www.electrolux.com CONTENTS 1. SAFETY INFORMATION....................................................................................3 2. SAFETY INSTRUCTIONS..................................................................................5 3. PRODUCT DESCRIPTION................................................................................ 8 4. BEFORE FIRST USE......................................................................................... 9 5. HOB - DAILY USE.................................
ENGLISH 1. 3 SAFETY INFORMATION Before the installation and use of the appliance, carefully read the supplied instructions. The manufacturer is not responsible for any injuries or damages that are the result of incorrect installation or usage. Always keep the instructions in a safe and accessible location for future reference. 1.1 Children and vulnerable people safety WARNING! Risk of suffocation, injury or permanent disability.
www.electrolux.com • • • • • • • • • • • • CAUTION: The cooking process has to be supervised. A short term cooking process has to be supervised continuously. WARNING: Danger of fire: Do not store items on the cooking surfaces. Do not use a steam cleaner to clean the appliance. Do not use harsh abrasive cleaners or sharp metal scrapers to clean the glass door or the glass of hinged lids of the hob since they can scratch the surface, which may result in shattering of the glass.
ENGLISH 5 2. SAFETY INSTRUCTIONS This appliance is suitable for the following markets: PH 2.1 Installation WARNING! Only a qualified person must install this appliance. • • • • • • • • • • • • • Remove all the packaging. Do not install or use a damaged appliance. Follow the installation instruction supplied with the appliance. Always take care when moving the appliance as it is heavy. Always use safety gloves and enclosed footwear. Do not pull the appliance by the handle.
www.electrolux.com • This appliance is not connected to a device, which evacuates the products of combustion. Make sure to connect the appliance according to current installation regulations. Pay attention to requirements regarding adequate ventilation. WARNING! Risk of damage to the appliance. • 2.4 Use WARNING! Risk of injury and burns. Risk of electrical shock. • • • • • • • • This appliance is for household use only. Do not change the specification of this appliance.
ENGLISH 7 other purposes, for example room heating. 2.5 Care and Cleaning WARNING! Risk of injury, fire, or damage to the appliance. • • • • • • • • • Before maintenance, deactivate the appliance. Disconnect the mains plug from the mains socket. Make sure the appliance is cold. There is the risk that the glass panels can break. Replace immediately the door glass panels when they are damaged. Contact the Authorised Service Centre.
www.electrolux.com • Flat the external gas pipes. • Use original spare parts only. 2.10 Service • To repair the appliance contact an Authorised Service Centre. 3. PRODUCT DESCRIPTION 3.
ENGLISH • • Grill deflector To protect the knobs when you use the grill. Storage compartment The storage compartment is below the oven cavity. To use the compartment, lift the lower front door then pull it down. • 9 WARNING! The storage compartment can become hot when the appliance operates. Wok support To cook with wok. 4. BEFORE FIRST USE WARNING! Refer to Safety chapters. 4.1 Initial Cleaning Remove all accessories from the appliance. Refer to "Care and cleaning" chapter.
www.electrolux.com WARNING! Do not keep the knob pushed for more than 15 seconds. If the burner does not light after 15 seconds, release the knob, turn it into the off position and try to light the burner again after minimum 1 minute. 5.2 Burner overview A B If after some tries the burner does not light, check if the crown and its cap are in the correct position. In the absence of electricity you can ignite the burner without an electrical device.
ENGLISH CAUTION! Make sure that the pots are placed centrally on the burner in order to get maximum stability and to get lower gas consumption. Burner 6.2 Diameters of cookware 11 Diameter of cook‐ ware (mm) Rapid 160 - 220 Semi - rapid 140 - 220 Auxiliary 120 - 180 WARNING! Use cookware with diameters applicable to the size of burners. 7. HOB - CARE AND CLEANING WARNING! Refer to Safety chapters. 7.1 General information • • • • • Clean the hob after each use.
www.electrolux.com 8. OVEN - DAILY USE WARNING! Refer to Safety chapters. 8.1 Oven Functions Oven function 1 - 81) Application Off position The appliance is off. Heat settings Range of temperature levels adjustment for the oven . Grilling To grill flat food in the middle of the grill. To make toast. Oven lamp To illuminate the oven interior. To use this function, press the button for the lamp and turnspit. Turnspit To spit roasting meat.
ENGLISH 3. At the same time push the knob for the oven functions and turn it counterclockwise to the maximum gas flow position. 4. When the flame comes on, keep the knob for the oven functions pushed on the maximum gas flow position for 15 seconds or less to let the thermocouple warm up. A Do not keep the knob for the oven functions pushed for more than 15 seconds.
www.electrolux.com 8.7 Turning off the grill burner To put out the flame, turn the knob to the off position . 9. OVEN - CLOCK FUNCTIONS 9.1 Minute Minder Use it to set a countdown time. This function has no effect on the operation of the appliance. Turn the knob for the timer as far as it goes, then turn it to necessary time period. After the time period is completed, an acoustic signal sounds. 10. USING THE ACCESSORIES WARNING! Refer to Safety chapters. 10.
ENGLISH A B 15 C D A. B. C. D. Support hook Forks Spit Handle 1. Open the oven door. 2. Put the turnspit handle into the spit. 3. Put the deep pan on the lowest shelf level. 4. Put the support hook into the hole in the top cavity of the oven. 5. Install the first fork on the spit, then put the meat on the turnspit and install the second fork. Make sure that the meat is in the middle of the spit. 6. Use the screws to tighten the forks. 7. Put the tip of the spit into the turnspit hole.
www.electrolux.com 11.2 Baking 11.3 Baking cakes • • • • • • • Your oven may bake or roast differently to the appliance you had before. Adapt your usual settings (temperature, cooking times) and shelf positions to the values in the tables. The manufacturer recommends that you use the lower temperature the first time. If you cannot find the settings for a special recipe, look for the one that is almost the same.
ENGLISH 17 Food Quantity (g) Ther‐ mostat posi‐ tion Time (min) Shelf posi‐ tion Accessories Chicken, whole 1400 50 - 60 3 wire shelf 3 baking tray Flan bread3) 800 6-7 15 - 20 3 baking tray Stuffed yeast cake 4) 1200 4-5 40 - 50 3 baking tray Pizza1) 1000 5-6 25 - 30 3 baking tray Cheese cake 2600 3 70 - 80 3 baking tray Swiss apple flan 4) 1900 6-7 40 - 50 3 baking tray Christmas cake 5) 2400 3-4 60 2) 3 baking tray Quiche Lor‐ raine4) 1000 5-6 50 - 60
www.electrolux.com Food Quantity (g) Ther‐ mostat posi‐ tion Time (min) Shelf posi‐ tion Accessories Buttered cake4) 600 20 - 25 baking tray 3 3 1) Preheat the oven for 10 minutes. 2) After you switch off the appliance, leave the cake in the oven for 5 minutes. 3) Preheat the oven for 20 minutes. 4) Preheat the oven for 15 minutes. 5) Preheat the oven for 15 minutes with the thermostat set at position 8. 11.
ENGLISH WARNING! Do not use the appliance without the glass panels. 1. Open the door until it is at an angle of approximately 30°. The door stands alone when slightly open. 19 the above steps in the opposite sequence. Install the smaller panel first, then the larger. CAUTION! The screen with a printing on the inner glass panel must face the inner side of the door.
www.electrolux.com 13.1 What to do if... Problem Possible cause Remedy There is no spark when you try to activate the spark generator. The hob is not connected to an electrical supply or it is connected incorrectly. Check if the hob is correct‐ ly connected to the electri‐ cal supply. Refer to the connection diagram. There is no spark when you try to activate the spark generator. The fuse is blown. Make sure that the fuse is the cause of the malfunc‐ tion.
ENGLISH 13.2 Service data If you cannot find a solution to the problem yourself, contact your dealer or an Authorised Service Centre. plate is on the front frame of the appliance cavity. Do not remove the rating plate from the appliance cavity. The necessary data for the service centre is on the rating plate. The rating We recommend that you write the data here: Model (MOD.) ......................................... Product number (PNC) ......................................... Serial number (S.N.
www.electrolux.com 14.4 Bypass diameters BURNER Ø BYPASS1) 1/100 mm Auxiliary 29 / 30 Semi-rapid 32 Rapid 42 Oven 44 1) Type of bypass depends on model. 14.5 Gas burners for LPG G30 30 mbar BURNER NORMAL POWER kW REDUCED POWER kW INJECTOR MARK 1/100 mm NOMINAL GAS FLOW g/h Rapid 3.0 0.72 88 218 Semi-rapid 2.0 0.43 71 145 Auxiliary 1.0 0.35 50 73 Oven 2.7 0.90 80 196 Grill 1.9 - 71 138 14.
ENGLISH • • the fastening clamps are not rusted, expired term is not due. If one or more defects are visible, do not repair the pipe, but replace it. WARNING! When installation is complete, make sure that the seal of each pipe fitting does not leak. To check the seal use a soap solution, not a flame. The gas supply ramp is on the rear side of the control panel. WARNING! Before you connect the gas, disconnect the appliance from the electricity supply or switch off the fuse in the fuse box.
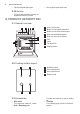
www.electrolux.com into the solid material or use applicable reinforcement (wall). CAUTION! If the space between the bench cupboards is larger than the width of the appliance, you must adjust the side measurement to the centre of the appliance. 80-85 mm 317-322 mm 14.11 Electrical installation WARNING! The manufacturer is not responsible if you do not follow the safety precautions from Safety chapters. This appliance is supplied with a main plug and a main cable. 2.
ENGLISH EN 30-2-1: Domestic cooking appliances burning gas - Part 2-1 : Rational use of energy - General • 15.2 Hob - Energy saving You can save energy during everyday cooking if you follow below hints. • • • • • • • When you heat up water, use only the amount you need. If it is possible, always put the lids on the cookware. Before you use the burners and pan support make sure they are assembled correctly. The cookware bottom should have the correct diameters for the burner size.
www.electrolux.
ENGLISH 27
867313847-A-062016 www.electrolux.