EKG61104OX ................................................ .............................................
www.electrolux.com CONTENTS 1. 2. 3. 4. 5. 6. 7. 8. 9. 10. 11. 12. 13. 14. SAFETY INFORMATION . . . . . . . . . . . . . . . . . . . . . . . . . . . . . . . . . . . . . . . . . . . . . . . . . . . 3 SAFETY INSTRUCTIONS . . . . . . . . . . . . . . . . . . . . . . . . . . . . . . . . . . . . . . . . . . . . . . . . . . 4 PRODUCT DESCRIPTION . . . . . . . . . . . . . . . . . . . . . . . . . . . . . . . . . . . . . . . . . . . . . . . . . 7 BEFORE FIRST USE . . . . . . . . . . . . . . . . . . . . . . . . .
ENGLISH 3 1. SAFETY INFORMATION Before the installation and use of the appliance, carefully read the supplied instructions. The manufacturer is not responsible if an incorrect installation and use causes injuries and damages. Always keep the instructions with the appliance for future reference. 1.1 Children and vulnerable people safety WARNING! Risk of suffocation, injury or permanent disability.
www.electrolux.com • Never try to extinguish a fire with water, but switch off the appliance and then cover flame e.g. with a lid or a fire blanket. • Do not store items on the cooking surfaces. • Do not use a steam cleaner to clean the appliance. • Metallic objects such as knives, forks, spoons and lids should not be placed on the hob surface since they can get hot. • Remove any spillage from the lid before opening. Let the hob surface cool down before closing the lid.
ENGLISH • Make sure that the electrical information on the rating plate agrees with the power supply. If not, contact an electrician. • Always use a correctly installed shockproof socket. • Do not use multi-plug adapters and extension cables. • Make sure not to cause damage to the mains plug and to the mains cable. Contact the Service or an electrician to change a damaged mains cable. • Do not let mains cables to come in touch with the appliance door, specially when the door is hot.
www.electrolux.com • Use only the accessories supplied with the appliance. • Do not install a flame diffuser on the burner. • This appliance is for cooking purposes only. It must not be used for other purposes, for example room heating. WARNING! Risk of fire or explosion. • Fats and oil when heated can release flammable vapours. Keep flames or heated objects away from fats and oils when you cook with them. • The vapours that very hot oil releases can cause spontaneous combustion.
ENGLISH • Make sure the appliance is cold. There is the risk that the glass panels can break. • Replace immediately the door glass panels when they are damaged. Contact the Service. • Be careful when you remove the door from the appliance. The door is heavy! • Clean regularly the appliance to prevent the deterioration of the surface material. • Remaining fat or food in the appliance can cause fire. • Clean the appliance with a moist soft cloth. Only use neutral detergents.
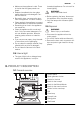
www.electrolux.com 3.2 Cooking surface layout 1 2 1 Semi-rapid burner 2 Semi-rapid burner 3 Auxiliary burner 4 Rapid burner 4 3 3.3 Accessories • Oven shelf For cookware, cake tins, roasts. • Flat baking tray For cakes and biscuits. • Flat aluminized baking tray For cakes and biscuits. • Turnspit For roasting larger joints of meat and poultry. • Grill deflector To protect the knobs when you use the grill. • Storage compartment Below the oven is the storage compartment.
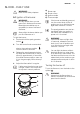
ENGLISH 9 5. HOB - DAILY USE WARNING! Refer to the Safety chapters. 5.1 Ignition of the burner WARNING! Be very careful when you use open fire in kitchen environment. Manufacturers decline any responsibility in case of misuse of the flame. Always light the burner before you put the cookware on it. To light the burner: Push and hold the spark generator button . 2. Turn the control knob counterclock1. 3. 4. wise to the maximum position . Push the knob in and hold.
www.electrolux.com 6. HOB - HELPFUL HINTS AND TIPS 6.1 Energy savings Use cookware with the bottom as thick and flat as possible. • If possible, always put the lids on the pans. • When the liquid starts to boil, turn down the flame to barely simmer the liquid. WARNING! Use pots and pans with bottom applicable to the dimension of burner. Do not use cooking vessels on the hotplate that overlap its edges.
ENGLISH 11 8.1 Oven Functions Oven function Off position 1-8 Range of temperature levels adjustment Grill Oven lamp Turnspit Application To switch off the appliance. Range of temperature levels adjustment for conventional cooking (1 - 135 °C; 2 - 150 °C; 3 - 165 °C; 4 - 180 °C; 5 - 195 °C; 6 - 210 °C; 7 - 230 °C; 8 - 250 °C). To grill flat food and to make toast. To light up the oven interior without any cooking function. To use this function, press the oven lamp button. To spit roasting meat.
www.electrolux.com 2. Put grill deflector A into position above the door. Make sure that the two catches engage correctly in the holes in the top part of the front frame of the oven cavity (underneath the control panel). A 10. Put a baking tray or roasting pan be- low, on shelf level 2, to collect the juices. Do not put the meat directly in the tray or pan. 11. Keep the oven door slightly open. 12. When the first side is roasted, turn the meat over with a fork to avoid losing its juice. 13.
ENGLISH 9.1 Inserting the baking tray Put the tray in the centre of the oven cavity, between the front and rear wall. This ensures that the heat can circulate in front of and behind the baking tray. Make sure that the tray is positioned like in the picture, with the angled slope in the rear. WARNING! Do not push the baking tray all the way to the rear wall of the oven cavity. This prevents the heat from circulating around the tray. The food may be burnt, especially in the rear part of the tray. 9.
www.electrolux.com • Do not put the objects directly on the appliance floor and do not cover the components with aluminium foil when you cook. This can change the baking results and damage the enamel coating. 10.1 Baking cakes • Preheat the oven for approximately 10 minutes before baking. • Do not open the oven door before 3/4 of the set cooking time is up. 10.2 Cooking meat and fish • Do not cook meat with weight below 1 kg. Cooking too small quantities makes the meat too dry.
ENGLISH Food Tray type and shelf level 15 Preheating time (minutes) Thermostat position Cooking / baking time (minutes) Flan bread ( 800 g) aluminized / enamelled tray at level 3 20 7 15 - 20 Stuffed yeast cake (1200 g) aluminized / enamelled tray at level 3 15 4-5 40 - 50 Pizza (1000 g) aluminized / enamelled tray at level 3 10 5-6 25 - 35 Cheese cake (2600 g) aluminized / enamelled tray at level 3 - 2 70 - 90 Swiss apple flan (1900 g) aluminized / enamelled tray at level 3 15
www.electrolux.com 10.5 Grill with turnspit Food Chicken, whole (1000 g) Shelf level Cooking / baking time (minutes) Oven shelf at level 3 1) 90 1) Put a baking tray under the oven shelf, on shelf level 1. 11. OVEN - CARE AND CLEANING WARNING! Refer to the Safety chapters. • Clean the front of the appliance with a soft cloth with warm water and cleaning agent. • To clean metal surfaces use a usual cleaning agent • Clean the oven interior after each use.
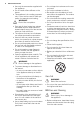
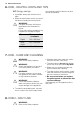
ENGLISH 17 Removing the oven door and the glass panel 1. Open the door fully and hold the two door hinges. 2. Lift and turn the levers on the two hinges. 3. Close the oven door to the first opening position (halfway). Then pull forward and remove the door from its seat.
www.electrolux.com 4. Put the door on a soft cloth on a stable surface. 5. Release the locking system to remove the internal glass panel. 6. Turn the two fasteners by 90° and remove them from their seats. 7. Carefully lift (step 1) and remove (step 2) the glass panel. Clean the glass panel with water and soap. Dry the glass panel carefully. 90° 8.
ENGLISH 19 Installing the door and the glass panel When the cleaning is completed, install the glass panel and the oven door. Do the above steps in the opposite sequence. The screen-printing zone must face the inner side of the door. Make sure that after the installation the surface of the glass panel frame on the screen-printing zones is not rough when you touch it. Make sure that you install the internal glass panel in the seats correctly. Refer to the illustration. 11.
www.electrolux.com Problem Possible cause Remedy The flame is blow out immediately after ignition Thermocouple is not heated sufficient After lightning the flame, keep the knob pushed for approximately 5 seconds. The gas ring burns unevenly Burner crown is blocked with food residues Make sure that the injector is not blocked and the burner crown is clear of food particles. The appliance does not operate The fuse in the fuse box is released Control the fuse.
ENGLISH Minimal distances Dimension mm A 690 B 150 C 20 Voltage 230 V Frequency 50 Hz Gas Category Gas Supply 21 II2H3B/P G20 (2H) 20 mbar G30/31 (3B/P) 30/30 mbar By-pass diameters 13.2 Technical Data Dimensions Burner Ø By-pass in 1/100 mm.
www.electrolux.com Burner Normal power Reduced power kW kW 1,65 - Type of gas Propane G31 Choose fixed connections or use a flexible pipe in stainless steel in compliance with the regulation in force. If you use flexible metallic pipes, be careful they do not come in touch with mobile parts or they are not squeezed. A 13.4 Flexible nonmetal pipes connection After installation is complete, use a soapy solution and never a flame to see if you sealed all the pipe fittings perfectly.
ENGLISH WARNING! Before replacing the injectors, make sure that the gas knobs are in the Off position and disconnect the appliance from the electrical supply. Let the appliance cool off fully. There is a risk of injury. 1. 2. 3. 4. 23 Light the burner. Turn the knob on the minimum position. Remove the knob. With a thin screwdriver, adjust the bypass screw position (A). The bypass screw position (A) depends on model. 13.6 Injectors replacement Replace the nozzles when changing the gas type. 1.
www.electrolux.com 2. Release the screw (C) which keeps the burner in position. 3. Carefully move the burner off the injector support (D). Slowly move it to the left side. Make sure that the burner bush stays on the burner mouthpiece. Do not apply force to the wire of the spark plug connector (E) and to the thermocouple conductor (F). Release the burner injector (D) with a 7 mm socket spanner and remove it. Replace it with the necessary one. Assemble the burner in the opposite sequence.
ENGLISH 6. Turn the knob for the oven functions from the maximum to the minimum position. Control the flame. If the flame goes out, do the procedure from point 1 to point 6 again. There must be a small regular flame on the oven burner crown. The manufacturer declines liability if you do not obey these safety measures. 13.9 Grill injector replacement 1. Remove the grill burner after removing the fixing screw A. 25 The grill temperature cannot be adjusted.
www.electrolux.com 15. ENVIRONMENT CONCERNS Recycle the materials with the symbol . Put the packaging in applicable and electronic appliances. Do not dispose appliances marked with the symbol containers to recycle it. Help protect the environment and human health and to recycle waste of electrical with the household waste. Return the product to your local recycling facility or contact your municipal office.
ENGLISH 27
892966034-A-482013 www.electrolux.