EKG612A1OX EN Cooker User Manual
www.electrolux.com CONTENTS 1. SAFETY INFORMATION....................................................................................3 2. SAFETY INSTRUCTIONS..................................................................................4 3. PRODUCT DESCRIPTION................................................................................ 7 4. BEFORE FIRST USE......................................................................................... 9 5. HOB - DAILY USE.................................
ENGLISH 1. 3 SAFETY INFORMATION Before the installation and use of the appliance, carefully read the supplied instructions. The manufacturer is not responsible if an incorrect installation and use causes injuries and damages. Always keep the instructions with the appliance for future reference. 1.1 Children and vulnerable people safety WARNING! Risk of suffocation, injury or permanent disability.
www.electrolux.com • • • • • • • • Do not use a steam cleaner to clean the appliance. Metallic objects such as knives, forks, spoons and lids should not be placed on the hob surface since they can get hot. Remove any spillage from the lid before opening. Let the hob surface cool down before closing the lid. Internally the appliance becomes hot when in operation. Do not touch the heating elements that are in the appliance. Always use oven gloves to remove or put in accessories or ovenware.
ENGLISH 2.2 Electrical Connection WARNING! Risk of fire and electrical shock. • • • • • • • • • • • • • All electrical connections should be made by a qualified electrician. The appliance must be earthed. Make sure that the electrical information on the rating plate agrees with the power supply. If not, contact an electrician. Always use a correctly installed shockproof socket. Do not use multi-plug adapters and extension cables.
www.electrolux.com • • Do not let sparks or open flames to come in contact with the appliance when you open the door. Open the appliance door carefully. The use of ingredients with alcohol can cause a mixture of alcohol and air. WARNING! Risk of damage to the appliance. • • • • • • • • • • • • To prevent damage or discoloration to the enamel: – do not put ovenware or other objects in the appliance directly on the bottom. – do not put water directly into the hot appliance.
ENGLISH • • • Before you close the lid turn all burners off. Do not close the lid until the hob and oven are completely cold. Glass lid can shatter, when heated (if applicable). • • • 7 Do not leave the appliance unattended during grilling. Accessible parts become hot. Keep children away when the grill is in use. Do not put the oven shelf with food on the highest shelf level. 2.9 Disposal WARNING! Risk of injury or suffocation.
www.electrolux.com Model denomination and PNC number Additional gas injectors EKG612A1OX 943006334 8 X Hob integrated ignition on the control knob Hob ignition on the spark generator button X Oven integrated ignition on the control knob Oven ignition on the spark generator button X Hob thermocouple X Oven thermocouple X Enamel Oven cleaning X Catalytic Enamel Pan support X Cast iron 3.
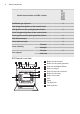
ENGLISH 3.3 Cooking surface layout 1 2 5 3 1 Auxiliary burner 2 Steam outlet - number and position depend on the model 3 Semi-rapid burner 4 Semi-rapid burner 5 Rapid burner 4 3.4 Accessories • • • • Wire shelf For cookware, cake tins, roasts. Baking tray For cakes and biscuits. Turnspit For roasting larger joints of meat and poultry. Storage compartment The storage compartment is below the oven cavity. To use the compartment, lift the lower front door then pull it down.
www.electrolux.com 5. HOB - DAILY USE WARNING! Refer to Safety chapters. In the absence of electricity you can ignite the burner without an electrical device. In this case approach the burner with a flame, push the relevant knob down and turn it to maximum position. Keep the knob pushed for equal or less than 10 seconds to let the thermocouple warm up. 5.1 Ignition of the hob burner Always light the burner before you put on the cookware.
ENGLISH 11 WARNING! Always turn the flame down or switch it off before you remove the pans from the burner. 6. HOB - HINTS AND TIPS WARNING! Refer to Safety chapters. 6.2 Diameters of cookware WARNING! Use cookware with diameters applicable to the size of burners. 6.1 Cookware WARNING! Do not put the same pan on two burners. Burner WARNING! Do not put unstable or damaged pots on the burners to prevent from spill and injury.
www.electrolux.com 7.3 Cleaning the spark plug This feature is obtained through a ceramic ignition candle with a metal electrode. Keep these components well clean to prevent difficult lighting and check that the burner crown holes are not obstructed. 7.4 Pan supports The pan supports are not resistant to washing in a dishwasher. They must be washed by hand. 1. Remove the pan supports to easily clean the hob. Be very careful when you replace the pan supports to prevent the hob top from damage. 2.
ENGLISH 8.2 Ignition of the oven gas burner CAUTION! When turning on the oven burner the oven door must be opened. CAUTION! Make sure that the lid is opened. When using the oven the lid has to be opened to avoid overheating. Oven safety device: The gas oven has a thermocouple. It stops the gas flow if the flame goes out. 1. Open the oven door. 2. Ignite the oven gas burner.
www.electrolux.com CAUTION! Do not put the meat on the highest shelf level. There is a risk of fire. CAUTION! Make sure to turn the knob as far as it goes. Avoid the intermediary position between Off and Grill. On the intermediary positions the spark generator can remain active. 1. Open the oven door. 2. For manual ignition hold a flame near the grill burner holes. Push and turn the gas grill control knob to the flame position. Hold the knob pushed down. 3.
ENGLISH 15 3. Put the baking tray on the lowest shelf level. 4. Snap out one end of the support hook from the oven ceiling A and let it hang on the other end. Put the tray or deep pan on the shelf position. Make sure it does not touch the back wall of the oven. 10.2 Using the turnspit WARNING! Be careful when you use the turnspit. The forks and the spit are sharp. There is a risk of injury. 5. Install the first fork on the spit, then put the meat on the turnspit and install the second fork.
www.electrolux.com 11. OVEN - HINTS AND TIPS WARNING! Refer to Safety chapters. The temperature and baking times in the tables are guidelines only. They depend on the recipes and the quality and quantity of the ingredients used. 11.1 General information • • • • The appliance has five shelf positions. Count the shelf positions from the bottom of the appliance floor. Moisture can condense in the appliance or on the door glass panels. This is normal.
ENGLISH 11.6 Cooking tables Casseroles Food Quantity (kg) Ther‐ Time mostat (min) posi‐ tion Grill posi‐ Grilling tion time (min) Total prepara‐ tion time (min) Shelf posi‐ tion Lasa‐ gna1) 1.5 - 2.5 5 35 40 min. 35 - 40 35 - 40 2 Cannel‐ loni 1.5 - 2.5 5 35 40 min. 35 - 40 35 - 40 2 Potato gratin 1.5 - 2.5 3 65 70 min. 10 - 15 65 - 70 2 Macaro‐ ni oven 1.5 - 2.5 5 35 40 min. 35 - 40 35 - 40 2 Kebab Hala 1.5 - 2.5 5 30 35 max.
www.electrolux.com Fish Food Quantity (kg) Ther‐ Time mostat (min) posi‐ tion Grill posi‐ Grilling tion time (min) Total prepara‐ tion time (min) Shelf posi‐ tion Pike 0.8 - 1.5 4 60 80 min. 60 - 80 60 - 80 2 Dorade 0.4 - 0.7 4 40 60 min. 40 - 60 40 - 60 2 Trout 0.5 - 1.0 4 25 30 min. 25 - 30 25 - 30 2 Food Quantity (kg) Ther‐ Time mostat (min) posi‐ tion Grill posi‐ Grilling tion time (min) Total prepara‐ tion time (min) Shelf posi‐ tion Thin 1.0 - 1.
ENGLISH Food Quantity Ther‐ (kg) mostat posi‐ tion Time (min) Yeast cake 1.0 - 1.5 45 - 50 min. 5 Grill posi‐ Grilling tion time (min) 5 - 10 Total prepara‐ tion time (min) Shelf posi‐ tion 45 - 50 2 19 1) 1) Preheat the oven for 10 minutes. Grilling Food Quantity (kg) Grill position Time (min) Shelf posi‐ tion Sheep chops1) 0.7 - 1.2 half 20 - 25 3 Ribs1) 1.0 - 1.2 half 45 - 60 3 Burgers1) 2.0 - 2.5 max. 15 - 20 3 Mackerel1) 1.2 - 1.
www.electrolux.com dishwasher. It can cause damage to the nonstick coating. 12.2 Stainless steel or aluminium appliances Clean the oven door with a wet sponge only. Dry it with a soft cloth. Do not use steel wool, acids or abrasive materials as they can damage the oven surface. Clean the oven control panel with the same precautions. 12.3 Cleaning the oven door The oven door has two panels of glass installed one behind the other. To make the cleaning easier remove the oven door. 3.
ENGLISH 6. Use a spatula made of wood or plastic or equivalent to open the inner door. Hold the outer door, and push the inner door against the top edge of the door. Lift the inner door. 21 12.4 Replacing the lamp Put a cloth on the bottom of the interior of the appliance. It prevents damage to the lamp glass cover and the cavity. WARNING! Danger of electrocution! Disconnect the fuse before you replace the lamp. The lamp and the lamp glass cover can be hot. 3 2 2 1. Deactivate the appliance. 2.
www.electrolux.com 13.1 What to do if... Problem Possible cause Remedy There is no spark when you try to activate the spark generator. The hob is not connected to an electrical supply or it is connected incorrectly. Check if the hob is correct‐ ly connected to the electri‐ cal supply. Refer to the connection diagram. There is no spark when you try to activate the spark generator. The fuse is released. Make sure that the fuse is the cause of the malfunc‐ tion.
ENGLISH 13.2 Service data If you cannot find a solution to the problem yourself, contact your dealer or an Authorised Service Centre. plate is on the front frame of the appliance cavity. Do not remove the rating plate from the appliance cavity. The necessary data for the service centre is on the rating plate. The rating We recommend that you write the data here: Model (MOD.) ......................................... Product number (PNC) ......................................... Serial number (S.N.
www.electrolux.com Natural Gas: G20 (2H) 20 mbar 14.4 Bypass diameters BURNER Ø BYPASS 1/100 mm Auxiliary 29 / 30 Semi-rapid 32 Rapid 42 Oven 50 Grill 59 14.5 Gas burners for NATURAL GAS G20 20 mbar BURNER NORMAL POW‐ ER kW REDUCED POWER kW INJECTOR MARK 1/100 mm Rapid 3.0 0.75 119 Semi-rapid 2.0 0.45 96 Auxiliary 1.0 0.35 70 Oven 2.25 1.0 108 Grill 2.0 1.5 108 14.
ENGLISH 25 The gas supply ramp is on the rear side of the control panel. WARNING! Before you connect the gas, disconnect the appliance from the electricity supply or switch off the fuse in the fuse box. Close the primary valve of the gas supply. 14.9 Adjustment to different types of gas 14.8 Flexible nonmetal pipes connection If you have an easy access to the connection, you can use a flexible pipe. The flexible pipe must be tightly attached by clamps.
www.electrolux.com A B C pressure, install an applicable pressure adjuster on the gas supply pipe. 14.11 Adjusting the minimum gas level on the hob burner A. Gas connection point (only one point is applicable for the appliance) B. Natural Gas pipe holder C. LPG pipe holder 1. Disconnect the appliance from the electricity. 2. Remove the knob for the hob. If there is no access to the bypass screw dismount the control panel before adjustment start. 3.
ENGLISH 27 14.12 Oven injector replacement 1. Remove the bottom plate of the oven cavity to get access to the oven burner . Assemble the burner in a revers sequence. Replace the gas type sticker near the gas supply ramp with the one related to the new gas type. 2. Carefully remove from the burner the thermocouple A. Next remove the spark plug B. A B 14.13 Adjusting the minimum gas level on the oven burner 1. Disconnect the appliance from the electricity. 2. Remove the knob for the oven functions.
www.electrolux.com 2. Put the knob back. 3. Connect the appliance to the electricity. A Changing from liquid gas to natural gas 1. Unscrew approximately one turn the bypass screw position A. 2. Put the knob for the oven functions back. 3. Connect the appliance to the electricity. WARNING! Put the mains plug into the mains socket only if all parts are back into their initial position. There is a risk of injury. 4. Light the burner. Refer to "Oven - Daily use" chapter. 5.
ENGLISH 29 3. If the floor is not equally flat, use the adjustable feet on the bottom of the appliance to set a stable position for the appliance. 2. Put the appliance on the sidewall on a clean and smooth surface. Place each foot into a separate hole, in the plinth, and rotate it counterclockwise. To install all the accessories, do the first step in an opposite sequence. 14.
www.electrolux.com 16. ENVIRONMENT CONCERNS Please recycle all materials marked with the symbol . Dispose of all packaging materials appropriately and help to protect the environment, and future generations. Do not dispose of electrical equipment marked with the symbol * along with the general house hold waste. Dispose all electrical goods via applicable local authority collections, or at local authority or, commercial recycling centres.
ENGLISH 31
867330006-A-102016 www.electrolux.