
User manual
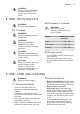


CAUTION!
Do not put the meat on the
highest shelf level. There is
a risk of fire.
CAUTION!
Make sure to turn the knob
as far as it goes. Avoid the
intermediary position
between Off and Grill. On
the intermediary positions
the spark generator can
remain active.
1. Open the oven door.
2. For manual ignition hold a flame near
the grill burner holes. Push and turn
the gas grill control knob to the flame
position. Hold the knob pushed
down.
3. For ignition on spark generator
button push and hold the spark
generator button. Push and turn the
gas grill control knob to the flame
position. Hold the knob pushed.
4. Release the spark generator button
when burner lights.
5. Hold the knob pushed for
approximately 15 seconds.
6. Release the oven control knob.
7. If the grill does not come on or if it
accidentally goes out release the
oven control knob and turn it to the
Off position. Open the oven door.
After one minute, try to light the grill
again.
8. Preheat the grill for 5 to 10 minutes.
9. Put the oven shelf with the meat on
shelf position 3.
10. Put a baking tray or roasting pan
below, on shelf position 2, to collect
the juices.
If there is temporarily no power supply
open the oven door hold a flame near the
grill burner holes and turn the gas grill
control knob to the flame position.
8.7 Turning off the grill burner
To put out the flame, turn the knob to the
off position .
9. OVEN - CLOCK FUNCTIONS
9.1 Minute Minder
This function has no effect
on the operation of the
appliance.
Turn the knob for the timer as far as it
goes, then turn it to necessary time
period.
After the time period is completed, an
acoustic signal sounds.
10. OVEN - USING THE ACCESSORIES
WARNING!
Refer to Safety chapters.
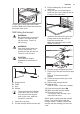
10.1 Inserting the accessories
Wire shelf:
Put the shelf on the correct shelf
position. Make sure it does not touch the
back wall of the oven.
Tray:
Do not push the baking tray
all the way to the back wall
of the cavity. This prevents
the heat from circulating
around the tray. The food
may be burnt, especially in
the rear part of the tray.
www.electrolux.com14