EKG613A1 EN Cooker User Manual
www.electrolux.com CONTENTS 1. SAFETY INFORMATION....................................................................................3 2. SAFETY INSTRUCTIONS..................................................................................4 3. COOKER SPECIFICATION................................................................................7 4. GENERAL OVERVIEW...................................................................................... 9 5. COOKING SURFACE LAYOUT.............................
ENGLISH 3 Subject to change without notice. 1. SAFETY INFORMATION Before the installation and use of the appliance, carefully read the supplied instructions. The manufacturer is not responsible if an incorrect installation and use causes injuries and damages. Always keep the instructions with the appliance for future reference. 1.1 Children and vulnerable people safety WARNING! Risk of suffocation, injury or permanent disability.
www.electrolux.com • • • • • • • • • • Never try to extinguish a fire with water, but switch off the appliance and then cover flame e.g. with a lid or a fire blanket. Do not store items on the cooking surfaces. Do not use a steam cleaner to clean the appliance. Metallic objects such as knives, forks, spoons and lids should not be placed on the hob surface since they can get hot. Remove any spillage from the lid before opening. Let the hob surface cool down before closing the lid.
ENGLISH • • • • Parts of the appliance carry current. Close the appliance with furniture to prevent touching the dangerous parts. The sides of the appliance must stay adjacent to appliances or to units with the same height. Do not install the appliance on a platform. Do not install the appliance adjacent to a door or under a window. This prevents hot cookware to fall from the appliance when the door or the window is opened. • 2.3 Gas connection • • 2.
www.electrolux.com • • • • • • Fats and oil when heated can release flammable vapours. Keep flames or heated objects away from fats and oils when you cook with them. The vapours that very hot oil releases can cause spontaneous combustion. Used oil, that can contain food remnants, can cause fire at a lower temperature than oil used for the first time. Do not put flammable products or items that are wet with flammable products in, near or on the appliance.
ENGLISH • • • cleaning pads, solvents or metal objects. If you use an oven spray, obey the safety instructions on the packaging. Do not clean the catalytic enamel (if applicable) with any kind of detergent. Do not clean the burners in the dishwasher. • • 2.8 Gas Grill WARNING! Risk of fire, explosion and burns. 2.6 Lid • • • • • • Do not change the specification of the lid. Clean the lid regularly. Do not open the lid, when there are spills on the surface.
Initial gas set‐ tings Natural gas X X LPG EKG613A1OX 943006127 Model denomination and PNC number EKG613A1OX 943006126 www.electrolux.
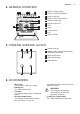
ENGLISH 4. GENERAL OVERVIEW 1 2 3 4 5 6 11 7 8 5 4 3 2 1 9 10 1 2 3 4 5 6 7 8 9 10 11 Button for the turnspit Knob for the Minute Minder Knob for the grill Knob for the oven functions Button for the lamp Knobs for the hob Grill Lamp Turnspit hole Fan Shelf positions 5. COOKING SURFACE LAYOUT 1 2 5 3 1 Auxiliary burner 2 Steam outlet - number and position depend on the model Semi-rapid burner 3 Semi-rapid burner 4 5 Rapid burner 4 6.
www.electrolux.com 7. BEFORE FIRST USE WARNING! Refer to Safety chapters. 1. Set the maximum temperature. 2. Let the appliance operate for approximately 1 hour. 7.1 Initial Cleaning Remove all accessories from the appliance. Refer to "Care and cleaning" chapter. Clean the appliance before first use. Put the accessories back to their initial position. WARNING! Accessories can become hotter than usual. The appliance can emit an odour and smoke. This is normal. Make sure that the airflow is sufficient.
ENGLISH A. B. C. D. If the burner accidentally goes out, turn the knob to the off position and try to light the burner again after minimum 1 minute. 11 Burner cap Burner crown Ignition candle (if applicable) Thermocouple (if applicable) 8.3 Turning the burner off 8.2 Burner overview To put the flame out, turn the knob to the off position . WARNING! Always turn the flame down or switch it off before you remove the pans from the burner. A B C D 9.
www.electrolux.com 10. HOB - CARE AND CLEANING clean to prevent difficult lighting and check that the burner crown holes are not obstructed. WARNING! Refer to Safety chapters. 10.1 General information • • • • • 10.4 Pan supports Clean the hob after each use. Always use cookware with clean bottom. Scratches or dark stains on the surface have no effect on how the hob operates. Use a special cleaner applicable for the surface of the hob.
ENGLISH Oven function 1-8 1-8 13 Application Heat settings Range of temperature levels adjustment for the oven.1) Grilling To grill flat food in the middle of the grill. To make toast. Oven fan To thaw frozen food. To use the fan in combination with the gas oven burner ignite the gas oven and turn the knob for the grill clockwise to activate the fan. Oven lamp To illuminate the oven interior. To use this function, press the button for the lamp. Turnspit To spit roasting meat.
www.electrolux.com 11.6 Using the grill CAUTION! Always keep the appliance door closed when the grill operates. Do not put the meat directly on the tray or pan. 3. At the same time push the knob for the oven functions and turn it counterclockwise to the maximum gas flow position. 4. When the flame comes on, keep the knob for the oven functions pushed on the maximum gas flow position for 15 seconds or less to let the thermocouple warm up.
ENGLISH 12. OVEN - CLOCK FUNCTIONS 12.1 Minute Minder This function has no effect on the operation of the appliance. Turn the knob for the timer as far as it goes, then turn it to necessary time period. After the time period is completed, an acoustic signal sounds. 13. OVEN - USING THE ACCESSORIES WARNING! Refer to Safety chapters. 13.2 Using the turnspit WARNING! Be careful when you use the turnspit. The forks and the spit are sharp. There is a risk of injury. 13.
www.electrolux.com The support hook is installed in the top of the oven cavity. You can leave the support hook in the oven, when the turnspit is not active. 1. Open the oven door. 2. Put the turnspit handle into the spit. 3. Put the baking tray on the lowest shelf level. 4. Snap out one end of the support hook from the oven ceiling A and let it hang on the other end. A 6. Use the screws to tighten the forks. 7. Put the tip of the spit into the turnspit hole. Refer to "Product description" chapter. 8.
ENGLISH • • • environment and keep the food soft inside and crusty outside. It decreases the cooking time and energy consumption to a minimum. Moisture can condense in the appliance or on the door glass panels. This is normal. Always stand back from the appliance when you open the appliance door while cooking. To decrease the condensation, operate the appliance for 10 minutes before cooking. Clean the moisture after each use of the appliance.
www.electrolux.com Food Quantity (kg) Thermostat position Time (min) Shelf position Potato gratin 1.5 - 2.5 4 33 - 40 2 Macaroni oven 1.5 - 2.5 4 45 - 50 2 Kebab Hala 1.5 - 2.5 5 35 - 40 2 1) 1) 1) Preheat the oven for 10 minutes. Meat & Poultry Food Quantity (kg) Thermostat position Time (min) Shelf posi‐ tion Sheep 1.5 - 2.0 6 90 - 120 2 Chicken 1.0 - 1.8 8 80 - 90 2 Duck 1.0 - 1.8 8 80 - 90 2 Goose 2.5 - 3.0 8 80 - 90 2 Rabbit 1.0 - 1.
ENGLISH Cakes Food Quantity (kg) Thermostat position Time (min) Shelf posi‐ tion Flat cake 0.6 - 1.0 4 25 - 35 2 Sponge cake 1.0 - 1.5 3 60 - 85 2 Feter Mshalted 1.2 - 1.5 5 40 - 45 1 Salty cake 1.0 - 1.2 5 50 - 60 2 Yeast cake 1.0 - 1.5 5 45 - 50 2 1) 1) 1) 1) 1) Preheat the oven for 10 minutes. Grilling Food Quantity (kg) Grill position Time (min) Shelf posi‐ tion Sheep chops1) 0.7 - 1.2 half 20 - 25 3 Ribs 1.0 - 1.2 half 45 - 60 3 Burgers 2.0 - 2.5 max.
www.electrolux.com 15. OVEN - CARE AND CLEANING WARNING! Refer to Safety chapters. 15.1 Notes on cleaning • • • • • • Clean the front of the appliance with a soft cloth with warm water and a cleaning agent. To clean metal surfaces, use a usual cleaning agent. Clean the appliance interior after each use. Fat accumulation or other food remains may result in a fire. Clean stubborn dirt with a special oven cleaner. Clean all accessories after each use and let them dry.
ENGLISH 21 4. Put the door on a soft cloth on a stable surface. 5. Use a screwdriver to remove 2 screws from bottom edge of door. 1 1 2. Lift and turn the levers on the two hinges. 6. Use a spatula made of wood or plastic or equivalent to open the inner door. Hold the outer door, and push the inner door against the top edge of the door. Lift the inner door. 3 2 2 3. Close the oven door to the first opening position (halfway). Then pull forward and remove the door from its seat. 7.
www.electrolux.com WARNING! Danger of electrocution! Disconnect the fuse before you replace the lamp. The lamp and the lamp glass cover can be hot. 4 4 6 1. Deactivate the appliance. 2. Remove the fuses from the fuse box or deactivate the circuit breaker. 5 5 The back lamp 15.5 Replacing the lamp Put a cloth on the bottom of the interior of the appliance. It prevents damage to the lamp glass cover and the cavity. 1. Turn the lamp glass cover counterclockwise to remove it. 2.
ENGLISH 23 Problem Possible cause Remedy The burners do not work. There is no gas supply. Check the gas connection. The appliance makes noises. Some metal parts of the appliance expand and con‐ tract when they heat up or cool down. The noises are normal. The flame colour is orange or yellow. The flame can look orange or yellow in some areas of the burner. This is normal. The lamp does not oper‐ ate. The lamp is defective. Replace the lamp.
www.electrolux.com Keep a distance of about 1 cm between the appliance and the back wall to make sure that the lid opens. For minimal distances for fitting check the table. Dimension mm B 650 C 150 D 20 17.2 Technical data Appliance class 1 Dimension mm Height 850 - 870 Width 600 Depth 600 B C A D D Minimum distances Dimension mm A 400 17.3 Other technical data Appliance category: II2H3B/P LPG: G30 (3B/P) 28-30 mbar Natural Gas: G20 (2H) 20 mbar 17.
ENGLISH BURNER NORMAL POW‐ ER kW Semi-rapid 2.0 0.45 96 Auxiliary 1.0 0.35 70 Oven 2.25 1.0 108 Grill 2.0 1.5 108 25 REDUCED POWER kW INJECTOR MARK 1/100 mm 17.6 Gas burners for LPG G30 28-30 mbar BURNER NORMAL POW‐ ER kW REDUCED POWER kW INJECTOR MARK 1/100 mm Rapid 3.0 0.72 88 Semi-rapid 2.0 0.43 71 Auxiliary 1.0 0.35 50 Oven 2.25 1.0 71 Grill 2.0 1.5 71 17.7 Gas connection The gas pipe in the appliance has two endings.
www.electrolux.com If one or more defects are visible, do not repair the pipe, but replace it. WARNING! When installation is complete, make sure that the seal of each pipe fitting does not leak. To check the seal use a soap solution, not a flame. The appliance is set to default gas. To change the setting choose a pipe holder from the list. Always use the gasket sealing. A B C The gas supply ramp is on the rear side of the control panel.
ENGLISH You can find this plate in the bag supplied with the appliance. If the supply gas pressure is not constant or it is different from the necessary pressure, install an applicable pressure adjuster on the gas supply pipe. 17.11 Adjusting the minimum gas level on the hob burner 1. Disconnect the appliance from the electricity. 2. Remove the knob for the hob. If there is no access to the bypass screw dismount the control panel before adjustment start. 3.
www.electrolux.com A 1 2 4. Release the burner injector with a 7 mm socket spanner and replace it with a right one. Changing from natural gas to liquid gas 1. Fully tighten the bypass screw. 2. Put the knob back. 3. Connect the appliance to the electricity. Changing from liquid gas to natural gas Assemble the burner in a revers sequence. Replace the gas type sticker near the gas supply ramp with the one related to the new gas type. 17.13 Adjusting the minimum gas level on the oven burner 1.
ENGLISH Refer to "Oven - Daily use" chapter. 5. Turn the knob for the oven functions on the minimum position. 6. Remove the knob for the oven functions again. 7. Screw on slowly the bypass screw till the flame becomes minimum and stable. 8. Put the knob for the oven functions back. 9. Set the maximum gas flow position on the knob for the oven functions and let the oven heat for at least 10 minutes. 10. Quickly turn the knob for the oven functions from maximum to the minimum gas flow position.
www.electrolux.com To install all the accessories, do the first step in an opposite sequence. 17.16 Electrical installation WARNING! The manufacturer is not responsible if you do not follow the safety precautions from Safety chapters. B This appliance is supplied with a main plug and a main cable. 3. If the floor is not equally flat, use the adjustable feet on the bottom of the appliance to set a stable position for the appliance. 18.
ENGLISH marked with the symbol with the household waste. Return the product to * your local recycling facility or contact your municipal office.
867306844-D-422015 www.electrolux.