EKI64500OX EN TH Cooker เตา User Manual คูมือการใชงาน 2 35
www.electrolux.com CONTENTS 1. SAFETY INFORMATION....................................................................................3 2. SAFETY INSTRUCTIONS..................................................................................5 3. PRODUCT DESCRIPTION................................................................................ 8 4. BEFORE FIRST USE......................................................................................... 9 5. HOB - DAILY USE.................................
ENGLISH 1. 3 SAFETY INFORMATION Before the installation and use of the appliance, carefully read the supplied instructions. The manufacturer is not responsible for any injuries or damages that are the result of incorrect installation or usage. Always keep the instructions in a safe and accessible location for future reference. 1.1 Children and vulnerable people safety WARNING! Risk of suffocation, injury or permanent disability.
www.electrolux.com • • • • • • • • • • • • • • • This appliance is not intended to be used on a ships, boats or vessels. Do not install the appliance behind a decorative door in order to avoid overheating. Do not install the appliance on a platform. Do not operate the appliance by means of an external timer or separate remote-control system. WARNING: Unattended cooking on a hob with fat or oil can be dangerous and may result in fire.
ENGLISH • • • • • 5 Before maintenance cut the power supply. Ensure that the appliance is switched off before replacing the lamp to avoid the possibility of electric shock. If the mains power supply cable is damaged, it must be replaced by the manufacturer, its Authorised Service Centre or similarly qualified persons to avoid an electrical hazard. The means for disconnection must be incorporated in the fixed wiring in accordance with the wiring rules.
www.electrolux.com • • • • • • • • Do not let mains cables touch or come near the appliance door, especially when the door is hot. The shock protection of live and insulated parts must be fastened in such a way that it cannot be removed without tools. Connect the mains plug to the mains socket only at the end of the installation. Make sure that there is access to the mains plug after the installation. If the mains socket is loose, do not connect the mains plug.
ENGLISH • • • • Do not activate the cooking zones with empty cookware or without cookware. Do not put aluminium foil on the appliance or directly on the bottom of the appliance. Cookware made of cast iron, aluminium or with a damaged bottom can cause scratches. Always lift these objects up when you have to move them on the cooking surface. This appliance is for cooking purposes only. It must not be used for other purposes, for example room heating. 2.
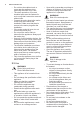
www.electrolux.com 3. PRODUCT DESCRIPTION 3.1 General overview 1 2 3 4 5 4 8 6 3 2 7 1 2 3 4 5 6 7 8 Temperature indicator / symbol Knob for the temperature Electronic programmer Knob for the oven functions Heating element Lamp Fan Shelf positions 1 3.2 Cooking surface layout 1 2 140 mm 180 mm 210 mm 140 mm 5 4 4 3 3.
ENGLISH 9 4. BEFORE FIRST USE Press again and again until the indicator for the Time of Day function flashes. To set a new time, refer to "Setting the time". WARNING! Refer to Safety chapters. 4.1 Initial Cleaning Remove all accessories from the appliance. 4.4 Preheating Preheat the empty appliance to burn off the remaining grease. Refer to "Care and cleaning" chapter. Clean the appliance and the accessories before first use. Put the accessories back to their initial position. 4.
www.electrolux.com Use the sensor fields to operate the appliance. The displays, indicators and sounds tell which functions operate. Sensor field Function Comment 1 ON / OFF To activate and deactivate the hob. 2 STOP+GO To activate and deactivate the function. 3 - To select the cooking zone. 4 - Heat setting display To show the heat setting. 5 / - To set a heat setting. 5.2 Heat setting displays Display Description The cooking zone is deactivated. - The cooking zone operates.
ENGLISH Heat setting The hob deacti‐ vates after 1-2 6 hours 3-4 5 hours 5 4 hours 6-9 1.5 hour To activate the function: touch comes on. 5.9 Power management function • To set the cooking zone touch the sensor related to this zone. The display highlights the heat setting indication ( ). 5.6 The heat setting Set the cooking zone. • • • Touch to increase the heat setting. Touch to decrease the heat setting. Touch and at the same time to deactivate the cooking zone. • 5.
www.electrolux.com 6.1 Cookware For induction cooking zones a strong electro-magnetic field creates the heat in the cookware very quickly. Use the induction cooking zones with correct cookware. Cooking zone Minimum cookware di‐ ameter (mm) Right rear 100 Right front 90 Left front 110 Cookware material 6.3 The noises during operation • If you can hear: correct: cast iron, steel, enamelled steel, stainless steel, the bottom made of multi-layer (with correct mark from a manufacturer).
ENGLISH 13 Heat setting Use to: Time (min) 1 Keep cooked food warm. as nec‐ Put a lid on the cookware. essary 1-2 Hollandaise sauce, melt: but‐ 5 - 25 ter, chocolate, gelatine. Mix from time to time. 1-2 Solidify: fluffy omelettes, baked eggs. 10 - 40 Cook with a lid on. 2-3 Simmer rice and milkbased dishes, heating up readycooked meals. 25 - 50 Add the minimum twice as much liquid as rice, mix milk dishes part procedure through. 3-4 Steam vegetables, fish, meat.
www.electrolux.com • Remove shiny metallic discoloration: use a solution of water with vinegar and clean the glass surface with a moist cloth. 8. OVEN - DAILY USE WARNING! Refer to Safety chapters. 8.1 Activating and deactivating the appliance It depends on the model if your appliance has lamps, knob symbols or indicators: • The lamp turns on when the appliance operates. • The symbol shows whether the knob controls one of the cooking zones, the oven functions or the temperature.
ENGLISH Sym‐ bol 15 Oven functions Application Fast Grilling To grill flat food in large quantities and to toast bread. Turbo Grilling To roast larger meat joints or poultry with bones on one shelf position. Also to make gratins and to brown. Pizza Setting To bake food on one shelf position for a more in‐ tensive browning and a crispy bottom. Set the temperature 20 - 40 °C lower than for Convention‐ al Cooking. Light Cooking To bake in tins and dry on one shelf position at a low temperature. 9.
www.electrolux.com Clock function Application TIME DELAY To combine DURATION and END function. MINUTE MIND‐ ER To set countdown time. This function has no effect on the operation of the appliance. You can set the MINUTE MINDER at any time, also when the appliance is off. 9.4 Setting the DURATION 4. Press . 1. Set an oven function and temperature. 5. Press END. or again and again until 2. Press starts to flash. 6. Press to confirm.
ENGLISH 17 10. OVEN - USING THE ACCESSORIES WARNING! Refer to Safety chapters. 10.1 Inserting the accessories Wire shelf: The wire shelf has a special shape in the rear which help with the heat circulation. Put the shelf on the correct shelf position. Make sure it does not touch the back wall of the oven. 11. OVEN - HINTS AND TIPS baking results and cause damage to the enamel. WARNING! Refer to Safety chapters. The temperature and baking times in the tables are guidelines only.
www.electrolux.com 11.4 Cooking meat and fish 11.5 Cooking times • Cooking times depend on the type of food, its consistency, and volume. • • Use a deep pan for very fatty food to prevent the oven from stains that can be permanent. Leave the meat for approximately 15 minutes before carving so that the juice does not seep out. To prevent too much smoke in the oven during roasting, add some water into the deep pan. To prevent the smoke condensation, add water each time after it dries up.
ENGLISH Food Quantity (g) Tempera‐ ture (°C) Time (min) Cheese cake 2600 170 - 190 60 - 70 2 baking tray Swiss apple flan 5) 1900 200 - 220 30 - 40 1 baking tray Christmas cake 5) 2400 170 - 180 55 - 65 6) 2 baking tray Quiche Lor‐ raine 5) 1000 220 - 230 40 - 50 1 1 round tray (di‐ ameter: 26 cm) Peasant bread 7) 750 + 750 180 - 200 60 - 70 1 2 aluminized trays (length: 20 cm) Romanian 600 + 600 sponge cake 1) 160 - 170 40 - 50 2 2 aluminized trays (length: 25 cm) on
www.electrolux.com 11.
ENGLISH 21 Food Quantity (g) Tempera‐ ture (°C) Time (min) Christmas cake 1) 2400 150 - 160 35 - 40 2) 2 baking tray Quiche Lor‐ raine 3) 1000 190 - 210 30 - 40 1 1 round tray (diameter: 26 cm) Peasant bread 4) 750 + 750 160 - 170 40 - 50 1 baking tray Romanian 600 + 600 sponge cake 3) 155 - 165 40 - 50 2 2 aluminized trays (length: 25 cm) on the same shelf position Romanian sponge cake traditional 600 + 600 150 - 160 30 - 40 2 2 aluminized trays (length: 25 cm) on the same
www.electrolux.com 11.
ENGLISH 23 Food Quantity (g) Tempera‐ ture (°C) Time (min) Quiche Lor‐ raine 3) 1000 210 - 230 35 - 45 2 1 round tray (diameter: 26 cm) Peasant bread 5) 750 + 750 180 - 190 50 - 60 3 baking tray Romanian 600 + 600 sponge cake 1) 150 - 170 40 - 50 2 2 aluminized trays (length: 25 cm) on the same shelf position Romanian sponge cake traditional 600 + 600 160 - 170 30 - 40 2 2 aluminized trays (length: 25 cm) on the same shelf position Yeast buns 1) 800 190 15 3 baking tray Ye
www.electrolux.com Food Quantity (g) Tempera‐ ture (°C) Time (min) Beef steaks 2) 1000 250 15 + 15 Half chicken 1200 230 30 + 30 Pork roast cut‐ let 500 230 25 + 25 Shelf Accessories position 3 wire shelf 1 baking tray 2 wire shelf 1 baking tray 3 wire shelf 1 baking tray 1) Preheat the oven for 4 minutes. 2) Preheat the oven for 10 minutes. 11.
ENGLISH 25 11.
www.electrolux.com CAUTION! Do not use the appliance without the glass panels. 1. Open the door fully and hold the two door hinges. 4. Put the door on a soft cloth on a stable surface. 2. Lift and turn the levers on the two hinges. 5. Release the locking system to remove the glass panels. 3. Close the oven door halfway to the first opening position. Then pull forward and remove the door from its seat. 6. Turn the two fasteners by 90° and remove them from their seats.
ENGLISH 7. First lift carefully and then remove the glass panels one by one. Start from the top panel. 1 2 8. Clean the glass panels with water and soap. Dry the glass panels carefully. When the cleaning is completed, install the glass panels and the oven door. Do the above steps in the opposite sequence. Make sure that you put the glass panels (A and B) back in the correct sequence. A 27 Make sure that you install the middle panel of glass in the seats correctly. B 12.
www.electrolux.com 13.1 What to do if... Problem Possible cause Remedy You cannot activate the appliance. The appliance is not con‐ Check if the appliance is nected to an electrical sup‐ correctly connected to the ply or it is connected incor‐ electrical supply. rectly. You cannot activate or op‐ erate the hob. The oven does not heat up. The fuse is blown. Make sure that the fuse is the cause of the malfunc‐ tion. If the fuse is blown again and again, contact a qualified electrician.
ENGLISH Problem Possible cause 29 Remedy comes on. Automatic Switch Off oper‐ Deactivate the hob and ac‐ ates. tivate it again. comes on. There is no cookware on the zone. Put cookware on the zone. comes on. The cookware is incorrect. Use the correct cookware. Refer to “Hints and tips” chapter. comes on. The diameter of the bottom Use cookware with correct of the cookware is too dimensions. small for the zone. and a number come on. There is an error in the hob.
www.electrolux.com Problem Possible cause Remedy It takes too long to cook The temperature is too low Adjust the temperature if the dishes or they cook too or too high. necessary. Follow the ad‐ quickly. vice in the user manual. The display shows an error There is an electrical fault. code that is not in this ta‐ ble. Deactivate the oven with the house fuse or the safe‐ ty switch in the fuse box and activate it again.
ENGLISH Minimum distances Dimension mm A 400 B 650 C 150 31 You must install the anti-tilt protection. If you do not install it, the appliance can tilt. Your appliance has the symbol shown on the picture (if applicable) to remind you about the installation of the anti-tilt protection. 14.2 Technical data Voltage 220 - 240 V Frequency 50 / 60 Hz Appliance class 1 Dimension mm Height 858 Width 600 Depth 600 14.
www.electrolux.com If you changed the dimensions of the cooker, you must align the non-tip device correctly. CAUTION! If the space between the bench cupboards is larger than the width of the appliance, you must adjust the side measurement to the centre of the appliance. Applicable types of cables for different phases: Phase Min. size cable 1 3x10.0 mm² 3 with neutral 5x1.5 mm² WARNING! The power cable must not touch the part of the appliance shaded in the illustration. 14.
ENGLISH Diameter of circular cook‐ ing zones (Ø) Left rear Right rear Right front Left front 14.0 cm 18.0 cm 14.0 cm 21.0 cm Energy con‐ sumption per cooking zone (EC electric cooking) Left rear Right rear Right front Left front 173.5 Wh/kg 169.8 Wh/kg 173.5 Wh/kg 163.7 Wh/kg Energy consumption of the hob (EC electric hob) EN 60350-2 - Household electric cooking appliances - Part 2: Hobs - Methods for measuring performance. • 15.
www.electrolux.com 15.4 Oven - Energy saving The appliance contains features which help you save energy during everyday cooking. General hints Make sure that the oven door is closed properly when the appliance operates and keep it closed as much as possible during the cooking. Use metal dishes to improve energy saving. When possible, do not preheat the oven before you put the food inside. to minimum 3 - 10 minutes before the end of the cooking time, depending on the duration of the cooking.
สารบัญ 1. ขอมูลดานความปลอดภัย...................................................................................... 36 2. คำแนะนำดานความปลอดภัย.................................................................................38 3. รายละเอียดผลิตภัณฑ.......................................................................................... 40 4. กอนการใชงานครั้งแรก........................................................................................41 5. เตาไฟฟา - การใชงานตามปกติ.................
1. www.electrolux.com ขอมูลดานความปลอดภัย กอนติดตั้งและใชงานเครื่อง กรุณาอานคำแนะนำที่จัดมาใหโดย ละเอียดกอนในเบื้องตน ผูผลิตจะไมรับผิดชอบใด ๆ ตอการบาด เจ็บหรือความเสียหายที่เปนผลมาจากการติดตั้งหรือใชงานที่ไม ถูกตอง เก็บชุดคำแนะนำเพื่อความปลอดภัยไวในที่ที่เรียกคน เพื่ออางอิงไดอยางสะดวก 1.
• • • • • • • • • • • • • • • • คำเตือน: การปรุงอาหารบนเตาไฟฟาที่มีไขมันหรือน้ำมันโดย ไมมีคนดูแลอาจเปนอันตรายและทำใหเกิดเพลิงไหมได อยาดับเพลิงดวยน้ำ ใหปดเครื่องจากนั้นปดคลุมเปลวไฟ เชน ใชประตูหรือผาหมกันไฟ คำเตือน: ควรมีการกำกับดูแลระหวางปรุงอาหารอยางตอ เนื่อง การปรุงอาหารระยะเวลาสั้น ๆ จะตองมีผูกำกับดูแล อยางตอเนื่อง คำเตือน: อันตรายตอการเกิดไฟไหม: อยาจัดเก็บขาวของไว บนพื้นผิวสำหรับปรุงอาหาร อยาใชเครื่องพนไอน้ำรอนเพื่อทำความสะอาดเครื่องใช อยาใชน้ำยาที่มีฤทธิ์กัดกร
www.electrolux.com 2. คำแนะนำดานความปลอดภัย 2.
• • • • น้ำมันที่ใชแลวอาจมีเศษอาหารตกคาง และทำใหเกิดเพลิงไหมที่อุณหภูมิต่ำกวา น้ำมันที่ใชเปนครั้งแรก อยาใสของไวไฟที่เปยกสารไวไฟภายใน ใกลหรือบนตัวเครื่อง อยาใหมีประกายไฟหรือเปลวไฟใกลกับ เครื่องขณะเปดประตู เปดประตูเครื่องดวยความระมัดระวัง การ ใชแอลกอฮอลกับเครื่องอาจทำให แอลกอฮอลผสมกับอากาศ คำเตือน ความเสียหายที่อาจเกิดขึ้นกับ เครื่อง • • • • • • • • • • เพื่อปองกันความเสียหายหรือการเปลี่ยนสี ของอีนาเมล: – อยาวางภาชนะหรือวัตถุอื่น ๆ ใน เครื่องที่ดานลางโดยตรง – อยาใสน้ำโดยตร
www.electrolux.com 3. รายละเอียดผลิตภัณฑ 3.1 ภาพรวมเบื้องตน 1 2 3 4 5 4 8 6 3 2 7 1 2 3 4 5 6 7 8 ไฟ/สัญลักษณแจงอุณหภูมิ แปนปรับอุณหภูมิ โปรแกรมอิเล็กทรอนิกส แปนฟงกชั่นของเตาอบ สวนทำความรอน หลอดไฟ พัดลม ตำแหนงชั้นวาง 1 3.2 แผนผังพื้นผิวการปรุงสุก 1 2 140 mm 180 mm 210 mm 140 mm 5 4 4 3 3.
4. กอนการใชงานครั้งแรก 4.3 การปรับเวลา คำเตือน ดูรายละเอียดจากหัวขอ ความ ปลอดภัย คุณไมสามารถปรับเวลาระหวาง วันไดหากฟงกชั่น ระยะเวลา 4.1 การทำความสะอาดเบื้องตน หรือ สิ้นสุด นำสวนประกอบทั้งหมดออกจากเครื่อง ทำงานอยู กด อีกครั้งซ้ำ ๆ กันจนไฟสถานะ นาฬิกา ติดกะพริบ ตั้งเวลาใหมไดตามหัวขอ "การตั้งเวลา" ดูในหัวขอ "การดูแลและ ทำความสะอาด" ทำความสะอาดเครื่องและอุปกรณตาง ๆ กอน ใชงานเปนครั้งแรก ติดตั้งสวนประกอบตาง ๆ กลับเขาในตำแหนง เดิม 4.
www.electrolux.com พื้นที่‐ ฟงกชั่น เซ็นเซอร - เพื่อเลือกพื้นที่ปรุงสุก - คาความรอนจะปรากฏขึ้น เพื่อแสดงคาความรอน / - เพื่อตั้งคาความรอน 3 4 5 ความเห็น 5.2 คาความรอนจะปรากฏขึ้น จอแสดงผล รายละเอียด พื้นที่ปรุงสุกจะปดทำงาน พื้นที่ปรุงสุกจะทำงาน - STOP+GO ฟงกชั่นทำงาน ฟงกชั่นพลังงาน ทำงาน + ตัวเลข มีขอผิดพลาดเกิดขึ้น พื้นที่ปรุงสุกยังรอนอยู (ความรอนหลงเหลือ) ภาชนะที่ไมเหมาะสมหรือเล็กเกินไปบนพื้นที่ปรุงสุก ปดการทำงานอัตโนมัติ ฟงกชั่นทำงาน 5.
5.6 คาความรอน การปดฟงกชั่นการทำงาน: กดเลือก ความรอนกอนหนาจะติดสวาง เลือกโซนประกอบอาหาร กดเลือก เพื่อเพิ่มคาความรอน กดเลือก เพื่อลดคาความรอน กดเลือก และ พรอม ๆ กันเพื่อปดโซนประกอบอาหาร 5.9 ฟงกชั่น การจัดการพลังงาน • • • 5.
www.electrolux.com ประสิทธิภาพในการทำงานของพื้นที่ปรุงสุกจะ สัมพันธกับเสนผานศูนยกลางของภาชนะ ภาชนะที่เสนผานศูนยกลางเล็กกวาเกณฑขั้น ต่ำจะไดรับพลังงานเฉพาะจากสวนพื้นที่ปรุง สุกเทานั้น 6.2 เสนผานศูนยกลางขั้นต่ำของ ภาชนะ โซนประกอบอาหาร เสนผาน‐ ศูนยกลาง‐ ภาชนะขั้นต่ำ (มม.
คาความรอน ใชเพื่อ: เวลา (นาที) คำแนะนำ 7-8 ทอดวัตถุดิบจำนวนมาก แฮช‐ บราวน สเต็กเนื้อสันและสเต็ก 5 - 15 พลิกกลับดานเมื่อผานไปครึ่ง‐ หนึ่ง 9 ตมน้ำ ปรุงสุกพาสตา ฉาเนื้อ (กูลาช พอทโรสต) ทอดกรอบมันฝรั่ง ตมน้ำเปนจำนวนมาก ฟงกชั่นเพิ่มพลังงานเปดทำงาน 7. เตาไฟฟา - การดูแลและทำความสะอาด คำเตือน ดูรายละเอียดจากหัวขอ ความ ปลอดภัย 7.
www.electrolux.com 8.
9.2 ปุมสั่งการ ปุมสั่งการ ฟงกชั่น รายละเอียด MINUS (ลบ) ตั้งเวลา CLOCK (นาฬิกา) ตั้งคานาฬิกา PLUS (บวก) ตั้งเวลา 9.
www.electrolux.com 3. เมื่อเวลาที่ตั้งไวสิ้นสุดลง เสียงสัญญาณจะ ดังขึ้น กดปุมใด ๆ เพื่อหยุดเสียงเตือน 4. หมุนลูกบิดฟงกชั่นของเตาอบและลูกบิด อุณหภูมิไปที่ตำแหนงปด 2. กดคางที่ ฟงกชั่นนาฬิกาจะดับลงหลังผานไปครูหนึ่ง 9.8 การยกเลิกฟงกชั่นนาฬิกา 1. กดปุม ซ้ำกันไปเรื่อย ๆ จนกระทั่งไฟ สถานะฟงกชั่นเริ่มติดกะพริบ 10. เตาอบ - การใชอุปกรณเสริม คำเตือน ดูรายละเอียดจากหัวขอ ความ ปลอดภัย 10.
11.3 การอบเคก • • อยาเปดประตูเตาอบกอนพนกำหนดเวลา 3/4 ของโปรแกรมที่ตั้งไว หากใชถาดอบสองถาดพรอมกัน ใหใสถาด เปลาคั่นกลางไว 11.4 การปรุงสุกเนื้อและปลา • • • ใชถาดกนลึกสำหรับอาหารที่มีไขมันมาก เพื่อปองกันไมใหเกิดคราบถาวรที่เตา วางเนื้อทิ้งไวประมาณ 15 นาทีกอนตัดเพื่อ ไมใหน้ำเนื้อเล็ดรอดออกมา เติมน้ำในถาดกนลึกเพื่อปองกันไมใหมี ควันมากเกินไประหวางการยาง เติมน้ำทุก ครั้งที่น้ำแหงเพื่อปองกันการเกิดไอน้ำ เนื่องจากควัน 11.
www.electrolux.com อาหาร ปริมาณ (ก.) อุณหภูมิ (°C) เวลา (นาที) ตำแหน‐ อุปกรณเสริม งชั้นวาง ยีสตเคกยัดไส 5) 1200 170 - 180 25 - 35 2 ถาดอบ พิซซา 1000 200 - 220 25 - 35 2 ถาดอบ ชีสเคก 2600 170 - 190 60 - 70 2 ถาดอบ สวิสแอปเปลแฟ‐ ลน 5) 1900 200 - 220 30 - 40 1 ถาดอบ คริสตมาสเคก 5) 2400 170 - 180 55 - 65 6) 2 ถาดอบ คิชลอเรน 5) 1000 220 - 230 40 - 50 1 ถาดทรงกลม 1 ถาด (เสนผาน‐ ศูนยกลาง: 26 ซม.
11.7 อบแบบมีพัดลม อาหาร ปริมาณ (ก.) อุณหภูมิ (°C) เวลา (นาที) ตำแหน‐ งชั้นวาง อุปกรณเสริม ขนมอบทรงยาว 1) 250 145 25 3 ถาดอบ ขนมอบทรงยาว 1) 250 + 250 145 25 1+3 ถาดอบ เคกทรงแบน 1) 1000 150 30 2 ถาดอบ เคกทรงแบน 1) 1000 + 1000 155 40 1+3 ถาดอบ ยีสตเคกใส‐ แอปเปล 2000 170 - 180 40 - 50 3 ถาดอบ แอปเปลพาย 1200 + 1200 175 55 2 ถาดอะลูมิ‐ ไนซทรงกลม 2 ถาด (เสน‐ ผาน‐ ศูนยกลาง: 20 ซม.
www.electrolux.com อาหาร ปริมาณ (ก.) อุณหภูมิ (°C) เวลา (นาที) สวิสแอปเปลแฟ‐ ลน 3) 1900 180 - 200 30 - 40 2 ถาดอบ คริสตมาสเคก 1) 2400 150 - 160 35 - 40 2) 2 ถาดอบ คิชลอเรน 3) 1000 190 - 210 30 - 40 1 ถาดทรงกลม 1 ถาด (เสนผาน‐ ศูนยกลาง: 26 ซม.) พีซองตเบรด 4) 750 + 750 160 - 170 40 - 50 1 ถาดอบ สปอนจเคกแบบ‐ โรมาเนีย 3) 600 + 600 155 - 165 40 - 50 2 ถาดอะลูมิไนซ 2 ถาด (ยาว: 25 ซม.
11.8 อบลมรอน อาหาร ปริมาณ (ก.) อุณหภูมิ (°C) เวลา (นาที) ตำแหน‐ งชั้นวาง อุปกรณเสริม ขนมอบทรงยาว 1) 250 155 20 3 ถาดอบ ขนมอบทรงยาว 1) 250 + 250 150 20 1+3 ถาดอบ เคกทรงแบน 1) 1000 155 35 2 ถาดอบ เคกทรงแบน 1) 1000 + 1000 145 50 1+3 ถาดอบ ยีสตเคกใส‐ แอปเปล 1) 2000 170 - 180 40 - 50 3 ถาดอบ พายแอปเปล 1) 1200 + 1200 175 55 1 ถาดอะลูมิ‐ ไนซทรงกลม 2 ถาด (เสน‐ ผาน‐ ศูนยกลาง: 20 ซม.
www.electrolux.com อาหาร ปริมาณ (ก.) อุณหภูมิ (°C) เวลา (นาที) ตำแหน‐ งชั้นวาง อุปกรณเสริม คริสตมาสเคก 1) 2400 150 - 170 50 - 60 4) 3 ถาดอบ คิชลอเรน 3) 1000 210 - 230 35 - 45 2 ถาดทรงกลม 1 ถาด (เสน‐ ผาน‐ ศูนยกลาง: 26 ซม.) พีซองตเบรด 5) 750 + 750 180 - 190 50 - 60 3 ถาดอบ สปอนจเคกแบบ‐ โรมาเนีย 1) 600 + 600 150 - 170 40 - 50 2 ถาดอะลูมิไนซ 2 ถาด (ยาว: 25 ซม.
อาหาร ปริมาณ (ก.) อุณหภูมิ (°C) เวลา (นาที) สเต็กเนื้อ 2) 1000 250 15 + 15 ไกครึ่งตัว หมูอบหั่นชิ้น 1200 500 230 230 30 + 30 25 + 25 ตำแหน‐ งชั้นวาง อุปกรณเสริม 3 ตะแกรงชั้น‐ วาง 1 ถาดอบ 2 ตะแกรงชั้น‐ วาง 1 ถาดอบ 3 ตะแกรงชั้น‐ วาง 1 ถาดอบ 1) อุนเตาเปนเวลา 4 นาที 2) อุนเตาเปนเวลา 10 นาที 11.10 ปงยางเทอรโบ อาหาร ปริมาณ (ก.
www.electrolux.com 11.12 อบปริมาณนอย อาหาร ปริมาณ (ก.
ขอควรระวัง อยาใชเครื่องโดยไมมีแผง กระจก 1. เปดประตูใหสุดและจับที่บานพับทั้งสอง ดาน 4. วางประตูไวบนผานุมบนพื้นผิวที่มั่นคง 2. ยกและหมุนแปนที่บานพับทั้งสอง 5. ปลดล็อคเพื่อนำแผงกระจกออก 3. ปดประตูเตาอบไปยังตำแหนงเปดแรกครึ่ง ระยะ จากนั้นดึงไปดานหนาแลวนำประตู ออกจากฐานรอง 6. หมุนตัวยึดสองตัว 90° จากนั้นนำออกจาก ฐานรอง 90° 7.
www.electrolux.com 1 2 8. ทำความสะอาดแผงกระจกดวยน้ำและสบู เช็ดแหงแผงกระจกดวยความระมัดระวัง หลังจากทำความสะอาดเสร็จสิ้น ใหติดตั้งแผง กระจกและประตูเตาอบ ทำตามขั้นตอนขางตน โดยยอนลำดับ ใสแผงกระจก (A และ B) กลับเขาในลำดับที่ ถูกตอง A 12.4 การเปลี่ยนหลอดไฟ วางผาไวดานลางภายในเครื่อง ทั้งนี้เพื่อ ปองกันความเสียหายตอฝากระจกครอบหลอด ไฟและชองเปด คำเตือน อันตรายจากไฟฟาช็อต! ถอด ฟวสกอนเปลี่ยนหลอดไฟ หลอดไฟและฝาครอบกระจก หลอดไฟอาจรอนจัด B 1. ปดเครื่อง 2.
ปญหา สาเหตุที่เปนไปได วิธีแกไข คุณไมสามารถเปดใชงาน‐ เตาไฟฟาได เตาไมทำความรอน ฟวสขาด ตรวจสอบใหแนใจวาฟวสเปน‐ สาเหตุของปญหาในการ‐ ทำงานหรือไม หากฟวสขาด ใหติดตอชางไฟฟา หนาจอที่เตาอบ/เตาไฟฟา‐ มีขอผิดพลาดของระบบไฟฟา แสดงรหัสขอผิดพลาดซึ่งไมมี‐ อยูในตาราง ปดใชงานเครื่องโดยใชฟวส‐ ตัดในบานหรือสวิตชนิรภัยใน‐ กลองฟวสและเปดใชงานอีก‐ ครั้ง หากจอแสดงผลแสดงรหัสขอ‐ ผิดพลาดอีก ใหติดตอฝาย‐ บริการลูกคา คุณไมสามารถเปดใชงาน‐ เตาไฟฟาได ฟวสขาด เปดใชเตาไฟฟาอ
www.electrolux.
13.2 ขอมูลการใหบริการ หากไมสามารถแกไขปญหาไดเอง ใหติดตอ ตัวแทนจำหนายหรือศูนยบริการที่ไดรับ อนุญาต ขอมูลที่จำเปนสำหรับศูนยบริการมีแจงไวที่ แผนพิกัด แผนพิกัดอยูที่โครงดานหนาของ ชองเปดของเครื่อง อยานำแผนพิกัดทาง เทคนิคออกจากชองวางของเครื่อง แนะนำใหเขียนขอมูลไวที่นี่ รุน (MOD.) ......................................... หมายเลขผลิตภัณฑ (PNC) ......................................... ซีเรียลนัมเบอร (S.N.) ......................................... 14.
www.electrolux.com คุณจะตองติดตั้งชิ้นสวนปองกันการพลิกคว่ำ หากไมติดตั้ง เครื่องอาจพลิกคว่ำได ขอควรระวัง หากพื้นที่ระหวางตูใหญกวา ความกวางของเครื่อง ใหปรับ ระยะดานขางเพื่อใหเครื่องได ศูนยกลาง เครื่องจะมีสัญลักษณตามภาพ (แลวแตกรณี) เพื่อแจงเตือนใหติดตั้งชิ้นสวนปองกันการพลิก คว่ำ 14.
15. การประหยัดพลังงาน 15.1 ขอมูลเตาตามมาตรฐาน EU 66/2014 รหัสรุน EKI64500OX ประเภทเตา เตาดานในเตาแยกเดี่ยวแบบเคลื่อนยายได จำนวนพื้นที่‐ ปรุงอาหาร 4 เทคโนโลยี‐ ทำความรอน เตาแมเหล็ก เสนผาน‐ ศูนยกลางของ‐ พื้นที่ปรุง‐ อาหารทรงกลม (Ø) หลังซาย หลังขวา หนาขวา หนาซาย 14.0 cm 18.0 ซม. 14.0 cm 21.0 ซม. การสิ้นเปลือง‐ พลังงานตอ‐ พื้นที่ปรุงอาหาร (EC electric cooking) หลังซาย หลังขวา หนาขวา หนาซาย 173.5 Wh/กก. 169.8 Wh/กก. 173.5 Wh/กก. 163.7 Wh/กก.
www.electrolux.com จำนวนชองเปด 1 แหลงความรอน ไฟฟา ปริมาตร 54 l ประเภทเตาอบ เตาอบดานในเตาแยกเดี่ยวแบบ‐ เคลื่อนยายได มวล 46.0 กก. EN 60350-1 - Household electric cooking appliances - Part 1: เตาอบแกส เตาอบ เตา อบไอน้ำและเตายาง - วิธีการตรวจวัด ประสิทธิภาพ 15.
www.electrolux.
867330446-A-042017 www.electrolux.