user manual Cooker EKK511510
electrolux Electrolux. Thinking of you. Share more of our thinking at www.electrolux.
electrolux 3 • • • • • • • • • • approved service centre. This is to prevent the risks of structural damage or physical injury. The appliance must be earthed. Make sure that the electrical data on the rating plate agree with your domestic power supply. Information on the voltage is on the rating plate. You must have the correct isolation devices: line protecting cut-outs, fuses (screw type fuses removed from the holder), earth leakage trips and contactors.
electrolux • • • • • • • • • • • • • • aluminium) in, near or on the appliance. There is a risk of explosion or fire. Set the cooking zones to "off" after each use. Do not use the cooking zones with empty cookware or without cookware Do not let cookware boil dry. This can cause damage to the cookware and hob surface. If an object or cookware falls on the hob surface, the surface can be damaged. Do not put hot cookware near to the control panel because the heat can cause a damage to the appliance.
electrolux 5 Service centre • Only an approved engineer can repair or work on the appliance. Contact an approved service centre. • Use only original spare parts. – Disconnect the appliance from the power supply. – Cut off the mains cable and discard it. – Discard the door catch. This prevents children or small animals from being closed inside of the appliance. There is a risk of suffocation.
electrolux Warning! The storage drawer can become hot when the appliance operates. • Optional telescopic runners To put the shelves or trays on it. You can order them separately. BEFORE FIRST USE Warning! Refer to "Safety information" chapter. Caution! To open the oven door, always hold the handle in the centre. Initial Cleaning • Remove all parts from the appliance. • Clean the appliance before first use. Caution! Do not use abrasive cleaning agents! This can damage the surface.
electrolux 7 Important! You can light the burner without electrical device (e.g. when there is no electricity in the kitchen). To do so, put the flame near the burner, push the related control knob down and turn it counterclockwise to the maximum gas release position. If the burner accidentally goes out, turn the control knob to the off position and try to light the burner again after minimum 1 minute. after installation or a power cut. It is normal.
electrolux 2. Turn the temperature control knob to a temperature. The temperature indicator comes on while the temperature in the appliance increases. 3. To deactivate the appliance, turn the oven functions control knob and the temperature control knob to the Off position. Safety thermostat To prevent dangerous overheating (due to incorrect use of the appliance or defective components), the oven has a safety thermostat, which interrupts the power supply.
electrolux 9 Put the oven shelf on the deep roasting pan. Push the deep roasting pan between the guide-bars of one of the oven levels. Inserting the oven shelf and deep roasting pan together OVEN - HELPFUL HINTS AND TIPS Caution! Use a deep baking tray for very moist cakes. Fruit juices can cause permanent stains on the enamel. • The appliance has four shelf levels. Count the shelf levels from the bottom of the appliance floor. • You can cook different dishes on two levels at the same time.
electrolux Cooking meat and fish • Do not cook meat with weight below 1 kg. Cooking too small quantities makes the meat too dry. • Use a dripping pan for very fatty food to prevent the oven from stains that can be permanent. • Leave the meat for approximately 15 minutes before carving so that the juice does not seep out. • To prevent too much smoke in the oven during roasting, add some water into the dripping pan. To prevent the smoke condensation, add water each time after it dries up.
electrolux 11 Food Weight (g) Tray type Shelf level Preheating time (minutes) Temperature (°C) Cooking / baking time (minutes) Pizza 1000 enamelled 2 10-15 200-220 30-40 Cheese cake 2600 enamelled 2 - 170-190 60-70 Swiss apple flan 1900 enamelled 1 10-15 200-220 30-40 Christmas cake 2400 enamelled 2 10-15 170-180 55-652) Quiche Lorraine 1000 1 round tray (diameter: 26 cm) 1 10-15 220-230 40-50 Peasant bread 750+750 2 round aluminized trays (diameter: 20 cm) 1 1
electrolux Food Pastry stripes Weight (g) Tray type Shelf level Preheating time (minutes) Temperature (°C) Cooking / baking time (minutes) 1/2/4 10 150-160 30-35 250 + 250 + 250 enamelled Flat cake 1000 enamelled 2 10 150-160 30-40 Flat cake 1000 + 1000 enamelled 1/3 10 140-150 45-55 Flat cake 1000 + 1000 + 1000 enamelled 1 /2/ 4 10 140-150 55-65 2000 enamelled 3 10 170-180 40-50 2/3 10 170-180 50-60 Yeast cake with apples Apple pie 1200 + 1200 2 round alum
electrolux 13 Food Weight (g) Tray type Shelf level Preheating time (minutes) Temperature (°C) Cooking / baking time (minutes) Romanian sponge cake 600+600 2 round aluminized trays (diameter: 25 cm) 2/2 10 150-170 40-50 Romanian sponge cake - traditional 600+600 2 round aluminized trays (diameter: 20 cm) 2/2 - 160-170 30-40 Yeast buns 800 enamelled 3 10 180-200 10-15 Yeast buns 800 + 800 enamelled 1/3 10 180-200 15-20 Swiss roll 500 enamelled 3 10 150-170 10-15 Mer
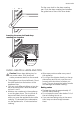
electrolux Shelf Support Rails Removing the shelf support rails 1. Pull the front of the shelf support rail away from the side wall. To prevent this you must replace them. For more instructions, contact your local Service Centre. Removing the oven door and the glass panel 1. Open the door fully and hold the two door hinges. 2. Pull the rear shelf support rail away from the side wall and remove it. 2. Lift and turn the levers on the two hinges.
electrolux 15 4. Place the door on a stable surface protected by a soft cloth. Use a screwdriver to remove 2 screws from bottom edge of door Inserting the door and the glass panel When the cleaning procedure is completed, insert the oven door. To do so, do the steps in opposite way. 4 4 6 5 1 1 5 Important! Do not loose the screws 5.
electrolux To install the drawer, do the above steps in the opposite sequence. Warning! Do not keep flammable items (such as cleaning materials, plastic bags, oven gloves, paper or cleaning sprays) in the drawer. When you use the oven, the drawer can become hot. There is a risk of fire. Oven lamp Warning! Be careful! There is the risk of electrical shock! Before you change the oven lamp: • Switch off the oven. • Remove the fuses in the fuse box or switch off the circuit breaker.
electrolux 17 Product number (PNC) ......................................... Serial number (S.N.) ......................................... INSTALLATION Warning! Refer to "Safety information" chapter. Location of the appliance You can install your freestanding appliance with cabinets on one or two sides and in the corner. Keep a distance of about 1 cm between the appliance and the wall to make sure that the lid opens.
electrolux Burner Rapid burner Normal power Reduced power kW kW 2,00 0,45 2,00 1,70 Type of gas Pressure Inj. Diameter Cons. mbar mm g/h Natural Gas G25.1 25 1,06 - 0,43 Butane G30 30 0,71 145,43 0,38 Propane G31 30 0,71 121,40 3,00 0,75 Natural Gas G20 25 1,13 - 3,00 0,75 Natural Gas G25.
electrolux 19 The appliance is set to default gas, to change the setting choose pipe holder from the list. Always use the gasket sealing Injectors replacement 1. Remove the pan supports. 2. Remove the caps and crowns of the burner. 3. With a socket spanner 7 remove the injectors and replace them with the ones which are necessary for the type of gas you use. 4. Assemble the parts, follow the same procedure backwards. 5.
electrolux caused by inappropriate waste handling of this product. For more detailed information about recycling of this product, please contact your local council, your household waste disposal service or the shop where you purchased the product. Packaging material The packaging material is environmentally-friendly and recyclable. Plastic parts are marked with international abbreviations such as PE, PS, etc.
electrolux 21
electrolux
electrolux 23
www.electrolux.