user manual Mixed-Fuel Cooker EKK603504
electrolux Electrolux. Thinking of you. Share more of our thinking at www.electrolux.com Contents Safety information Product description Accessories Operating instructions Electronic programmer Before first use 2 4 5 5 7 10 Helpful hints and tips Care and cleaning What to do if… Technical data Installation 10 16 20 20 21 Subject to change without notice Safety information Important! You MUST read these warnings carefully before installing or using the appliance.
electrolux 3 • When in use the appliance will produce heat and moisture in the room in which it has been installed. Ensure there is a continuous air supply, keeping air vents in good condition or installing a cooker hood with a venting hose. • When using the appliance for a long period of time, the ventilation should be improved, by opening a window or increasing the extractor speed.
electrolux Important! Keep this instruction book for future reference and ensure it is passed on to any new owner. Important! These instruction are only valid in the countries whose symbols appear on this booklet’s cover.
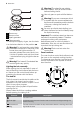
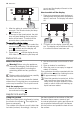
electrolux 5 Accessories Dripping tray Oven shelf It is used to collect juice when cooking in it. If you do not use the dripping tray, remove it from the oven. One or two, depending on the model. All accessories can be storage in the drawer which is located underneath the oven cavity. Baking tray Warning! During cooking the storage drawer may become hot. Operating instructions Control knobs on the gas hob The knobs for using the gas hob of the cooker are found on the control panel.
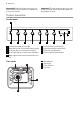
electrolux 1 Warning! The glass lid may shatter when heated. Turn off all the burners before shutting the lid. Use only pans or pots with flat bottom. 2 3 4 1 Burner cap 2 Burner crown 3 Spark generator 4 Thermocouple To interrupt the supply of gas, turn the knob in a clockwise direction to the position . Warning! Do not keep the control knob pressed for more than 15 seconds.
electrolux 7 Function Description Bottom heating The heat comes from the bottom of the oven only Inner grill It can be used for grilling small quantities Full grill The full grill element will be on.
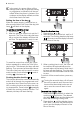
electrolux In the event of a power failure, all the settings (time of day, programme setting or programme in operation) will be cancelled. When the power is restored, the numbers on the display will flash, and the clock/timer has to be reset. Setting the time of the day When the power supply is switched on, or after a power failure, the Time of the day pilot lamp will flash on the display. To set the correct time of day: 1. Press button or 2. After the setting is carried out, wait for 5 seconds.
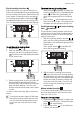
electrolux 9 End of cooking function With this function, you can set the oven to switch off automatically when a programmed end of cooking time is over. Place food in the oven, select a cooking function and adjust the cooking temperature. Press button repeatedly to select the end of cooking function. The relevant pilot lamp will start flashing. To set the end of cooking time: 1. Press button or . 2.
electrolux go out and the display will revert to the time of the day. How to switch off the display 1. Press two programmer push buttons simultaneously and keep them pressed for about 5 seconds. The display will switch off. 3. After the setting is carried out, wait for 5 seconds. The minute minder pilot lamp will come on. 4. At the end of the timed period, the pilot lamp will start flashing and an acoustic alarm will be heard. To switch off the acoustic alarm, press any button.
electrolux 11 No special pans are required for gas burners. However, thin walled pans transmit the heat to the food more quickly than thick-walled ones. Since heat doesn't spread evenly on the pan's bottom, the food may only be partially heated. Consequently it is advisable to stir the food many times. A thick pan bottom prevents partial overheating as it allows sufficient thermic compensation. Avoid very small pans.
electrolux do not cover any part of the oven with aluminium foil while cooking, as this could cause a heat buildup which would affect the baking results and damage the oven enamel. Always place pans, heatresisting pans and aluminium trays on the shelf. 2.
electrolux 13 A: Aluminium, earthenware, oven glassware and bright shiny utensils reduce cooking and base browning. B: Enamelled cast iron, anodized aluminium, aluminium with nonstick interior and coloured exterior and dark, heavy utensils increase cooking and base browning. Cooking fish and meat You can place meat in oven proof dishes, or directly on the oven shelf. In this case, remember to place the drip tray in the first position from the bottom with some water in it.
electrolux Cooking time minutes NOTES 150 60 ~ 80 In cake mould on the shelf 2 (1 and 3)1) 170 40 ~ 60 In cake mould on the shelf 175 2 150 60 ~ 80 In cake tin on the shelf 2 175 2 (1 and 3)1) 160 30 ~ 40 In cake mould on the shelf Fruit cake 1 175 1 160 45 ~ 60 In cake mould Sponge cake 1 175 2 160 30 ~ 40 In cake mould on the shelf Christmas cake 1 170 1 160 40 ~ 60 In cake mould on the shelf Plum cake 1 170 1 160 50 ~ 60 In cake mould on the shelf Small
Weight (gr.) electrolux 15 Type of dish Conventional Cooking Fan cooking Level temp.
electrolux Type of dish Quantity Level Temp.°C Cooking time (minutes) Pieces Weight(gr.
electrolux 17 caution, if the marks are particularly difficult to remove. After cleaning, be sure to wipe dry with a soft cloth. Ignition electrode The electric ignition is obtained through a ceramic "electrode" with a metal electrode inside. Keep these components well clean, to avoid difficult lighting, and check that the burner crown holes are not obstructed. Cleaning the oven Warning! The oven should be kept clean at all times.
electrolux weakened and must be replaced to prevent the possibility of the panel shattering. Contact your local Service Centre who will be pleased to advise further. 4. handle the door by its left- and right-hand sides, then slowly turn it towards the oven until it is half closed Models in stainless steel or aluminium We recommend to clean the oven door using only a wet sponge and dry it up after cleaning with a soft cloth.
electrolux 19 Warning! When cleaning the shelf supports, take care not to remove the lubricating grease behind the telescopic runners. This is meant to ensure their good operation. Controls - sundries Periodically check the condition of the flexible pipe of gas connection and make it replaced by skilled technicians as soon as it shows abnormalities. Annual replacement is recommended. Oven lamp replacement Warning! Disconnect the appliance from the electricity supply. 2.
electrolux What to do if… If the appliance is not working correctly, please carry out the following checks, before contacting your local Service Centre. Symptoms Solutions There is no spark when lighting the gas • check that the unit is plugged in and the electrical supply is switched on • check the mains fuse has not blown • check the burner cap and crown have been replaced correctly, e.g.
electrolux 21 Oven Oven elements (top+bottom) 1800 W Bottom heating element 1000 W Inner grill element 1650 W Full grill element 2450 W Pizza 2675 W Fan cooking 2025 W Defrosting 25 W Total rating 2700 W Supply voltage (50 Hz) 230 V Total appliance electric rating 2700 W Burner characteristics Burner Normal power kW Reduced power kW Normal power Natural gas G20(2H) - 20 mbar inj.100/ mm m3/h Liquid gas (Butane/Propane) 30 mbar inj.
electrolux Levelling The appliance is provided with adjustable small feet placed in the back and front corners on the base. By adjusting the small feet it is possible to change the height of the appliance so as to ensure a better levelling with other surfaces and a uniform distribution of the liquids contained in pans or pots. ing to connect the unit to the same kind of gas written on the plate.
electrolux 23 The flexible pipe must be tightly fixed using clamps according to the rules in force.
electrolux Hob burners nozzles Warning! Before replacing the nozzles ensure that the gas knobs are in OFF position and disconnect the appliance from the electrical supply. Nozzles replacement 1. Remove the pan supports. 2. Extract the caps and the wall baffles of the burners. If changing from natural gas 20 mbar/13 mbar to liquid gas, completely tighten the adjustment screw in, until a small regular flame is obtained.
electrolux 25 of 3 mm, between the unit and the mains, complying with the existing regulations. The brown live wire (originating from the clamp of the appliance junction box) must always be connected to the phase of the mains supply. In any case, the supply cord must be positioned in such a way as it does not reach in any point a temperature higher by 50° C than the room temperature.
electrolux
electrolux 27
www.electrolux.com www.electrolux.com 892930198-A-06.