user manual Cooker EKM6044 EKM6045
electrolux Electrolux. Thinking of you. Share more of our thinking at www.electrolux.com Contents Safety information Product description Before first use Operation Helpful hints and tips Cooking tables 2 4 5 6 11 13 Care and cleaning What to do if… Installation instructions Technical data Environment concerns Guarantee/Customer Service 16 19 20 24 25 25 Subject to change without notice Safety information These warnings are provided in the interests of your safety.
electrolux 3 • This appliance has been designed for domestic use to cook edible foodstuffs only and must not be used for any other purposes. • Take great care when heating fats and oils, as they will ignite if they become too hot. • When you are lighting any burner check that it is lit before you leave the appliance. When turning off a burner, do not leave the appliance until the flame has gone out. • Never place plastic or any other material, which may melt in or on the oven.
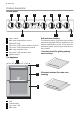
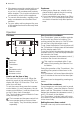
electrolux Product description Control panel 1 1 2 3 4 6 1 2 3 4 5 6 7 8 1 5 1 7 Hob controls Main oven temperature control Electronic timer Top oven / Grill function selector control Top oven / Grill temperature control Main oven indicator neon Top oven / Grill indicator neon Ignition switch Grill and oven furniture The following items of grill and oven furniture have been supplied with the appliance.
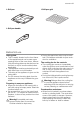
electrolux 5 1 Grill pan 1 Grill pan grid 1 Grill pan handle Before first use Rating plate • This is usually situated on the front frame of the appliance and can be seen upon opening either of the oven doors. Alternatively the rating plate may also be found on the back or top of some models (where applicable). • The appliance must be protected by a suitably rated fuse or circuit breaker. • The rating of the appliance is given on the rating plate.
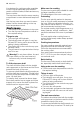
electrolux • If the steam comes into contact with a cool surface on the outside of the appliance, e.g. a trim, it will condense and produce water droplets. This is quite normal and is not caused by a fault on the appliance. • To prevent discolouration, regularly wipe away condensation and foodstuff from surfaces. • For your safety wall coverings at the rear of the appliance should be securely fixed to the wall. Cookware • Baking trays, dishes etc.
electrolux 7 When using the timer control for the very first time, it is advisable to let it operate while you are at home. The displays can be checked to show that it is operating correctly and you will feel confident to leave a meal to cook automatically in the future. To set the timer to switch on and off automatically 1. Ensure the electricity supply is switched ON and that the correct time of day is displayed. 2. Set the main oven controls to the required function and temperature. 3.
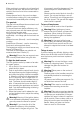
electrolux When cooking is complete, do not leave food to stand in the oven, but remove and cool it quickly if the food is not to be consumed immediately. Always ensure food in the oven has been covered before cooking if it is not possible to remove food immediately after cooking. The gas hob The gas hob has different burner sizes to suit different types of cooking: To ensure maximum burner efficiency only use pots and pans with flat bases appropriate to the burner size used.
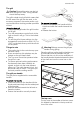
electrolux 9 The grill Caution! Accessible parts may be hot when the grill is in use. Young children should be kept away. The grill is a dual circuit grill which means that the full area of the grill can be used, or for economy purposes, the centre section only can be used when cooking smaller quantities of food. Using the dual grill • To operate the grill select the grill function for full grill. • Turn the temperature control knob to the right as far as it will go. This is the hottest setting.
electrolux It is designed for cooking smaller quantities of food. It gives especially good results if used to cook fruit cakes, sweets and savoury flans or quiche. The top oven is also ideal for use as warming compartment to warm dishes and keep food hot. Use the top oven when you want to warm plates. Use the lowest setting on the top oven temperature control. Using the top oven • Turn the top oven/grill selector to top oven. • Turn the top oven temperature control to the required setting.
electrolux 11 the front to that the stops clear the side supports. Lift shelf clear. To install a shelf, reverse the above steps. Each shelf position has an upper and lower support wire, ensure the shelf is placed between these two support wires. Defrost This main oven function defrosts most foods faster than more conventional methods. It is particularly suitable for delicate frozen foods which are to be served cold e.g.
electrolux • Ensure that food is placed centrally on the shelf and there is sufficient room around the baking tray/dish to allow for maximum circulation. • There should always be at least 2.5cm (1") between the top of the food and the element. This gives best cooking results and allows room for rise in yeast mixtures, Yorkshire puddings etc. When cooking cakes, pastry, scones bread etc., place the tins or baking trays centrally on the shelf.
electrolux 13 Cooking tables Grilling chart Food Grilling Time (Total Hours) Bacon Rashers 0:05 - 0:06 Beef Burgers 0:10 - 0:15 Chicken Joints 0:30 - 0:40 Lamb Chops 0:15 - 0:20 Pork Chops 0:20 - 0:30 Whole Trout/Mackerel 0:15 - 0:25 Plaice/Cod Fillets 0:10 - 0:15 Kebabs 0:20 - 0:30 Kidneys – Lamb/Pig 0:08 - 0:12 Liver – Lamb/Pig 0:10 - 0:20 Sausages 0:20 - 0:30 Steak – Rare 0:06 - 0:12 Steak – Medium 0:12 - 0:16 Steak – Well Done 0:14 - 0:20 Toasted Sandwiches 0:03 - 0:04 T
electrolux Food Shelf position Temp oC Cooking Time (Total Hours) Shortbread 3 140 - 150 0:45 - 1:05 Fruit Pies, Crumbles 2 190 - 200 0:40 - 0:50 Milk Puddings 3 140 - 150 1:30 - 2:00 Scones 4 220 - 230 0:08 - 0:12 Choux Pastry 3 180 - 190 0:30 - 0:35 Éclairs / Profiteroles 3 170 - 180 0:20 - 0:30 Flaky Pastry 3 210 - 220 0:25 - 0:40 Mince Pies 3 190 - 200 0:15 - 0:20 Pasta Lasagne etc.
electrolux 15 Food Fan Temp oC Shelf position Cooking Time (Total Hours) Rich Fruit Cake 3 150 - 150 2:15 - 2:30 Christmas Cake 2 120 - 130 3:00 - 4:30 Gingerbread 3 130 - 140 1:15 - 1:30 Meringues 2 80 - 90 2:30 - 3:00 Flapjack 3 160 - 170 0:25 - 0:30 Shortbread 3 130 - 140 0:45 - 1:05 Fruit Pies, Crumbles 3 180 - 190 0:40 - 0:60 Milk Puddings 3 120 - 130 1:30 - 2:00 Scones 4 180 - 200 0:08 - 0:12 Choux Pastry 3 190 - 210 0:30 - 0:35 Éclairs / Profiteroles 3 16
electrolux o Meat Temp C Cooking time Turkey/Goose 160 - 180 15-20 minutes per 500g (1lb) up to 3500g (7lb) then 10 minutes per 500g (1lb) over 3500g (7lb) Duck 160 - 180 25-35 minutes per 500g (1lb) and 25-30 minutes over Pheasant 160 - 180 35-40 minutes per 500g (1lb) and 35-40 minutes over Rabbit 160 - 180 20 minutes per 500g (1lb) and 20 minutes over INTERNAL TEMPERATURES – Rare: 50 - 60°C; Medium: 60 - 70°C; Well done: 70 - 80°C The roasting temperatures and times given in the chart
electrolux 17 Warning! Ensure the wirework runners are firmly in position before replacing the oven shelves. Cleaning the gas hob Clean the hotplate top using a mild abrasive. Take care not to damage the spark electrodes. If the spark electrodes are damaged the burners will not light. You can remove the pan supports, burner caps and burner crowns to clean them. Again take care not to damage the spark electrodes. Clean the burner crowns and pan supports by soaking them in very hot soapy water.
electrolux It is a good idea to run the oven for an hour or two per week to ensure continued good performance from the Stayclean finish. Slight discolouration and polishing of the Stayclean surfaces may occur in time. This DOES NOT affect the Stayclean properties in any way. Use minimal, if any, extra oil or fat when roasting meat, potatoes only require brushing with fat before cooking. Extra fat in the oven during roasting will increase splashing and soilage.
electrolux 19 2. Open the door and remove the shelves and wire work runners. 3. Remove the glass cover by turning it to the left. 4. Unscrew the bulb by turning it to the left. 5. Fit a new bulb and then replace the glass bulb cover. 6. Refit the wire work runners and replace the oven shelves. 7. Restore the electricity supply and reset the time of day. Warning! Do not attempt to use the oven without the glass being in place.
electrolux Problem Possible solution The timer does not work. Check that the instructions for the operation of the timer are being closely followed. The oven is not cooking evenly. Check that the appliance is correctly installed and is level. Check that the recommended temperatures and shelf positions are being used. The oven light fails to illuminate. The oven light bulb may need replacing. If the Main Oven is set for automatic cooking the light will illuminate when the cook time begins.
electrolux 21 Practice - BS.5440: Par 2 and BS.6891. All British Standards must be 'Current Editions'. Warning! This appliance must be installed by a qualified electrician / competent person (Gas Safe Register registered). Safety may be impaired if installation is not carried out in accordance with these instructions. Before connecting the appliance make sure that the voltage of your electricity supply is the same as that indicated on the rating plate.
electrolux tween each unit and the sides of the appliance. The levelling feet fitted to the appliance will achieve a nominal height to hotplate of 907mm + / - 5mm. ENSURE THAT THE LINKS ARE FITTED AS SHOWN L L N N N Blanking plates not to be removed Fig 1.a Fig 1.b L.P.G. cookers MUST NOT be installed below ground level i.e. in a basement or aboard any boat, yacht or other vessel.
electrolux 23 NOTE: ONLY LIQUID SEALANTS TO BE USED WHEN INLET GAS PIPE IS FITTED I.E.: DO NOT USE P.T.F.E. SEALANT TAPE. Carry out a gas tightness test after connecting to the gas supply. The gas bayonet connector must be fitted in the shaded area indicated. Take into account that it must be possible to pull the appliance forward sufficiently. Ensure the hose does not become trapped when pushing the appliance into position. IMPORTANT: FLEXIBLE TUBING USED MUST COMPLY WITH BS.669 CURRENT EDITION.
electrolux Checking the lid shut-off device 1. Lift the lid 2. Turn one hotplate tap to its full on position and push the ignition button. 3. Close lid. There should now be no gas supply to the hotplate and the burner will go out. 4. Turn off the hotplate and lift the lid. The gas supply should now be restored to the hotplate, when the tap is turned on. Checking the grill Place the grill pan containing the grid into the grill compartment. Open the grill door and turn the grill control to full on.
electrolux 25 Injector Marking 070 096 096 136 L.P. Gas R.H.F R.H.R L.H.R L.H.F Heat input 1.0kW 2.0kW 2.0kW 3.4kW Injector Marking 050 (71.8g/h) 071 (136.5g/h) 071 (136.5g/h) 093 (244.12g/h) General Ignition (H.T. Spark) Spark Gap 3-4mm GAS CATERGORY COUNTRIES OF DESTINATION CAT. I2H GB CAT. I3+ GB Environment concerns The symbol on the product or on its packaging indicates that this product may not be treated as household waste.
electrolux Before calling out an engineer, please ensure you have read the details under the heading "What to do if..." When you contact the Service Force Centre you will need to give the following details: Your name, address and postcode, your telephone number, clear concise details of the fault, model and serial number of the appliance (found on the rating plate), the purchase date. Please note a valid purchase receipt or guarantee documentation is required for in guarantee service calls.
electrolux 27
www.electrolux.com To buy accessories, consumables and spare parts at our online shop please visit: www.electrolux.co.