USER MANUAL EFA9620
electrolux 3 EN RECOMMENDATIONS AND SUGGESTIONS 6 CHARACTERISTICS 7 USE 12 MAINTENANCE 14 IT
electrolux EN Welcome to the world of Electrolux Thank you for choosing a first class product from Electrolux, which hopefully will provide you with lots of pleasure in the future. The Electrolux ambition is to offer a wide variety of quality products that make your life more comfortable. You find some examples on the cover in this manual. Please take a few minutes to study this manual so that you can take advantage of the benefits of your new machine.
electrolux 5
electrolux Recommendations and Suggestions RECOMMENDATIONS AND SUGGESTIONS Installation • The manufacturer will not be held liable for any damages resulting from EN incorrect or improper installation. • The minimum safety distance between the cooker top and the extractor hood is 650 mm. • Check that the mains voltage corresponds to that indicated on the rating plate fixed to the inside of the hood. • For Class I appliances, check that the domestic power supply guarantees adequate earthing.
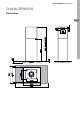
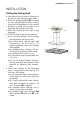
Characteristics electrolux 7 CHARACTERISTICS Dimensions EN
electrolux Characteristics Components 21 Ref. Q.ty Product Components 1 Hood Body, complete with: ConEN 1 trols, Light, Blower, Filters 2 1 Telescopic Chimney comprising: 2.1 1 Upper Section 2.2 1 Lower Section 7.1 1 Telescopic frame complete with extractor, consisting of: 7.1a 1 Upper frame 7.1b 1 Lower frame 9 1 Reducer Flange ø 150-120 mm 10 1 Flange ø 150 15 1 Air Outlet Connection 24 1 Junction box 25 2 Pipe clamps Ref. Q.ty 11 4 12c 6 12e 2 12f 4 12g 4 12h 4 21 1 22 4 23 4 23 12h 7.
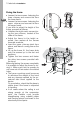
Installation electrolux 9 INSTALLATION Drilling the Ceiling/shelf • Use a plumb line to mark the centre of the hob on the ceiling/support shelf. • Place the drilling template 21 provided on the ceiling/support shelf, making sure that the template is in the correct position by lining up the axes of the template with those of the hob. • Mark the centres of the holes in the template. • Drill the holes at the points marked: • for concrete ceilings, drill for plugs appropriate to the screw size.
electrolux Installation Fixing the frame • Loosen the two screws fastening the lower chimney and remove this from the lower frame. EN • Loosen the two screws fastening the upper chimney and remove this from the upper frame. If you wish to adjust the height of the frame, proceed as follows: • Unfasten the eight metric screws joining the two columns, located at the sides of the frame. • Adjust the frame to the height required, then replace all the screws removed as above.
Installation electrolux 11 Connection in Ducting Version When installing the ducting version, connect the hood to the chimney using either a flexible or rigid pipe ø 150 or 120 mm, the choice of which is left to the installer. • To install a ø 120 mm air exhaust connection, insert the reducer flange 9 on the hood body outlet. • Fix the pipe using the pipe clamps 25 provided. • Remove charcoal filters, if present.
electrolux Installation / Use Electrical Connection • Connect the hood to the mains through a two-pole switch having a EN contact gap of at least 3 mm. • Remove the grease filters (see paragraph Maintenance) being sure that the connector of the feeding cable is correctly inserted in the socket placed on the side of the fan. • Connect the control connector Cmd. • Connect the lights connector Lux. • Place the connectors in the junction box 24 and close it using the 2 screws 12e (2,9 x 9,5) provided.
Use electrolux Touch Basic functions control Dual Function L When briefly pressed it switches the lighting system on and off. When pressed for 2 seconds it starts the lighting system in “courtesy light” mode. The lamps are fed at a reduced power of approximately 5W. Such function can be stopped by pressing the touch control for 2 seconds or just by pressing it shortly in order to return to the normal lighting mode. In courtesy light mode the touch control is not lit.
electrolux Maintenance MAINTENANCE Cleaning the Comfort Panels • Pull the Comfort Panel to open it. • Disconnect the panel from the hood EN canopy by sliding the fixing pin lever. • The comfort panel must never be washed in a dishwasher. • Clean the outside using a damp cloth and neutral liquid detergent. • Clean the inside as well using a damp cloth and neutral detergent; do not use wet cloths or sponges, or jets of water; do not use abrasive substances.
Maintenance electrolux Replacing the Charcoal Filter This filter cannot be washed or regenerated, and must be replaced when the F touch control starts to flash, or at least once every 4 months. The alarm is only triggered when the motor is on. Enabling/Disabling the alarm signal • In Recirculation Version Hoods, the Filter saturation Alarm must be enabled at the time of installation or later. • Switch off the lights and the motor.
electrolux
www.electrolux.