
Installation Instructions


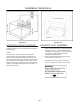
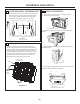
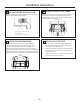
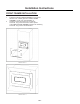
Table Of Contents

PARTS INCLUDED IN THE KIT
1. Front Frame Assembly- QTY 1
2. Exhaust Duct - QTY 1
Rail – QTY 2
Screw A - Short Screws - QTY 11 + 3 extra
Screw B - Long Screws - QTY 4 + 2 extra
CHOOSING A LOCATION FOR
YOUR MICROWAVE OVEN IF
BUILT-IN
Built-In Trim Kit allows for the installation of microwaves
listed below to be built into a cabinet or wall by itself or
over an electric wall oven*.
Microwave Model:
See Illustration 1 for proper location and when building
in above a wall oven. Carefully follow both the wall oven
installation instructions and Electrolux’s Built-in Kit
instructions. If building over a wall oven, be sure the
clearance between the wall oven and the microwave
oven is a minimum of 3 inches.See illustration 2.
*NOTE: Trim Kit and microwave can only be built-in
over an electric self-clean or non self-clean
single cavity wall oven.
CABINET OR WALL CUTOUT
)3 noitartsulli eeS (snoisnemiD tuotuC
Height (A)
Minimum
Maximum
17-
(43
2
m)
17-=
(438 m)
Width (B)
Minimum
Maximum
24- (629 mm)
Depth (C)
Minimum
2
Illustration 1
Exhaust Duct
Front Frame Assembly
Trim Kit Overall Dimensions
Height
Width
Depth
Installation Instructions
" (635 mm)
25
Screw A - Short Screws
Screw B - Long Screws
Illustration 2
3"Min
3-
"
"
Rail
Rear Duct
m
m
Rear Duct
4.
5.
6.
30"
2"
1/64"
EMBS2411AB
3.
EN-2
( ) 597mm
18 7/64'' (460mm)
29 55/64'' (758mm)
1 5/8'' (41.6mm)
Min.depth with receptacle
outside cutout – 22” (559mm)
Min.depth with receptacle
inside cutout – 23 1/2”(597mm)
1/4
1/
49/64
-
-
-
-