EN3851AOW ................................................ NL KOEL-VRIESCOMBINATIE EN FRIDGE FREEZER FR RÉFRIGÉRATEUR/ CONGÉLATEUR DE KÜHL - GEFRIERSCHRANK .............................................
www.electrolux.com INHOUD 1. 2. 3. 4. 5. 6. 7. 8. 9. 10. 11. VEILIGHEIDSINFORMATIE . . . . . . . . . . . . . . . . . . . . . . . . . . . . . . . . . . . . . . . . . . . . . . . . . 3 BESCHRIJVING VAN HET PRODUCT . . . . . . . . . . . . . . . . . . . . . . . . . . . . . . . . . . . . . . . . . 6 BEDIENINGSPANEEL . . . . . . . . . . . . . . . . . . . . . . . . . . . . . . . . . . . . . . . . . . . . . . . . . . . . . 7 DAGELIJKS GEBRUIK . . . . . . . . . . . . . . . . . . . . . . . . . . . . . . . . . .
NEDERLANDS 1. 3 VEILIGHEIDSINFORMATIE In het belang van uw veiligheid en om een correct gebruik te kunnen waarborgen is het van belang dat u, alvorens het apparaat te installeren en in gebruik te nemen, deze gebruiksaanwijzing, inclusief de tips en waarschuwingen, grondig doorleest. Om onnodige vergissingen en ongevallen te voorkomen is het belangrijk ervoor te zorgen dat alle mensen die het apparaat gebruiken, volledig bekend zijn met de werking ervan en de veiligheidsvoorzieningen.
www.electrolux.com WAARSCHUWING! Alle elektrische onderdelen (netsnoer, stekker, compressor) mogen om gevaar te voorkomen uitsluitend worden vervangen door een erkende onderhoudsdienst of gekwalificeerd onderhoudspersoneel. 1. • • • • Het netsnoer mag niet verlengd worden. 2. Verzeker u ervan dat de stekker niet platgedrukt of beschadigd wordt door de achterkant van het apparaat. Een platgedrukte of beschadigde stekker kan oververhit raken en brand veroorzaken. 3.
NEDERLANDS • De achterkant dient zo mogelijk tegen een muur geplaatst te worden, teneinde te voorkomen dat hete onderdelen (compressor, condensator) aangeraakt kunnen worden en brandwonden veroorzaken. • Het apparaat mag niet vlakbij radiatoren of kooktoestellen geplaatst worden. • Verzeker u ervan dat de stekker bereikbaar is nadat het apparaat geïnstalleerd is. • Aansluiten op de drinkwatervoorziening (indien voorzien van een wateraansluiting). 1.
www.electrolux.com 2.
NEDERLANDS 7 3. BEDIENINGSPANEEL 1 2 5 1 Temperatuurweergave LED 2 Fast Freeze-indicatielampje 3 Deursensor 4 Fast Freeze-toets 5 Temperatuurregelaar 3.1 Inschakelen Steek dan de stekker in het stopcontact. 3.2 Temperatuurregeling Ga als volgt te werk om het apparaat in werking te stellen: • houd de thermostaatknop ingedrukt tot de LED van de gewenste temperatuur brandt. De selectie loopt van 2°C tot 8°C Áls de knop één keer wordt aangeraakt, blijft de huidige instelling LED knipperen.
www.electrolux.com 4. DAGELIJKS GEBRUIK 4.1 Vers voedsel invriezen Het vriesvak is geschikt voor het invriezen van vers voedsel en voor het voor een lange periode bewaren van ingevroren en diepgevroren voedsel. Om vers voedsel in te vriezen moet de gemiddelde instelling veranderd worden. Om het invriezen sneller te laten verlopen moet u de thermostaatknop echter op een hogere stand instellen om de maximale koude te kunnen verkrijgen.
NEDERLANDS 9 4.6 Flessenrek Plaats de flessen (met de openingen naar voren gericht) in het voorgeplaatste schap. Als het schap horizontaal geplaatst is, mogen alleen afgesloten flessen worden neergezet. Dit schap voor een flessenhouder kan worden gekanteld om vooraf geopende flessen te bewaren. Trek hiervoor de houder omhoog zodat deze omhoog draait en op het niveau erboven kan worden geplaatst. 4.
www.electrolux.com 4.9 Vriesmandjes uit de vriezer verwijderen 2 1 De vriesmandjes hebben een limietstop om te voorkomen dat ze per ongeluk verschuiven of vallen. Trek de korf naar u toe om het uit de vriezer te halen, tot het niet verder kan, verwijder de korf door de voorkant naar boven te kantelen. Bij het terugzetten tilt u de voorkant van de korf een beetje op en schuift u hem gekanteld in de vriezer. Zodra het mandje over de eindpunten heen is, kunt u hem terug op zijn plaats schuiven. 5.
NEDERLANDS 11 6. ONDERHOUD EN REINIGING 6.1 De binnenkant schoonmaken Voordat u het apparaat voor de eerste keer gebruikt, wast u de binnenkant en de interne accessoires met lauwwarm water en een beetje neutrale zeep om de typische geur van een nieuw product weg te nemen. Droog daarna grondig af. Gebruik geen oplosmiddelen of schuurmiddelen. Deze beschadigen de lak. LET OP! Voordat u welke onderhoudshandeling dan ook verricht, de stekker uit het stopcontact trekken.
www.electrolux.com 6.3 Het ontdooien van de koelkast Rijp wordt elke keer als de compressormotor tijdens normale werking stopt, automatisch van de verdamper van het koelvak verwijderd. Het dooiwater loopt via een afvoergaatje in een speciale opvangbak aan de achterkant van het apparaat, boven de compressormotor, waar het verdampt.
NEDERLANDS 13 Probleem Mogelijke oorzaak Oplossing De verlichting werkt niet. de verlichting staat in stand-by. Sluit en open de deur. De eenheid is defect. Zie 'De bedieningseenheid vervangen'. De temperatuur is niet goed ingesteld. Stel een hogere temperatuur in. De deur is niet goed gesloten. Zie 'De deur sluiten'. De deur is te vaak geopend. Laat de deur niet langer dan noodzakelijk open. De temperatuur van het voedsel is te hoog.
www.electrolux.com 8. MONTAGE WAARSCHUWING! Lees voor uw eigen veiligheid en correcte werking van het apparaat eerst de "veiligheidsinformatie" aandachtig door, alvorens het apparaat te installeren. 8.1 Opstelling Installeer dit apparaat op een plaats waar de omgevingstemperatuur overeenkomt met de klimaatklasse die vermeld is op het typeplaatje van het apparaat: Klimaatklasse Omgevingstemperatuur SN +10°C tot + 32°C N +16°C tot + 32°C ST +16°C tot + 38°C T +16°C tot + 43°C 8.
NEDERLANDS 15 8.4 Afstandhouders achterkant 2 1 4 3 U vindt de twee afstandhouders in de zak van de gebruikershandleiding. Volg deze stappen om de afstandhouders te installeren: 1. Draai de schroef los. 2. Plaats de afstandhouder onder de schroef. 3. Draai de afstandshouder in de juiste positie. 4. Draai de schroeven opnieuw aan. 8.5 Nivellering Zorg ervoor dat het apparaat waterpas staat wanneer u het plaatst.
www.electrolux.com 8.6 Omkeerbaarheid van de deur A E B F C D WAARSCHUWING! Voordat werkzaamheden worden uitgevoerd, moet u zich ervan verzekeren dat de stekker uit het stopcontact is getrokken. Om de volgende handelingen uit te voeren, raden we aan dit te doen met de hulp van iemand anders die de deuren van het apparaat tijdens de werkzaamheden stevig vasthoudt. Om de draairichting van de deur te veranderen, gaat u als volgt te werk: • Open de deur. Schroef het middelste scharnier (B) los.
NEDERLANDS 17 • Verwijder de afdekking m.b.v. het gepaste gereedschap. (A). • Schroef het onderste scharnier (B) en het afstandsstuk (C) los en monteer ze aan de andere kant. • Plaats de afdekking (A) aan de andere kant. A B C C B A C A B 9. GELUIDEN Tijdens normaal gebruik hoort u geluiden (compressor, koelmiddelcirculatie). • Verwijder de afdekkingen (B). Verwijder de afdekpennen (A). • Schroef de handgrepen (C) los en bevestig ze aan de tegenovergestelde zijde.
www.electrolux.
NEDERLANDS HISSS! SSSRRR! CRACK! HISSS! SSSRRR! CRACK! 19
www.electrolux.com 10. TECHNISCHE GEGEVENS Afmetingen van de uitsparing Hoogte 2010 mm Breedte 595 mm Diepte 658 mm Tijdsduur 18 h Spanning 230 - 240 V Frequentie 50 Hz De technische gegevens staan op het typeplaatje aan de linker binnenkant in het apparaat en op het energielabel. 11. MILIEUBESCHERMING Recycle de materialen met het symbool . Gooi de verpakking in een geschikte elektronische apparaten. Gooi apparaten niet weg gemarkeerd met het symbool verzamelcontainer om het te recyclen.
ENGLISH 21 CONTENTS 1. 2. 3. 4. 5. 6. 7. 8. 9. 10. 11. SAFETY INFORMATION . . . . . . . . . . . . . . . . . . . . . . . . . . . . . . . . . . . . . . . . . . . . . . . . . . PRODUCT DESCRIPTION . . . . . . . . . . . . . . . . . . . . . . . . . . . . . . . . . . . . . . . . . . . . . . . . CONTROL PANEL . . . . . . . . . . . . . . . . . . . . . . . . . . . . . . . . . . . . . . . . . . . . . . . . . . . . . . DAILY USE . . . . . . . . . . . . . . . . . . . . . . . . . . . . . . . . . . . . . . . . . . . .
www.electrolux.com 1. SAFETY INFORMATION In the interest of your safety and to ensure the correct use, before installing and first using the appliance, read this user manual carefully, including its hints and warnings. To avoid unnecessary mistakes and accidents, it is important to ensure that all people using the appliance are thoroughly familiar with its operation and safety features.
ENGLISH 4. 5. • • • • Do not pull the mains cable. If the power plug socket is loose, do not insert the power plug. There is a risk of electric shock or fire. 6. You must not operate the appliance without the lamp cover (if foreseen) of interior lighting. This appliance is heavy. Care should be taken when moving it. Do not remove nor touch items from the freezer compartment if your hands are damp/wet, as this could cause skin abrasions or frost/freezer burns.
www.electrolux.com • This product must be serviced by an authorized Service Centre, and only genuine spare parts must be used. together with the urban refuse and rubbish. The insulation foam contains flammable gases: the appliance shall be disposed according to the applicable regulations to obtain from your local authorities. Avoid damaging the cooling unit, especially at the rear near the heat exchanger. The materials used on this appliance marked by the symare recyclable. bol 1.
ENGLISH 25 3. CONTROL PANEL 1 2 5 1 Temperature indicator LED 2 Fast Freeze indicator 3 Door sensor 4 Fast Freeze button 5 Temperature regulator 4 3 However, the exact setting should be chosen keeping in mind that the temperature inside the appliance depends on: • room temperature • how often the door is opened • quantity of food stored • appliance location. 3.1 Switching on Insert the plug into the wall socket. 3.
www.electrolux.com 4. DAILY USE compartment let the appliance run at least 2 hours on the higher settings. 4.1 Freezing fresh food The freezer compartment is suitable for freezing fresh food and storing frozen and deep-frozen food for a long time. To freeze fresh foods it is not necessary to change the medium setting. However, for a faster freezing operation, turn the temperature regulator toward higher settings to obtain the maximum coldness.
ENGLISH 27 4.6 Bottle rack Place the bottles (with the opening facing front) in the pre-positioned shelf. If the shelf is positioned horizontally, place only closed bottles. This bottle holder shelf can be tilted in order to store previously opened bottles. To obtain this result, pull the shelf up so it can rotate upwards and be placed on the next higher level. 4.
www.electrolux.com 4.9 Removal of freezing baskets from the freezer 2 1 The freezing baskets have a limit stop to prevent their accidental removal or falling out. At the time of its removal from the freezer, pull the basket towards yourself and, upon reaching the end point, remove the basket by tilting its front upwards. At the time of putting it back, slightly lift the front of the basket to insert it into the freezer. Once you are over the end points, push the baskets back in their position. 5.
ENGLISH 29 6. CARE AND CLEANING 6.1 Cleaning the interior Before using the appliance for the first time, wash the interior and all internal accessories with lukewarm water and some neutral soap so as to remove the typical smell of a brand-new product, then dry thoroughly. Do not use detergents or abrasive powders, as these will damage the finish. CAUTION! Unplug the appliance before carrying out any maintenance operation.
www.electrolux.com 6.4 Defrosting of the freezer The freezer compartment of this model, on the other hand, is a "no frost" type. This means that there is no buildup of frost when it is in operation, neither on the internal walls nor on the foods. The absence of frost is due to the continuous circulation of cold air inside the compartment, driven by an automatically controlled fan. 7. TROUBLESHOOTING CAUTION! Before troubleshooting, disconnect the power supply.
ENGLISH 31 Problem Possible cause Solution Water flows into the refrigerator. The water outlet is clogged. Clean the water outlet. Products prevent that water flows into the water collector. Make sure that products do not touch the rear plate. Water flows on the ground. The melting water outlet does not flow in the evaporative tray above the compressor. Attach the melting water outlet to the evaporative tray. The temperature in the appliance is too low/high.
www.electrolux.com 8.3 Location 100 mm min The appliance should be installed well away from sources of heat such as radiators, boilers, direct sunlight etc. Ensure that air can circulate freely around the back of the cabinet. To ensure best performance, if the appliance is positioned below an overhanging wall unit, the minimum distance between the top of the cabinet and the wall unit must be at least 100 mm . Ideally, however, the appliance should not be positioned below overhanging wall units.
ENGLISH 33 8.6 Door reversibility A E WARNING! Before carrying out any operations, remove the plug from the power socket. B To carry out the following operations, we suggest that this be made with another person that will keep a firm hold on the doors of the appliance during the operations. F C D To change the opening direction of the door, do these steps: • Open the doors. Unscrew the middle hinge (B).
www.electrolux.com C B A C A B • Remove the covers (B). Remove the cover pins (A). • Unscrew the handles (C) and fix them on the opposite side . Place the lower handle to the upper door and the upper handle to the lower door. • Re-insert the cover pins (A) on the opposite side. Do a final check to make sure that: • All screws are tightened. • The magnetic seal adheres to the cabinet. • The door opens and closes correctly. If the ambient temperature is cold (i.e.
ENGLISH CLICK! BRRR! BLUBB! HISSS! CLICK! BRRR! BLUBB! HISSS! 35
www.electrolux.com SSSRRR! SSSRRR! CRACK! CRACK! 10. TECHNICAL DATA Dimension of the recess Height 2010 mm Width 595 mm Depth 658 mm Rising Time 18 h Voltage 230 - 240 V Frequency 50 Hz The technical information are situated in the rating plate on the internal left side of the appliance and in the energy label. 11. ENVIRONMENT CONCERNS Recycle the materials with the symbol . Put the packaging in applicable containers to recycle it.
ENGLISH with the household waste. Return the product to your local recycling facility or contact your municipal office.
www.electrolux.com SOMMAIRE 1. 2. 3. 4. 5. 6. 7. 8. 9. 10. 11. CONSIGNES DE SÉCURITÉ . . . . . . . . . . . . . . . . . . . . . . . . . . . . . . . . . . . . . . . . . . . . . . . DESCRIPTION DE L'APPAREIL . . . . . . . . . . . . . . . . . . . . . . . . . . . . . . . . . . . . . . . . . . . . BANDEAU DE COMMANDE . . . . . . . . . . . . . . . . . . . . . . . . . . . . . . . . . . . . . . . . . . . . . . . UTILISATION QUOTIDIENNE . . . . . . . . . . . . . . . . . . . . . . . . . . . . . . . . . . . . . .
FRANÇAIS 1. 39 CONSIGNES DE SÉCURITÉ Pour votre sécurité et garantir une utilisation correcte de l'appareil, lisez attentivement cette notice, y compris les conseils et avertissements, avant d'installer et d'utiliser l'appareil pour la première fois. Pour éviter toute erreur ou accident, veillez à ce que toute personne qui utilise l'appareil connaisse bien son fonctionnement et ses fonctions de sécurité. Conservez cette notice avec l'appareil.
www.electrolux.com AVERTISSEMENT Les éventuelles réparations ou interventions sur votre appareil, ainsi que le remplacement du câble d'alimentation, ne doivent être effectuées que par un professionnel qualifié. 1. • • • • Ne branchez pas le cordon d'alimentation à une rallonge. 2. Assurez-vous que la prise n'est pas écrasée ou endommagée par l'arrière de l'appareil. Une prise de courant écrasée ou endommagée peut s'échauffer et causer un incendie. 3.
FRANÇAIS • • • • surchauffe. Pour assurer une ventilation suffisante, respectez les instructions de la notice (chapitre Installation). Placez l'appareil dos au mur pour éviter tout contact avec le compresseur et le condenseur (risque de brûlure). Placez de préférence votre appareil loin d'une source de chaleur (chauffage, cuisson ou rayons solaires trop intenses). Assurez-vous que la prise murale reste accessible après l'installation de l'appareil. Branchez à l'alimentation en eau potable uniquement.
www.electrolux.com 2.
FRANÇAIS 43 3. BANDEAU DE COMMANDE 1 2 5 1 Indicateur de température LED 2 Voyant Fast Freeze 3 Capteur de porte 4 Touche Fast Freeze 5 Thermostat 3.1 Mise en marche Insérez la fiche dans la prise murale. 3.2 Réglage de la température Pour utiliser l'appareil, procédez comme suit : • appuyez sur la touche du thermostat jusqu'à ce que le voyant LED correspondant à la température souhaitée apparaisse.
www.electrolux.com 4. UTILISATION QUOTIDIENNE 4.1 Congélation d'aliments frais Le compartiment congélateur est idéal pour congeler des denrées fraîches et conserver les aliments surgelés ou congelés pendant longtemps. Pour congeler les denrées fraîches, il n'est pas nécessaire de modifier le réglage moyen. Toutefois, pour une congélation plus rapide, tournez le bouton du thermostat vers le haut pour obtenir un réglage de froid maximum.
FRANÇAIS 45 4.5 Clayettes amovibles Les parois du réfrigérateur sont équipées d'une série de glissières pour que les clayettes puissent être placées en fonction des besoins. 4.6 Compartiment à bouteilles Placez les bouteilles (ouverture vers l'avant) sur la clayette prévue à cet effet. Si la clayette est en position horizontale, placez uniquement des bouteilles non entamées. Cette clayette peut être inclinée afin de pouvoir y placer des bouteilles déjà ouvertes.
www.electrolux.com 4.8 Bac Freshzone Le bac FreshZone est adapté à la conservation des denrées fraîches et hautement périssables (poissons, viandes, fruits de mer), car la température y est inférieure à celle des autres zones du réfrigérateur. 4.9 Retrait des bacs de congélation du congélateur 2 1 Certains bacs de congélation sont équipés d'une butée afin d'empêcher leur retrait accidentel ou leur chute.
FRANÇAIS La période de conservation est de 1 à 2 jours au maximum. Aliments cuits, plats froids, etc. : placezles bien couverts sur une clayette. Fruits et légumes : placez-les une fois nettoyés dans le(s) bac(s) à légumes fourni(s). Beurre et fromage : placez-les dans des récipients étanches spéciaux ou enveloppez-les soigneusement dans des feuilles 47 d'aluminium ou de polyéthylène, pour emmagasiner le moins d'air possible.
www.electrolux.com 6.3 Dégivrage du réfrigérateur En fonctionnement normal, le givre est automatiquement éliminé de l'évaporateur du compartiment réfrigérateur à chaque fois que le compresseur s'arrête. L'eau de dégivrage est collectée, via un orifice d'évacuation, dans un récipient spécial situé à l'arrière de l'appareil, au-dessus du compresseur, d'où elle s'évapore.
FRANÇAIS 49 Problème Cause possible Solution L’éclairage ne fonctionne pas. L'éclairage est en mode veille. Fermez puis ouvrez la porte. L'unité de commande est défectueuse. Consultez le paragraphe « Remplacement de l'unité de commande ». La température n'est pas réglée correctement. Sélectionnez une température plus élevée. La porte n'est pas fermée correctement. Reportez-vous au chapitre « Fermeture de la porte ». Le compresseur fonctionne en permanence.
www.electrolux.com 7.2 Fermeture de la porte 1. Nettoyez les joints de la porte. 2. Si nécessaire, remplacez les joints défectueux. Contactez le service après-vente. 8. INSTALLATION AVERTISSEMENT Pour votre sécurité et le bon fonctionnement de l'appareil, veuillez lire attentivement les "Consignes de sécurité" avant d'installer l'appareil. 8.
FRANÇAIS 51 8.4 Entretoises arrière 2 1 4 3 Vous trouverez deux entretoises dans le même sachet que la notice d'utilisation. Pour installer les entretoises, procédez comme suit : 1. Desserrez la vis. 2. Faites glisser l'entretoise sous la vis. 3. Tournez l'entretoise en position correcte. 4. Resserrez la vis. 8.5 Mise de niveau Lorsque vous installez l'appareil, veillez à le placer de niveau. Servez-vous des deux pieds réglables se trouvant à l’avant de l’appareil.
www.electrolux.com 8.6 Réversibilité de la porte A E B Pour effectuer les opérations suivantes, il est conseillé de se faire aider par une autre personne pour maintenir fermement les portes lors de toute manipulation de l'appareil. F C AVERTISSEMENT Avant toute opération, débranchez la fiche de la prise de courant. D Pour changer le sens d'ouverture de la porte, procédez comme suit : • Ouvrez les portes. Dévissez la charnière intermédiaire (B).
FRANÇAIS 53 • Retirez le cache à l'aide d'un outil. (A) • Dévissez le gond de la charnière inférieure (B) et l'entretoise (C) et placez-les du côté opposé. • Réinsérez le cache (A) du côté opposé. A B C C B A C A B 9. BRUITS L'appareil émet certains bruits pendant son fonctionnement (compresseur, circuit frigorifique). • Retirez les caches (B). Retirez les goupilles du cache (A). • Dévissez les poignées (C) et remontezles sur le côté opposé.
www.electrolux.
FRANÇAIS HISSS! SSSRRR! CRACK! HISSS! SSSRRR! CRACK! 55
www.electrolux.com 10. CARACTÉRISTIQUES TECHNIQUES Dimensions de la niche d'encastrement Hauteur 2010 mm Largeur 595 mm Profondeur 658 mm Autonomie de fonctionnement 18 h Tension 230 - 240 V Fréquence 50 Hz Les caractéristiques techniques figurent sur la plaque signalétique située sur le cô- té gauche à l'intérieur de l'appareil et sur l'étiquette énergétique. 11. EN MATIÈRE DE PROTECTION DE L'ENVIRONNEMENT Recyclez les matériaux portant le symbole .
DEUTSCH 57 INHALT 1. 2. 3. 4. 5. 6. 7. 8. 9. 10. 11. SICHERHEITSHINWEISE . . . . . . . . . . . . . . . . . . . . . . . . . . . . . . . . . . . . . . . . . . . . . . . . . GERÄTEBESCHREIBUNG . . . . . . . . . . . . . . . . . . . . . . . . . . . . . . . . . . . . . . . . . . . . . . . . BEDIENFELD . . . . . . . . . . . . . . . . . . . . . . . . . . . . . . . . . . . . . . . . . . . . . . . . . . . . . . . . . . TÄGLICHER GEBRAUCH . . . . . . . . . . . . . . . . . . . . . . . . . . . . . . . . . . . . . . .
www.electrolux.com 1. SICHERHEITSHINWEISE Lesen Sie zu Ihrer Sicherheit und für die optimale Geräteanwendung vor der Installation und dem Gebrauch des Gerätes die vorliegende Benutzerinformation aufmerksam durch, einschließlich der Ratschläge und Warnungen. Es ist wichtig, dass zur Vermeidung von Fehlern und Unfällen alle Personen, die das Gerät benutzen, mit der Bedienung und den Sicherheitsvorschriften vertraut sind.
DEUTSCH WARNUNG! Elektrische Bauteile (Netzkabel, Stecker, Kompressor) dürfen zur Vermeidung von Gefahren nur vom Kundendienst oder einer Fachkraft ausgewechselt werden. 1. • • • • Das Netzkabel darf nicht verlängert werden. 2. Vergewissern Sie sich, dass der Netzstecker nicht von der Geräterückseite geklemmt oder beschädigt wird. Ein geklemmter oder beschädigter Netzstecker überhitzt und kann einen Brand verursachen. 3. Vergewissern Sie sich, dass der Netzstecker des Geräts frei zugänglich ist. 4.
www.electrolux.com • Das Gerät sollte zur Vermeidung von Verbrennungen durch Berührung von heißen Bauteilen (Kompressor, Kondensator) möglichst mit der Rückseite gegen eine Wand aufgestellt werden. • Das Gerät darf nicht in der Nähe von Heizkörpern oder Kochern installiert werden. • Vergewissern Sie sich, dass der Netzstecker des Gerätes nach der Installation frei zugänglich ist. • Wenn ein Wasseranschluss vorgesehen ist, verbinden Sie das Gerät nur mit dem Trinkwasseranschluss. 1.
DEUTSCH 2.
www.electrolux.com 3. BEDIENFELD 1 2 5 1 Kontroll-LED „Temperatur“ 2 Kontroll-LED „Fast Freeze“ 3 Türsensor 4 Taste „Fast Freeze“ 5 Temperaturregler 3.1 Einschalten des Geräts 4 3 Allerdings muss für eine exakte Einstellung berücksichtigt werden, dass die Temperatur im Inneren des Geräts von verschiedenen Faktoren abhängt: • Raumtemperatur • Häufigkeit des Türöffnens • Menge der gelagerten Lebensmittel • Aufstellungsort des Geräts Stecken Sie den Stecker in die Netzsteckdose. 3.
DEUTSCH 63 4. TÄGLICHER GEBRAUCH 4.1 Einfrieren frischer Lebensmittel Das Gefrierfach eignet sich zum Einfrieren von frischen Lebensmitteln und zum Lagern von gefrorenen und tiefgefrorenen Lebensmitteln für einen längeren Zeitraum. Für das Einfrieren frischer Lebensmittel ist eine Änderung der mittleren Einstellung nicht erforderlich. Möchten Sie den Gefriervorgang beschleunigen, drehen Sie bitte den Temperaturregler auf eine höhere Einstellung, um die maximal mögliche Kühlung zu erreichen.
www.electrolux.com 4.5 Verstellbare Ablagen/Einsätze Die Wände des Kühlschranks sind mit einer Reihe von Führungsschienen ausgestattet, die verschiedene Möglichkeiten für das Einsetzen der Ablagen bieten. 4.6 Flaschenhalter Im voreingestellten Flaschenhalter können Flaschen (mit der Öffnung nach vorn) gelagert werden. Legen Sie nur verschlossene Flaschen in den Flaschenhalter, wenn er sich in horizontaler Stellung befindet.
DEUTSCH 65 4.8 Freshzone-Schublade Die Freshzone Schublade eignet sich zur Aufbewahrung von frischen Lebensmitteln wie Fisch, Fleisch und Meeresfrüchten, da hier die Temperatur niedriger ist als im restlichen Kühlraum. 4.9 Entnahme von Gefrierkörben aus dem Gefrierschrank 2 1 Die Gefrierkörbe sind mit einem Anschlag ausgestattet, der die versehentliche Entnahme oder ein Herausfallen verhindert.
www.electrolux.com Fleisch (alle Sorten): wickeln Sie Fleisch in lebensmittelechte Tüten und legen Sie diese auf die Glasablage über der Gemüseschublade. Bitte lagern Sie Fleisch aus Sicherheitsgründen nur einen oder maximal zwei Tage auf diese Weise. Gekochte Lebensmittel, kalte Gerichte usw.: diese können abgedeckt auf eine Ablage gelegt werden. Obst und Gemüse: bitte waschen Sie Obst und Gemüse gründlich und legen Sie es in die speziell dafür vorgesehene(n) Schublade(n).
DEUTSCH 67 6.3 Abtauen des Kühlschranks Bei normalem Betrieb wird Reif bei jedem Anhalten des Kompressors automatisch aus dem Verdampfer des Kühlschranks entfernt. Das Tauwasser läuft durch eine Abflussöffnung in einen speziellen Behälter an der Rückseite des Geräts über dem Motorkompressor, wo es verdampft. Reinigen Sie deshalb regelmäßig die Abflussöffnung des Tauwassers in der Mitte des Kühlschrankkanals, damit das Wasser nicht überfließt und auf die gelagerten Lebensmittel tropft.
www.electrolux.com Problem Die Beleuchtungseinheit funktioniert nicht. Der Kompressor ist durchgehend in Betrieb. Mögliche Ursache Abhilfe Das Gerät wird nicht mit Spannung versorgt. Es liegt keine Spannung an der Netzsteckdose an. Schließen Sie ein anderes Gerät an diese Steckdose an, und prüfen Sie, ob es funktioniert. Wenden Sie sich an eine qualifizierte Elektrofachkraft. Die Beleuchtungseinheit Schließen und öffnen Sie befindet sich im Stand-by- die Tür. Modus. Die Einheit ist defekt.
DEUTSCH Die Regeleinheit darf nur von einer qualifizierten Fachkraft ausgetauscht werden. Wenden Sie sich hierzu an den Kundendienst. 2. 69 Ersetzen Sie die defekten Türdichtungen, falls erforderlich. Kontaktieren Sie den Kundendienst. 7.2 Schließen Sie die Tür 1. Reinigen Sie die Türdichtungen. 8. MONTAGE WARNUNG! Lesen Sie bitte die "Sicherheitshinweise" sorgfältig vor der Aufstellung des Geräts durch, um Gefahren für Sie selbst zu vermeiden und einen korrekten Betrieb des Geräts zu gewährleisten.
www.electrolux.com 8.3 Aufstellort 100 mm min Das Gerät sollte in ausreichendem Abstand von Wärmequellen wie Heizungen, Boilern, direkter Sonneneinstrahlung etc. aufgestellt werden. Vergewissern Sie sich, dass Luft an der Rückseite des Gehäuses frei zirkulieren kann. Um einwandfreien Betrieb sicherzustellen, sollte der Abstand zwischen der Oberseite des Gehäuses und dem Hängeschrank mindestens 100 mm betragen, wenn das Gerät unter einem Hängeschrank aufgestellt wurde.
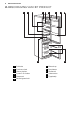
DEUTSCH 71 8.6 Wechseln des Türanschlags A E B Die nachfolgend beschriebenen Schritte sollten von mindestens zwei Personen durchgeführt werden, um ein Herunterfallen der Türen zu vermeiden. F C WARNUNG! Vor der Durchführung von Arbeiten am Gerät ist stets der Netzstecker aus der Steckdose zu ziehen. D Zum Wechseln des Türanschlags muss wie folgt vorgegangen werden: • Öffnen Sie die Türen. Lösen Sie das mittlere Scharnier (B). Entfernen Sie das Kunststoff-Distanzstück (A).
www.electrolux.com • Entfernen Sie die Abdeckung mit einem Werkzeug. (A). • Lösen Sie den Haltestift (B) des unteren Scharniers, entfernen Sie das Distanzstück (C), und montieren Sie beide an der gegenüberliegenden Seite. • Bringen Sie die Abdeckung (A) auf der anderen Seite wieder an. A B C C B A C A B 9. GERÄUSCHE Während das Gerät in Betrieb ist, entstehen bestimmte Geräusche (Kompressor und Kühlkreislauf). • Nehmen Sie die Abdeckungen (B) ab.
DEUTSCH SSS RRR ! HISSS! OK CLICK! BRRR! BLUBB! K! IC CL BRRR! ! BB U BL 73 CR AC K! CLICK! BRRR! BLUBB!
www.electrolux.
DEUTSCH 75 10. TECHNISCHE DATEN Abmessungen der Einbaunische Höhe 2010 mm Breite 595 mm Tiefe 658 mm Lagerzeit bei Störung 18 Std. Spannung 230 - 240 V Frequenz 50 Hz Die technischen Informationen befinden sich auf dem Typenschild innen links im Gerät sowie auf der Energieplakette. 11. UMWELTTIPPS Recyceln Sie Materialien mit dem Symbol . Entsorgen Sie die Verpackung in den elektronische Geräte. Entsorgen Sie nicht mit Geräte mit diesem Symbol entsprechenden Recyclingbehältern.
280150453-A-162012 www.electrolux.