EN3881AOW EN3881AOX ................................................ EN FRIDGE FREEZER RO FRIGIDER CU CONGELATOR UK ХОЛОДИЛЬНИКМОРОЗИЛЬНИК .............................................
www.electrolux.com CONTENTS 1. 2. 3. 4. 5. 6. 7. 8. 9. SAFETY INSTRUCTIONS . . . . . . . . . . . . . . . . . . . . . . . . . . . . . . . . . . . . . . . . . . . . . . . . . . 3 PRODUCT DESCRIPTION . . . . . . . . . . . . . . . . . . . . . . . . . . . . . . . . . . . . . . . . . . . . . . . . . 5 CONTROL PANEL . . . . . . . . . . . . . . . . . . . . . . . . . . . . . . . . . . . . . . . . . . . . . . . . . . . . . . . 6 DAILY USE . . . . . . . . . . . . . . . . . . . . . . . . . . . . . . . . . . . . .
ENGLISH 1. 3 SAFETY INSTRUCTIONS In the interest of your safety and to ensure the correct use, before installing and first using the appliance, read this user manual carefully, including its hints and warnings. To avoid unnecessary mistakes and accidents, it is important to ensure that all people using the appliance are thoroughly familiar with its operation and safety features.
www.electrolux.com 1. • • • • Power cord must not be lengthened. 2. Make sure that the power plug is not squashed or damaged by the back of the appliance. A squashed or damaged power plug may overheat and cause a fire. 3. Make sure that you can come to the mains plug of the appliance. 4. Do not pull the mains cable. 5. If the power plug socket is loose, do not insert the power plug. There is a risk of electric shock or fire. 6.
ENGLISH ozone layer, in either its refrigerant circuit or insulation materials. The appliance shall not be discarded together with the urban refuse and rubbish. The insulation foam contains flammable gases: the appliance shall be disposed according to the applicable regulations to obtain from your local authorities. Avoid damaging the cooling unit, especially at the rear near the heat exchanger. The materials used on this appliance marked by the symare recyclable. bol 1.
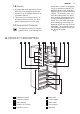
www.electrolux.com 11 Bottle shelf 13 Rating plate 12 Freezer baskets 3.
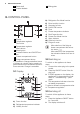
ENGLISH 3. To disconnect the appliance from the power disconnect the mains plug from the power socket. 3.4 Switching off the fridge To switch off the fridge: 1. Press the Fridge Compartment button for few seconds. 2. The fridge OFF indicator is shown. 3.5 Switching on the fridge To switch on the fridge: 1. Press the Fridge Compartment button. The fridge OFF indicator goes off. To select a different set temperature refer to "Temperature regulation". 7 To switch on the function: 1.
www.electrolux.com 1. Press the Mode button until the corresponding icon appears. The fridge temperature indicator shows the set temperature. To switch off the function: 1. Press the Mode button in order to select an other function or press the Mode button until you can see none of the special icons The function switches off by selecting a different fridge set temperature. 3.
ENGLISH 3.15 Door open alarm An acoustic alarm will sound if the door is left open for a few minutes. The door open alarm conditions are indicated by: • flashing Alarm indicator 9 • acoustic buzzer When normal conditions are restored (door closed), the alarm will stop. During the alarm, the buzzer can be switched off by pressing any button. 4. DAILY USE 4.1 Storage of frozen food 4.
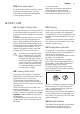
www.electrolux.com 4.6 Bottle rack Place the bottles (with the opening facing front) in the pre-positioned shelf. If the shelf is positioned horizontally, place only closed bottles. This bottle holder shelf can be tilted in order to store previously opened bottles. To obtain this result, pull the shelf up so it can rotate upwards and be placed on the next higher level. 4.8 Carbon Air Filter Your appliance is equipped with a carbon filter behind a flap in the rear wall of the air distributing box.
ENGLISH Do not move the big lower door shelf to ensure correct air circulation. 2. 3. 11 The Shopping indicator comes on. Slide upward the flap as shown in the figure. 4.10 Humidity Control When storing vegetables and fruits in the refrigerator it is good practise to place the produce in the drawer. The refrigerator makes sure that the temperature is kept low, thus slowing down the aging.
www.electrolux.com To switch off the function: 1. Slide down the flap. 2. Switch off the Shopping function. 3. The Shopping indicator goes off. The function switches off automatically after few hours. 4.15 Removal of freezing baskets from the freezer 4.14 QuickChill of Drinks This function allows rapid cooling of drinks. To switch on the function: 1. Remove or place upward the Freshzone drawer and put the bottle rack in front of the QuickChill slots as shown in the figure. 2.
ENGLISH • position food so that air can circulate freely around it 5.3 Hints for refrigeration Useful hints: Meat (all types) : wrap in polythene bags and place on the glass shelf above the vegetable drawer. For safety, store in this way only one or two days at the most. Cooked foods, cold dishes, etc.: these should be covered and may be placed on any shelf. Fruits and vegetables: these should be thoroughly cleaned and placed in the special drawer(s) provided.
www.electrolux.com CAUTION! Unplug the appliance before carrying out any maintenance operation. This appliance contains hydrocarbons in its cooling unit; maintenance and recharging must therefore only be carried out by authorized technicians. 6.2 Periodic cleaning The equipment has to be cleaned regularly: • clean the inside and accessories with lukewarm water and some neutral soap. • regularly check the door seals and wipe clean to ensure they are clean and free from debris.
ENGLISH 15 7. TROUBLESHOOTING CAUTION! Before troubleshooting, disconnect the power supply. Only a qualified electrician or competent person must do the troubleshooting that is not in this manual. There are some sounds during normal use (compressor, refrigerant circulation). Problem Possible cause Solution The appliance is noisy. The appliance is not supported properly. Check if the appliance stands stable (all the four feet should be on the floor).
www.electrolux.com Problem Possible cause Solution The temperature in the appliance is too high. The door is not closed correctly. Refer to "Closing the door". The product temperature is too high. Let the product temperature decrease to room temperature before storage. Many products are stored at the same time. Store less products at the same time. The temperature in the refrigeration is too high. There is no cold air circulation in the appliance.
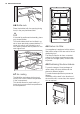
ENGLISH 7.2 Closing the door 1. 2. 3. 17 If necessary, replace the defective door gaskets. Contact the Service Center. Clean the door gaskets. If necessary, adjust the door. Refer to "Installation". WARNING! Read the "Safety Information" carefully for your safety and correct operation of the appliance before installing the appliance. 100 mm min 8. INSTALLATION 8.
www.electrolux.com 8.4 Levelling When placing the appliance ensure that it stands level. This can be achieved by two adjustable feet at the bottom in front. To get the best performance the carbon air filter should be changed once every six months. New active air filters can be purchased from your local dealer. 8.6 Electrical connection 8.
ENGLISH A 1 E B F C 2 3 • Unscrew the hinges and remove the door (4). 4 19 D Remove the cover with the help of a tool (A) unscrew the lower hinge pivot (B) and place it on the opposite side. Reinsert the cover (A) on the opposite side. Reinsert the lower door on the pivot pin (B). Remove the 2 plastic covers and refit it on the opposite side. Insert the pivot of the center hinge on the left hole of the lower door. Insert the lower door on the pivot of the lower hinge (B).
www.electrolux.com • Re-insert the cover plugs (C) on the opposite side. 7 C B A C A 6 B • Connect the cable to the socket in the front panel. (8) • Put back the top front covers on both sides (5,9). • Place the display cable, which is currently disconnected, into the cable holder in the door end cap then put back the door end cap cover (10) 10 9 8 Do a final check to make sure that: • All screws are tightened. • The magnetic seal adheres to the cabinet. • The door opens and closes correctly.
ENGLISH WARNING! Make sure that the appliance is electrically not powered. 21 4 To carry out the following operations, we suggest that this be done with another person who will keep a firm hold on the doors of the appliance during the operations. • Remove the upper hinge cover with a screwdriver (4). • Open the door and remove the door end cap cover (1) . • Remove the top front covers on both sides. (2,6). • Unplug the cable connector of the display (3). 5 • Unscrew the middle hinge (B).
www.electrolux.com A 10 B C • Take out the cable from the door end cap and place it into the upper hinge . • Re- screw the hinge (7). 7 9 8 6 • Remove the covers (A). Remove the cover plugs (C). • Unscrew the handles (B)and fix them on the opposite side. Place the upper handle to the lower door and the lower handle to the upper door • Re-insert the cover plugs (C) on the opposite side. C • Connect the cable to the socket in the front panel. (8) • Put back the top front covers on both sides (5,9).
ENGLISH WARNING! In case you do not want to carry out the above mentioned operations, contact the nearest After Sales Service Force. The After Sales Service specialist will carry out the reversibility of the doors at your cost. 23 WARNING! After having reversed the opening direction of the doors check that all the screws are properly tightened and that the magnetic seal adheres to the cabinet. If the ambient temperature is cold (i.e. in Winter), the gasket may not fit perfectly to the cabinet.
www.electrolux.com CUPRINS 1. 2. 3. 4. 5. 6. 7. 8. 9. INSTRUCŢIUNI PRIVIND SIGURANŢA . . . . . . . . . . . . . . . . . . . . . . . . . . . . . . . . . . . . . . . . . . . . . . . . . . . . DESCRIEREA PRODUSULUI . . . . . . . . . . . . . . . . . . . . . . . . . . . . . . . . . . . . . . . . . . . . . . . . . . . . . . . . . . . PANOUL DE COMANDĂ . . . . . . . . . . . . . . . . . . . . . . . . . . . . . . . . . . . . . . . . . . . . . . . . . . . . . . . . . . . . . . . UTILIZAREA ZILNICĂ . . . . . . . .
ROMÂNA 1. 25 INSTRUCŢIUNI PRIVIND SIGURANŢA Pentru siguranţa dv. şi pentru a asigura utilizarea corectă a aparatului, înainte de instalare şi de prima utilizare, citiţi cu atenţie acest manual de utilizare, inclusiv recomandările şi avertismentele cuprinse în el. Pentru a evita erorile inutile şi ac‐ cidentele, este important să vă asiguraţi că toate persoanele care vor folosi aparatul cunosc foarte bine modul său de funcţionare şi caracteristicile de siguranţă.
www.electrolux.com Asiguraţi-vă ca ştecherul nu este strivit sau deteriorat de partea din spate a apa‐ ratului. Un cablu de alimentare strivit sau deteriorat se poate supraîncălzi şi poate produce un incendiu. 3. Trebuie să puteţi accesa uşor ştecherul aparatului. 4. Nu trageţi de cablu. 5. Dacă priza nu este fixă, nu introduceţi ştecherul în priză. Există riscul de elec‐ trocutare sau de incendiu. 6. Aparatul nu trebuie utilizat fără a fi mon‐ tat capacul becului din interior (dacă este prevăzut).
ROMÂNA 1.7 Protecţia mediului înconjurător flamabile: aparatul trebuie eliminat con‐ form reglementărilor aplicabile ale auto‐ rităţilor locale. Evitaţi deteriorarea unităţii de răcire, mai ales în spate, lângă schimbătorul de căldură. Materia‐ lele folosite pentru acest aparat marcate sunt reciclabile. cu simbolul Acest aparat nu conţine gaze care pot deteriora stratul de ozon, nici în circuitul de răcire şi nici în materialele de izola‐ re.
www.electrolux.com 3. PANOUL DE COMANDĂ 1 7 2 6 3 5 4 2 Butonul de reglare a temperaturii Buton plus (creştere) 3 Butonul de reglare a temperaturii Buton minus (scădere) 4 Buton Mode 6 Buton compartiment congelator 7 Buton compartiment frigider Se poate modifica sunetul predefinit al butoane‐ lor cu un altul de volum mai mare prin apăsarea simultană a butoanelor Mode şi Minus timp de câteva secunde. Modificarea este reversibilă. 3.
ROMÂNA Indicatorul OFF aferent frigiderului se stin‐ ge. Pentru a selecta o temperatură diferită, consultaţi paragraful "Reglarea temperaturii". 3.6 Reglarea temperaturii Selectaţi compartimentul frigiderului sau al con‐ gelatorului. Apăsaţi butonul temperatură pentru a seta tem‐ peratura. Setaţi temperatura implicită: • +4 °C pentru frigider • -18 °C pentru congelator Indicatorii de temperatură afişează temperatura setată. Temperatura aleasă va fi atinsă în 24 de ore.
www.electrolux.com sau când este nevoie de un semnal de reaminti‐ re pentru a nu uita sticlele care au fost puse în congelator pentru o răcire rapidă. Pentru activarea funcţiei: 1. Apăsaţi butonul DrinkChill . Apare simbolul DrinksChill. Cronometrul indică valoarea aleasă (30 de minute). 2. Pentru a schimba valoarea setată a crono‐ metrului între 1 şi 90 de minute, apăsaţi bu‐ toanele de reglare a temperaturii frigiderului. 3. Cronometrul începe să se aprindă intermi‐ tent (min).
ROMÂNA 31 4. UTILIZAREA ZILNICĂ 4.1 Conservarea alimentelor congelate La prima pornire sau după o perioadă de neutili‐ zare, înainte de a introduce alimentele în conge‐ lator, lăsaţi aparatul să funcţioneze timp de cel puţin 2 ore. Sertarele congelatorului vă permit să găsiţi rapid şi uşor pachetul de alimente dorit. Dacă se sto‐ chează cantităţi mari de alimente, scoateţi toate sertarele cu excepţia sertarului inferior care tre‐ buie păstrat pentru a asigura o circulaţie bună a aerului.
www.electrolux.com Acest suport pentru sticle poate fi înclinat pentru a păstra sticlele deschise anterior. Pentru a obţi‐ ne acest rezultat, trageţi raftul în sus astfel încât să se poată roti şi fixa pe următorul nivel supe‐ rior. 4.9 Poziţionarea rafturilor pe uşă Pentru a permite conservarea pachetelor cu ali‐ mente de diferite dimensiuni, rafturile de pe uşă pot fi poziţionate la înălţimi diferite.
ROMÂNA 4.11 Sertarul Freshzone Acest dispozitiv permite răcirea rapidă a alimen‐ telor şi creează o temperatură uniformă în sertar. Pentru activarea funcţiei: 1. Activaţi funcţia Cumpărături. 2. Indicatorul Cumpărături se aprinde. 3. Ridicaţi clapa, conform indicaţiilor din imagi‐ ne. 33 4.13 Sertarul CrispFresh Sertarul este potrivit pentru păstrarea fructelor şi legumelor. 4.14 QuickChill pentru băuturi Pentru dezactivarea funcţiei: 1. Coborâţi clapa. 2. Oprirea funcţiei Cumpărături. 3.
www.electrolux.com scoateţi cutia din congelator, trageţi-o în exterior, iar când ajunge la capăt, scoateţi-o ridicându-o de partea frontală. 2 1 Pentru dezactivarea funcţiei: 1. Coborâţi clapa. 2. Oprirea funcţiei Cumpărături. 3. Indicatorul Cumpărături se stinge. Funcţia se opreşte automat după câte‐ va ore. Când o puneţi înapoi, ridicaţi puţin partea din faţă a cutiei pentru a o introduce în congelator. După ce au trecut peste opritoare, împingeţi cutiile îna‐ poi pe poziţia lor. 4.
ROMÂNA Sticle: acestea trebuie să aibă dop şi să fie păstrate în raftul pentru sticle de pe uşă. Bananele, cartofii, ceapa şi usturoiul, dacă nu sunt ambalate, nu trebuie păstrate în frigider. 5.4 Recomandări privind păstrarea în congelator Pentru a obţine o congelare eficientă, iată câteva recomandări importante: • cantitatea maximă de alimente care poate fi congelată într-o perioadă de 24 de ore este in‐ dicată pe plăcuţa cu datele tehnice; • procesul de congelare durează 24 ore.
www.electrolux.com Multe substanţe speciale de curăţat suprafeţele din bucătărie conţin substanţe chimice care pot ataca/deteriora materialul plastic utilizat în acest aparat. Din acest motiv, se recomandă să curăţaţi carcasa exterioară a aparatului numai cu apă caldă în care s-a adăugat puţin detergent. După curăţare, conectaţi din nou aparatul la re‐ ţea. 6.
ROMÂNA Problemă 37 Cauză posibilă Soluţie Temperatura alimentelor este prea mare. Lăsaţi temperatura alimentelor să scadă până la temperatura camerei înainte de conservare. Temperatura camerei este prea mare. Reduceţi temperatura camerei. Funcţia Congelare rapidă este activată. Consultaţi paragraful "Funcţia Congelare Rapidă" Pe peretele posterior al fri‐ În timpul procesului de dezghe‐ Acest lucru este normal. giderului curge apă. ţare automată, gheaţa de pe peretele din spate se topeşte.
www.electrolux.com Problemă Cauză posibilă Soluţie Becul nu funcţionează. Becul se află în modul de aş‐ teptare. Închideţi şi deschideţi uşa. "dEMo" apare pe afişaj. Aparatul este în modul de‐ monstrativ. Menţineţi apăsat butonul Mode timp de aproximativ 10 secunde, până când este emis un semnal sonor lung, iar afişajul se stinge pentru scurt timp: aparatul va în‐ cepe să funcţioneze în modul obişnuit. Este declanşată soneria. . Uşa nu este închisă corect.
ROMÂNA 39 100 mm min corpul suspendat trebuie să fie de cel puţin 100 mm. În mod ideal, aparatul nu ar trebui amplasat sub corpuri de mobilier suspendate. Pentru a amplasa aparatul cu precizie în poziţie orizontală utilizaţi picioarele reglabile de la bază. 8.5 Instalarea filtrului TasteGuard B 20 mm A AVERTIZARE Trebuie să existe posibilitatea de a de‐ cupla aparatul de la priza de alimentare; prin urmare, ştecherul trebuie să fie uşor accesibil după instalarea aparatu‐ lui. 8.
www.electrolux.com tele tehnice corespund cu sursa de alimentare a locuinţei dv. Aparatul trebuie să fie legat la pământ. Ştecherul cablului electric este prevăzut cu un contact în acest scop. Dacă priza din locuinţă nu este le‐ gată la pământ, conectaţi aparatul la o împămân‐ tare separată, în conformitate cu reglementările în vigoare, după ce aţi consultat un electrician calificat. Producătorul nu-şi asumă nicio responsabilitate dacă aceste măsuri de siguranţă nu sunt respec‐ tate.
ROMÂNA A E 41 7 B F C D Scoateţi capacul cu ajutorul unei unelte (A). De‐ şurubaţi axul balamalei inferioare (B) şi montaţi-l în partea opusă. Reintroduceţi capacul (A) pe partea opusă. Reintroduceţi uşa de jos pe pivotul (B). Scoateţi cele 2 capace din plastic şi poziţionaţi-le pe partea opusă. Introduceţi axul balamalei centrale în orificiul din stânga al uşii de jos. Introduceţi uşa de jos pe pivotul balamalei infe‐ rioare (B). A 6 • Conectaţi cablul la priza din panoul frontal.
www.electrolux.com • Reintroduceţi ştifturile capacelor (C) pe partea opusă. C B A C A Pentru a efectua operaţiile următoare, vă recomandăm să apelaţi la încă o persoană care să ţină bine uşile apara‐ tului în cursul operaţiilor. • Scoateţi capacul balamalei superioare cu aju‐ torul unei şurubelniţe (4). • Deschideţi uşa şi scoateţi capacul de la capătul uşii (1). • Scoateţi capacele frontale de pe ambele laturi. (2,6). • Deconectaţi cablul conector pentru afişaj (3).
ROMÂNA • Deşurubaţi balamaua din mijloc (B). Scoateţi distanţierul de plastic (A) • Scoateţi distanţierul (F) şi mutaţi-l în partea cealaltă a pivotului balamalei (E). • Scoateţi uşile. • Îndepărtaţi ştiftul capacului din stânga al bala‐ malei din mijloc (C, D) şi mutaţi-l pe partea cealaltă. • Potriviţi ştiftul balamalei din mijloc (E) în orifi‐ ciul din stânga al uşii inferioare. A 43 7 B 6 E F C D Scoateţi capacul cu ajutorul unei unelte (A).
www.electrolux.com • Reintroduceţi ştifturile capacelor (C) pe partea opusă. C B A C A B Efectuaţi o verificare finală pentru a vă asigura că: • Toate şuruburile sunt bine strânse. • Garnitura magnetică aderă la carcasă. • Uşa se deschide şi se închide corect. AVERTIZARE Dacă nu doriţi să realizaţi singur opera‐ ţiile de mai sus, adresaţi-vă celui mai apropiat centru de service. Centrul de service va efectua operaţia de schimba‐ re a sensului de deschidere a uşilor contra cost.
Українська 45 ЗМІСТ 1. 2. 3. 4. 5. 6. 7. 8. 9. ІНСТРУКЦІЇ З ТЕХНІКИ БЕЗПЕКИ . . . . . . . . . . . . . . . . . . . . . . . . . . . . . . . . . . . . . . . . . . . . . . . . . . . . . . . ОПИС ВИРОБУ . . . . . . . . . . . . . . . . . . . . . . . . . . . . . . . . . . . . . . . . . . . . . . . . . . . . . . . . . . . . . . . . . . . . . . ПАНЕЛЬ КЕРУВАННЯ . . . . . . . . . . . . . . . . . . . . . . . . . . . . . . . . . . . . . . . . . . . . . . . . . . . . . . . . . . . . . . . . ЩОДЕННЕ КОРИСТУВАННЯ . . .
www.electrolux.com 1. ІНСТРУКЦІЇ З ТЕХНІКИ БЕЗПЕКИ В інтересах вашої безпеки та для належного використання приладу уважно прочитайте цю інструкцію, включаючи підказки та застере‐ ження, перш ніж встановлювати його і розпо‐ чинати ним користуватися. Аби уникнути по‐ милкових дій і нещасних випадків необхідно, щоб усі, хто користується приладом, ретельно ознайомилися з правилами експлуатації і тех‐ ніки безпеки.
Українська Попередження! Щоб уникнути нещасних випадків, за‐ міну всіх електричних компонентів (кабель живлення, вилка, компресор) має виконувати сертифікований май‐ стер або спеціаліст сервісного цент‐ ру. Забороняється подовжувати кабель живлення. 2. Подбайте про те, щоб вилка кабелю живлення не була роздавлена чи пош‐ коджена задньою частиною приладу. Роздавлена чи пошкоджена вилка ка‐ белю живлення може перегрітися і спричинити пожежу. 3. Подбайте про наявність доступу до вилки кабелю живлення. 4.
www.electrolux.com • Подбайте про те, щоб до розетки був до‐ ступ після встановлення приладу. • Підключення з метою подачі води здійснюй‐ те лише до джерела питної води (якщо пе‐ редбачено підключення до водопроводу). 1.6 Технічне обслуговування • Електричні роботи, необхідні для обслуго‐ вування приладу, мають виконуватися ква‐ ліфікованим електриком або компетентною особою. • Технічне обслуговування цього приладу має здійснюватися лише кваліфікованим персоналом.
Українська 2.
www.electrolux.com 3. ПАНЕЛЬ КЕРУВАННЯ 1 7 2 6 3 5 4 Після вибору температури анімація блимає протягом кількох хвилин. 3.2 Увімкнення 5 Кнопка DrinksChill і кнопка увімкнення/ вимкнення ON/OFF 6 Кнопка морозильника 7 Кнопка холодильного відділення Стандартний звук кнопок можна змінити на го‐ лосніший, одночасно натиснувши й утримую‐ чи декілька секунд кнопку Mode і кнопку «–». Нове налаштування можна скасувати у будьякий час. 3.
Українська 3.5 Вмикання холодильника Щоб увімкнути холодильник, виконайте ниж‐ ченаведені дії. 1. Натисніть кнопку холодильної камери. Індикатор вимкнення холодильника (OFF) згасне. Інструкції щодо вибору і встановлення іншої температури див. у розділі «Регулювання тем‐ ператури». 3.6 Регулювання температури Оберіть холодильну або морозильну камеру. Натисніть кнопку «Температура», щоб встано‐ вити температуру.
www.electrolux.com Щоб вимкнути функцію, виконайте описані нижче дії. 1. Натисніть кнопку Mode, щоб вибрати іншу функцію, або виберіть іншу функцію чи натискайте кнопку Mode, доки не зни‐ кнуть усі спеціальні символи. Функція вимикається шляхом вибору іншої температури для холодильника. 3.
Українська 3.15 Сигнал відкритих дверцят Якщо залишити дверцята відкритими на де‐ кілька хвилин, то пролунає звуковий сигнал. Про відкриті дверцята вас сповіщають: • блимання сигнального індикатора та 53 • звуковий сигнал Після відновлення нормальних умов (дверця‐ та закриті) звуковий сигнал вимикається. Під час сигнальної фази звуковий сигнал мож‐ на вимкнути, натиснувши будь-яку кнопку. 4. ЩОДЕННЕ КОРИСТУВАННЯ 4.
www.electrolux.com 4.6 Підставка для пляшок Покладіть пляшки (отворами наперед) на по‐ лицю вигнутої форми. Якщо полиця встановлена горизонтально, кладіть на неї лише закриті пляшки. Цю полицю можна нахиляти для зберігання раніше відкритих пляшок. Потягніть полицю вгору, щоб її можна було повернути догори й поставити на наступний вищий рівень. 4.
Українська Не переміщуйте велику нижню поли‐ чку дверцят, щоб забезпечити пра‐ вильне циркулювання повітря. 4.10 Регулювання вологості Овочі та фрукти рекомендується зберігати в шухлядах холодильника. Холодильник забез‐ печує низьку температуру, що дає змогу до‐ вше зберігати продукти.
www.electrolux.com 4.13 Шухляда CrispFresh Ця шухляда підходить для зберігання фруктів і овочів. Щоб вимкнути функцію, виконайте описані нижче дії. 1. Потягніть заслінку вниз. 2. Вимкніть функцію «Після відвідування ма‐ газину». 3. Індикатор «Після відвідування магазину» згасає. Функція автоматично вимикається че‐ рез декілька годин. 4.15 Виймання кошиків для заморожування з морозильника 4.14 Функція швидкого охолодження напоїв (QuickChill) Ця функція дозволяє швидко охолоджувати напої.
Українська 57 5. КОРИСНІ ПОРАДИ 5.1 Поради про те, як заощаджувати електроенергію • Не відкривати часто дверцята і не залиша‐ ти їх відкритими довше, ніж це абсолютно необхідно. • Коли температура навколишнього повітря висока, регулятор температури встановле‐ ний на більшу потужність, а прилад повні‐ стю завантажений, компресор може працю‐ вати безперервно, що призводить до появи інею або льоду на випарнику.
www.electrolux.com • не відкривайте часто дверцята і не зали‐ шайте їх відкритими довше, ніж це абсо‐ лютно необхідно; • після розморожування продукти швидко псуються, і їх не можна заморожувати зно‐ ву; • не можна зберігати продукти довше, ніж вказано їх виробником. 6. ДОГЛЯД ТА ЧИСТКА 6.
Українська 59 6.4 Розморожування морозильника Морозильна камера цієї моделі працює за принципом "no frost" (без наморожування). Це означає, що під час роботи приладу поклади криги не утворюються ні на внутрішніх стінках, ні на продуктах. Відсутність криги досягається завдяки постій‐ ній циркуляції холодного повітря всередині ка‐ мери, яке нагнітає вентилятор, робота якого регулюється автоматично. 7.
www.electrolux.com Проблема Можлива причина Спосіб усунення Вода затікає всередину холодильника. Закупорився отвір для зливу води. Прочистіть отвір для зливу во‐ ди. Пляшки з вином заважають воді стікати в колектор. Подбайте про те, щоб продук‐ ти не торкалися задньої стін‐ ки. Вода тече на підлогу. Злив для талої води спрямо‐ ваний не у піддон для випа‐ ровування, який розташова‐ ний над компресором. Приєднайте злив для талої во‐ ди до піддону для випарову‐ вання.
Українська 61 Проблема Можлива причина Спосіб усунення На дисплеї з'являється напис «dEMo». Прилад перебуває в демон‐ страційному режимі. Натисніть і утримуйте кнопку Mode протягом приблизно 10 секунд, доки не пролунає три‐ валий звуковий сигнал, а дисплей на короткий час не вимкнеться: прилад почне працювати у звичайному ре‐ жимі. Лунає звуковий сигнал. . Дверцята не зачинені належ‐ ним чином. Див. розділ «Сигнал відкритих дверцят».
www.electrolux.com 8.4 Вирівнювання Встановлюючи прилад, подбайте про те, щоб він стояв рівно. Цього можна досягти за допо‐ могою двох регульованих ніжок, що розташо‐ вані спереду внизу. 100 mm min прилад встановлюється під навісною шафою, то для забезпечення найвищої ефективності мінімальна відстань від верхнього краю при‐ ладу до навісної шафи має становити не мен‐ ше 100 мм. Утім, прилад краще не ставити під навісними шафами.
Українська Щоб забезпечити ефективну роботу повітряного фільтра з активованим вугіллям, слід замінювати його кожні півроку. Нові повітряні фільтри з активованим вугіллям можна придбати в магазині. 63 1 8.6 Підключення до електромережі Перш ніж підключати прилад до електромере‐ жі, переконайтеся, що показники напруги і ча‐ стоти, вказані на табличці з паспортними да‐ ними, відповідають показникам мережі у ва‐ шому регіоні. Прилад має бути заземлений.
www.electrolux.com A E 7 B F C D Зніміть кришку (А) за допомогою інструмента, відкрутіть шарнір нижньої завіси (В) і встано‐ віть його з протилежного боку. Встановіть кришку (А) з іншого боку. Встановіть нижні дверцята на стержень завіси (В). Зніміть 2 пластмасові кришки і встановіть їх з протилежного боку. Вставте шарнір середньої завіси у лівий отвір на нижніх дверцятах. Встановіть нижні дверцята на шарнір нижньої завіси (В). A 6 • Під’єднайте кабель до гнізда на передній панелі.
Українська • Встановіть заглушки (С) з протилежного бо‐ ку. C Попередження! Переконайтеся, що прилад не підклю‐ чено до електроживлення. Для виконання нижченаведеної про‐ цедури вам знадобиться помічник, який буде міцно тримати дверцята приладу. B A C 65 A B Проведіть остаточну перевірку, щоб переконатися в тому, що: • всі гвинти міцно загвинчені; • магнітний ущільнювач прилягає до корпусу; • дверцята правильно відкриваються і закри‐ ваються.
www.electrolux.com A 4 B C • Витягніть кабель з верхньої частини дверц‐ ят і протягніть його у верхню завісу. • Прикрутіть завісу (7). 5 7 • Відкрутіть середню завісу (В). Вийміть пластмасову прокладку (А) • Зніміть прокладку (F) і встановіть її з іншого боку шарніра завіси (E). • Зніміть дверцята. • Вийміть лівий шплінт середньої завіси (C, D) і встановіть його з протилежного боку. • Вставте стержень середньої завіси (E) у лі‐ вий отвір на нижніх дверцятах.
Українська 67 Проведіть остаточну перевірку, щоб переконатися в тому, що: • всі гвинти міцно загвинчені; • магнітний ущільнювач прилягає до корпусу; • дверцята правильно відкриваються і закри‐ ваються. 10 Попередження! Якщо ви не хочете самостійно вико‐ нувати наведені вище операції, звер‐ ніться до найближчого центру після‐ продажного обслуговування. Спеціа‐ ліст центру післяпродажного обслуго‐ вування перевстановить дверцята на інший бік за ваш рахунок. 9 8 • Зніміть кришки (А).
www.electrolux.com 9. ТЕХНІЧНІ ДАНІ Розміри ніші Висота 2019 мм Ширина 595 мм Глибина 658 мм Час виходу в робочий ре‐ жим 18 год. Напруга 230 - 240 В Частота струму 50 Гц Технічна інформація міститься на табличці, розташованій на внутрішньому лівому боці приладу, та на ярлику енергоспоживання. 10. ОХОРОНА ДОВКІЛЛЯ Здавайте на повторну переробку матеріали, позначені відповідним символом . і електронних приладів.
Українська 69
www.electrolux.
Українська 71
280152047-A-272013 www.electrolux.