user manual manual de instruções Fridge-Freezer Combinado END42405W
electrolux Electrolux. Thinking of you. Share more of our thinking at www.electrolux.
electrolux 3 – avoid open flames and sources of ignition – thoroughly ventilate the room in which the appliance is situated • It is dangerous to alter the specifications or modify this product in any way. Any damage to the cord may cause a short-circuit, fire and/or electric shock. Warning! Any electrical component (power cord, plug, compressor) must be replaced by a certified service agent or qualified service personnel. 1. Power cord must not be lengthened. 2.
electrolux • Connect to potable water supply only.3) Service • Any electrical work required to do the servicing of the appliance should be carried out by a qualified electrician or competent person. • This product must be serviced by an authorized Service Centre, and only genuine spare parts must be used. Environment Protection This appliance does not contain gasses which could damage the ozone layer, in either its refrigerant circuit or insulation materials.
electrolux 5 First use Cleaning the interior Before using the appliance for the first time, wash the interior and all internal accessories with lukewarm water and some neutral soap so as to remove the typical smell of a brandnew product, then dry thoroughly. Important! Do not use detergents or abrasive powders, as these will damage the finish. Daily use Movable shelves The walls of the refrigerator are equipped with a series of runners so that the shelves can be positioned as desired.
electrolux the natural moisture content of the food in the fruit and vegetable compartments is preserved for longer. When the ventilation slots are opened: more air circulation results in a lower air moisture content in the fruit and vegetable compartments. Positioning the door shelves To permit storage of food packages of various sizes, the door shelves can be placed at different heights.
electrolux 7 Meat (all types) : wrap in polythene bags and place on the glass shelf above the vegetable drawer. For safety, store in this way only one or two days at the most. Cooked foods, cold dishes, etc..: these should be covered and may be placed on any shelf. Fruit and vegetables: these should be thoroughly cleaned and placed in the special drawer(s) provided.
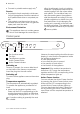
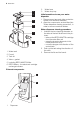
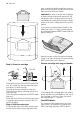
electrolux 2 Water lever 6 3 Water drop tray 3 Initial operations to use your water dispenser 1. Remove every tape and other protection system from the tank assembly 2. clean the components, as described into "Water dispenser cleaning procedure", in order to remove eventual residue. 5 2 Water dispenser cleaning procedure 1.
electrolux 9 8. Put the assembled tank on the door along the valve direction. 9. Block the stopping elements in the inverse order of unblock. 10. Insert again the BRITA MAXTRA cartridge in the funnel . A 4. Unscrew the valve in counter clockwise (pay particular attention not to lose the Valve Gasket because is necessary to a correct functioning of the features ). 5. Clean the tank lid, the valve and the gasket with a solution of warm water and neutral soap.
electrolux pour it inside the tank through the cover as shown into the picture (use the lid every time that you want to fill your water). Important! In order to avoid risk of spillage of water during closing and opening of the refrigerator door, we recommend to not fill completely the water tank but leave a head space of air (max. refilling limit till the frontal marks).
electrolux 11 mends that you replace the cartridge in the BRITA unit of your fridge every four weeks. BRITA Memo automatically reminds you when to change the cartridge. START START % 100 75 50 25 % 100 75 50 25 Functional control The flashing dot in the bottom right corner of the Memo indicates that the Memo is working. The unique BRITA Memo measures the recommended time of use of your cartridge. Memo is easy to use and automatically reminds your when to change your cartridge.
electrolux Every week one bar will disappear to show the remaining cartridge life. After four weeks all four bars will disappear. This, and a flashing arrow, indicate that the cartridge should now be changed. Insert a new cartridge according to the instructions and reactivate the Memo as described above. START % 100 75 50 25 Change display START START % 100 75 50 25 When only one bar is showing, you should just check whether you have a new BRITA MAXTRA filter cartridge to hand.
electrolux 13 Important information • The fridge door valve hole must be closed with the Water Valve during the regular functioning of the appliance. • Use only drinking water. The use of any other drink type can leave residues, taste or odor in the reservoir and in the tap. • It is possible to hear some noises caused by air entering when the water left the reservoir. • In case the water does not flow well, press the driving lever once again.
electrolux Defrosting of the refrigerator Frost is automatically eliminated from the evaporator of the refrigerator compartment every time the motor compressor stops, during normal use. The defrost water drains out through a trough into a special container at the back of the appliance, over the motor compressor, where it evaporates.
electrolux 15 Problem Possible cause Solution The lamp is in stand-by. Close and open the door. The lamp is defective. Refer to "Replacing the lamp". The temperature is not set correctly. Set a higher temperature. The door is not closed correctly. Refer to "Closing the door". The door has been opened too frequently. Do not keep the door open longer than necessary. The product temperature is too high. Let the product temperature decrease to room temperature before storage.
electrolux 5. Tighten the screw to the lamp cover. 6. Connect the plug to the mains socket. 7. Open the door. Make sure that the light comes on. Closing the door 1. Clean the door gaskets. 2. If necessary, adjust the door. Refer to "Installation". 3. If necessary, replace the defective door gaskets. Contact the Service Center.
A B 10 mm 10 mm 100 mm electrolux 17 Electrical connection Before plugging in, ensure that the voltage and frequency shown on the rating plate correspond to your domestic power supply. The appliance must be earthed. The power supply cable plug is provided with a contact for this purpose. If the domestic power supply socket is not earthed, connect the appliance to a separate earth in compliance with current regulations, consulting a qualified electrician.
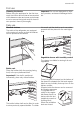
electrolux 2. Remove the upper door. 3. Remove the upper support and mount it in the opposite side. 4. Unscrew the middle hinge (H). Unscrew the plastic plugs located on the opposite side of the central hinge and introduce them in the holes occupied before by the hinge. H 7. Carefully place the appliance on its back, totally unscrew the adjustable foot and screw it in the opposite side. 8. Remove the bottom hinge by unscrewing its fixing screws. 9.
electrolux 19 13. Refit the ventilation grille, fixing the screws. 14. Reassemble the lower door. 15. Reassemble the middle hinge (H) in the opposite side. 16. Reassemble the upper door. 17. In your documentation bag you will find the upper hinge necessary to make the reversibility. Please screw it in place. Do a final check to make sure that: • All screws are tightened. • The magnetic seal adheres to the cabinet. • The door opens and closes correctly. If the ambient temperature is cold (i.e.
electrolux Electrolux. Thinking of you. Saiba mais sobre a nossa filosofia em www.electrolux.
electrolux 21 patibilidade ambiental, que é, no entanto, inflamável. Durante o transporte e a instalação do aparelho, certifique-se de nenhum dos componentes do circuito refrigerante está danificado. Se o circuito refrigerante se danificar: – evite chamas livres e fontes de ignição – ventile totalmente a divisão onde o aparelho se encontra • É perigoso alterar as especificações ou efectuar qualquer tipo de alteração neste produto.
electrolux • Assegure uma circulação de ar adequada à volta do aparelho, caso contrário pode provocar sobreaquecimento. Para garantir uma ventilação suficiente, siga as instruções relevantes para a instalação. • Sempre que possível, a traseira do aparelho deve ficar virada para uma parede para evitar toques nas partes quentes (compressor, condensador) e possíveis queimaduras. • Não coloque o aparelho perto de radiadores ou fogões.
electrolux 23 Importante Se a temperatura ambiente for inferior a 16 °C, prima o regulador da temperatura, até que se acenda o LED correspondente à temperatura inferior. Action Freeze Função Pode activar a função Action Freeze premindo o botão Action Freeze mais vezes, até que o LED correspondente ao indicador do símbolo Action Freeze se acenda. Pode desactivar a função Action Freeze premindo o botão Action Freeze mais vezes, até que seja seleccionada a temperatura pretendida.
electrolux Gaveta de vegetais com controlo de humidade A gaveta é indicada para o armazenamento de fruta e vegetais. peratura mais uniforme dentro do compartimento. Pode activar o ventilador premindo o botão de activação da ventoinha (consultar "Painel de controlo"). A lâmpada da ventoinha acende-se. Importante Ligue a ventoinha quando a temperatura ambiente exceder os 25 °C.
electrolux 25 Importante Em caso de descongelação acidental, por exemplo, devido a falta de electricidade, se a alimentação estiver desligada por mais tempo que aquele mostrado na tabela de características técnicas em "tempo de reinício", os alimentos descongelados têm de ser consumidos rapidamente ou cozinhados imediatamente e depois, novamente congelados (depois de arrefecerem).
electrolux • a água congela. Se for consumida imediatamente após a remoção do compartimento do congelador, poderá causar queimaduras de gelo na pele; • é aconselhável que anote a data de congelação em cada embalagem individual para permitir que saiba o tempo de armazenamento.
electrolux 27 Limpeza do dispensador de água 1. Destrave os dois elementos de bloqueio nos lados do reservatório tal como indicado nas figuras abaixo: – Retire o cartucho BRITA MAXTRA da unidade de filtragem da água – Pressione os elementos de bloqueio no meio e eleve-os – Desloque o bloqueador em direcção ao centro do reservatório. 2. Puxe o reservatório para cima, na direcção da válvula. 3. Retire a tampa e o funil. 5. 6. 7. 8. 9. 10. A 4.
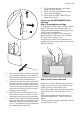
electrolux Passo 2: Inserir no reservatório da água Retire a tampa do reservatório. Antes de inserir o cartucho, retire o funil, lave-o, enxagúe-o e seque-o bem. A seguir, limpe bem o interior do reservatório da água com um pano húmido e seque-o. Coloque o cartucho no reservatório do filtro e empurre para baixo, até fazer 'click'. Ao virar o funil para baixo o cartucho deverá ficar no lugar.
electrolux 29 Para encher o reservatório com água fria, basta abrir a tampa no topo e despejar um jarro de água da torneira tal como indicado na figura (utilize a tampa de cada vez que desejar encher com água). Importante Para evitar o risco de derramemento de água durante o fecho e abertura da porta do frigorífico, recomendamos que não encha totalmente o depósito de água, deixando algum espaço com ar (limite de enchimento máximo até às marcas na frente).
electrolux START START % 100 75 50 25 Controlar o funcionamento O ponto intermitente no canto inferior direito do Memo indica que este está a funcionar.
electrolux 31 Em cada semana desaparece uma barra para indicar a vida útil restante do cartucho. Após quatro semanas todas as barras terão desaparecido. Isto e uma seta intermitente indicam que o cartucho deve ser agora trocado. Insira um cartucho novo de acordo com as instruções e reactive o Memo tal como acima descrito. START % 100 75 50 25 Quando for visível apenas uma barra, deverá verificar se possui um cartucho filtrante BRITA MAXTRA novo disponível.
electrolux Caso sejam recebidas instruções das autoridades no sentido de ferver a água da torneira, a água filtrada BRITA terá igualmente de ser fervida. Quando as instruções para ferver a água deixarem de estar em vigor, todo o sistema de filtragem tem de ser limpo e inserido um novo cartucho. Pode encontrar mais informações sobre os cartuchos filtrantes BRITA e o Memo no manual informativo BRITA.
electrolux 33 Descongelar o congelador O compartimento do congelador deste modelo, por sua vez, é do tipo "no frost". Isto significa que não há qualquer formação de gelo durante o seu funcionamento, quer nas paredes interiores, quer nos alimentos. A ausência de gelo deve-se à circulação contínua de ar frio no interior do compartimento, accionado por um ventilador controlado automaticamente.
electrolux Problema Possível causa A água escorre para o frigorífico. A saída de água está obstruída. Limpe a saída da água. Os produtos evitam que a água escorra para o colector de água. Certifique-se de que os produtos não tocam na placa traseira. A saída de água descongelada não escorre para o tabuleiro de evaporação acima do compressor. Engate a saída de água descongelada no tabuleiro de evaporação. A água escorre para o chão.
electrolux 35 3. Se necessário, substitua as juntas de porta defeituosas. Contacte o Centro de Assistência. Dados técnicos Dimensão do nicho de instalação Altura 1800 mm Largura 695 mm Profundidade 669 mm Tempo de reinício 20 h As informações técnicas encontram-se na placa de dados no lado esquerdo interno do aparelho e na etiqueta de energia.
electrolux uma ligação à terra separada, em conformidade com as normas actuais, consultando um electricista qualificado. O fabricante declina toda a responsabilidade caso as precauções de segurança acima não sejam cumpridas. Este aparelho cumpre com as directivas. E.E.C. 1. Retire a dobradiça superior com cuidado para que a porta superior não caia e guarde-a para utilização futura. Separadores traseiros No interior do aparelho, existem dois separadores que devem ser instalados conforme ilustrado.
electrolux 37 12. Retire a cobertura do orifício da grelha de ventilação, puxando-a na direcção da seta, e volte a instalá-la no lado oposto. 13. Volte a colocar a grelha de ventilação e aperte os parafusos. 14. Volte a instalar a porta inferior. 15. Volte a instalar a dobradiça central (H) no lado oposto. 16. Volte a instalar a porta superior. 17. No saco da documentação poderá encontrar a dobradiça superior necessária para efectuar esta reversibilidade. Coloque o parafuso no lugar. 7.
electrolux Preocupações ambientais O símbolo no produto ou na embalagem indica que este produto não pode ser tratado como lixo doméstico. Em vez disso, deve ser entregue ao centro de recolha selectiva para a reciclagem de equipamento eléctrico e electrónico. Ao garantir uma eliminação adequada deste produto, irá ajudar a evitar eventuais consequências negativas para o meio ambiente e para a saúde pública, que, de outra forma, poderiam ser provocadas por um tratamento incorrecto do produto.
electrolux 39
www.electrolux.com Para comprar acessórios e consumiveis na nossa loja web, por favor, visite: www.electrolux.