USER INSTRUCTIONS FROST FREE REFRIGERATION ENG
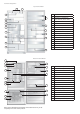
ii contents refrigeration Top Freezer Model 16 17 15 1 14 13 12 2 11 3 10 4 9 5 8 7 1 Freezer Bins 2 Twin Dairy Compartments 3 Store Safe Bin (where fitted) 4 Adjustable Door Bins 5 Multi Flow Outlets 6 Bottle Restrainer 7 Converta Bin(s) 8 Feature Lighting (where fitted) 9 Wine Rack (where fitted) 10 Deli Bin (where fitted) 11 Food Compartment Light 12 Air Curtain Cooling 13 Freezer Air Returns 14 Ice Cube Tray Lid & Storage Bin 15 Freezer Light (where fitted) 16 Freez
electrolux refrigeration contents i Congratulations Congratulations and thank you for choosing our refrigerator/ freezer. We are sure you will find your new appliance a pleasure to use. Before you use the appliance, we recommend that you read through the entire user manual, which provides the description of the appliance and its functions.
important safety instructions electrolux refrigeration Important safety instructions Please read the user manual carefully and store in a handy place for later reference.
installing your new appliance electrolux refrigeration Installing your new appliance Clearance around your appliance If you do not have a cupboard with a rear gap, the recommended clearance area on top increases from 50mm to 90mm (x) and from 32mm to 72mm (y). When positioned in a corner area, spacing of at least 350mm (400mm for E:Line models) on the hinge side will allow the doors to open enough to enable the removal of bins and shelves. 4.
initial start up/electronic display controls – electronic models electrolux refrigeration Initial start up Electronic display controls – electronic models only The appliance transfers heat from food placed inside the appliance to the outside air. This process makes the rear, the sides and the area adjacent to the doors, particularly at initial start up, feel warm. This is normal. There is a cooling coil located behind the rear wall of the cabinet. This coil cools and removes moisture from the air.
electrolux refrigeration electronic display controls – electronic models 7 Quick freeze function Use the quick freeze function when you add a large amount of food to the freezer compartment. This freezes the food quickly but does not affect the temperature in the refrigerator compartment. To use this function, press the quick freeze button once. An animated icon will light up. The quick freeze function will now operate for 90 minutes.
manual (rotary) controls – manual models electrolux refrigeration • Holiday mode Manual (rotary) controls – manual models If you think that you will be away from your appliance for an extended period and would like to take advantage of Controlling the temperature maximum energy efficiency. Then, just before you leave press Set the temperature by using the main temperature the Holiday mode button once and the appliance will enter controls at the rear of the refrigerator compartment.
electrolux refrigeration how to use the features of your appliance 9 How to use the features of your appliance • Adjusting the refrigerator temperature – bottom mount freezer (BM) model 1. Select the refrigerator control (top knob). 2. Rotate the knob clockwise to set colder. 3. Rotate the knob anti-clockwise to set less cold. This section tells you how to make the most of the refrigerator’s many useful features and how to clean them.
how to use the features of your appliance electrolux refrigeration STORE SAFE BIN(S) (WHERE FITTED) These bins are designed for the storage of items such as cosmetics and medicines and slide out for easy access. The left hand bin has a lock that is operated by turning the knob located on the fixed area between the bins. This may be turned with a coin. Do not store solvents or flammable materials such as nail polish remover or lighter fluid inside your refrigerator.
electrolux refrigeration care and maintenance 11 Care and maintenance Changing the light bulb •Refrigerator Light 1. Switch off the power at the power point and remove the refrigerator’s electric cord fromthe power point. 2. Carefully unclip the light cover. You do this by pulling the light cover tab at the reartowards the front of the cabinet. • Freezer light (where fitted) 1. Switch off the power at the power point and remove the refrigerator’s power cord from the power point. 2.
care and maintenance/general information electrolux refrigeration General information Cleaning the appliance warning BEFORE CLEANING: Turn appliance off at the power point, then remove power cord from socket. This will make sure there is no chance of getting an electric shock. • • Doors and exterior – white You should only clean the doors with luke-warm soapy water and a soft cloth, rinsing with clean water and then wipe the surface with clean water and a soft clean cloth to remove soap residue.
electrolux refrigeration troubleshooting 13 Troubleshooting If you think something may be wrong with your refrigerator, you can carry out some easy checks before calling for service. You may locate the problem, sparing yourself from inconvenience and saving time and money. problem When the motor seems to run more than expected solution When your appliance • Check that the power cord is plugged is not operating into the power outlet properly and that the outlet is switched ‘ON’.
specifications electrolux refrigeration MODEL GROUP ITEM DIMENSIONS (cm) Top Freezer Model Bottom Freezer Model HEIGHT 172.0 172.0 WIDTH 80.2 80.2 DEPTH 74.3 74.3 POWER SUPPLY VOLTAGE AND FREQUENCY 220-240v 50Hz TOTAL POWER ABSORBED (W) *AVERAGE DAILY UNITS ELECTRICITY (kWh) 1.07 1.19 FRIDGE 395.7 348.7 FREEZER 121.4 156.3 FRIDGE 377.3 330.6 FREEZER 98.4 132.
MODE D’EMPLOI LA RÉFRIGÉRATION SANS GIVRE FRE
ii Table des matières Modèle avec congélateur dans la partie supérieure 16 17 15 1 1 Bacs du congélateur 2 Double compartiment pour produits laitiers 3 Bac de stockage sécurisé (lorsqu’il en est équipé) 4 Bacs de porte modulables 5 Sorties d’air à débit multiple 6 Casiers à bouteilles 7 Bac(s) à légumes 8 Eclairage partiel (lorsqu’il en est équipé) 9 Porte-bouteilles (lorsqu’il en est équipé) 10 Bac à charcuterie (lorsqu’il en est équipé) 11 Lumière du compartiment à aliments 12 Re
Réfrigération, table des matières i Félicitations Avant d’utiliser cet appareil, nous vous recommandons de lire entièrement le manuel de l’utilisateur qui fournit une description du produit et de ses fonctions. Afin d’éviter les risques inhérents à l’utilisation d’un appareil électrique, il est important que le réfrigérateur soit installé correctement et que vous preniez connaissance des instructions de sécurité afin d’éviter une mauvaise utilisation et écarter les dangers.
Consignes importantes concernant la sécurité Consignes importantes concernant la sécurité Veuillez lire attentivement ce mode d’emploi et conservez-le à portée de main pour une consultation ultérieure.
Installation de votre nouvel appareil Installation de votre nouvel appareil Espace autour de votre appareil Si vous ne disposez pas d’un placard avec un espace à l’arrière, l’espace recommandé en haut augmente de 50 mm à 90 mm (x) et de 32 mm à 72 mm (y). Lorsqu’il est placé dans un coin, un espace d’au moins 350 mm (400 mm pour les modèles de la ligne E) du côté des charnières permettra d’ouvrir suffisamment la porte pour retirer les bacs et les clayettes. 4.
6 Première mise en marche/commandes à affichage électronique – modèles électroniques Première mise en marche Commandes à affichage électronique L’appareil évacue la chaleur des aliments qu’il contient vers l’extérieur. En raison de ce processus, lors de la première mise en marche, l’arrière, les côtés et la zone près de la porte dégagent de la chaleur. Cela est normal. Un serpentin de refroidissement se trouve derrière la paroi arrière de la carrosserie.
Commandes à affichage électronique – modèles électroniques Alarme de température du congélateur Mode vacances Si l’alarme sonne sans raison apparente, vérifiez que rien n’entrave la fermeture de la porte.
Commandes manuelles (rotatives) – modèles manuels Commandes manuelles (rotatives) – modèles manuels Contrôle de la température Réglez la température en utilisant les commandes de températures principales au fond du compartiment du réfrigérateur. Lorsque vous mettez votre réfrigérateur en marche pour la première fois, réglez les commandes du réfrigérateur et du congélateur sur MID.
Comment utiliser les fonctions de votre appareil Comment utiliser les fonctions de votre appareil Cette section vous apprend comment profiter au PANIERS DU CONGELATEUR (LORSQU’IL EN EST EQUIPE) maximum des fonctions de votre réfrigérateur et comment Des paniers et une clayette de congélateur sont placés dans le nettoyer. les réfrigérateurs avec congélateur dans la partie inférieure. Des paniers en grillage sont utilisés pour une bonne visibilité BACS DE PORTE du contenu.
10 Comment utiliser les fonctions de votre appareil BAC DE STOCKAGE SECURISE (LORSQU’IL EN EST EQUIPE) Ces bacs ont été conçus pour le stockage d’éléments comme des produits cosmétiques et des médicaments et ils coulissent pour un accès facile. Le bac gauche possède un système de verrou qui fonctionne en tournant la molette située sur la zone fixe entre les bacs. Il est possible de la tourner avec une pièce.
Soin et entretien/informations générales 11 Informations générales Nettoyage de l’appareil Avertissement AVANT LE NETTOYAGE : Inactivez l’appareil, puis débranchez le cordon d’alimentation. Cela écartera tout risque d’électrocution. • Portes et extérieur – blanc Vous ne devriez nettoyer les portes qu’avec de l’eau tiède savonneuse et un chiffon doux en rinçant avec de l’eau propre puis en essuyant avec un chiffon propre et doux pour éliminer les résidus de savon.
Localisation des pannes 12 Localisation des pannes Si vous pensez que votre réfrigérateur a un problème, vous pouvez effectuer quelques vérifications simples avant d’appeler un réparateur. Vous pourrez peut être localiser le problème, vous évitant des dépenses inutiles et vous faisant gagner du temps. Problème Solution Ne fonctionne pas • Vérifiez que le cordon d’alimentation est bien branché et que la prise est alimentée. Lorsque le moteur semble fonctionner plus que la normale.
13 Spécifications GROUPE DU MODELE Modèle avec le congélateur dans la partie supérieure (électronique) Modèle avec le congélateur dans la partie supérieure (manuel) Modèle avec le congélateur dans la partie inférieure HAUTEUR 172.0 172.0 172.0 LARGEUR 80.2 80.2 80.2 PROFONDEUR 74.3 74.3 74.3 ARTICLE DIMENSIONS (cm) TENSION ET FREQUENCE DE L’ALIMENTATION 220-240v 50Hz COURANT TOTAL ABSORBE (w) *UNITES ELECTRIQUES QUOTIDIENNES MOYENNES (kWh) 1.07 1.17 1.19 REFRIGERATEUR 395.7 427.
ISTRUZIONI PER L’USO FRIGORIFERI FROST FREE (sistema ‘senza brina’) ITA
ii indice Modello Top Freezer 16 17 15 1 14 13 12 2 11 3 10 4 9 5 8 7 6 1 Vaschette congelatore 2 Doppio scomparto burro/formaggi 3 Vaschetta di sicurezza (se in dotazione) 4 Vaschette regolabili nella porta 5 Bocchette di ventilazione multiflusso 6 Portabottiglie 7 Vaschetta/e Converta 8 Illuminazione principale (se in dotazione) 9 Rastrelliera vini (se in dotazione) 10 Vaschetta gastronomia (se in dotazione) 11 Lampada scomparto alimenti 12 Raffreddamento a porta d’aria 13
indice refrigerazione i Complimenti per l’acquisto Prima di mettere in uso l’apparecchio, raccomandiamo di leggere con attenzione l’intero manuale per l’utente che fornisce la descrizione dell’apparecchio e delle sue funzioni. Per evitare i rischi sempre presenti quando si utilizza un apparecchio elettrico, è importante che sia correttamente installato e che l’utente legga con attenzione le istruzioni di sicurezza, in modo da evitare un uso scorretto ed eventuali pericoli.
importanti istruzioni di sicurezza importanti istruzioni di sicurezza Leggere con attenzione il manuale per l’uso e conservarlo in un luogo a portata di mano per la successiva consultazione.
installazione del nuovo apparecchio installazione del nuovo apparecchio Lo spazio attorno all’apparecchio Se non si dispone di un mobile con apertura posteriore, lo spazio libero superiore raccomandato aumenta da 50 mm a 90 mm (x) e da 32 mm a 72 mm (y). Se l’apparecchio è collocato in posizione d’angolo, uno spazio di almeno 350 mm (400 mm per i modelli E:Line) sul lato della cerniera permetterà alle porte di aprirsi a sufficienza per la rimozione di vaschette e ripiani. 4.
6 primo avviamento/display elettronico comandi – modelli elettronici Primo avviamento Display elettronico dei comandi L’apparecchio trasferisce il calore dal cibo che viene posto all’interno all’aria esterna. Questo processo fa sì che le zone posteriori, laterali e intorno alla porta si riscaldino, in modo particolare al primo avviamento. Questo è normale. C’è una spirale di raffreddamento posta sulla parete posteriore del mobile. Questa spirale raffredda ed elimina l’umidità dall’aria.
display elettronico dei comandi – modelli elettronici Allarme temperatura del congelatore Modalità vacanze Se l’allarme suona senza motivo apparente, controllare che qualcosa non impedisca la chiusura completa della porta. Si utilizza quando si pensa di lasciare l’apparecchio per un lungo periodo e si vuole sfruttare al massimo la possibilità di risparmio energetico.
comandi manuali (rotazioni) – modelli manuali Comandi manuali (rotazioni) – modelli manuali Controllo della temperatura Per impostare la temperatura utilizzare i comandi temperatura principali sul retro dello scomparto frigorifero. La prima volta che si avvia il frigorifero, impostare su MID (medio) i comandi sia del frigorifero sia del congelatore. Il comando temperatura del frigorifero è influenzato dall’altitudine e si raccomanda di impostarlo su una temperatura più alta per compensare.
come utilizzare le funzioni dell’apparecchio Come utilizzare le funzioni dell’apparecchio In questa sezione si illustra come è possibile sfruttare al meglio le caratteristiche del frigorifero e come pulirlo. VASCHETTE DELLA PORTA Sia il frigorifero sia il congelatore hanno vaschette sulle porte. CESTELLI DEL CONGELATORE (SE IN DOTAZIONE) I cestelli del congelatore e un ripiano del congelatore sono montati sul fondo dei frigoriferi con congelatore.
10 come utilizzare le funzioni dell’apparecchio VASCHETTA/E DI SICUREZZA (SE IN DOTAZIONE) Queste vaschette sono progettate per la conservazione di prodotti come cosmetici o medicine e sono di facile accesso in quanto scorrevoli. La vaschetta di sinistra ha una chiusura di sicurezza che si attiva ruotando la manopola posta sulla parte fissa tra le vaschette. Per ruotarla, usare una moneta. Non riporre solventi o materiali infiammabili come toglismalto o acquaragia nel frigorifero.
cura e manutenzione / informazioni generali 11 Informazioni generali Pulizia dell’apparecchio avvertenza PRIMA DELLA PULIZIA: Spegnere l’apparecchio, quindi togliere il cavo di alimentazione dalla presa. In questo modo si è al sicuro da rischi di shock elettrico. • Porte ed esterni – bianco Le porte vanno pulite solo con acqua saponata tiepida e un panno morbido, e risciacquate con acqua pulita; infine pulire la superficie con un panno morbido bagnato con acqua pulita per rimuovere i residui di sapone.
risoluzione dei problemi 12 Risoluzione dei problemi Se si pensa che qualcosa nel frigorifero sia guasto, si possono eseguire alcune semplici verifiche prima di rivolgersi all’assistenza. È possibile che si individui il problema, evitando così qualunque incomodo e risparmiando tempo e denaro. Problema Soluzione Non funziona • Controllare che il cavo di alimentazione sia ben collegato alla presa di alimentazione e che la presa sia accesa.
13 specifiche GRUPPO MODELLO ARTICOLO DIMENSIONI (cm) Modello Top Freezer (elettronico) Modello Top Freezer (manuale) Modello Bottom Freezer ALTEZZA 172.0 172.0 172.0 LARGHEZZA 80.2 80.2 80.2 PROFONDITÀ 74.3 74.3 74.3 TENSIONE DI ALIMENTAZIONE E FREQUENZA 220-240 v 50 Hz POTENZA TOTALE ASSORBITA (W) *ELETTRICITÀ MEDIA GIORNALIERA PER UNITÀ (kWh) 1.07 1.17 1.19 FRIGORIFERO 395.7 427.0 348.7 CONGELATORE 121.4 121.4 156.3 FRIGORIFERO 377.3 377.3 330.6 CONGELATORE 98.4 98.
KULLANICI TALİMATLARI DONDURMAZ SOĞUTUCU TUR
ii içindekiler Üst Derin Dondurucu Modeli 16 17 15 1 14 13 12 2 11 3 10 4 9 5 8 7 6 1 Derin Dondurucu Kutular 2 İkiz Süt Ürünleri Bölmeleri 3 Güvenli Saklama Kutusu (mevcutsa) 4 Ayarlanabilir Kapı Kutuları 5 Çok Akışlı Hava Çıkışları 6 Şişe Tutucu 7 Converta Kutusu(ları) 8 Özellik Aydınlatması (mevcutsa) 9 Şarap Rafı (mevcutsa) 10 Deli Kutusu (mevcutsa) 11 Yiyecek Bölmesi Lambası 12 Hava Perdesi Soğutucusu 13 Derin Dondurucu Hava Geri Dönüşleri 14 Buzluk Kapağı & Saklama Ku
soğutma içerikleri i Tebrikler Cihazı kullanmadan önce, cihazın ve fonksiyonlarının açıklamalarını içeren kullanım kılavuzunu tamamen okumanızı tavsiye ediyoruz. Elektrikli bir cihazı kullanırken potensiyel olarak mevcut olan tehlikelerden kaçınmak için, cihazın doğru kurulmuş olması ve sizin yanlış kullanım ve tehlikelerden sakınmak için emniyet talimatlarını iyice okumuş olmanız önemlidir.
önemli güvenlik talimatları Önemli güvenlik talimatları Lütfen kullanım kılavuzunu dikkatli bir şekilde okuyunuz ve sonraki başvurular için el altında bir yerde saklayınız. Bu kitapçıkta göreceğiniz semboller aşağıdaki anlamlara gelmektedirler: Bu sembol kişisel güvenliğiniz ile ilgili bilgileri içermektedir Cihaz kendine tahsis edilmiş 220-240V, 50Hz AC elektrik fişine bağlanmalıdır. Cihazı ana güç kaynağından çıkarmak mümkün olmalıdır; fiş bu bakımdan kurulumdan sonra kolayca erişilebilir olmalıdır.
yeni cihazınızın montajı Yeni cihazınızın montajı Cihazınızın etrafındaki boşluk Eğer arkada boşluğu olan bir rafınız yoksa, tavsiye edilen aralık alanı üstte 50mm’den başlayarak 90mm (x)’ye kadar ve 32mm’den 72mm (y)’ye kadar olmalıdır. Köşe bir bölgeye yerleştirilmişse, menteşe tarafında en az 350mm (E:hattı modelleri için 400 mm) aralık bırakmak, kutu ve rafları çıkarmak için kapının yeteri kadar açılmasını sağlayacaktır. 4. Cihazın çevredeki dolaplar ile olan düzenini kontrol ediniz.
6 ilk çalıştırma /elektronik gösterge kontrolleri – elektronik modeller İlk çalıştırma Elektronik gösterge kontrolleri Cihaz, içine yerleştirilen yiyecekten dışardaki havaya ısı transfer eder. Bu işlem arkada, yanlarda ve kapıya bitişik bölgelerde, özellikle ilk çalıştırmada sıcaklık verir. Bu normaldir. Dolabın arka duvarının arkasına yerleştirilmiş bir soğutma kangalı vardır. Bu soğutma kangalı nemi havadan uzaklaştırır. O zaman bir fan soğuk, kuru havayı dolap boyunca devirdaim eder.
elektronik gösterge kontrolleri – elektronik modeller Derin dondurucu ısı alarmı Tatil modu Eğer alarm görünen bir neden için çalmıyorsa, herhangi birşeyin kapıyı açık tutup tutmadığını kontrol ediniz. Cihazınızdan uzun bir süre uzak kalacağınızı düşünüyorsanız ve maksimum enerji veriminden faydalanmak istiyorsanız, o halde gitmeden hemen önce tatil modu butonuna bir kez basınız ve cihazınız şemsiye ve güneş sembolü ile belirtilen tatil moduna geçer.
manüel (döner) kontroller – manüel modelleri Manüel (döner) kontroller – manüel modelleri Isının kontrol edilmesi Isıyı, soğutucu bölmesinin arkasındaki ana ısı kontrollerini kullanarak ayarlayınız. Soğutucuyu ilk çalıştırdığınızda, hem soğutucu hem de dipfriz kontrollerini MID’e ayarlayınız. Soğutucunun ısı kontrolü yükseklikten etkilenir ve dengelemek için onun daha sıcağa ayarlanması önerilir. Örn.
cihazınızın özelliklerinin kullanımı Cihazınızın özelliklerinin kullanımı Bu bölüm soğutucu özelliklerinden en iyi şekilde nasıl faydalanabildiğinizi ve bunların nasıl temizlendiklerini gösterir. KAPI SAKLAMA KUTULARI Hem buzdolabının hem de derin dondurucunun kapı saklama kutuları vardır. DERİN DONDURUCU SEPETLERİ (MEVCUTSA) Soğutucu Sepetler ve Soğutucu Raf alt derin donduruculu buzdolaplarına yerleştirilmişlerdir. Tel sepetler içeriğin kolaylıkla görünürlülüğünü sağlamak için kullanılırlar.
10 cihazınızın özelliklerinin kullanımı EMNİYETLİ KUTUDA(LAR) SAKLAMA (MEVCUTSA) Bu kutular kozmetik ve ilaç gibi maddelerin saklanması için tasarlanmışlardır ve kolay erişim için kaydırılabilirler. Sol taraftaki kutu, kutular arasındaki sabit bölgenin üzerindeki düğmenin döndürülmesi ile çalışan bir kilide sahiptir. Bu madeni bir para ile döndürülebilir. Soğutucunuzun içinde aseton veya yakıcı sıvı gibi çözücü veya yanıcı maddeler saklamayınız.
dikkat ve bakım/genel bilgiler 11 Genel bilgiler Cihazın temizlenmesi Güvenlik TEMIZLEMEDEN ÖNCE: Cihazı güç noktasından kapatınız, sonra güç kablosunu prizden çıkartınız. Bu elektrik şoku olması şansını sıfırlar. Cihazınızı emniyetli bir şekilde kullanmak önemlidir. Bu çocuklara dikkat etmeniz ve cihazı kullanırken kişileri bilgilendirmeniz anlamına gelir. Çocukların cihaz ile oynamadıklarından emin olmanız gerekmektedir. Aşağıdaki ip uçlarına uyunuz.
sorun giderme 12 Sorun giderme Eğer buzdolabınızda ters giden bir şeylerin olduğunu düşünüyorsanız, servisi çağırmadan önce bazı basit kontroller yapabilirsiniz. Problemin yerini belirleyebilir, kendinizi rahatsız olmaktan kurtarabilir, zaman ve para tasarrufu yapabilirsiniz. problem çözüm Çalışmıyor • Besleme kablosunun güç çıkışına doğru bir şekilde bağlanmış olduğunu ve çıkışın “AÇIK” olduğunu kontrol edin.
13 teknik özellikler MODEL GRUBU Üst Derin Donduruculu Model (elektronik) Üst Derin Donduruculu Model (manüel) Alt Derin Donduruculu Model YÜKSEKLİK 172.0 172.0 172.0 GENİŞLİK 80.2 80.2 80.2 DERİNLİK 74.3 74.3 74.3 PARÇA BOYUTLAR (cm) GÜÇ BESLEME VOLTAJI VE FREKANSI 220-240v 50Hz EMİLEN TOPLAM GÜÇ (W) *ORTALAMA GÜNLÜK ÜNİTE ELEKTRİĞİ (kWh) BRÜT KAPASİTE (litre) SAKLAMA KAPASİTESİ (litre) 1.07 1.17 1.19 BUZDOLABI 395.7 427.0 348.7 DERİN DONDURUCU 121.4 121.4 156.
ΟΔΗΓΙΕΣ ΓΙΑ ΤΟΝ ΧΡΗΣΤΗ ΨΥΞΗ ΧΩΡΙΣ ΔΗΜΙΟΥΡΓΙΑ ΠΑΓΟΥ GRE
ii Περιεχόμενα Μοντέλο με τον καταψύκτη επάνω 16 17 15 1 14 13 12 2 11 3 10 1 Θήκες καταψύκτη 2 Διπλά ράφια γαλακτοκομικών 3 Θήκη ασφαλούς αποθήκευσης (όπου υπάρχει) 4 Προσαρμοζόμενες θήκες πόρτας 5 Πολλαπλές έξοδοι αέρα 6 Βάση μπουκαλιών 7 Στεγανή θήκη (θήκες) 8 Φωτισμός χώρων (όπου υπάρχει) 9 Θήκη κρασιών (όπου υπάρχει) 10 Θήκη ευαίσθητων τροφίμων (όπου υπάρχει) 4 9 5 11 Φως χώρου τροφίμων 12 Σύστημα ψύξης Air Curtain Cooling 13 Επιστροφή αέρα καταψύκτη 14 Καπάκι θήκης για
Υλικά για ψύξη i Συγχαρητήρια Προτού χρησιμοποιήσετε την συσκευή σας, σας συνιστούμε να διαβάσετε ολόκληρο το εγχειρίδιο χρήσης, το οποίο περιέχει την περιγραφή της συσκευής και των λειτουργιών αυτής. Για να αποφύγετε τους κινδύνους που συνοδεύουν πάντοτε τη χρήση μιας ηλεκτρικής συσκευής, είναι σημαντικό η συσκευή να έχει εγκατασταθεί σωστά και να έχετε διαβάσει τις οδηγίες ασφαλείας, προκειμένου να αποφύγετε την εσφαλμένη χρήση και τους επακόλουθους κινδύνους.
Σημαντικές οδηγίες ασφαλείας Σημαντικές οδηγίες ασφαλείας Παρακαλούμε να διαβάσετε προσεκτικά το παρόν εγχειρίδιο χρήσης και να το φυλάξετε σε εύκολα προσβάσιμο σημείο για να το χρησιμοποιήσετε αργότερα.
Εγκατάσταση της νέας σας συσκευής Εγκατάσταση της νέας σας συσκευής Χώρος γύρω από την συσκευή σας Εάν δεν διαθέτετε ερμάριο με κενό στην πίσω πλευρά του, το συνιστώμενο κενό στην επάνω πλευρά της συσκευής αυξάνει από τα 50 mm στα 90 mm (x) και από τα 32 mm στα 72 mm (y). Όταν τοποθετείτε την συσκευή σε γωνία, το κενό πρέπει να είναι τουλάχιστον 350mm (400mm για τα μοντέλα E: Line) από την πλευρά των μεντεσέδων, προκειμένου να ανοίγουν αρκετά οι πόρτες, ώστε να μπορείτε να αφαιρέσετε καλάθια και ράφια.
6 Αρχική ενεργοποίηση / χειριστήρια ηλεκτρονικών ενδείξεων – ηλεκτρονικά μοντέλα Πρώτη θέση σε λειτουργία Χειριστήρια ηλεκτρονικών ενδείξεων Η συσκευή μεταφέρει τη θερμότητα από τα τρόφιμα που τοποθετείτε μέσα σε αυτήν στον περιβάλλοντα αέρα. Η διαδικασία αυτή κάνει το πίσω μέρος και το χώρο κοντά στις πόρτες να θερμαίνονται, ειδικά δε κατά την αρχική ενεργοποίηση. Αυτό είναι κάτι φυσιολογικό. Υπάρχει ένα ψυκτικό πηνίο πίσω από το εσωτερικό τοίχωμα του ψυγείου.
Χειριστήρια ηλεκτρονικών ενδείξεων – ηλεκτρονικά μοντέλα Συναγερμός θερμοκρασίας ψυγείου Σε περίπτωση που ηχεί ο συναγερμός χωρίς προφανή λόγο, ελέγξτε εάν κάτι εμποδίζει το κλείσιμο της πόρτας.
χειροκίνητα (περιστροφικά) χειριστήρια – χειροκίνητα μοντέλα Χειροκίνητα (περιστροφικά) χειριστήρια – χειροκίνητα μοντέλα Ρυθμίστε τη θερμοκρασία χρησιμοποιώντας τα κύρια χειριστήρια ρύθμισης της θερμοκρασίας στο πίσω μέρος του χώρου του ψυγείου. Όταν θα θέσετε το ψυγείο σας για πρώτη φορά σε λειτουργία, θέστε τόσο το χειριστήριο ρύθμισης της θερμοκρασίας του καταψύκτη όσο και το χειριστήριο ρύθμισης της θερμοκρασίας του ψυγείου στη θέση MID (μεσαία θέση).
Πώς να χρησιμοποιήσετε τις δυνατότητες της συσκευής σας Πώς να χρησιμοποιήσετε τις δυνατότητες της συσκευής σας Σε αυτό το μέρος των οδηγιών θα μάθετε πώς να χρησιμοποιείτε με τον καλύτερο δυνατό τρόπο τους αποθηκευτικούς χώρους του ψυγείου σας και πώς να τους καθαρίζετε. ΘΗΚΕΣ ΠΟΡΤΑΣ Τόσο στο ψυγείο όσο και στον καταψύκτη υπάρχουν θήκες στην πόρτα. Όλες οι θήκες πόρτας μπορούν να αφαιρεθούν και να καθαριστούν.
10 Πώς να χρησιμοποιήσετε τις δυνατότητες της συσκευής σας ΘΗΚΗ(-ΕΣ) ΑΣΦΑΛΟΥΣ ΑΠΟΘΗΚΕΥΣΗΣ (ΟΠΟΥ ΥΠΑΡΧΟΥΝ) Οι θήκες αυτές είναι σχεδιασμένες για την αποθήκευση αντικειμένων όπως καλλυντικά και φάρμακα και μπορείτε να τις τραβήξετε προς τα έξω για να έχετε καλύτερη πρόσβαση στο περιεχόμενό τους. Η θήκη στο αριστερό σας χέρι διαθέτει κλειδαριά, την οποία μπορείτε να γυρίσετε με το κομβίο που βρίσκεται στο σημείο μεταξύ των δύο θηκών. Το κομβίο αυτό μπορείτε να το περιστρέψετε χρησιμοποιώντας ένα νόμισμα.
Συντήρηση και φροντίδα / Γενικές πληροφορίες 11 Γενικές πληροφορίες Καθαρισμός της συσκευής Προειδοποίηση ΠΡΙΝ ΑΠΟ ΤΟΝ ΚΑΘΑΡΙΣΜΟ: Απενεργοποιήστε την συσκευή από τον ρευματοδότη και στη συνέχεια αποσυνδέστε το καλώδιο του ρεύματος από τον ρευματοδότη. Με τον τρόπο αυτό δεν κινδυνεύετε από ηλεκτροπληξία.
Αντιμετώπιση προβλημάτων 12 Αντιμετώπιση προβλημάτων Εάν πιστεύετε ότι το ψυγείο σας έχει κάποιο πρόβλημα, μπορείτε να εκτελέσετε ορισμένους εύκολους ελέγχους προτού καλέσετε τον τεχνικό. Υπάρχει πιθανότητα να εντοπίσετε μόνοι σας το πρόβλημα, με αποτέλεσμα να αποφύγετε την ταλαιπωρία και να εξοικονομήσετε χρόνο και χρήμα. Πρόβλημα Αντιμετώπιση Δεν λειτουργεί • Ελέγξτε, εάν το καλώδιο ρεύματος είναι συνδεμένο σωστά στον ρευματοδότη και ότι ο ρευματοδότης είναι ενεργοποιημένος (‘ON’).
13 Χαρακτηριστικά ΚΑΤΗΓΟΡΙΑ – ΜΟΝΤΕΛΟ ΕΙΔΟΣ ΔΙΑΣΤΑΣΕΙΣ (cm) Μοντέλο με τον καταψύκτη επάνω (ηλεκτρονικό) Μοντέλο με τον καταψύκτη επάνω (χειροκίνητο) Μοντέλο με τον καταψύκτη κάτω ΥΨΟΣ 172.0 172.0 172.0 ΠΛΑΤΟΣ 80.2 80.2 80.2 ΒΑΘΟΣ 74.3 74.3 74.3 ΤΑΣΗ ΤΡΟΦΟΔΟΣΙΑΣ VOLTAGE ΚΑΙ ΣΥΧΝΟΤΗΤΑ 220-240v 50Hz ΣΥΝΟΛΙΚΗ ΚΑΤΑΝΑΛΩΣΗ ΡΕΥΜΑΤΟΣ (W) * ΜΕΣΗ ΗΜΕΡΗΣΙΑ ΚΑΤΑΝΑΛΩΣΗ ΡΕΥΜΑΤΟΣ (kWh) ΣΥΝΟΛΙΚΗ ΧΩΡΗΤΙΚΟΤΗΤΑ (λίτρα) ΧΩΡΗΤΙΚΟΤΗΤΑ ΑΠΟΘΗΚΕΥΣΗΣ (λίτρα) 1.07 1.17 1.19 ΨΥΓΕΙΟ 395.7 427.0 348.
©2007 ELECTROLUX HOME PRODUCTS PTY LTD A.B.