ENN2643AOW .................................................. ...............................................
www.electrolux.com CONTENTS SAFETY INFORMATION . . . . . . . . . . . . . . . . . . . . . . . . . . . . . . . . . . . . . . . . . . . . . . . . . . . . . . . . . 3 CONTROL PANEL . . . . . . . . . . . . . . . . . . . . . . . . . . . . . . . . . . . . . . . . . . . . . . . . . . . . . . . . . . . . . 6 DAILY USE . . . . . . . . . . . . . . . . . . . . . . . . . . . . . . . . . . . . . . . . . . . . . . . . . . . . . . . . . . . . . . . . . . . 9 HELPFUL HINTS AND TIPS . . . . . . . . . . . . . . . . . . .
ENGLISH 3 SAFETY INFORMATION In the interest of your safety and to ensure the correct use, before installing and first using the appliance, read this user manual carefully, including its hints and warnings. To avoid unnecessary mistakes and accidents, it is important to ensure that all people using the appliance are thoroughly familiar with its operation and safety features.
www.electrolux.com 5. • • • • If the power plug socket is loose, do not insert the power plug. There is a risk of electric shock or fire. 6. You must not operate the appliance without the lamp cover (if foreseen) of interior lighting. This appliance is heavy. Care should be taken when moving it. Do not remove nor touch items from the freezer compartment if your hands are damp/wet, as this could cause skin abrasions or frost/freezer burns. Avoid prolonged exposure of the appliance to direct sunlight.
ENGLISH ENVIRONMENT PROTECTION This appliance does not contain gasses which could damage the ozone layer, in either its refrigerant circuit or insulation materials. The appliance shall not be discarded together with the urban refuse and rubbish. The insulation foam contains flammable gases: the appliance shall be disposed according to the applicable regulations to obtain from your local authorities. Avoid damaging the cooling unit, especially at the rear near the heat exchanger.
www.electrolux.com CONTROL PANEL 1 7 6 5 4 1 Display 3 2 6 Freezer Compartment button 2 Drink Chill button and Appliance ON/ OFF button 3 Temperature colder button 4 Temperature warmer button 5 Fridge Compartment button 7 Mode button It is possible to change predefined sound of buttons to a loudly one by pressing together Mode button and Temperature colder button for some seconds. Change is reversible.
ENGLISH SWITCHING ON THE FRIDGE To switch on the fridge: 1. Press the Fridge Compartment button. The fridge OFF indicator goes off. To select a different set temperature refer to "Temperature regulation". SWITCHING OFF To switch off the appliance do these steps: 1. Press the Appliance ON/OFF button for 3 seconds. 2. The display switches off. 3. To disconnect the appliance from the power disconnect the mains plug from the power socket. TEMPERATURE REGULATION Select the fridge or freezer compartment.
www.electrolux.com FASTFREEZE MODE To switch on the function: 1. Select the freezer compartment. 2. Press the Mode button until the corresponding icon appears. The FastFreeze indicator flashes for few seconds. This function stops automatically after 52 hours. To switch off the function before its automatic end: 1. Select the freezer compartment. 2. Press the Mode button until the FastFreeze indicator flashes. 3. The FastFreeze indicator goes off.
ENGLISH 9 DAILY USE CLEANING THE INTERIOR Before using the appliance for the first time, wash the interior and all internal accessories with lukewarm water and some neutral soap so as to remove the typical smell of a brand-new product, then dry thoroughly. Do not use detergents or abrasive powders, as these will damage the finish. If DEMO appears on the Display, the appliance is in demonstration mode: refer to “WHAT TO DO IF...” paragraph.
www.electrolux.com POSITIONING THE DOOR SHELVES To permit storage of food packages of various sizes, the door shelves can be placed at different heights. To make these adjustments proceed as follow: gradually pull the shelf in the direction of the arrows until it comes free, then reposition as required. HUMIDITY CONTROL The glass shelf incorporates a device with slits (adjustable by means of a sliding lever), which makes it possible to regulate the temperature in the vegetable drawer(s).
ENGLISH 11 HELPFUL HINTS AND TIPS HINTS FOR ENERGY SAVING • Do not open the door frequently or leave it open longer than absolutely necessary. • If the ambient temperature is high and the Temperature Regulator is set to low temperature and the appliance is fully loaded, the compressor may run continuously, causing frost or ice on the evaporator. If this happens, set the Temperature Regulator toward warmer settings to allow automatic defrosting and so a saving in electricity consumption.
www.electrolux.com CARE AND CLEANING CAUTION! Unplug the appliance before carrying out any maintenance operation. This appliance contains hydrocarbons in its cooling unit; maintenance and recharging must therefore only be carried out by authorized technicians. PERIODIC CLEANING The equipment has to be cleaned regularly: • clean the inside and accessories with lukewarm water and some neutral soap. • regularly check the door seals and wipe clean to ensure they are clean and free from debris.
ENGLISH 13 WHAT TO DO IF… WARNING! Before troubleshooting, disconnect the mains plug from the mains socket. Only a qualified electrician or competent person must do the troubleshooting that is not in this manual. There are some sounds during normal use (compressor, refrigerant circulation). Problem Possible cause Solution The appliance does not operate. The lamp does not operate. The appliance is switched off. Switch on the appliance. The mains plug is not connected to the mains socket correctly.
www.electrolux.com Problem Possible cause Water flows on the ground. The melting water outlet Attach the melting water does not flow in the evapo- outlet to the evaporative rative tray above the com- tray. pressor. Solution The temperature in the appliance is too low. The temperature regulator is not set correctly. Set a higher temperature. The temperature in the appliance is too high. The temperature regulator is not set correctly. Set a lower temperature.
ENGLISH 1. 2. 3. 4. 5. CLOSING THE DOOR 1. 2. 3. Clean the door gaskets. If necessary, adjust the door. Refer to "Installation". If necessary, replace the defective door gaskets. Contact the Service Center. 15 Press on the rear hook and at the same time slide the cover in the direction of the arrow. Replace the lamp with one of the same power and specifically designed for household appliances. (the maximum power is shown on the light bulb cover). Fix the lamp cover into its original position.
www.electrolux.com INSTALLATION WARNING! Read the "Safety Information" carefully for your safety and correct operation of the appliance before installing the appliance.
ENGLISH WARNING! A cut off plug inserted into a 13 amp socket is a serious safety (shock) hazard. Ensure that it is disposed of safely. DOOR REVERSIBILITY The door of the appliance opens to the right. If you want to open the door to the left, do these steps before you install the appliance: • Loosen and remove the upper pin. • Remove the upper door. • Remove the spacer. • Loosen the middle hinge. • Remove the lower door. S • Loosen and remove the lower pin.
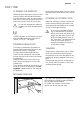
www.electrolux.com VENTILATION REQUIREMENTS 6 cm The airflow behind the appliance must be sufficient. min. 200 cm2 min. 200 cm2 Do these steps. INSTALLING THE APPLIANCE CAUTION! Make sure that the mains cable can move freely. If necessary cut the adhesive sealing strip and then apply it to the appliance as shown in figure.
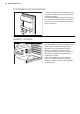
ENGLISH 2 1 19 Install the appliance in the niche. Push the appliance in the direction of the arrow (1) until the upper gap cover stops against the kitchen furniture. Push the appliance in the direction of the arrow (2) against the cupboard on the opposite side of the hinge. Adjust the appliance in the niche. Make sure that the distance between the appliance and the cupboard front-edge is 44 mm.
www.electrolux.com Remove the correct part from the hinge cover (E). Make sure to remove the part DX, in the case of right hinge, SX in opposite case. Attach the covers (C, D) to the lugs and the hinge holes. Install the vent grille (B). Attach the hinge covers (E) to the hinge. C D E E B E F D Connect the appliance laterally to the kitchen furniture sidewall: 1. Fit the bracket (E) and (F), adjust the distance. 2. Fix using the screws (as in figure). 3. Fit the cover (D).
ENGLISH 21 Disconnect the parts (Ha), (Hb), (Hc) and (Hd). Install the part (Ha) on the inner side of the kitchen furniture. ca. 50 mm 90° 21 mm 90° ca. 50 mm 21 mm Push the part (Hc) on the part (Ha). Ha Hc Open the appliance door and the kitchen furniture door at an angle of 90°. Insert the small square (Hb) into guide (Ha). Put together the appliance door and the furniture door and mark the holes.
www.electrolux.com Remove the brackets and mark a distance of 8 mm from the outer edge of the door where the nail must be fitted (K). 8 mm K Ha Place the small square on the guide again and fix it with the screws supplied. Align the kitchen furniture door and the appliance door by adjusting the part Hb. Hb Press the part (Hd) on the part (Hb). Hb Hd Do a final check to make sure that: • All screws are tightened. • The sealing strip is attached tightly to the cabinet.
ENGLISH 23 NOISES There are some sounds during normal running (compressor, refrigerant circulation).
www.electrolux.com HISSS! HISSS! SSSRRR! SSSRRR! CRACK! CRACK! TECHNICAL DATA Dimension of the recess Height 1780 mm Width 560 mm Depth 560 mm Rising Time 25 h Voltage 230-240 V Frequency 50 Hz The technical information are situated in the rating plate on the internal left side of the appliance and in the energy label.
ENGLISH 25 ENVIRONMENT CONCERNS Recycle the materials with the symbol . Put the packaging in applicable containers to recycle it. Help protect the environment and human health and to recycle waste of electrical and electronic appliances. Do not dispose appliances marked with the symbol with the household waste. Return the product to your local recycling facility or contact your municipal office.
www.electrolux.
ENGLISH 27
www.electrolux.