EOA5450BAK EOA5450BAX EN Oven User Manual
www.electrolux.com CONTENTS 1. SAFETY INFORMATION....................................................................................3 2. SAFETY INSTRUCTIONS..................................................................................4 3. PRODUCT DESCRIPTION................................................................................ 6 4. BEFORE FIRST USE......................................................................................... 7 5. DAILY USE.......................................
ENGLISH 1. 3 SAFETY INFORMATION Before the installation and use of the appliance, carefully read the supplied instructions. The manufacturer is not responsible for any injuries or damages that are the result of incorrect installation or usage. Always keep the instructions in a safe and accessible location for future reference. 1.
www.electrolux.com • • • • • • • • Always use oven gloves to remove or put in accessories or ovenware. Before maintenance cut the power supply. Ensure that the appliance is switched off before replacing the lamp to avoid the possibility of electric shock. Do not use a steam cleaner to clean the appliance. Do not use harsh abrasive cleaners or sharp metal scrapers to clean the glass door since they can scratch the surface, which may result in shattering of the glass.
ENGLISH • • • • • • • • • Make sure not to cause damage to the mains plug and to the mains cable. Should the mains cable need to be replaced, this must be carried out by our Authorised Service Centre. Do not let mains cables touch or come near the appliance door, especially when the door is hot. The shock protection of live and insulated parts must be fastened in such a way that it cannot be removed without tools. Connect the mains plug to the mains socket only at the end of the installation.
www.electrolux.com closed furniture panel and cause subsequent damage to the appliance, the housing unit or the floor. Do not close the furniture panel until the appliance has cooled down completely after use. • 2.5 Internal light • 2.4 Care and cleaning WARNING! Risk of injury, fire, or damage to the appliance. • • • • • • • Before maintenance, deactivate the appliance and disconnect the mains plug from the mains socket. Make sure the appliance is cold.
ENGLISH 7 11 Shelf positions 3.2 Accessories Wire shelf For roasting and grilling. Use the trivet only with the Grill- / Roasting pan. Telescopic runners For cookware, cake tins, roasts. Grill- / Roasting pan For shelves and trays. To bake and roast or as a pan to collect fat. Trivet 4. BEFORE FIRST USE WARNING! Refer to Safety chapters. Put the accessories and the removable shelf supports back to their initial position. 4.1 Initial Cleaning 4.
www.electrolux.com Press the or button to set the correct time. After approximately five seconds, the flashing stops and the display shows the time of day you set. Press again and again until the indicator for the Time of Day function flashes. To set a new time, refer to "Setting the time". 4.3 Changing the time You cannot change the time of day if the Duration End or function operates. 5. DAILY USE WARNING! Refer to Safety chapters. 5.
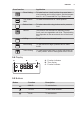
ENGLISH Oven function Application Pizza Setting To bake food on 1 shelf position for a more inten‐ sive browning and a crispy bottom. Set the tempera‐ ture 20 - 40 °C lower than for Top / Bottom Heat. Top / Bottom Heat To bake and roast food on 1 shelf position. Bottom Heat To bake cakes with crispy bottom and to preserve food. Defrost This function can be used for defrosting frozen foods, such as vegetables and fruits. The defrosting time depends on the amount and size of the frozen food.
www.electrolux.com 6. CLOCK FUNCTIONS 6.1 Clock functions table Clock function Application Time of day To set, change or check the time of day. Minute Minder To set countdown time. This function has no effect on the operation of the appliance. Duration To set the cooking time of the oven. End To set the time of day when the oven should deactivate.
ENGLISH 11 7.2 Telescopic runners inserting the accessories With the telescopic runners you can put in and remove the shelves more easily. CAUTION! Do not clean the telescopic runners in the dishwasher. Do not lubricate the telescopic runners. Deep pan: Push the deep pan between the guide bars of the shelf support. CAUTION! Make sure you push back the telescopic runners fully in the appliance before you close the oven door.
www.electrolux.com Put the wire shelf on the deep pan. Put the wire shelf and the deep pan on the telescopic runners. 2. Put the deep pan into the oven on the necessary shelf position. You can use the trivet to grill flat dishes in large quantities and to toast. 1. Put the trivet into the deep pan so that the supports of the wire shelf point down. 7.3 Trivet and Grill- / Roasting pan WARNING! Be careful when you remove the accessories from a hot appliance. There is a risk of burns. 2.
ENGLISH 13 9. HINTS AND TIPS WARNING! Refer to Safety chapters. The temperature and baking times in the tables are guidelines only. They depend on the recipes and the quality and quantity of the ingredients used. 9.1 Inner side of the door • • • • In some models, on the inner side of the door you can find: • • the numbers of the shelf positions. information about the oven functions, recommended shelf positions and temperatures for typical dishes. • 9.
www.electrolux.com Baking results Possible cause Remedy The cake browns uneven‐ ly. The oven temperature is too high and the baking time is too short. Set a lower oven tempera‐ ture and a longer baking time. The cake browns uneven‐ ly. The mixture is unevenly distributed. Spread the mixture evenly on the baking tray. The cake is not ready in the baking time given. The oven temperature is too low. The next time you bake, set a slightly higher oven temperature. 9.
ENGLISH 15 Cakes / pastries / breads on baking trays Food Function Temperature (°C) Time (min) Shelf position Plaited bread / Bread crown Top / Bottom Heat 170 - 190 30 - 40 3 Christmas stol‐ len Top / Bottom Heat 160 - 1801) 50 - 70 2 Bread (rye Top / Bottom bread): Heat 1. First part of baking pro‐ cedure. 2. Second part of bak‐ ing proce‐ dure. 1. 2301) 2. 160 - 180 1. 20 2.
www.electrolux.com Food Function Temperature (°C) Time (min) Shelf position Yeast cakes with delicate toppings (e.g. quark, cream, custard) Top / Bottom Heat 160 - 1801) 40 - 80 3 Temperature (°C) Time (min) Shelf position 1) Preheat the oven. 2) Use a deep pan.
ENGLISH 17 Food Function Temperature (°C) Time (min) Shelf position Small cakes / Small cakes (20 per tray) Top / Bottom Heat 1701) 20 - 30 3 1) Preheat the oven. 9.
www.electrolux.
ENGLISH Food Temperature (°C) Time (min) Shelf position Unleavened bread 230 - 2501) 10 - 20 2 Puff pastry flan 160 - 1801) 45 - 55 2 Flammekuchen (Pizza-like dish from Alsace) 230 - 2501) 12 - 20 2 Piroggen (Russian version of calzone) 180 - 2001) 15 - 25 2 19 1) Preheat the oven. 2) Use a deep pan. 9.8 Roasting • • • • • • Use heat-resistant ovenware to roast (refer to the instructions of the manufacturer).
www.electrolux.com Pork Food Quantity (kg) Function Tempera‐ ture (°C) Time (min) Shelf posi‐ tion Shoulder / Neck / Ham joint 1 - 1.5 Turbo Grill‐ ing 160 - 180 90 - 120 1 Chop / Spare rib 1 - 1.5 Turbo Grill‐ ing 170 - 180 60 - 90 1 Meatloaf 0.75 - 1 Turbo Grill‐ ing 160 - 170 50 - 60 1 Pork knuckle (precooked) 0.
ENGLISH 21 Poultry Food Quantity (kg) Function Tempera‐ ture (°C) Time (min) Shelf posi‐ tion Poultry por‐ tions 0.2 - 0.25 each Turbo Grill‐ ing 200 - 220 30 - 50 1 Half chicken 0.4 - 0.5 each Turbo Grill‐ ing 190 - 210 35 - 50 1 Chicken, poulard 1 - 1.5 Turbo Grill‐ ing 190 - 210 50 - 70 1 Duck 1.5 - 2 Turbo Grill‐ ing 180 - 200 80 - 100 1 Goose 3.5 - 5 Turbo Grill‐ ing 160 - 180 120 - 180 1 Turkey 2.5 - 3.
www.electrolux.com Food Whole Fish, 500 - 1000 g Temperature (°C) Time (min) Shelf position 1st side 2nd side 210 - 230 15 - 30 15 - 30 3/4 Fast Grilling Food Time (min) Shelf position 1st side 2nd side Burgers / Burgers 8 - 10 6-8 4 Pork fillet 10 - 12 6 - 10 4 Sausages 10 - 12 6-8 4 Fillet / Veal steaks 7 - 10 6-8 4 Toast / Toast 1-3 1-3 5 Toast with topping 6-8 - 4 9.11 Frozen foods Use the function True Fan Cooking.
ENGLISH 23 Frozen ready meals Food Function Temperature (°C) Time (min) Shelf position Frozen pizza Top / Bottom Heat as per manu‐ facturer’s in‐ structions as per manu‐ facturer’s in‐ structions 3 French fries1) (300 - 600 g) Top / Bottom Heat or Turbo Grilling 200 - 220 as per manu‐ facturer’s in‐ structions 3 Baguettes Top / Bottom Heat as per manu‐ facturer’s in‐ structions as per manu‐ facturer’s in‐ structions 3 Fruit flans Top / Bottom Heat as per manu‐ facturer’s in‐ structio
www.electrolux.com • • • • Put no more than six one-litre preserve jars on the baking tray. Fill the jars equally and close with a clamp. The jars cannot touch each other. Put approximately 1/2 litre of water into the baking tray to give sufficient moisture in the oven. • When the liquid in the jars starts to simmer (after approximately 35 - 60 minutes with one-litre jars), stop the oven or decrease the temperature to 100 °C (see the table).
ENGLISH Food Temperature (°C) Time (h) Vegetables for sour 60 - 70 Mushrooms Herbs 25 Shelf position 1 position 2 positions 5-6 3 1/4 50 - 60 6-8 3 1/4 40 - 50 2-3 3 1/4 Temperature (°C) Time (h) Shelf position Plums 60 - 70 Apricots Fruit Food 1 position 2 positions 8 - 10 3 1/4 60 - 70 8 - 10 3 1/4 Apple slices 60 - 70 6-8 3 1/4 Pears 60 - 70 6-9 3 1/4 10. CARE AND CLEANING WARNING! Refer to Safety chapters. 10.
www.electrolux.com 3. Set the oven temperature to 250 °C and let the oven operate for 1 hour. 4. When the appliance is cool, clean it with a soft and moist sponge. 10.4 Removing and installing the door 2 1 Install the shelf supports in the opposite sequence. The retaining pins on the telescopic runners must point to the front. 10.3 Catalytic cleaning CAUTION! Do not clean the catalytic surface with oven sprays, abrasive cleaning agents, soap or other cleaning agents.
ENGLISH 8. Hold the door glass panels on their top edge one by one and pull them up out of the guide. 27 1. Deactivate the appliance. 2. Remove the fuses from the fuse box or deactivate the circuit breaker. The top lamp 1. Turn the lamp glass cover counterclockwise to remove it. 9. Clean the glass panel with water and soap. Dry the glass panel carefully. When the cleaning is completed, install the glass panels and the door. Do the above steps in the opposite sequence.
www.electrolux.com Problem Possible cause The oven does not heat up. The necessary settings are Make sure that the settings not set. are correct. The oven does not heat up. The fuse is blown. Make sure that the fuse is the cause of the malfunc‐ tion. If the fuse is blown again and again, contact a qualified electrician. The lamp does not oper‐ ate. The lamp is defective. Replace the lamp. Steam and condensation settle on the food and in the cavity of the oven.
ENGLISH min. 3 mm min.
www.electrolux.com 546 21 min. 550 20 600 548 15 546 21 114 589 594 min. 560 579 min. 550 590 20 548 15 114 min. 560 589 594 579 594 594 5 5 3 3 alternativ 100 max. R1200 mm 130 140 H05VV-F H05RR-F min.
ENGLISH 2x3,5x25 13. ENERGY EFFICIENCY 13.1 Product Fiche and information according to EU 65-66/2014 Supplier's name Electrolux Model identification EOA5450BAK EOA5450BAX Energy Efficiency Index 103.5 Energy efficiency class A Energy consumption with a standard load, con‐ ventional mode 0.99 kWh/cycle Energy consumption with a standard load, fanforced mode 0.
www.electrolux.com 13.2 Energy saving The appliance contains features which help you save energy during everyday cooking. • General hints – Make sure that the oven door is closed properly when the appliance operates and keep it closed as much as possible during the cooking. – Use metal dishes to improve the energy saving. – When possible, put the food inside the oven without heating it up.
ENGLISH 33
www.electrolux.
ENGLISH 35
867316926-B-092016 www.electrolux.