EOA5651 EN OVEN EL ΦΟΎΡΝΟΣ USER MANUAL ΟΔΗΓΊΕΣ ΧΡΉΣΗΣ 2 30
www.electrolux.com CONTENTS 1. SAFETY INFORMATION...................................................................................... 3 2. SAFETY INSTRUCTIONS.....................................................................................4 3. PRODUCT DESCRIPTION................................................................................... 6 4. BEFORE FIRST USE............................................................................................ 6 5. DAILY USE...........................
ENGLISH 1. 3 SAFETY INFORMATION Before the installation and use of the appliance, carefully read the supplied instructions. The manufacturer is not responsible if an incorrect installation and use causes injuries and damages. Always keep the instructions with the appliance for future reference. 1.
www.electrolux.com • • • • • Do not use a steam cleaner to clean the appliance. Do not use harsh abrasive cleaners or sharp metal scrapers to clean the glass door since they can scratch the surface, which may result in shattering of the glass. If the supply cord is damaged, it must be replaced by the manufacturer, its Authorised Service Centre or similarly qualified persons in order to avoid a hazard.
ENGLISH fuses removed from the holder), earth leakage trips and contactors. • The electrical installation must have an isolation device which lets you disconnect the appliance from the mains at all poles. The isolation device must have a contact opening width of minimum 3 mm. • This appliance complies with the E.E.C. Directives. • 2.3 Use WARNING! Risk of injury, burns and electrical shock or explosion. • Use this appliance in a household only. • Do not change the specification of this appliance.
www.electrolux.com 2.6 Disposal 2.5 Internal light • The type of light bulb or halogen lamp used for this appliance is only for household appliances. Do not use it for house lighting. WARNING! Risk of electrical shock. • Before replacing the lamp, disconnect the appliance from the power supply. • Only use lamps with the same specifications. WARNING! Risk of injury or suffocation. • Disconnect the appliance from the mains supply. • Cut off the mains cable and discard it.
ENGLISH Refer to "Care and cleaning" chapter. Clean the appliance before first use. Put the accessories and the removable shelf supports back to their initial position. 4.2 Setting the time After the first connection to the mains, all symbols in the display are on for some seconds. For the subsequent few seconds the display shows the software version. After the software version goes off, the display shows flashes. 1. Press or and "12:00". "12" to set the current hour. to confirm. This is necessary 2.
www.electrolux.com 3. To deactivate the appliance turn the knobs for the oven functions and temperature to the off position. 5.3 Oven functions Oven function Application Off position The appliance is off. Fast Heat Up To decrease the heat-up time. True Fan Cooking To bake on up to 3 shelf positions at the same time and to dry food. Set the temperature 20 - 40 °C lower than for Conventional Cooking.
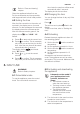
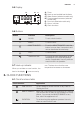
ENGLISH 5.5 Display A G B F E C D A) B) C) D) Timer Heat-up and residual heat indicator Water drawer (selected models only) Core temperature sensor (selected models only) E) Door lock (selected models only) F) Hours / minutes G) Clock functions 5.6 Buttons Button Function Description CLOCK To set a clock function. MINUS To set the time. MINUTE MINDER To set the MINUTE MINDER. Hold the button for more than 3 seconds to activate or deactivate the oven lamp. PLUS To set the time.
www.electrolux.com Clock function Application END To set when the appliance must deactivate. Use only when an oven function is set. You can use Duration and End at the same time (time delay), if the appliance is to be activate and deactivate automatically later. Press again and again to switch between the clock functions. To confirm the settings of the clock functions, press wait 5 seconds for an automatic confirmation. or 6.2 Setting the DURATION or END 1.
ENGLISH 11 7. USING THE ACCESSORIES WARNING! Refer to Safety chapters. 7.1 Using the core temperature sensor The core temperature sensor measures the core temperature of the meat. When the meat is at the set temperature, the appliance deactivates. There are two temperatures to be set: • The oven temperature. Refer to the table for roasting. • The core temperature. Refer to the table for the core temperature sensor.
www.electrolux.com When the appliance calculates the provisional duration time for the first time, the symbol flashes in the display. When the calculation ends, the display shows the duration of the cooking. Calculations run in the background during the cooking and the duration value in the display is updated if necessary. 1. Pull out the right and left hand telescopic runners. °C You can change the temperature at any time during the cooking: 1.
ENGLISH 8.2 Using the Function Lock You can activate the Function Lock function only when the appliance operates. if an oven function operates and you do not change any settings. Temperature (°C) The Function Lock prevents an accidental change of the temperature and time settings of a running oven function. Switch-off time (h) 30 - 115 12.5 120 - 195 8.5 1. Select an oven function and set it according your preferences 200 - 245 5.5 250 - maximum 3 2.
www.electrolux.com 9.1 Inner side of the door In some models, on the inner side of the door you can find: • the numbers of the shelf positions. • information about the oven functions, recommended shelf positions and temperatures for typical dishes. 9.2 General information • The appliance has five shelf positions. Count the shelf positions from the bottom of the appliance floor. • The appliance has a special system which circulates the air and constantly recycles the steam.
ENGLISH Food Conventional Cooking True Fan Cooking Tempera- Shelf poture (°C) sition Tempera- Shelf poture (°C) sition Apple cake (Apple pie)1) 170 2 160 Strudel 175 3 Jam-tart 170 Sponge cake 15 Time (min) Comments 2 (left and right) 80 - 100 In two 20 cm cake moulds on a wire shelf 150 2 60 - 80 In a baking tray 2 165 2 (left and right) 30 - 40 In a 26 cm cake mould 170 2 160 2 50 - 60 In a 26 cm cake mould Christmas cake / Rich fruit cake1) 160 2 150 2 90 - 120
www.electrolux.
ENGLISH Food Time (min) 17 Conventional Cooking True Fan Cooking Comments Tempera- Shelf poture (°C) sition Tempera- Shelf poture (°C) sition Bread rolls1) 190 2 180 2 (2 and 4) 25 - 40 6 - 8 rolls in a baking tray Pizza1) 230 - 250 1 230 - 250 1 10 - 20 In a baking tray or a deep pan Scones1) 200 3 190 3 10 - 20 In a baking tray Time (min) Comments 1) Preheat for 10 minutes.
www.electrolux.
ENGLISH Food Quantity Pieces (g) Tempera- Time (min) ture (°C) 1st side 2nd side Fillet steaks 4 800 max. 12 - 15 12 - 14 4 Beef steaks 4 600 max. 10 - 12 6-8 4 Sausages 8 - max. 12 - 15 10 - 12 4 Pork chops 4 600 max. 12 - 16 12 - 14 4 Chicken (cut in 2) 2 1000 max. 30 - 35 25 - 30 4 Kebabs 4 - max. 10 - 15 10 - 12 4 Breast of chicken 4 400 max. 12 - 15 12 - 14 4 Hamburger 6 600 max. 20 - 30 - 4 Fish fillet 4 400 max.
www.electrolux.com Pork Food Quantity (kg) Temperature (°C) Time (min) Shelf position Shoulder, neck, ham joint 1 - 1.5 160 - 180 90 - 120 1 or 2 Chop, spare rib 1 - 1.5 170 - 180 60 - 90 1 or 2 Meat loaf 0.75 - 1 160 - 170 50 - 60 1 or 2 Pork knuckle (precooked) 0.75 - 1 150 - 170 90 - 120 1 or 2 Food Quantity (kg) Temperature (°C) Time (min) Shelf position Roast veal 1 160 - 180 90 - 120 1 or 2 Knuckle of veal 1.
ENGLISH 21 9.9 Defrost Food Quantity (g) Defrosting time (min) Further defrost- Comments ing time (min) Chicken 1000 100 - 140 20 - 30 Place the chicken on an upturned saucer placed on a large plate. Turn halfway through. Meat 1000 100 - 140 20 - 30 Turn halfway through. Meat 500 90 - 120 20 - 30 Turn halfway through.
www.electrolux.com Food Temperature (°C) Time (h) Apple slices 60 - 70 Pears 60 - 70 Shelf position 1 position 2 positions 6-8 3 1/4 6-9 3 1/4 9.
ENGLISH 10.3 Cleaning the door gasket • Regularly do a check of the door gasket. The door gasket is around the frame of the oven cavity. Do not use the appliance if the door gasket is damaged. Contact an Authorised Service Centre. • To clean the door gasket, refer to the general information about cleaning. 10.4 Removing the shelf supports and removing the catalytic panels To clean the oven, remove the shelf supports and catalytic panels. CAUTION! Be careful when you remove the shelf supports.
www.electrolux.com The cleaning reminder goes out: • after the end of the Catalysis function. • if you press and the same time. at 10.7 Cleaning the oven door The oven door has three glass panels.You can remove the oven door and the internal glass panels to clean them. The oven door can close if you try to remove the glass panels before you remove the oven door. 4. Identify the hinge to the left side of the door. CAUTION! Do not use the appliance without the glass panels. 1.
ENGLISH 25 10. First lift carefully and then remove the glass panels one by one. Start from the top panel. 1 7. Put the door on a soft cloth on a stable surface. 2 11. Clean the glass panels with water and soap. Dry the glass panels carefully. When the cleaning is completed, install the glass panels and the oven door. Do the above steps in the opposite sequence. Make sure that you put the glass panels (A and B) back in the correct sequence. The first panel (A) has a decorative frame.
www.electrolux.com CAUTION! Always hold the halogen lamp with a cloth to prevent grease residue from burning on the lamp. 1. Deactivate the appliance. 2. Remove the fuses from the fuse box or deactivate the circuit breaker. The back lamp 10.8 Replacing the lamp Put a cloth on the bottom of the interior of the appliance. It prevents damage to the lamp glass cover and the cavity. 1. Turn the lamp glass cover counterclockwise to remove it. 2. Clean the glass cover. 3.
ENGLISH 27 Problem Possible cause Remedy The core temperature sensor does not operate. The plug of the core temperature sensor is not correctly installed into the socket. Put the plug of the core temperature sensor as far as possible into the socket. It takes too long to cook the The temperature is too low dishes or they cook too or too high. quickly. Adjust the temperature if necessary. Follow the advice in the user manual.
www.electrolux.com 11.2 Service data If you cannot find a solution to the problem yourself, contact your dealer or an Authorised Service Centre. the front frame of the appliance cavity. Do not remove the rating plate from the appliance cavity. The necessary data for the service centre is on the rating plate. The rating plate is on We recommend that you write the data here: Model (MOD.) ......................................... Product number (PNC) .........................................
ENGLISH Total power (W) Section of the cable (mm²) Total power (W) Section of the cable (mm²) maximum 1380 3 x 0.75 maximum 3680 3 x 1.5 maximum 2300 3x1 The earth cord (green / yellow cable) must be 2 cm longer than phase and neutral cables (blue and brown cables). 13. ENVIRONMENTAL CONCERNS Recycle the materials with the symbol . Put the packaging in applicable containers to recycle it. Help protect the environment and human health and to recycle waste of electrical and electronic appliances.
www.electrolux.com ΠΕΡΙΕΧΌΜΕΝΑ 1. ΠΛΗΡΟΦΟΡΊΕΣ ΓΙΑ ΤΗΝ ΑΣΦΆΛΕΙΑ............................................................. 31 2. ΟΔΗΓΊΕΣ ΓΙΑ ΤΗΝ ΑΣΦΆΛΕΙΑ........................................................................ 32 3. ΠΕΡΙΓΡΑΦΉ ΠΡΟΪΌΝΤΟΣ...............................................................................35 4. ΠΡΙΝ ΑΠΌ ΤΗΝ ΠΡΏΤΗ ΧΡΉΣΗ..................................................................... 35 5. ΚΑΘΗΜΕΡΙΝΉ ΧΡΉΣΗ......................................................
ΕΛΛΗΝΙΚΑ 1. 31 ΠΛΗΡΟΦΟΡΊΕΣ ΓΙΑ ΤΗΝ ΑΣΦΆΛΕΙΑ Πριν από την εγκατάσταση και τη χρήση της συσκευής, διαβάστε προσεκτικά τις παρεχόμενες οδηγίες. Ο κατασκευαστής δεν ευθύνεται αν προκληθεί τραυματισμός ή ζημιά από λανθασμένη εγκατάσταση και χρήση. Να φυλάσσετε πάντα αυτές τις οδηγίες μαζί με τη συσκευή για μελλοντική αναφορά. 1.
www.electrolux.com • • • • • • • φούρνου όταν αφαιρείτε ή εισάγετε εξαρτήματα ή σκεύη. Πριν από οποιαδήποτε εργασία συντήρησης, διακόπτετε την παροχή ρεύματος. Βεβαιωθείτε ότι η συσκευή είναι απενεργοποιημένη προτού αντικαταστήσετε τον λαμπτήρα για την αποφυγή πιθανότητας ηλεκτροπληξίας. Μη χρησιμοποιείτε ατμοκαθαριστή για τον καθαρισμό της συσκευής.
ΕΛΛΗΝΙΚΑ • • • Τηρείτε την ελάχιστη απόσταση από τις άλλες συσκευές και μονάδες. Βεβαιωθείτε ότι οι κατασκευές κάτω από τις οποίες ή δίπλα στις οποίες εγκαθίσταται η συσκευή είναι ασφαλείς. Οι πλευρές της συσκευής πρέπει να πρόσκεινται σε συσκευές ή μονάδες με το ίδιο ύψος. 2.2 Ηλεκτρική σύνδεση • • • ΠΡΟΕΙΔΟΠΟΙΗΣΗ! Κίνδυνος πυρκαγιάς και ηλεκτροπληξίας. • • • • • • • • • • Όλες οι ηλεκτρικές συνδέσεις πρέπει να πραγματοποιούνται από επαγγελματία ηλεκτρολόγο. Η συσκευή πρέπει να είναι γειωμένη.
www.electrolux.com • φλόγες να έρθουν σε επαφή με τη συσκευή. Μην τοποθετείτε μέσα, κοντά ή επάνω στη συσκευή εύφλεκτα αντικείμενα ή αντικείμενα εμποτισμένα με εύφλεκτα προϊόντα. ΠΡΟΕΙΔΟΠΟΙΗΣΗ! Κίνδυνος πρόκλησης ζημιάς στη συσκευή. • • • • • Για να αποφευχθεί η πρόκληση ζημιάς ή ο αποχρωματισμός της εμαγιέ επίστρωσης: – μην τοποθετείτε σκεύη ή άλλα αντικείμενα απευθείας σε επαφή με το δάπεδο της συσκευής. – μην τοποθετείτε αλουμινόχαρτο απευθείας σε επαφή με το δάπεδο της συσκευής.
ΕΛΛΗΝΙΚΑ • 35 Αφαιρέστε το μάνταλο της πόρτας για να αποτραπεί ο εγκλεισμός παιδιών ή ζώων μέσα στη συσκευή. 3. ΠΕΡΙΓΡΑΦΉ ΠΡΟΪΌΝΤΟΣ 3.1 Γενική επισκόπηση 1 2 3 4 5 6 5 7 4 10 3 8 2 1 1 2 3 4 5 6 7 8 9 10 Πίνακας χειριστηρίων Διακόπτης λειτουργιών φούρνου Ηλεκτρονικός προγραμματιστής Διακόπτης θερμοκρασίας Αντίσταση Υποδοχή αισθητήρα θερμοκρασίας πυρήνα Λαμπτήρας Ανεμιστήρας Στήριγμα σχάρας, αποσπώμενο Θέσεις σχαρών 9 3.
www.electrolux.com 1. Πιέστε το κουμπί ή για να ρυθμίσετε την τρέχουσα ώρα. Πιέστε το κουμπί . Στην οθόνη αναβοσβήνει η ρυθμισμένη 2. Πιέστε το κουμπί για επιβεβαίωση. Αυτό είναι απαραίτητο μόνο όταν ρυθμίζετε την ώρα για πρώτη φορά. Τις επόμενες φορές η νέα ώρα θα αποθηκεύεται αυτόματα μετά από 5 δευτερόλεπτα. ώρα και το σύμβολο . Για να ρυθμίσετε τη νέα ώρα, ακολουθήστε τη διαδικασία της ενότητας «Ρύθμιση της ώρας». Στην οθόνη εμφανίζεται η ένδειξη και η ρυθμισμένη ώρα.
ΕΛΛΗΝΙΚΑ 3. Για να απενεργοποιήσετε τη συσκευή, στρέψτε τον διακόπτη 37 λειτουργιών φούρνου και το διακόπτη θερμοκρασίας στη θέση απενεργοποίησης. 5.3 Λειτουργίες φούρνου Λειτουργία φούρνου Χρήση Θέση απενεργοποίησ ης Η συσκευή είναι απενεργοποιημένη. Ταχεία προθέρμανση Για μείωση του χρόνου προθέρμανσης του φούρνου. Θερμός Αέρας Για ψήσιμο μέχρι και σε 3 θέσεις σχαρών ταυτόχρονα και για ξήρανση φαγητού.
www.electrolux.com 3. Επιλέξτε μια λειτουργία φούρνου. Η λειτουργία ταχείας προθέρμανσης δεν απενεργοποιείται μετά το ηχητικό σήμα. Πρέπει να απενεργοποιήσετε τη λειτουργία χειροκίνητα. 5.5 Οθόνη A G F B E C D A) Χρονοδιακόπτης B) Ένδειξη προθέρμανσης και υπολειπόμενης θερμότητας C) Θήκη νερού (μόνο σε επιλεγμένα μοντέλα) D) Αισθητήρας θερμοκρασίας πυρήνα (μόνο σε επιλεγμένα μοντέλα) E) Κλείδωμα πόρτας (μόνο σε επιλεγμένα μοντέλα) F) Ώρες / λεπτά G) Λειτουργίες ρολογιού 5.
ΕΛΛΗΝΙΚΑ 39 6. ΛΕΙΤΟΥΡΓΊΕΣ ΡΟΛΟΓΙΟΎ 6.1 Πίνακας λειτουργιών ρολογιού Λειτουργία ρολογιού Χρήση ΩΡΑ Για τη ρύθμιση, αλλαγή ή έλεγχο της ώρας. Ανατρέξτε στην ενότητα «Ρύθμιση της ώρας». ΧΡΟΝΟΜΕΤΡΗΤ ΗΣ Χρησιμοποιήστε τον για να ορίσετε μια αντίστροφη μέτρηση (η μέγιστη ρύθμιση είναι 23 ώρες και 59 λεπτά). Η λειτουργία αυτή δεν έχει καμία επίδραση στη λειτουργία της συσκευής. Μπορείτε να ρυθμίσετε το ΧΡΟΝΟΜΕΤΡΗΤΗ οποιαδήποτε στιγμή, ακόμα και αν η συσκευή είναι απενεργοποιημένη.
www.electrolux.com Στην οθόνη αναβοσβήνουν οι ενδείξεις και «00». 2. Πιέστε το κουμπί ή για να ρυθμίσετε το ΧΡΟΝΟΜΕΤΡΗΤΗ. Πρώτα ρυθμίζετε τα δευτερόλεπτα, μετά τα λεπτά και μετά τις ώρες. Αρχικά, ο χρόνος υπολογίζεται σε λεπτά και δευτερόλεπτα. Όταν ο χρόνος που ορίζετε υπερβαίνει τα 60 λεπτά, εμφανίζεται το σύμβολο στην οθόνη. Η συσκευή τώρα υπολογίζει το χρόνο σε ώρες και λεπτά. 3. Ο ΧΡΟΝΟΜΕΤΡΗΤΗΣ τίθεται αυτόματα σε λειτουργία μετά από πέντε δευτερόλεπτα.
ΕΛΛΗΝΙΚΑ φούρνου. 41 υποδοχή. Αφαιρέστε το κρέας από τη συσκευή. 7. Απενεργοποιήστε τη συσκευή. ΠΡΟΕΙΔΟΠΟΙΗΣΗ! Αφαιρείτε τη μύτη και το βύσμα του αισθητήρα θερμοκρασίας πυρήνα με προσοχή. Ο αισθητήρας θερμοκρασίας πυρήνα είναι ζεστός. Υπάρχει κίνδυνος εγκαυμάτων. Βεβαιωθείτε ότι ο αισθητήρας θερμοκρασίας πυρήνα παραμένει τοποθετημένος στο κρέας και στην υποδοχή καθ' όλη τη διάρκεια του μαγειρέματος.
www.electrolux.com • τρεις φορές - η οθόνη εμφανίζει την καθορισμένη θερμοκρασία του φούρνου. 2. Χρησιμοποιήστε το διακόπτη θερμοκρασίας για να αλλάξετε τη θερμοκρασία. 7.2 Τηλεσκοπικοί βραχίονες 2. Τοποθετήστε τη μεταλλική σχάρα επάνω στους τηλεσκοπικούς βραχίονες και σπρώξτε τους προσεκτικά στο εσωτερικό της συσκευής. °C Φυλάξτε τις οδηγίες εγκατάστασης για τους τηλεσκοπικούς βραχίονες για μελλοντική χρήση.
ΕΛΛΗΝΙΚΑ 43 8.2 Χρήση της λειτουργίας Κλειδώματος Χειρισμού αριστερά ή προς τα δεξιά για να εμφανιστεί η θερμοκρασία του φούρνου. Μπορείτε να ενεργοποιήσετε τη λειτουργία Κλειδώματος χειρισμού μόνο όταν η συσκευή βρίσκεται σε λειτουργία. 8.4 Αυτόματη απενεργοποίηση Το Κλείδωμα Χειρισμού εμποδίζει την ακούσια αλλαγή της θερμοκρασίας και των ρυθμίσεων ώρας μιας ενεργής λειτουργίας του φούρνου. 1. Επιλέξτε μια λειτουργία φούρνου και ρυθμίστε την σύμφωνα με τις προτιμήσεις σας 2.
www.electrolux.com 9. ΥΠΟΔΕΙΞΕΙΣ ΚΑΙ ΣΥΜΒΟΥΛΕΣ ΠΡΟΕΙΔΟΠΟΙΗΣΗ! Ανατρέξτε στα κεφάλαια σχετικά με την ασφάλεια. Οι τιμές θερμοκρασίας και χρόνου ψησίματος στους πίνακες είναι μόνο ενδεικτικές. Εξαρτώνται από τις συνταγές, καθώς και από την ποιότητα και ποσότητα των υλικών που χρησιμοποιούνται. • • 9.3 Ψήσιμο κέικ 9.1 Εσωτερική πλευρά της πόρτας • Σε ορισμένα μοντέλα, στην εσωτερική πλευρά της πόρτας θα βρείτε: • • • τους αριθμούς των θέσεων των σχαρών.
ΕΛΛΗΝΙΚΑ 45 9.
www.electrolux.
ΕΛΛΗΝΙΚΑ Τύπος φαγητού Πάνω + Κάτω Θέρμανση Θερμός Αέρας Θερμοκρα Θέση σία (°C) σχάρας Θερμοκρ ασία (°C) Θέση σχάρας Κέικ φρούτων 160 1 150 Κέικ «σάντουιτ ς» 170 1 160 47 Χρόνος (λεπτά) Σχόλια 2 110 - 120 Σε φόρμα για κέικ των 24 cm 2 (αριστερά και δεξιά) 50 - 60 Σε φόρμα για κέικ των 20 cm Χρόνος (λεπτά) Σχόλια 1) Προθερμάνετε για 10 λεπτά.
www.electrolux.com Τύπος φαγητού Πάνω + Κάτω Θέρμανση Θερμός Αέρας Χρόνος (λεπτά) Σχόλια Θερμοκρ ασία (°C) Θέση σχάρας Θερμοκρ ασία (°C) Θέση σχάρας Σουφλέ 200 λαχανικών 2 175 2 45 - 60 Σε φόρμα Κις1) 180 1 180 1 50 - 60 Σε φόρμα Λαζάνια1) 180 - 190 2 180 - 190 2 25 - 40 Σε φόρμα Καννελόνι α1) 180 - 190 2 180 - 190 2 25 - 40 Σε φόρμα Χρόνος (λεπτά) Σχόλια 1) Προθερμάνετε για 10 λεπτά.
ΕΛΛΗΝΙΚΑ Τύπος φαγητού Πάνω + Κάτω Θέρμανση Θερμός Αέρας Θερμοκρ ασία (°C) Θέση σχάρας Θερμοκρ ασία (°C) Θέση σχάρας Μπούτι χοιρινό 180 2 160 Αρνί 190 2 Κοτόπουλ ο 220 Γαλοπούλ α 49 Χρόνος (λεπτά) Σχόλια 2 100 - 120 2 κομμάτια 175 2 110 - 130 Μπούτι 2 200 2 70 - 85 Ολόκληρο 180 2 160 2 210 - 240 Ολόκληρο Πάπια 175 2 220 2 120 - 150 Ολόκληρο Χήνα 175 2 160 1 150 - 200 Ολόκληρο Κουνέλι 190 2 175 2 60 - 80 Σε κομμάτια Λαγός 190 2 175 2 150 - 200
www.electrolux.com Τύπος φαγητού Θερμοκρ ασία (°C) Χρόνος (λεπτά) 1η πλευρά 2η πλευρά 600 μέγ. 10 - 12 6-8 4 Λουκάνικα 8 - μέγ. 12 - 15 10 - 12 4 Χοιρινές μπριζόλες 4 600 μέγ. 12 - 16 12 - 14 4 Κοτόπουλ ο (κομμένο στα 2) 2 1000 μέγ. 30 - 35 25 - 30 4 Κεμπάπ 4 - μέγ. 10 - 15 10 - 12 4 Στήθος κοτόπουλ ο 4 400 μέγ. 12 - 15 12 - 14 4 Μπιφτέκι 6 600 μέγ. 20 - 30 - 4 Φιλέτο ψαριού 4 400 μέγ. 12 - 14 10 - 12 4 Τοστ 4-6 (σάντουιτς ) - μέγ.
ΕΛΛΗΝΙΚΑ 51 Χοιρινό Τύπος φαγητού Ποσότητα (kg) Θερμοκρασία Χρόνος (°C) (λεπτά) Θέση σχάρας Ωμοπλάτη, λαιμός, χοιρινό μπούτι 1 - 1.5 160 - 180 90 - 120 1ή2 Μπριζόλα, παϊδάκια 1 - 1.5 170 - 180 60 - 90 1ή2 Ρολό κιμάς 0.75 - 1 160 - 170 50 - 60 1ή2 Κότσι χοιρινό (προμαγειρεμένο) 0.75 - 1 150 - 170 90 - 120 1ή2 Μοσχάρι Τύπος φαγητού Ποσότητα (kg) Θερμοκρασία (°C) Χρόνος (λεπτά) Θέση σχάρας Ψητό μοσχάρι 1 160 - 180 90 - 120 1ή2 Μοσχάρι κότσι 1.
www.electrolux.com Ψάρι Τύπος φαγητού Ποσότητα (kg) Θερμοκρασία (°C) Ψάρι ολόκληρο 1 - 1.5 210 - 220 Χρόνος (λεπτά) Θέση σχάρας 40 - 60 1ή2 9.9 Απόψυξη Τύπος φαγητού Ποσότητ α (g) Χρόνος απόψυξης (λεπτά) Επιπλέον χρόνος απόψυξης (λεπτά) Σχόλια Κοτόπουλο 1000 100 - 140 20 - 30 Τοποθετήστε το κοτόπουλο επάνω σε ένα αναποδογυρισμένο πιατάκι μέσα σε ένα μεγάλο πιάτο Γυρίστε από την άλλη πλευρά μόλις περάσει ο μισός χρόνος.
ΕΛΛΗΝΙΚΑ Λαχανικά Τύπος φαγητού Θερμοκρασία (°C) Χρόνος (ώρες) Θέση σχάρας Φασόλια 60 - 70 Πιπεριές 1 θέση 2 θέσεις 6-8 3 1/4 60 - 70 5-6 3 1/4 Λαχανικά για σούπα 60 - 70 5-6 3 1/4 Μανιτάρια 50 - 60 6-8 3 1/4 Μυρωδικά 40 - 50 2-3 3 1/4 Τύπος φαγητού Θερμοκρασία (°C) Χρόνος (ώρες) Θέση σχάρας Δαμάσκηνα 60 - 70 Βερίκοκα Φρούτα 1 θέση 2 θέσεις 8 - 10 3 1/4 60 - 70 8 - 10 3 1/4 Φέτες μήλου 60 - 70 6-8 3 1/4 Αχλάδια 60 - 70 6-9 3 1/4 9.
www.electrolux.com 10. ΦΡΟΝΤΊΔΑ ΚΑΙ ΚΑΘΆΡΙΣΜΑ ΠΡΟΕΙΔΟΠΟΙΗΣΗ! Ανατρέξτε στα κεφάλαια σχετικά με την ασφάλεια. 10.3 Καθαρισμός του λάστιχου της πόρτας • 10.1 Σημειώσεις για τον καθαρισμό • • • • • • Καθαρίστε την πρόσοψη της συσκευής με ένα μαλακό πανί, χλιαρό νερό και ένα προϊόν καθαρισμού. Για να καθαρίσετε τις μεταλλικές επιφάνειες, χρησιμοποιήστε ένα κοινό καθαριστικό. Καθαρίζετε το εσωτερικό της συσκευής μετά από κάθε χρήση.
ΕΛΛΗΝΙΚΑ 2. Τραβήξτε το πίσω άκρο του στηρίγματος σχαρών από το πλαϊνό τοίχωμα και αφαιρέστε το. 1 2 Τοποθετήστε τα στηρίγματα σχαρών στη θέση τους, ακολουθώντας την παραπάνω διαδικασία με την αντίστροφη σειρά. Οι πείροι στερέωσης των τηλεσκοπικών βραχιόνων πρέπει να είναι στραμμένοι προς τα εμπρός. 10.5 Κατάλυση ΠΡΟΣΟΧΗ! Μην καθαρίζετε την καταλυτική επιφάνεια με σπρέι καθαρισμού για το φούρνο, λειαντικά καθαριστικά, σαπούνι ή άλλα προϊόντα καθαρισμού.
www.electrolux.com ΠΡΟΣΟΧΗ! Μη χρησιμοποιείτε τη συσκευή χωρίς τα τζάμια. 1. Ανοίξτε πλήρως την πόρτα και εντοπίστε τον μεντεσέ στη δεξιά πλευρά της πόρτας. 2. Σπρώξτε το εξάρτημα σύσφιγξης μέχρι να οπισθοχωρήσει. 5. Ανασηκώστε και στρέψτε τον μοχλό του αριστερού μεντεσέ. 3. Κρατήστε το εξάρτημα που σπρώξατε με το ένα χέρι. Χρησιμοποιήστε ένα κατσαβίδι με το άλλο χέρι, για να ανασηκώστε και να στρέψετε τον μοχλό του μεντεσέ της δεξιάς πλευράς. 6.
ΕΛΛΗΝΙΚΑ 57 7. Τοποθετήστε την πόρτα επάνω σε ένα απαλό πανί και σε σταθερή επιφάνεια. 1 8. Απασφαλίστε το σύστημα ασφάλισης, για να αφαιρέσετε τα τζάμια. 9. Στρέψτε τους δύο συνδετήρες κατά 90° και αφαιρέστε τους από τις υποδοχές τους. 2 11. Καθαρίστε τα τζάμια με νερό και σαπούνι. Σκουπίστε προσεκτικά τα τζάμια. Αφού ολοκληρωθεί ο καθαρισμός, τοποθετήστε τα τζάμια και την πόρτα του φούρνου στη θέση τους. Πραγματοποιήστε τα παραπάνω βήματα με την αντίστροφη σειρά.
www.electrolux.com ΠΡΟΣΟΧΗ! Πιάνετε πάντα το λαμπτήρα αλογόνου με ένα πανί, για να αποτρέψετε το κάψιμο υπολειμμάτων λίπους επάνω στο λαμπτήρα. 1. Απενεργοποιήστε τη συσκευή. 2. Αφαιρέστε τις ασφάλειες από τον πίνακα ασφαλειών ή απενεργοποιήστε τον ασφαλειοδιακόπτη κυκλώματος. 10.8 Αντικατάσταση του λαμπτήρα Τοποθετήστε ένα πανί στο κάτω μέρος του εσωτερικού της συσκευής. Αποτρέπει τη ζημιά στο γυάλινο κάλυμμα του λαμπτήρα και στο εσωτερικό του φούρνου.
ΕΛΛΗΝΙΚΑ 59 Πρόβλημα Πιθανή αιτία Αντιμετώπιση Ο φούρνος δεν θερμαίνεται. Είναι ενεργοποιημένη η λειτουργία Κλείδωμα ασφαλείας για παιδιά. Ανατρέξτε στην ενότητα «Χρήση του Κλειδώματος ασφαλείας για παιδιά». Ο φούρνος δεν θερμαίνεται. Έχει πέσει η ασφάλεια. Ελέγξτε αν η ασφάλεια είναι η αιτία της δυσλειτουργίας. Εάν η ασφάλεια πέφτει επανειλημμένα, επικοινωνήστε με επαγγελματία ηλεκτρολόγο. Ο λαμπτήρας δεν λειτουργεί. Ο λαμπτήρας είναι ελαττωματικός. Αντικαταστήστε το λαμπτήρα.
www.electrolux.com Πρόβλημα Πιθανή αιτία Αντιμετώπιση Η οθόνη εμφανίζει ένα Υπάρχει ηλεκτρική βλάβη. κωδικό σφάλματος που δεν βρίσκεται σε αυτόν τον πίνακα. • • Η συσκευή ενεργοποιείται και δεν θερμαίνεται. Ο ανεμιστήρας δεν λειτουργεί. Στην οθόνη εμφανίζεται η ένδειξη "Demo". Είναι ενεργοποιημένη η λειτουργία επίδειξης (demo). Απενεργοποιήστε το φούρνο από το γενικό διακόπτη του σπιτιού ή από το διακόπτη ασφαλείας στον πίνακα ασφαλειών και κατόπιν ενεργοποιήστε τον ξανά.
ΕΛΛΗΝΙΚΑ 61 Σας συνιστούμε να σημειώσετε τα σχετικά στοιχεία εδώ: Μοντέλο (MOD.) ......................................... Κωδικός προϊόντος (PNC) ......................................... Αριθμός σειράς (S.N.) ......................................... 12. ΕΓΚΑΤΆΣΤΑΣΗ 12.2 Στερέωση της συσκευής στο ντουλάπι ΠΡΟΕΙΔΟΠΟΙΗΣΗ! Ανατρέξτε στα κεφάλαια σχετικά με την ασφάλεια. 12.1 Εντοιχισμός A B min. 550 20 600 min. 560 548 20 558 573 589 12.
www.electrolux.com Συνολική ισχύς (W) Διατομή του καλωδίου (mm²) μέγιστη 2.300 3x1 μέγιστη 3.680 3 x 1,5 13. ΠΕΡΙΒΑΛΛΟΝΤΙΚΑ ΘΕΜΑΤΑ Ανακυκλώστε τα υλικά με το σύμβολο . Τοποθετήστε τα υλικά συσκευασίας σε κατάλληλα δοχεία για ανακύκλωση. Συμβάλετε στην προστασία του περιβάλλοντος και της ανθρώπινης υγείας ανακυκλώνοντας τις άχρηστες ηλεκτρικές και ηλεκτρονικές συσκευές. Μην απορρίπτετε με τα οικιακά απορρίμματα συσκευές που φέρουν το σύμβολο .
ΕΛΛΗΝΙΚΑ 63
867304184-A-102014 www.electrolux.