EOB2400AOX EN TH Oven เตาอบ User Manual คูมือการใชงาน 2 27
www.electrolux.com CONTENTS 1. SAFETY INFORMATION....................................................................................3 2. SAFETY INSTRUCTIONS..................................................................................4 3. INSTALLATION.................................................................................................. 7 4. PRODUCT DESCRIPTION................................................................................ 9 5. CONTROL PANEL..............................
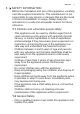
ENGLISH 1. 3 SAFETY INFORMATION Before the installation and use of the appliance, carefully read the supplied instructions. The manufacturer is not responsible for any injuries or damage that are the result of incorrect installation or usage. Always keep the instructions in a safe and accessible location for future reference. 1.
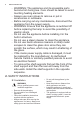
www.electrolux.com • • • • • • • • • WARNING: The appliance and its accessible parts become hot during use. Care should be taken to avoid touching heating elements. Always use oven gloves to remove or put in accessories or ovenware. Before carrying out any maintenance, disconnect the appliance from the power supply. WARNING: Ensure that the appliance is switched off before replacing the lamp to avoid the possibility of electric shock.
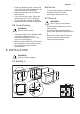
ENGLISH • Cabinet minimum height (Cabinet un‐ der the worktop minimum height) 590 (600) mm Cabinet width 560 mm Cabinet depth 550 (550) mm Height of the front of the appliance 594 mm Height of the back of the appliance 576 mm Width of the front of the appliance 595 mm Width of the back of the appliance 559 mm Depth of the appli‐ ance 569 mm Built in depth of the appliance 548 mm Depth with open door 1022 mm Ventilation opening minimum size.
www.electrolux.com Total power (W) Section of the ca‐ ble (mm²) maximum 3680 3 x 1.5 The earth cord (green / yellow cable) must be 2 cm longer than phase and neutral cables (blue and brown cables). 2.3 Use WARNING! Risk of injury, burns and electric shock or explosion. • • • • • • • • • • • • This appliance is for household use only. Do not change the specification of this appliance. Make sure that the ventilation openings are not blocked.
ENGLISH • • • Clean the appliance with a moist soft cloth. Only use neutral detergents. Do not use any abrasive products, abrasive cleaning pads, solvents or metal objects. If you use an oven spray, follow the safety instruction on it's packaging. Do not clean the catalytic enamel (if applicable) with any kind of detergent. 2.5 Internal lighting • • • 2.6 Service • • WARNING! Risk of injury or suffocation.
www.electrolux.com 548 70 60 21 min. 550 20 520 18 590 114 min. 560 589 594 198 60 595+-1 5 3 20 3.
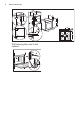
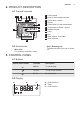
ENGLISH 9 4. PRODUCT DESCRIPTION 4.1 General overview 1 2 3 4 5 6 7 5 8 4 11 3 9 2 1 1 2 3 4 5 6 7 8 9 10 11 Control panel Knob for the heating functions Power lamp / symbol Display Control knob (for the temperature) Temperature indicator / symbol Heating element Lamp Fan Shelf support, removable Shelf positions 10 4.2 Accessories • • Wire shelf For cookware, cake tins, roasts. Grill- / Roasting pan To bake and roast or as pan to collect fat. 5. CONTROL PANEL 5.
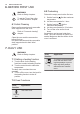
www.electrolux.com 6. BEFORE FIRST USE WARNING! Refer to Safety chapters. To set the Time of day refer to "Clock functions" chapter. 6.1 Initial Cleaning Remove all accessories and removable shelf supports from the oven. Refer to "Care and cleaning" chapter. Clean the oven and the accessories before first use. Put the accessories and the removable shelf supports back to their initial position. 6.2 Preheating Preheat the empty oven before first use. 1. Set the function .Set the maximum temperature. 2.
ENGLISH Oven function Application Oven function This function is designed to save energy during Moist Fan cooking. For the cooking instructions refer to "Hints Baking and tips" chapter, Moist Fan Baking. The oven door should be closed during cooking so that the func‐ tion is not interrupted and to ensure that the oven op‐ erates with the highest en‐ ergy efficiency possible. When you use this func‐ tion, the temperature in the cavity may differ from the set temperature.
www.electrolux.com 8.2 Setting the time. Changing the time 8.5 Setting the TIME DELAY You must set the time before you operate the oven. 1. Set an oven function and temperature. flashes when you connect the The appliance to the electrical supply, when there was a power cut or when the timer is not set. or 3. Press DURATION. or to set the correct Press the time. After approximately five seconds, the flashing stops and the display shows the time of day you set.
ENGLISH 13 9. USING THE ACCESSORIES WARNING! Refer to Safety chapters. 9.1 Inserting the accessories Wire shelf and deep pan together: Push the deep pan between the guide bars of the shelf support and the wire shelf on the guide bars above. Wire shelf: Push the shelf between the guide bars of the shelf support and make sure that the feet point down. Deep pan: Small indentation at the top increase safety. The indentations are also anti-tip devices.
www.electrolux.com 11. HINTS AND TIPS Baking cakes Do not open the oven door before 3/4 of the set cooking time is up. WARNING! Refer to Safety chapters. If you use two baking trays at the same time, keep one empty level between them. The temperature and baking times in the tables are guidelines only. They depend on the recipes and the quality and quantity of the ingredients used. 11.1 Cooking recommendations The oven has five shelf positions.
ENGLISH Food Top / Bottom Heat Fan Cooking Tempera‐ Shelf po‐ ture (°C) sition Tempera‐ Shelf po‐ ture (°C) sition Apple cake (Ap‐ ple pie)1) 170 2 160 Strudel 175 3 Jam-tart 170 Sponge cake 15 Time (min) Com‐ ments 2 (left and right) 80 - 100 In two 20 cm cake moulds on a wire shelf 150 2 60 - 80 In a bak‐ ing tray 2 165 2 (left and right) 30 - 40 In a 26 cm cake mould 170 2 160 2 50 - 60 In a 26 cm cake mould Christmas 160 cake / Rich fruit cake1) 2 150 2 90 - 120
www.electrolux.com Food Top / Bottom Heat Fan Cooking Tempera‐ Shelf po‐ ture (°C) sition Tempera‐ Shelf po‐ ture (°C) sition Time (min) Com‐ ments Plate tarts 180 2 170 2 45 - 70 In a 20 cm cake mould Rich fruit cake 160 1 150 2 110 - 120 In a 24 cm cake mould Victoria sand‐ wich1) 170 1 160 1 50 - 60 In a 20 cm cake mould Time (min) Com‐ ments 1) Preheat the oven for 10 minutes.
ENGLISH Food Top / Bottom Heat Fan Cooking Tempera‐ Shelf po‐ ture (°C) sition Tempera‐ Shelf po‐ ture (°C) sition Time (min) Com‐ ments 17 Lasagne1) 180 - 190 2 180 - 190 2 25 - 40 In a mould Cannello‐ ni1) 2 180 - 190 2 25 - 40 In a mould Time (min) Com‐ ments 180 - 190 1) Preheat the oven for 10 minutes.
www.electrolux.com Food Top / Bottom Heat Fan Cooking Time (min) Com‐ ments Tempera‐ Shelf po‐ ture (°C) sition Tempera‐ Shelf po‐ ture (°C) sition Hare 190 2 175 2 150 - 200 Cut in pieces Pheasant 190 2 175 2 90 - 120 Whole Time (min) Com‐ ments Fish Food Top / Bottom Heat Fan Cooking Tempera‐ Shelf po‐ ture (°C) sition Tempera‐ Shelf po‐ ture (°C) sition 190 2 175 2 40 - 55 3 - 4 fish Tuna fish / 190 Salmon 2 175 2 35 - 60 4 - 6 fillets Trout / Sea bream 11.
ENGLISH 11.4 Moist Fan Baking For best results follow suggestions listed in the table below. Food Accessories Temperature Shelf po‐ (°C) sition Time (min) Sweet rolls, 12 pieces baking tray or dripping pan 175 3 40 - 50 Rolls, 9 pieces baking tray or dripping pan 180 2 35 - 45 Pizza, frozen, 0.
www.electrolux.com Food Accessories Temperature Shelf po‐ (°C) sition Time (min) Savory pastry, 16 pieces baking tray or dripping pan 170 2 35 - 45 Short crust bis‐ baking tray or dripping cuits, 20 pieces pan 150 2 40 - 50 Tartlets, 8 pieces baking tray or dripping pan 170 2 30 - 40 Poached vege‐ baking tray or dripping tables, 0.4 kg pan 180 2 35 - 45 Vegetarian omelette pizza pan on wire shelf 180 3 35 - 45 Vegetables, mediterrean 0.
ENGLISH 21 11.6 Information for test institutes Tests according to IEC 60350-1. Food Function Small cake Acces‐ sories Shelf posi‐ tion Tem‐ pera‐ ture (°C) Time (min) Comments Conven‐ Baking tional Cook‐ tray ing 3 170 20 - 30 Put 20 small cakes per one baking tray. Small cake True Fan Cooking / Fan Cook‐ ing Baking tray 3 150 160 20 - 35 Put 20 small cakes per one baking tray.
www.electrolux.com Food Function Acces‐ sories Shelf posi‐ tion Tem‐ pera‐ ture (°C) Time (min) Comments Short bread True Fan Cooking / Fan Cook‐ ing Baking tray 2 and 4 140 150 25 - 45 - Short bread Conven‐ Baking tional Cook‐ tray ing 3 140 150 25 - 45 - Toast 4-6 pieces Grilling 4 max. 2 - 3 minutes Preheat the oven first side; 2 - 3 for 3 minutes. minutes sec‐ ond side Wire 4 shelf and dripping pan max. 20 - 30 Beef bur‐ Grilling ger 6 pieces, 0.
ENGLISH 12.3 Cleaning the door gasket Regularly do a check of the door gasket. The door gasket is around the frame of the oven cavity. Do not use the oven if the door gasket is damaged. Contact an Authorised Service Centre. To clean the door gasket, refer to the general information about cleaning. 12.4 Removing the shelf supports The oven door may close if you try to remove the internal glass panel before you remove the oven door. CAUTION! Do not use the oven without the internal glass panel. 1.
www.electrolux.com carefully. Do not clean the glass panels in the dishwasher. When the cleaning is completed, install the glass panel and the oven door. The screen-printing zone must face the inner side of the door. Make sure that after the installation the surface of the glass panel frame on the screen-printing zones is not rough when you touch it. When installed correctly the door trim clicks. Make sure that you install the internal glass panel in the seats correctly. 4.
ENGLISH 25 13.1 What to do if... Problem Possible cause Remedy The oven does not heat up. The oven is deactivated. Activate the oven. The oven does not heat up. The clock is not set. Set the clock. The oven does not heat up. The necessary settings are Make sure that the settings not set. are correct. The oven does not heat up. The fuse is blown. Make sure that the fuse is the cause of the malfunc‐ tion. If the fuse is blown again and again, contact a qualified electrician.
www.electrolux.com When the cooking duration is longer than 30 minutes, reduce the oven temperature to minimum 3 - 10 minutes before the end of the cooking time, depending on the duration of the cooking. The residual heat inside the oven will continue to cook. Use the residual heat to warm up other dishes. Keep breaks between baking as short as possible when you prepare few dishes at one time. Cooking with fan When possible, use the cooking functions with fan to save energy.
สารบัญ 1. ขอมูลดานความปลอดภัย...................................................................................... 28 2. คำแนะนำดานความปลอดภัย.................................................................................29 3. การติดตั้ง............................................................................................................ 31 4. รายละเอียดผลิตภัณฑ.......................................................................................... 33 5. แผงควบคุม.........................
1. www.electrolux.com ขอมูลดานความปลอดภัย กอนติดตั้งและใชงานเครื่อง กรุณาอานคำแนะนำที่จัดมาใหโดย ละเอียดกอนในเบื้องตน ผูผลิตจะไมรับผิดชอบใด ๆ ตอการบาด เจ็บหรือความเสียหายที่เปนผลมาจากการติดตั้งหรือใชงานที่ไม ถูกตอง เก็บชุดคำแนะนำเพื่อความปลอดภัยไวในที่ที่เรียกคน เพื่ออางอิงไดอยางสะดวก 1.
• • • • • อยาใชเครื่องกอนติดตั้งกับโครงสรางบิลทอิน อยาใชเครื่องพนไอน้ำรอนเพื่อทำความสะอาดเครื่องใช อยาใชน้ำยาที่มีฤทธิ์กัดกรอนหรือวัสดุแหลมคมเพื่อทำความ สะอาดชองกระจก เนื่องจากอาจทำใหพื้นผิวเกิดรอยและ ทำใหกระจกแตกเสียหายได หากอุปกรณหรือสายไฟเสียหาย ใหสงซอมกับผูผลิต ศูนย บริการที่ไดรับอนุญาตหรือบุคลากรผูเชี่ยวชาญเพื่อปองกัน อันตรายจากไฟฟาที่อาจเกิดขึ้น นำฐานรองชั้นวางออกกอนโดยดึงดานหนาของฐานรองชั้น วาง จากนั้นดึงปลายดานหลังออกจากผนังดานขาง ใสฐาน รองชั้นวางโดยยอนลำดับ
www.electrolux.
2.
www.electrolux.com 3.1 การติดตั้งแบบบิลทอิน 548 21 min. 550 80 60 520 600 114 18 20 589 594 min. 560 595+-1 198 60 5 3 523 20 548 70 60 21 min. 550 20 520 18 590 114 min. 560 589 594 198 60 595+-1 5 3 20 3.
4. รายละเอียดผลิตภัณฑ 4.1 ภาพรวมเบื้องตน 1 2 3 4 5 6 7 5 8 4 11 3 9 2 1 1 2 3 4 5 6 7 8 9 10 11 แผงควบคุม แปนฟงกชั่นทำความรอน ไฟ/สัญลักษณแสดงการทำงาน จอแสดงผล ลูกบิด (สำหรับปรับอุณหภูมิ) ไฟ/สัญลักษณแจงอุณหภูมิ สวนทำความรอน หลอดไฟ พัดลม ฐานรองชั้นวางถอดได ตำแหนงชั้นวาง 10 4.2 อุปกรณเสริม • • ตะแกรงชั้นวาง สำหรับภาชนะ ถาดเคกและอุปกรณปงยาง ถาดปง/ยาง สำหรับอบและยางหรือใชเปนอางรองไข มัน 5. แผงควบคุม 5.
www.electrolux.com 6. กอนการใชงานครั้งแรก คำเตือน ดูรายละเอียดจากหัวขอ ความ ปลอดภัย ตั้งคาเวลาตามคำแนะนำใน หัวขอ “ฟงกชั่นนาฬิกา” 6.1 การทำความสะอาดเบื้องตน นำอุปกรณทั้งหมดและฐานรองชั้นวางที่ถอด ไดออกจากเตาอบ ดูในหัวขอ "การดูแลและ ทำความสะอาด" ทำความสะอาดเตาอบและอุปกรณตาง ๆ กอน ใชงานเปนครั้งแรก ติดตั้งสวนประกอบตาง ๆ และฐานรองชั้นวาง แบบถอดไดกลับเขาไปที่ตำแหนงเดิม 6.2 การอุนรอน ทำความสะอาดเตาอบกอนใชงานเปนครั้งแรก 1. ตั้งคาฟงกชั่นการทำงาน ตั้งคาอุณหภูมิ สูงสุด 2.
ฟงกชั่น‐ เตาอบ การใช ฟงกชั่น‐ เตาอบ การใช สำหรับยางอาหารและปง‐ ขนมปง สำหรับอบและยางอาหารบน‐ ชั้นที่หนึ่ง ปงยาง ใชสำหรับยางวัตถุดิบอาหาร‐ แบบเรียบเปนจำนวนมากและ‐ ปงยางดวน สำหรับงานปงขนมปง อบปกติ (ความรอน‐ ดานบน/ ดานลาง) อบพิซซา อบเกรียมใหเหลือง‐ กรอบดานลาง อบพิซซา 8. ฟงกชั่นนาฬิกา 8.
www.electrolux.com 5. กดปุมใด ๆ เพื่อหยุดสัญญาณดังกลาว 6. บิดลูกบิดปรับฟงกชั่นของเตาอบและแปน ปรับอุณหภูมิไปที่ตำแหนงปดการทำงาน 8.5 การตั้งคา หนวงเวลา 1. กำหนดฟงกชั่นเตาอบและตั้งอุณหภูมิ 2. กด ซ้ำ ๆ จนกวา 3. กด หรือ เพื่อกำหนด ระยะเวลา จะเริ่มกะพริบ 5. กด หรือ โปรแกรม เพื่อกำหนดเวลาสิ้นสุด 4. กด 6. กด เพื่อยืนยัน เครื่องจะเปดทำงานอัตโนมัติในภายหลัง ใชไดเฉพาะสำหรับระยะเวลาที่กำหนด และจุ หยุดลงเมื่อถึงเวลาสิ้นสุดโปรแกรมที่กำหนด เมื่อเวลาที่ตั้งไว เสียงสัญญาณจะดังขึ้น 7.
แนวเวาดานบนชวยเพิ่มความ ปลอดภัย แนวเยื้องนี้ยังใชเพื่อ ปองกันการพลิกดวย ของดานสูง รอบ ๆ ชั้นวางใชเพื่อปองกัน ภาชนะเลื่อนหลนจากชั้นวาง 10. ฟงกชั่นเพิ่มเติม 10.1 พัดลมระบายความรอน 10.
www.electrolux.com 11.2 ตารางการอบและยาง เคก อาหาร ความรอนดานบน/ดาน‐ ใชพัดลมปรุงสุก ลาง อุณหภูมิ (°C) เวลา (นาที) ความเห็น ตำแหนง‐ ชั้นวาง อุณหภูมิ (°C) ตำแหนง‐ ชั้นวาง สูตรอาหาร‐ 170 ที่ตองตี‐ สวนผสม 2 160 3 45 - 60 ในแมพิมพ‐ เคก โดขนมปง‐ สั้น 170 2 160 3 20 - 30 ในแมพิมพ‐ เคก ชีสเคกบัต‐ เตอรมิลค 170 1 160 1 70 - 80 ในแมพิมพ‐ เคกขนาด 26 ซม.
อาหาร ความรอนดานบน/ดาน‐ ใชพัดลมปรุงสุก ลาง เวลา (นาที) ความเห็น อุณหภูมิ (°C) ตำแหนง‐ ชั้นวาง อุณหภูมิ (°C) ตำแหนง‐ ชั้นวาง บิสกิต / แผนแปง สองชั้น - - 140 - 150 2 และ 4 35 - 40 ในถาดอบ เมอแรง 120 3 120 3 80 - 100 ในถาดอบ บัน1) 190 3 180 3 15 - 20 ในถาดอบ เอแคลร 190 3 170 3 25 - 35 ในถาดอบ เพลททารต 180 2 170 2 45 - 70 ในแมพิมพ‐ เคกขนาด 20 ซม. ฟรุตเคก‐ เนื้อเขมขน 160 1 150 2 110 - 120 ในแมพิมพ‐ เคกขนาด 24 ซม.
www.electrolux.
อาหาร ความรอนดานบน/ดาน‐ ใชพัดลมปรุงสุก ลาง เวลา (นาที) ความเห็น อุณหภูมิ (°C) ตำแหนง‐ ชั้นวาง อุณหภูมิ (°C) ตำแหนง‐ ชั้นวาง ไก 220 2 200 2 70 - 85 ทั้งตัว ไกงวง 180 2 160 2 210 - 240 ทั้งตัว เปด 175 2 220 2 120 - 150 ทั้งตัว เนื้อหาน 175 2 160 1 150 - 200 ทั้งตัว เนื้อกระตาย 190 2 175 2 60 - 80 ตัดเปนชิ้น ๆ เนื้อ‐ กระตายปา 190 2 175 2 150 - 200 ตัดเปนชิ้น ๆ เนื้อไกฟา 190 2 175 2 90 - 120 ทั้งตัว เวลา (นาที) ความเห็น ปลา อาหาร ค
www.electrolux.com อาหาร ปริมาณ เวลา (นาที) ชิ้น ปริมาณ (กก.) ดานที่ 1 ดานที่ 2 อกไก 4 0.4 12 - 15 12 - 14 แฮมเบอรเกอร 6 0.6 20 - 30 - เนื้อปลาไมมีกระดูก 4 0.4 12 - 14 10 - 12 แซนดวิชปง 4-6 - 5-7 - ขนมปงปง 4-6 - 2-4 2-3 11.
อาหาร อุปกรณเสริม อุณหภูมิ (°C) ตำแหนง‐ ชั้นวาง เวลา (นาที) มาการอง, 20 ชิ้น ถาดอบหรือถาดรองหยด 180 2 45 - 55 มาการูน, 12 ชิ้น ถาดอบหรือถาดรองหยด 170 2 30 - 40 ขนมอบแบบปรุง‐ ถาดอบหรือถาดรองหยด รสชาติ, 16 ชิ้น 170 2 35 - 45 บิสกิตกรอบชิ้น‐ สั้น, 20 ชิ้น ถาดอบหรือถาดรองหยด 150 2 40 - 50 ทารตเล็ต, 8 ชิ้น ถาดอบหรือถาดรองหยด 170 2 30 - 40 ผักเคี่ยว, 0.4 กก.
www.electrolux.com 11.
อาหาร ฟงกชั่น อุปกรณ‐ เสริม ตำแห‐ อุณห‐ นง‐ ภูมิ ชั้น‐ (°C) วาง เวลา (นาที) ความเห็น ขนมปง‐ ชิ้นสั้น ใชพัดลม‐ ปรุงสุก / ใชพัดลม‐ ปรุงสุก ถาดอบ 2 และ 4 140 150 25 - 45 - ขนมปง‐ ชิ้นสั้น อบปกติ ถาดอบ 3 140 150 25 - 45 - ขนมปงปง ปงยาง 4 - 6 ชิ้น ตะแกรง‐ ชั้นวาง 4 สูงสุด 2 - 3 นาที‐ อุนเตาไว 3 นาที สำหรับดานแรก 2 - 3 นาที‐ สำหรับดานที่‐ สอง เบอร‐ ปงยาง เกอรเนื้อ 6 ชิ้น, 0.6 กก.
www.electrolux.com 12.3 การทำความสะอาดซีลยาง ประตูปด ตรวจสอบซีลยางที่ประตูปดเปนประจำ ซีลยาง ประตูอยูบริเวณรอบชองเปดของเตาอบ อยา ใชเตาอบหากซีลยางประตูปดเสียหาย ติดตอ ศูนยบริการที่ไดรับอนุญาต ขอควรระวัง อยาใชเตาอบโดยไมมีแผง กระจกดานใน 1. เปดประตูใหสุดและคางตำแหนงบานพับ ทั้งสองไว ทำความสะอาดซีลยางประตูปดตามขอมูล ทั่วไปในการทำความสะอาด 12.4 การถอดฐานรองชั้นวาง ทำความสะอาดเตาอบโดยนำฐานรองชั้นวาง ขอควรระวัง ใชความระมัดระวังขณะนำฐาน รองชั้นวางออก 1.
อยาทำความสะอาดแผงกระจกในเครื่อง ลางจาน หลังจากทำความสะอาดเสร็จสิ้น ใหติดตั้งแผง กระจกและประตูเตาอบ สวนพิมพสกรีนจะตองหันเขาดานในของประตู ปด หลังจากติดตั้งพื้นผิวกรอบแผงกระจกที่ สวนพิมพสกรีนจะตองรูสึกเรียบเนียนเมื่อ สัมผัสดู หากติดตั้งไดถูกตอง ขอบประตูจะคลิกล็อคเขา ที่ อยาลืมติดตั้งแผงกระจกดานในเขาในฐานรอง ใหถูกตอง A 4. วางประตูปดไวบนผานุมบนพื้นผิวที่มั่นคง 5. จับที่ขอบประตูปด (B) ที่ขอบดานบนของ ประตูทั้งสองดาน จากนั้นดันเขาเพื่อคลาย คลิปซีลออก 12.
www.electrolux.com 13.1 จะทำอยางไรถา...
อบพัดลมแบบมีความชื้น ฟงกชั่นนี้ออกแบบมาเพื่อใหประหยัดพลังงาน ระหวางการปรุงสุก 15.
www.electrolux.
867347983-B-192019 www.electrolux.