user manual Built-In Electric Oven EOB32000
We were thinking of you when we made this product
electrolux 3 Welcome to the world of Electrolux Thank you for choosing a first class product from Electrolux, which hopefully will provide you with lots of pleasure in the future. The Electrolux ambition is to offer a wide variety of quality products that make your life more comfortable. You will find some examples on the cover in this manual. Please take a few minutes to study this manual so that you can take advantage of the benefits of your new machine.
electrolux contents Contents Safety instructions Description of the Appliance Before Using for the first time Using the Oven Uses, Tables and Tips Cleaning and Care What to do if … Installation Instructions Disposal Guarantee/Customer Service Service and Spare Parts 5 7 10 12 21 36 47 48 53 54 57 The following symbols are used in this user manual: 1 3 2 Important information concerning your personal safety and information on how to avoid damaging the appliance.
safety instructions electrolux 5 Safety instructions Electrical safety • This appliance must be only connected by a registered electrician. • In the event of a fault or damage to the appliance: Take the fuses out or switch off. • Repairs to the appliance must only be carried out by qualified service engineers. Considerable danger may result from improper repairs. If repairs become necessary, please contact our Customer Services or your dealer.
electrolux safety instructions How to avoid damage to the appliance • Do not line the oven with aluminium foil and do not place baking trays, pots, etc. on the oven floor, as the heat that builds up will damage the oven enamel. • Fruit juices dripping from the baking tray will leave stains, which you will not be able to remove. For very moist cakes, use a deep tray. • Do not put any strain on the oven door when open. • Never pour water directly into the oven when it is hot.
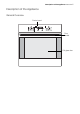
description of the appliance electrolux 7 Description of the Appliance General Overview Control panel Door handle Full glass door
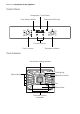
electrolux description of the appliance Control Panel Temperature / Time Display Oven Power Indicator Temperature Pilot Light Function buttons Oven Functions Temperature selector Oven Features Top heat and heating elements Oven lighting Shelf positions Meat probe socket Fan Bottom Heat Oven shelf runners, removable
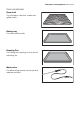
description of the appliance electrolux 9 Oven accessories Oven shelf For cookware, cake tins, roasts and grilled foods. Baking tray For cakes and biscuits. Roasting Pan For baking and roasting or as a pan for collecting fat. Meat probe For determining exactly how far joints of meat are cooked.
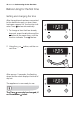
electrolux before using for the first time Before Using for the first time Setting and changing the time After the appliance has been connected to the electrical supply or when there has been a power cut, the function indicator Time flashes automatically. 1. To change a time that has already been set, press the button and the button at the same time, until the function indicator Time flashes. 2. Using the rent time. or button, set the cur- After approx.
before using for the first time electrolux 11 Initial Cleaning Before using the oven for the first time you should clean it thoroughly. Caution: Do not use any caustic, abrasive cleaners! The surface could be damaged. To clean metal fronts use commercially available cleaning agents. 1. Turn the oven function switch to oven lighting . 2. Remove all accessories and the shelf support rails and wash them with warm water and washing up liquid. 3.
electrolux using the oven Using the Oven Switching the Oven On and Off Temperature / Time Display Oven Power Indicator Temperature Pilot Light Meat probe indicator Button Oven function selection 1. Turn the oven functions dial to the desired function. 2. Turn the temperature selector to the desired temperature. The power indicator is lit as long as the oven is in operation. The temperature pilot light is lit as long as the oven is heating up. 3.
using the oven electrolux 13 Oven Functions The oven has the following functions: Oven function Application Light Using this function you can light up the oven interior, e.g. for cleaning. Convection For baking on up to two oven levels. Set the oven temperatures 20-40 °C lower than when using Conventional. Conventional For baking and roasting on one oven level. Bottom heat For baking cakes with crispy or crusty bases. Defrost For defrosting e. g.
electrolux using the oven Inserting the Oven Shelf, Baking Tray and Roasting Pan Shelf runner safety and anti-tip device As a shelf runner safety device, all insertable components have a small curved indentation at the bottom on the right and left-hand edge. Always insert insertable components so that this indentation is at the back of the oven interior. This indentation is also important for preventing the insertable components from tipping.
using the oven electrolux 15 Inserting the oven shelf: Insert the oven shelf so that the feet point downwards. Push the oven shelf between the guide bars of the selected oven level. The high rim around the oven shelf is an additional device to prevent cookware from slipping. Inserting the oven shelf and roasting pan together Lay the oven shelf on the roasting pan. Push the roasting pan between the guide bars of the selected oven level.
electrolux using the oven Additional functions Either Countdown or Meat probe can be set. Time or temperature display Countdown To set a countdown. Meat probe To set a core temperature. Selector buttons Switching off the time display You can save energy by switching off the time display. To switch off the time display Press the button and the button at the same time until the display goes out. To switch on the time display Press any button until the time appears in the display again.
using the oven electrolux 17 General Hints • After a function has been selected, the display flashes for about 5 seconds. While it flashes, the desired time can be set using the or buttons. • When the desired time has been set, the display flashes for another 5 seconds. The set time begins to run. • Press any of the buttons to stop the signal. • The desired oven function and temperature can be selected before or after setting the clock functions.
electrolux using the oven Countdown This function has no effect on the operation of the oven. 1. Press any button. “0.00” flashes in the display. 2. Within 5 seconds set the desired countdown using the or buttons (max. 2 hours 30 minutes). After 5 seconds the display shows the time remaining. When the time has elapsed, “0.00” is displayed and an audible signal sounds for 2 minutes. 3. The signal can be stopped by pressing any button.
using the oven electrolux 19 Meat probe Important: Only the meat probe supplied with the oven may be used. If replacing, please use only original replacement parts. 1. Push the tip of the meat probe right into the meat so that the tip is in the centre of the meat. 2. Insert the meat probe plug into the socket on the side wall of the oven as far as it will go. 3. Using the or button set the desired core temperature. The display changes to the current core temperature.
electrolux using the oven As soon as the core temperature set is reached, an audible signal sounds. 5. Press any key to switch off the signal. 6. Turn oven function selector and temperature selector to the Off position. Warning: The meat probe is hot. There is a risk of being burned when removing the plug and the tip of the meat probe. 7. Remove the meat probe’s plug from the socket and take the meat out of the oven. Changing the core temperature – If necessary, change the temperature using or .
uses, tables and tips electrolux 21 Uses, Tables and Tips Baking Oven function: Convection Conventional or Baking tins • For Conventional , dark metal and non-stick tins are suitable. • For Convection bright metal tins are also suitable. Oven levels • Baking with Conventional is only possible on one level. • With Convection you can bake dry cakes and biscuits on 2 baking trays at the same time. 1 baking tray: e.g. oven level 3 1 cake tin: e.g. oven level 1 2 baking trays: e. g.
electrolux uses, tables and tips General Instructions • Insert the tray with the bevel at the front. • With Conventional or Convection you can also bake with two tins next to one another on the oven shelf at the same time. This does not significantly increase baking time. When frozen foods are used the trays inserted may distort during cooking. This is due to the large difference in temperature between the freezing temperature and the temperature in the oven.
uses, tables and tips electrolux 23 How to use the Baking Tables The tables give the required temperature settings, baking times and oven shelf levels for a selection of typical dishes. • Temperatures and baking times are for guidance only, as these will depend on the consistency of pastry or mixture, the number and the type of cake tin.
electrolux uses, tables and tips Baking table Type of baking Ovenfunction Shelf Temperaposition ture °C Time Hours mins.
uses, tables and tips electrolux 25 Type of baking Ovenfunction Shelf Temperaposition ture °C Time Hours mins. Yeast cakes with delicate toppings (e. g.
electrolux uses, tables and tips Tips on baking Baking results Possible cause Remedy The cake is not browned Wrong oven level enough at the bottom Place cake lower in the oven The cake sinks (becomes soggy, lumpy, streaky) Oven temperature too high Use a slightly lower setting Baking time too short Set a longer baking time Baking times cannot be reduced by setting higher temperatures Too much liquid in the mixture Use less liquid Pay attention to mixing times, especially if using mixing machi
uses, tables and tips electrolux 27 Table for Bakes and Gratins Shelf position Temperature °C Time Hours mins.
electrolux uses, tables and tips Frozen Ready Meals Table Food to be cooked Oven function Shelf positio n Temperature °C Time Frozen pizza Conventional 3 as per manufacturer’s instructions as per manufacturer’s instructions Chips1) (300-600 g) Convection grilling 3 200-220 as per manufacturer’s instructions Baguettes Conventional 3 as per manufacturer’s instructions as per manufacturer’s instructions Fruit flans Conventional 3 as per manufacturer’s instructions as per manufacture
uses, tables and tips electrolux 29 Roasting Oven function: Conventional Convection grilling or Roasting dishes • Any heat-resistant ovenware is suitable to use for roasting (please read the manufacturer's instructions). • Large roasting joints can be roasted directly in the roasting tray or on the oven shelf with the roasting tray placed below it. • For all lean meats, we recommend roasting these in a roasting tin with a lid. This will keep the meat more succulent.
electrolux uses, tables and tips Roasting table Type of meat Quantity Shelf Ovenfunction position Temperature °C Time Hours mins. 200-250 2:00-2:30 Beef Pot roast 1-1.5 kg Conventional 1 per cm. of thickness Roast beef or fillet - rare per cm. of thickness Convection grilling 1 190-2001) 0:05-0:06 - medium per cm. of thickness Convection grilling 1 180-190 0:06-0:08 - well done per cm. of thickness Convection grilling 1 170-180 0:08-0:10 Shoulder, neck, ham joint 1-1.
uses, tables and tips electrolux 31 Type of meat Quantity Shelf Ovenfunction position Temperature °C Time Hours mins. Poultry Poultry portions 200-250g each Convection grilling 1 200-220 0:35-0:50 Half chicken 400-500g each Convection grilling 1 190-210 0:35-0:50 Chicken, poulard 1-1.5 kg Convection grilling 1 190-210 0:45-1:15 Duck 1.5-2 kg Convection grilling 1 180-200 1:15-1:45 Goose 3.5-5 kg Convection grilling 1 160-180 2:30-3:30 Turkey 2.5-3.
electrolux uses, tables and tips Grill Sizes Oven function: Grill or Dual grill with maximum temperature setting Important: Always grill with the oven door closed. The empty oven should always be pre-heated with the grill functions for 5 minutes. • For grilling, place the shelf in the recommended shelf position. • Always insert the tray for collecting the fat into the first shelf position from the bottom. • The grilling times are guidelines.
uses, tables and tips electrolux 33 Defrosting Oven function: Defrost perature setting) (no tem- • Unwrap the food and place it on a plate on the oven shelf. • Do not cover with a plate or bowl, as these can substantially lengthen the defrosting time. • For defrosting, place the shelf in the 1st oven level from the bottom. Defrosting table Defrosting time mins. Further defrosting time (mins.
electrolux uses, tables and tips Drying Oven function: Convection • Use oven shelves covered with greaseproof paper or baking parchment. • You get a better result if you switch the oven off halfway through the drying time, open the door and leave the oven to cool down overnight. • After this finish drying the food to be dried.
uses, tables and tips electrolux 35 Making Preserves Oven function: Bottom heat • For preserving, use only commercially available preserve jars of the same size. • Jars with twist-off or bayonet type lids and metal tins are not suitable. • When making preserves, the first shelf position from the bottom is the one most used. • Use the shelf for making preserves. There is enough room on this for up to six 1-litre preserving jars. • The jars should all be filled to the same level and clamped shut.
electrolux cleaning and care Cleaning and Care Warning: First switch off the appliance and let it cool down before carrying out any cleaning. Warning: For safety reasons, do not clean the appliance with steam blasters or high-pressure cleaners. Attention: Do not use any corrosive cleaning fluids, sharp objects or stain removers. Do not clean the glass oven door with abrasive fluids or metal scrapers, which could scratch the surface. The glass could crack and shatter.
cleaning and care electrolux 37 Shelf Support Rails The shelf support rails on the left and right hand sides of the oven can be removed for cleaning the side walls. Removing the shelf support rails First pull the front of the rail away from the oven wall (1) and then unhitch at the back (2).
electrolux cleaning and care Oven Lighting Warning: Risk of electric shock! Prior to changing the oven light bulb: – Switch off the oven! – Disconnect from the electricity supply. Place a cloth on the oven floor to protect the oven light and glass cover. Changing the oven light bulb/cleaning the glass cover 1. Remove the glass cover by turning it anti-clockwise and then clean it. 2. If necessary: replace with 25 watt, 230 V, 300 °C heat-resistant oven lighting. 3. Refit the glass cover.
cleaning and care electrolux 39 Oven Ceiling The upper heating element can be folded down to make it easier to clean the oven ceiling. Folding down the heating element Warning: Only fold down the heating element when the oven is switched off and there is no risk of being burnt! 1. Remove the side shelf support rails. 2. Grip the heating element at the front and pull it forwards and out over the support lug on the inner wall of the oven. 3. The heating element will now fold down.
electrolux cleaning and care Repositioning the heating element 1. Move the heating element back up towards the oven ceiling. 2. Pull the heating element forwards against the spring pressure and guide it over the oven support lug. 3. Settle it onto the support. 4. Insert shelf support rail. Important: The heating element must be positioned correctly and securely on both sides above the support lug on the inner wall of the oven.
cleaning and care electrolux 41 Oven door For easier cleaning of the oven interior the oven door of your appliance can be taken off its hinges. Removing the oven door from its hinges 1. Open the oven door as far as it will go. 2. Undo the clamping levers (A) on both door hinges fully. 3. Close the oven door as far as the first position (approx. 45°). 4. Take hold of the oven door with a hand on each side and pull it away from the oven at an upwards angle (Take care: It is heavy).
electrolux cleaning and care Hanging the oven door back on its hinges 1. From the handle side take hold of the oven door with a hand on each side and hold at an angle of approx. 45°. Position the recesses on the bottom of the oven door on the hinges on the oven. Let the door slide down as far as it will go. 2. Open the oven door as far as it will go. 3. Fold up the clamping levers (A) on both door hinges back into their original positions. 4. Close the oven door.
cleaning and care electrolux 43 Oven door glass The oven door is fitted with two panels of glass mounted one behind the other. The inner panel can be removed for cleaning. Important Rough handling, especially around the edges of the front panel, can cause the glass to break. Removing the door glass 1. Open the oven door as far as it will go. 2. Undo the clamping levers (A) on both door hinges fully. 3. Close the oven door as far as the first position (approx. 45°).
electrolux cleaning and care 4. Take hold of the door trim (B) on the upper edge of the door at both sides and press inwards to release the clip seal. Then remove the door trim by pulling upwards. 5. Take hold of the door glass on its upper edge and take it out of the guide by pulling it upwards. Cleaning the door glass Clean the door glass thoroughly with a solution of water and washing up liquid. Then dry it carefully. Putting the door glass back 1.
cleaning and care electrolux 45 2. Take hold of the door trim (B) at each side, position it on the inside edge of the door and plug the door trim(B) into the upper edge of the door. On the open side of the door trim (B) there is a guide bar (C). This must be pushed between the outer door panel and the guide corner(D). The clip seal (E) must be snapped in.
electrolux cleaning and care 3. Open the oven door as far as it will go. 4. Fold up the clamping levers (A) on both door hinges back into their original positions. 5. Close the oven door.
what to do if … electrolux 47 What to do if … Problem The oven does not heat up Possible cause The oven is not switched on Remedy Switch the oven on The required settings have not Check the settings been set The house wiring fuse (in the fuse box) has tripped Check the fuse If the fuses trip several times, please call a qualified electrician The oven lighting is not operat- The oven light bulb is faulty ing Replace the oven bulb F11 appears in the clock display Insert the plug of the meat probe as
electrolux installation instructions Installation Instructions Attention: The new appliance may only be installed and connected by a registered expert. Please comply with this. If you do not, any damage resulting is not covered by the warranty. Safety information for the installer • The electrical installation is to be set up so that the appliance can be isolated from the mains with a minimum 3mm all-pole contact separation. Suitable separation devices include e.g.
installation instructions electrolux 49
electrolux installation instructions
installation instructions electrolux 51
electrolux installation instructions
disposal electrolux 53 Disposal Packaging material The packaging materials are environmentally friendly and can be recycled. The plastic components are identified by markings, e.g. >PE<, >PS<, etc. Please dispose of the packaging materials in the appropriate container at the community waste disposal facilities. Old appliance W The symbol on the product or on its packaging indicates that this product may not be treated as household waste.
electrolux guarantee/customer service Guarantee/Customer Service European Guarantee This appliance is guaranteed by Electrolux in each of the countries listed at the back of this user manual, for the period specified in the appliance guarantee or otherwise by law.
guarantee/customer service electrolux 55 www.electrolux.com p t b Albania +35 5 4 261 450 Rr. Pjeter Bogdani Nr. 7 Tirane Belgique/België/ Belgien +32 2 363 04 44 Bergensesteenweg 719, 1502 Lembeek Èeská republika +420 2 61 12 61 12 Budìjovická 3, Praha 4, 140 21 Danmark +45 70 11 74 00 Sjællandsgade 2, 7000 Fredericia Deutschland +49 180 32 26 622 Muggenhofer Str. 135, 90429 Nürnberg Eesti +37 2 66 50 030 Mustamäe tee 24, 10621 Tallinn España +34 902 11 63 88 Carretera M-300, Km.
electrolux guarantee/customer service p t b Slovensko +421 2 43 33 43 22 Electrolux Slovakia s.r.o., Electrolux Domáce spotrebièe SK, Seberíniho 1, 821 03 Bratislava Suomi www.electrolux.fi Sverige +46 (0)771 76 76 76 Electrolux Service, S:t Göransgatan 143, S-105 45 Stockholm Türkiye +90 21 22 93 10 25 Tarlabaþý caddesi no : 35 Taksim Istanbul Ðîññèÿ +7 495 937 7837 129090 Ìîñêâà, Îëèìïèéñêèé ïðîñïåêò, 16, ÁÖ „Îëèìïèê“ Óêðà¿íà +380 44 586 20 60 04074 Êè¿â, âóë.
service and spare parts electrolux 57 Service and Spare Parts If the event of your appliance requiring service, or if you wish to purchase spare parts, please contact Service Force by telephoning: 0870 5 929 929 Your telephone call will be automatically routed to the Service Force Centre covering your post code area. For the address of your local Service Force Centre and further information about Service Force, please visit the website at www. serviceforce.co.
electrolux service and spare parts Customer Care Department Major Appliances Electrolux Addington Way Luton Bedfordshire, LU4 9QQ Tel: 08705 350350 (*) For Customer Service in the Republic of Ireland please contact us at the address below: AEG/ Electrolux Group (Ire) Ltd Long Mile Road/ Dublin 12 Republic of Ireland Tel: +353 (0) 1 4090753 Email: service.eid@electrolux.
www.electrolux.