user manual Oven EOB32000
electrolux Electrolux. Thinking of you. Share more of our thinking at www.electrolux.
electrolux 3 • Keep the minimum distances to the other appliances and units. • The appliance cannot be positioned on a base. • Built in ovens and built in cooking surfaces are attached with special connection system. To prevent damage to the appliance, only use an appliance with the appliances from the same manufacturer. Electrical connection • The appliance must be earthed. • Make sure that the electrical data on the rating plate agree with your domestic power supply.
electrolux • Be careful when you remove the door from the appliance. The door is heavy! • Do not clean catalytic enamel (if applicable). specifically designed for household appliances only. • Disconnect the appliance from the power supply before the replacement of the oven lamp. There is the risk of electrical shock. Risk of fire • Open the door carefully. The use of ingredients with alcohol can cause a mixture of alcohol and air. There is the risk of fire.
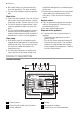
electrolux 5 7 8 9 10 11 12 13 Heating element Meat probe socket Oven lamp Fan and rear wall heating element Bottom heat Oven shelf runners, removable Shelf positions For cookware, cake tins, roasts. • Flat baking tray For cakes and biscuits. • Deep roasting pan To bake and roast or as pan to collect fat. • Meat probe To measure how far the food is cooked. Oven accessories • Oven shelf BEFORE FIRST USE Warning! Refer to "Safety information" chapter.
electrolux Oven Functions Oven function Light Convection Application Use this function to light up the oven interior. To bake on a maximum of two oven levels at the same time. Set the oven temperatures (20-40°C) lower than for Conventional. To dry food. Conventional To bake and roast on one oven level. Bottom heat To bake cakes with crispy or crusty bases and to preserve food. Defrost Grill Dual grill Convection grilling To defrost frozen food.
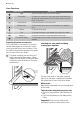
electrolux 7 Warning! The meat probe is hot! Risk of burns! Be careful when you remove the tip and plug of the meat probe. Display 1 2 3 4 Using the meat probe: 1. Insert the meat probe plug into the socket in the side wall of the oven. Meat flashes. probe indicator 2. Insert the meat probe point in the middle of the meat, as far as it goes. 2 6 1 3. Use "+" or "-" buttons to set the core temperature. You can set the temperature from 30 °C to 99 °C. Refer to values in the table. 4.
electrolux • With longer baking times, the oven can be switched off about 10 minutes before the end of baking time, to use the residual heat. When you use frozen food, the trays in the oven can twist during baking. When the trays get cold again, the distortion will be gone. How to use the Baking Tables • We recommend to use the lower temperature the first time. Tips on baking Baking results • If you cannot find the settings for a special recipe, look for the one that is almost the same.
electrolux 9 Type of baking Oven function Level Temperature (°C) Time (h:min) Apple pie (2 tins, Ø 20 cm, diagonally off set) Convection 1 160 1:10 - 1:30 Apple pie (2 tins, Ø 20 cm, diagonally off set) Conventional 1 180 1:10 - 1:30 Savoury flan (e.g.
electrolux Biscuits Type of baking Oven function Level Temperature (°C) Time (h:min) Short pastry biscuits Convection 3 150 - 160 0:06 - 0:20 Short pastry biscuits Convection 1/3 150 - 160 0:06 - 0:20 Viennese whirls Convection 3 140 0:20 - 0:30 Viennese whirls Convection 1/3 140 0:25 - 0:40 Conventional 3 160 0:20 - 0:30 Biscuits made with sponge mixture Convection 3 150 - 160 0:15 - 0:20 Biscuits made with sponge mixture Convection 1/3 150 - 160 0:15 - 0:20 Pastr
electrolux 11 Ready meals Food to be cooked Shelf level Temperature °C Time Conventional 3 refer to instructions of the manufacturer refer to instructions of the manufacturer Convection grilling 3 200-220 refer to instructions of the manufacturer Baguettes Conventional 3 refer to instructions of the manufacturer refer to instructions of the manufacturer Fruit flans Conventional 3 refer to instructions of the manufacturer refer to instructions of the manufacturer Frozen pizza Chips1)
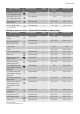
electrolux Pork Type of meat Quantity Oven function Shel f level Temperature °C Time (h:min) Shoulder, neck, ham joint 1 - 1.5 kg Convection grilling 1 160 - 180 1:30 - 2:00 Chop, spare rib 1 - 1.
electrolux 13 Type of meat Quantity Oven function Shel f level Temperature °C Time (h:min) Duck 1.5 - 2 kg Convection grilling 1 180 - 200 1:15 - 1:45 Goose 3.5 - 5 kg Convection grilling 1 160 - 180 2:30 - 3:30 Turkey 2.5 - 3.
electrolux Food to be cooked Meat core temperature in °C Leg of hare 70 - 75 Whole hare 70 - 75 Saddle of venison 70 - 75 Leg of venison 70 - 75 Grilling Always use the grilling function with maximum temperature setting • Always set the pan to collect the fat into the first shelf level. • Grill only flat pieces of meat or fish. Important! Always grill with the oven door closed To see which oven function you must use please refer to the oven functions list in Daily use chapter.
electrolux 15 Stone fruit Preserve Temperature in °C Time until simmering in mins. Continue to cook at 100°C in mins. 160 - 170 35 - 45 10 - 15 Temperature in °C Time until simmering in mins. Continue to cook at 100°C in mins.
electrolux Dish Defrosting time (mins) Further defrosting time (mins) Comments Meat, 1000 g 100-140 20-30 Turn halfway through Meat, 500 g 90-120 20-30 Turn halfway through Trout, 150g 25-35 10-15 ------- Strawberries, 300g 30-40 10-20 ------- Butter, 250g 30-40 10-15 ------- Cream, 2 x 200g 80-100 10-15 Cream can also be whipped when still slightly frozen in places 60 60 ------- Gateau, 1400g Information on acrylamides Important! According to the newest scientific knowled
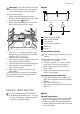
electrolux 17 Installing the shelf support rails Install the shelf support rails in opposite sequence. The rounded ends of the shelf support rails must point to the front! Oven lamp Warning! There is a danger of electrical shock! Before you change the oven lamp: • Switch off the oven. • Remove the fuses in the fuse box or switch off the circuit breaker. Put a cloth on the bottom of the oven for protection of the oven light and glass cover. Replacing the oven lamp 1.
electrolux 3. Close the oven door until the first position (angle approx. 45°). Removing and cleaning the door glasses 1. Hold the door trim (B) on the top edge of the door at the two sides and push inwards to release the clip seal. 2 B 1 45° 2. Pull the door trim to the front to remove it. 4. Hold of the oven door with one hand on each side and pull it away from the oven at an upwards angle. Put the oven door with the outer side down on a soft and level surface to prevent scratches. 5.
electrolux 19 Problem F11 appears in the clock display Possible cause Remedy The meat probe has short circuit or the plug of the meat probe is not tightly in position in the socket If you cannot find a solution to the problem yourself, contact your dealer or the service centre. Insert the plug of the meat probe as far as it will go into the socket on the side wall of the oven The necessary data for the service centre is on the rating plate. The rating plate is on the front frame of the oven cavity.
www.electrolux.