B u i l t - I n E l e c t r i c O v e n Operating Instructions EOB3637 822 923 665-A-230104-01 g
Dear customer, Please read these operating instructions carefully. Pay particular attention to the section “Safety information” on the first few pages. Please retain these operating instructions for later reference. Pass them on to possible new owners of the appliance. 1 3 2 The following symbols are used in the text: Safety instructions Warning: Information concerning your personal safety. Important: Information on how to avoid damaging the appliance.
Contents Safety . . . . . . . . . . . . . . . . . . . . . . . . . . . . . . . . . . . . . . . . . . . . . . . . . . . . . . . 5 Disposal . . . . . . . . . . . . . . . . . . . . . . . . . . . . . . . . . . . . . . . . . . . . . . . . . . . . . 6 Description of the Appliance . . . . . . . . . . . . . . . . . . . . . . . . . . . . . . . . . . . . General Overview . . . . . . . . . . . . . . . . . . . . . . . . . . . . . . . . . . . . . . . . . . . . . . Control Panel. . . . . . . . . . . . . . . . . . . .
What to do if … . . . . . . . . . . . . . . . . . . . . . . . . . . . . . . . . . . . . . . . . . . . . . . . 40 Technical Data . . . . . . . . . . . . . . . . . . . . . . . . . . . . . . . . . . . . . . . . . . . . . . . . Oven Interior Dimensions . . . . . . . . . . . . . . . . . . . . . . . . . . . . . . . . . . . . . . . . Regulations, Standards, Directives . . . . . . . . . . . . . . . . . . . . . . . . . . . . . . . . . 41 41 41 Index . . . . . . . . . . . . . . . . . . . . . . . . . . . . . . . .
1 Safety Electrical Safety • The appliance may only be connected by a registered specialist. • In the event of any faults or damage to the appliance: remove fuses or switch off. • It is not permissible to clean the appliance with a steam or high pressure cleaner for safety reasons! • Repairs to the appliance may only be carried out by specialists. Repairs carried out by inexperienced persons may cause injury or serious malfunctioning.
2 Disposal Disposing of the packaging material All materials used can be fully recycled. Plastics are marked as follows: • >PE< for polyethylene, as used for the outer wrapping and the bags inside. • >PS< for polystyrene foam, e.g., as used for the padding materials. They are completely free of CFCs. Disposal of old appliances 1 6 Warning: Before disposing of old appliances please make them inoperable so that they cannot be the source of danger.
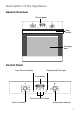
Description of the Appliance General Overview Control panel Door handle Full glass door Control Panel Oven Power Indicator Temperature Pilot Light Time display Clock function buttons Oven Functions Temperature selector 7
Oven Features Top heat and heating elements Oven lighting Shelf positions Fan Bottom Heat Oven shelf runners, removable Oven accessories Combination shelf For dishes, cake tins, items for roasting and grilling. Baking tray For cakes and biscuits. General purpose pan For roasting, or as a receptacle for grease.
Before Using for the first time Setting the Time 3 The oven will only function if the time is set. The set time function indicator will flash after the appliance has been connected to the mains or following a power failure. Use the + or - buttons to set the current time. After approx. 5 seconds the function indicator will stop flashing and the clock will show the set time. The appliance is ready for use.
Initial Cleaning 1 3 Before using the oven for the first time you should clean it thoroughly. Caution: Do not use any caustic, abrasive cleaners! The surface could be damaged. To clean metal fronts use commercially available cleaning agents. 1.Turn the oven function switch to oven lighting L. 2.Remove all accessories and the shelf support rails and wash them with warm water and washing up liquid. 3.Then wash out the oven with warm water and washing-up liquid, and dry. 4.
Using the Oven Switching the Oven On and Off Oven Power Indicator Oven Functions Temperature Pilot Light Temperature selector 1.Turn the oven functions switch to the required function. 2.Turn the temperature selection switch to the required temperature. The red oven power indicator is illuminated while the oven is in use. The red temperature pilot light is illuminated while the oven is heating up. 3.
Oven Functions The oven has the following functions: L Oven lighting With this function you can illuminate the oven interior, e.g., for cleaning. The heating element is not in use. Fan-assisted circulation For roasting and grilling on two shelf positions. Set the oven temperature 20-40 °C lower than for Top/Bottom heat. Top/Bottom heat is on and the fan is also on. ¼ Turbo All-Round Grill For roasting larger joints of meat or poultry on one level. The function is also suitable for gratinating and browning.
Inserting the general purpose pan, grill, and tray Inserting the general purpose pan and tray: The trays have a little bulge on the left and right edges. These are provided as positioning guides and must always be located towards the rear when inserting the tray. For grills: Insert the tray at the desired position.
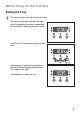
Clock Functions Function Indicators Button - Time Display Function Indicators Selector Button Countdown G To set a countdown. A signal sounds after the time has elapsed. This function does not affect the functioning of the oven. Cook time d To set how long the oven is to be in use. End time e To set when the oven is to switch off again. Time W To set, change or check the time (See also section “Before Using for the First Time”).
3 General information • Once a function has been selected the corresponding function indicator will flash for approx. 5 seconds. During this time the required times can be set using the + or - button. • After the required time has been set the function indicator will flash again for approx. 5 seconds. After this the function indicator will stay on. The set time will begin to count down. • The acoustic signal can be deactivated by pressing any button.
Countdown G 1.Press selection button T repeatedly until the countdown function indicator G flashes. 2.Using the + or - button set the required countdown G. (Max. 2 hours and 30 minutes.) After approx. 5 seconds the display will show the remaining time. The countdown function indicator G is illuminated. When the time has expired the function indicator will flash and an acoustic signal will sound for 2 minutes. Press any button to switch off the acoustic signal.
Cook time d 1.Press selection button T repeatedly until the cook time function indicator d flashes. 2.Using buttons + or - set the required cooking time. After approx. 5 seconds the display will revert to the time. The cook time function indicator d is illuminated. When the time has expired the function indicator will flash, an acoustic signal will sound for 2 minutes and the oven will switch off. 3.Switch off the acoustic signal and the programme by pressing any button.
End time e 1.Press selection button T repeatedly until the end time function indicator e flashes. 2.Using buttons + or - set the time at which you want the oven to switch off. After approx. 5 seconds the display will revert to the time. The end time function indicator e is illuminated. When the time has elapsed the function indicator will flash, an acoustic signal will sound for 2 minutes and the oven will switch off. 3.Switch off the acoustic signal and the programme by pressing any button.
3 Cook time d and End time e combined Cook time d and end time e can be used together if the oven is to switch on and off automatically at a later time. 1.Using the cook time d function sets the time required for the dish to cook. In this case 1 hour. 2.Using the end time function sets the time at which the dish is to be ready. In this case 14:05. The cook time d and end time e function indicators are illuminated and the time will appear in the display. In this case 12:05.
3 Changing Time W The time can only be changed if neither of the automatic functions (cook time d or end time e) has been set. 1.Press selection button T repeatedly until the time W function indicator flashes. 2.Using buttons + or - set the current time. After approx. 5 seconds the function indicator will stop flashing and the clock will show the set time. The appliance is ready for use.
Uses, Tables and Tips Baking Use either the fan assisted function or Top/Bottom ¡ heating for baking. Baking tins • Dark metal or coated tins are suitable for Top/Bottom ¡ heating. • Light metal/glass/ceramic containers are also suitable for fan-assisted baking. Tray levels • With Top/Bottom ¡ heating, baking can be done on one tray. • With the fan-assisted feature, you can bake flat, dry cakes and pastries on two trays at the same time.
General advice • When choosing the oven position, make sure you are counting from the bottom. • Insert the tray with the bevelled edge towards you. • Always place baking tins at the centre of the grill. • With fan-assisted circulation or Top/Bottom ¡ heat, you can bake two tins beside each other at the same time. The baking time becomes only slightly longer. 3 When frozen foods are used the trays inserted may distort during cooking.
Baking Table Fan-assisted circulation Top/Bottom heat ¡ Temperature in °C Shelf position Temperature in °C Shelf position Baking time in minutes (suggested) Ring cake or 'Gugelhupf' 140-160 1 160-180 1 50-70 Frankfurter ring cake (half tin) 140-160 2 150-170 1 45-60 Royal /Madeira cake (rectangular tin) 140-160 1 150-170 1 70-90 Fruit ingredients 150-170 3 170-190* 2 20-25 Fancy apple cakes 150-170 1 170-190* 1 50-80 Cheese flan (750 g cottage cheese) --- --- 170-190
Fan-assisted circulation Top/Bottom heat ¡ Temperature in °C Shelf position Temperature in °C Shelf position Baking time in minutes (suggested) Ring cakes 140-160 1 160-180 1 50-70 Plaited yeast cakes/ring cakes, buns 150-170 3 170-190* 3 30-40 Cakes with cream filling, sugar/almond toppings 160-170 3 180-200* 3 25-30 With sugar vermicelli 150-170 3 170-190 3 20-40 Fruit cakes (tray) with sugar vermicelli (DIN) 150-160 3 170-190 3 35-50 Ringcake 140-160 1 160-180 1
Fan-assisted circulation Top/Bottom heat ¡ Temperature in °C Shelf position Temperature in °C Shelf position Baking time in minutes (suggested) 170-190* 3 190-210 3 25-40 Swiss apple tart 180-200* 1 210-230* 2 35-50 Swiss cheese tart 180-200* 1 210-230* 2 35-50 Spinach cake, Quiche 170-190 1 180-200 1 35-50 Current rolls 180-190 3 190-210 3 10-15 Milk rolls 160-170 3 180-190 3 10-15 Rye bread, brown bread 190-200 2 or 3 190-210 2 45-65 White bread (tin) 170-1
Roasts For roasts, use the Fan-assisted or Top/Bottom Heat ¡ oven features. Ovenware • Any heat-resistant dish is suitable for roasting (please read the manufacturer's instructions). • For oven dishes with artificial handles, make sure that these are heat-resistant (please read the manufacturer's instructions). • Large roasts can be cooked on the general purpose tray or on the grill with the general purpose tray underneath (for example, turkey, goose, 3-4 chickens, 3-4 knuckles of veal).
Roast Table For each, place the baking tray/general purpose pan at position 1 Fan-assisted Type of roast Temperature in °C with simultaneous use of grill at position from bottom 1 Tray 2 Trays General purpose pan at position Suggested roasting time in minutes Roast/grill per piece 1 kg Pork roasts (Spare ribs or ham, rolled roasts), for each cm. thick 150-160 2 --- 1 14-20 Smoked loin of pork, for each cm.
Fan-assisted Type of roast Temperature in °C with simultaneous use of grill at position from bottom 1 Tray General purpose pan at position Suggested roasting time in minutes 2 Trays Quick-fries on the tray at 1or two 2 positions Fried/grilled sausages 220-230* 3 4+2 --- 10-15 Escalopes/cutlets, in batter 240-250* 3 4+2 --- 13-15 Rissoles 220-230* 3 4+2 --- 15-20 Fish on the tray, at 1 or 2 positions Trout, for each 200250 g 200-210 3 4+2 --- 15-20 4 Fillet of trout (for each 2
Grilling 1 3 For grilling use the infrared grill ¸ oven function or infrared wide-area grill º with temperature setting. Warning: Always close the oven door when grilling. Always pre-heat the empty oven using the grill functions for 5 minutes! Ovenware for grilling • Use the shelf unit and universal tray together for grilling. Shelf positions • For grilling flat foods you should mostly use the 4th shelf position from the bottom.
Food for grilling Function TemperUniversal ature tray in °C Grill tray Shelf positions 30 Grilling time in minutes 1. Page 2.
Turbo grilling Function: Turbo grill ¼ Dish Temper- Universal Grill tray Grilling tray ature time in in °C minutes Shelf positions Turn after ...
Preserving When preserving use the bottom heat oven function U. Preserving jars • When preserving use only commercially available jars that are the same size. 3 Jars with twist-off tops or with a bayonet fastening and metal containers are not suitable. Shelf positions • Use the 1st shelf position from the bottom for preserving. Notes on preserving • Use the baking tray for preserving. There is room for up to six jars, each with a capacity of 1 litre.
Preserves Continued Cooking Tempercooking time until ature in bubbles form at 100 °C °C Mins. Mins.
Cleaning and Care 1 Warning: For safety reasons cleaning the appliance with a steam jet cleaner or high-pressure water cleaner is not permissible! Exterior of the Appliance • Wipe the front of the appliance with a soft cloth dipped in warm soapy water. • Do not use scourers, caustic cleaners or abrasive items. • Use commercially available cleaners for metal fronts. Oven Interior 1 1 Warning: The oven must be switched off and cold before cleaning. Clean the appliance after each use.
Shelf Support Rails The shelf support rails on the left and right hand sides of the oven can be removed for cleaning the side walls. Removing the shelf support rails First pull the front of the rail away from the oven wall (1) and then unhitch at the back (2). 3 Fitting the shelf support rails Important! The rounded ends of the guide rails must be pointing forwards! To re-insert, first hook the rail into place at the back (1) and then insert the front and press into place (2).
Oven Lighting 1 3 Warning: Risk of electric shock! Prior to changing the oven light bulb: – Switch off the oven! – Disconnect from the electricity supply. Place a cloth on the oven floor to protect the oven light and glass cover. Changing the oven light bulb/cleaning the glass cover 1.Remove the glass cover by turning it anti-clockwise and then clean it. 2.If necessary: replace with 25 watt, 230 V, 300 °C heat-resistant oven lighting. 3.Refit the glass cover.
Oven Ceiling The upper heating element can be folded down to make it easier to clean the oven ceiling. 1 1 Folding down the heating element Warning: Only fold down the heating element when the oven is switched off and there is no risk of being burnt! 1.Remove the side shelf support rails. 2.Grip the heating element at the front and pull it forwards and out over the support lug on the inner wall of the oven. 3.The heating element will now fold down.
Oven Door The oven door of your appliance may be removed for cleaning. Removing the oven door 1.Open the oven door completely. 2.Completely fold back the brass-coloured clamping lever on both door hinges. 3.Grip the oven door with both hands on the sides and close it to about 3/4 going past the point of resistance. 4.Pull the door away from the oven (Caution: heavy!). 5.Place the door, with the outer surface downwards, on a soft, flat surface, for example a blanket, to avoid scratches.
Oven door glass 1 1 The oven door has two glass plates, set next to each other. The inner plate can be removed for cleaning. Caution: the following steps must be performed only with the oven door removed! If the glass is removed while the door is attached, the lighter weight may cause it to spring up and cause injury. Important! Rough handling of the glass, especially at the edges of the front plate, may cause it to break. Removing the glass from the door 1.
What to do if … Symptom Possible cause The oven does not heat The oven has not been up. switched on. The time has not been set. Remedy Switch on the oven. Set the time. The necessary settings Check the settings. have not been made. The oven lighting does not come on. 1 3 40 The circuit breaker (at the household fuse box) has tripped or the fuse has blown. Check the circuit breaker or fuse. If the circuit breaker trips or the fuse blows several times, please contact an approved electrician.
Technical Data Oven Interior Dimensions Height x Width x Depth Capacity (usable capacity) 31 cm x 41 cm x 41 cm 52 l Regulations, Standards, Directives This appliance meets the following standards: • EN 60 335-1 and EN 60 335-2-6 relating to the safety of electrical appliances for household use and similar purposes and • EN 60350, or DIN 44546 / 44547 / 44548 relating to the operating features of electric cookers, hobs, ovens, and grills for household use.
Index A S Accessories . . . . . . . . . . . . . . . . . . . . . . . 8 Baking tray . . . . . . . . . . . . . . . . . . . . . . . 8 Safety . . . . . . . . . . . . . . . . . . . . . . . . . . . 5 Shelf support rails . . . . . . . . . . . . . . . . . 35 Switching off the time display . . . . . . . . 15 C T Cleaning accessories . . . . . . . . . . . . . . . . . . . . 34 initial cleaning . . . . . . . . . . . . . . . . . . 10 oven Ceiling . . . . . . . . . . . . . . . . . . . 37 oven door . . . . . . . . .
Service In the “What to do if …” section a number of malfunctions are listed that you can rectify yourself Look there first if a fault occurs. Is it a technical fault? If so, please contact your customer service centre. (You will find addresses and telephone numbers in the section “Customer Service Centres”.) Always prepare in advance for the discussion.
822 923 665-A-230104-01 Subject to change without notice The Electrolux Group. The world´s No.1 choice. The Electrolux Group is the world´s largest producer of powered appliances for kitchen, cleaning and outdoor use. More than 55 million Electrolux Group products (such as refrigerators, cookers, washing machines, vacuum cleaners, chain saws and lawn mowers) are sold each year to a value of approx. USD 14 billion in more than 150 countries around the world.