user manual Built-In Electric Oven EOB50100
electrolux Electrolux. Thinking of you. Share more of our thinking at www.electrolux.com CONTENTS Safety information Product description Daily use Helpful hints and tips Care and cleaning 2 4 5 7 16 What to do if… Installation Environment concerns www.electrolux.
electrolux 3 • Built in ovens and built in cooking surfaces are attached with special connection system. To prevent damage to the appliance, only use an appliance with the appliances from the same manufacturer. Electrical connection • The appliance must be earthed. • Make sure that the electrical data on the rating plate agree with your domestic power supply. • Information on the voltage is on the rating plate. • Always use a correctly installed shockproof socket.
electrolux Risk of fire • Open the door carefully. The use of ingredients with alcohol can cause a mixture of alcohol and air. There is the risk of fire. • Do not let sparks or open flames come near the appliance when you open the door. • Do not put flammable products or items that are wet with flammable products, and/or fusible objects (made of plastic or aluminium) in, near or on the appliance. Oven lamp • Disconnect the appliance from the power supply before the replacement of the oven lamp.
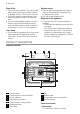
electrolux 5 • Flat baking tray For cakes and biscuits. • Deep roasting pan To bake and roast or as pan to collect fat. DAILY USE Warning! Refer to "Safety information" chapter. Initial Cleaning • Remove all parts from the appliance. • Clean the appliance before first use. Important! Refer to chapter "Care and Cleaning". To use the oven, push the retractable knob. The knob then comes out. Switching the Oven On and Off 1. Turn the oven functions control knob to an oven function. 2.
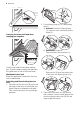
electrolux 2 B 1 2. For activating, step a. For Deactivating step b. a) Activate Doorlock: Remove lever (1), move it 4 mm to the left (2) and reinsert (3). Inserting the oven shelf and deep roasting pan together 2 3 1 b) Deactivate Doorlock: Demount lever: Remove lever (1). 1 Put the oven shelf on the deep roasting pan. Push the deep roasting pan between the guide-bars of one of the oven levels. Mechanical door lock When the appliance is delivered, the door lock is deactivated.
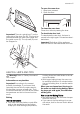
electrolux 7 To open the oven door. 1. Keep lever pressed. 2. Open the door. B Important! There is a guide bar (C) on the open side of the door trim (B). This must be pushed between the outer door panel and the guide corner (D). The clip seal (E) must be snapped in. To close the oven door Close door without pressing the lever. To deactivate door lock To deactivate the door lock, the lever is moved to the right again. Proceed as described above.
electrolux • Baking time can be extended by 10-15 minutes, if you bake cakes on more than one level. • Cakes and pastries at different heights do not always brown equally at first. If Baking on one oven level - Baking in tins Type of baking Oven function this occurs, do not change the temperature setting. The differences equalize during the baking procedure.
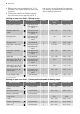
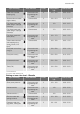
electrolux 9 Type of baking Level Temperature (°C) Time (h:min) Convection with ring heating element 3 150 - 160 0:20 - 0:40 Buttered almond cake/ sugar cakes1) Conventional 3 190 - 210 0:15 - 0:30 Fruit flans (made with yeast dough / sponge mixture)2) Convection with ring heating element 3 150 0:35 - 0:50 Fruit flans (made with yeast dough / sponge mixture)2) Conventional 3 170 0:35 - 0:50 Fruit flans made with short pastry Convection with ring heating element 3 160 - 170 0:40 -
electrolux Type of baking Oven function Level Temperature (°C) Time (h:min) Macaroons Convection with ring heating element 3 100 - 120 0:30 - 0:60 Biscuits made with yeast dough Convection with ring heating element 3 150 - 160 0:20 - 0:40 Puff pastries1) Convection with ring heating element 3 170 - 180 0:20 - 0:30 Rolls1) Convection with ring heating element 3 160 0:20 - 0:35 Rolls1) Conventional 3 180 0:20 - 0:35 Small cakes (20 per tray)1) Convection with ring heating ele
electrolux 11 Tips on baking Baking results Possible cause Remedy The cake is not browned sufficiently below Incorrect oven level Put the cake on a lower oven level The cake sinks (becomes soggy, lumpy, streaky) Oven temperature too high Use a lower setting The cake sinks (becomes soggy, lumpy, streaky) Baking time is too short Set a longer baking time Do not set higher temperatures to decrease baking times The cake sinks (becomes soggy, lumpy, streaky) Too much liquid in the mixture Use less
electrolux Type of baking Shelf level Temperature °C Time (Mins) Piroggen (Russian version of calzone) 1) 1 180 - 200 15 - 25 1) Pre-heat the oven Table for Bakes and Gratin Dish Oven function Shelf level Temperature °C Time Hr : Min Pasta bake Conventional 1 180-200 0:45-1:00 Lasagne Conventional 1 180-200 0:25-0:40 Vegetables au gratin1) Convection with ring heating element 1 160-170 0:15-0:30 Baguettes topped with melted cheese1) Convection with ring heating element 1 1
electrolux 13 • Put some water in the roasting tray to prevent meat juices or fat from burning to the pan. • Turn the meat if it is necessary (after 1/2 2/3 of the cooking time). • For better results, baste large pieces of meat and poultry with the cooking juices several times during the cooking time. Beef Type of meat Port roast Quantity 1 - 1,5 kg • Stop the oven approximately 10 minutes before the end of roasting time to use the residual heat.
electrolux Type of meat Saddle of lamb Quantity Oven function 1 - 1,5 kg Convection grilling Shel f level Temperature °C Time (h:min) 1 160 - 180 1:00 - 1:30 Shel f level Temperature °C Time (h:min) Game Type of meat Quantity Oven function Saddle of hare, leg of hare1) up to 1 kg Conventional 3 220 - 250 0:25 - 0:40 Saddle of venison 1,5 - 2 kg Conventional 1 210 - 220 1:15 - 1:45 Haunch of venison 1,5 - 2 kg Conventional 1 200 - 210 1:30 - 2:15 Shel f level Temperatu
electrolux 15 Food to grill Shelf level Time 1st side 2nd side Burgers 4 8 - 10 mins. 6 - 8 mins. Pork fillet 4 10 - 12 mins. 6 - 10 mins. Sausages 4 8 - 10 mins. 6 - 8 mins. Filet steaks, veal steaks 4 6 - 7 mins 5 - 6 mins. Filet of beef, roast beef ( approximately 1 kg) 3 10 - 12 mins. 10 - 12 mins. Toast 1) 3 4 - 6 mins. 3 - 5 mins. Toast with topping 3 6 - 8 mins. ------- 1) Do not pre-heat Preserving • Only use usual preserving jars of the same dimension.
electrolux Vegetables Food to be dried Temperature in °C Shelf level Time in hours (Guideline) 1 level 2 levels Beans 60 - 70 3 1/4 6-8 Peppers (strips) 60 - 70 3 1/4 5-6 Vegetables for soup 60 - 70 3 1/4 5-6 Mushrooms 50 - 70 3 1/4 6-8 Herbs 40 - 50 3 1/4 2-3 Fruit Food to be dried Temperature in °C Shelf level Time in hours (Guideline) 1 level 2 levels Plums 60 - 70 3 1/4 8 - 10 Apricots 60 - 70 3 1/4 8 - 10 Apple slices 60 - 70 3 1/4 6-8 Pears 60 -
electrolux 17 • Clean the oven interior after each use. Thus you can remove dirt more easily and it does not burn on. • Clean stubborn dirt with a special oven cleaner. • Clean all oven accessories (with a soft cloth with warm water and cleaning agent) after each use and let them dry. • If you have nonstick accessories, do not clean them using an aggressive agents, sharp edged objects or dishwasher. It can destroy nonstick coating! 2. Insert shelf support rails.
electrolux Replacing the oven light bulb/cleaning the glass cover 1. Turn the glass cover anti-clockwise to remove it. 2. Clean the glass cover. 3. Replace the oven light bulb with applicable 300°C heat-resistant oven light bulb. 4. Install the glass cover. Oven door and glass panels To clean the oven door remove it. Caution! Be careful when you remove the door from the appliance. The door is heavy! Removing the oven door 1. Open the oven door as far as it goes. 2.
electrolux 19 Problem Possible cause Remedy The oven does not heat up The oven is not switched on Switch on the oven (refer to chapter "Daily use"). The oven does not heat up The fuse in the fuse box is released Control the fuse. If the fuse is released more than one time, refer to a qualified electrician.
electrolux max. R1200 mm 140 130 alternativ 100 H05VV-F H05RR-F min.
electrolux 21 2x3,5x25 ENVIRONMENT CONCERNS The symbol on the product or on its packaging indicates that this product may not be treated as household waste. Instead it should be taken to the appropriate collection point for the recycling of electrical and electronic equipment. By ensuring this product is disposed of correctly, you will help prevent potential negative consequences for the environment and human health, which could otherwise be caused by inappropriate waste handling of this product.
electrolux WWW.ELECTROLUX.COM Albania +35 5 4 261 450 Rr. Pjeter Bogdani Nr. 7 Tirane Belgique/België/Belgien +32 2 363 04 44 Bergensesteenweg 719, 1502 Lembeek Česká republika +420 261302111 Budějovická 3, Praha 4, 140 21 Danmark +45 70 11 74 00 Sjællandsgade 2, 7000 Fredericia Deutschland +49 180 32 26 622 Fürther Str. 246, 90429 Nürnberg Eesti +37 2 66 50 030 Pärnu mnt. 153, 11624 Tallinn España +34 902 11 63 88 Carretera M-300, Km.
electrolux 23
www.electrolux.