user manual Built-In Electric Oven EOB51000
We were thinking of you when we made this product
electrolux 3 Welcome to the world of Electrolux Thank you for choosing a first class product from Electrolux, which hopefully will provide you with lots of pleasure in the future. The Electrolux ambition is to offer a wide variety of quality products that make your life more comfortable. You will find some examples on the cover in this manual. Please take a few minutes to study this manual so that you can take advantage of the benefits of your new machine.
electrolux contents Contents Safety instructions Description of the Appliance Before using for the first time Operating the Oven Usage, Tables and Tips Cleaning and care What to do if … Electrical Connection Installation Instructions Disposal Guarantee/Customer Service Service and Spare Parts 5 7 10 11 17 30 41 42 43 48 49 53 The following symbols are used in this user manual: 1 3 2 Important information concerning your personal safety and information on how to avoid damaging the appliance.
safety instructions electrolux 5 Safety instructions 5 This appliance conforms with the following EU Directives: – 73/23/EEC dated 19.02.1973 Low Voltage Directive – 89/336/EEC dated 03.05.1989 EMC Directive inclusive of Amending Directive 92/31/EEC – 93/68/EEC dated 22.07.1993 CE Marking Directive Electrical safety • This appliance must be connected by a qualified electrician only. • In the event of a fault or damage to the appliance: take the fuses out or switch off.
electrolux safety instructions How to avoid damage to the appliance • Do not line the oven with aluminium foil and do not place baking trays, pots, etc. on the oven floor, as the heat that builds up will damage the oven enamel. • Fruit juices dripping from the baking tray will leave stains, which you will not be able to remove. For very moist cakes, use a deep tray. • Do not put any strain on the oven door when open. • Never pour water directly into the oven when it is hot.
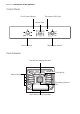
description of the appliance electrolux 7 Description of the Appliance General Overview Control panel Door handle Full glass door
electrolux description of the appliance Control Panel Oven Power Indicator Temperature Pilot Light Minute timer Oven Functions Temperature selector Oven Features Top heat and heating elements Oven lighting Shelf positions Fan heating element Fan Oven shelf runners, removable
description of the appliance electrolux 9 Oven Accessories Shelf For dishes, cake tins, items for roasting and grilling. Grill set Grill Insert for the roasting pan for roasting and grilling. Roasting Pan For baking and roasting or as a pan for collecting fat.
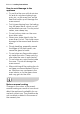
electrolux before using for the first time Before using for the first time Initial Cleaning Before using the oven for the first time you should clean it thoroughly. Caution: Do not use any caustic, abrasive cleaners! The surface could be damaged. To clean any metal front panels use commercially available cleaning agents. 1. Turn the oven function switch to oven lighting . 2. Remove all accessories and the shelf support rails and wash them with warm water and washing up liquid. 3.
operating the oven electrolux 11 Operating the Oven Switching the Oven On and Off Oven Power Indicator Temperature Pilot Light Oven Functions Temperature selector Cooling fan 1. Turn the oven functions control knob to the desired function. 2. Turn the temperature control knob to the desired temperature. The power indicator is lit while the oven is on. The temperature power indicator is lit while the oven is heating up. 3.
electrolux operating the oven Oven Functions The oven has the following functions: Oven function Use Heating element/ fan Light With this function you can light up the --oven interior, e.g. for cleaning. Convection with ring heating element For baking on up to three oven shelves at the same time. Set the oven temperatures 20-40 °C lower than when using Conventional. Ring element, fan Defrost For defrosting e. g. gateaux and flans, butter, bread, fruit or other frozen foods.
operating the oven electrolux 13 Minute Minder This function has no effect on the oven operation. Turn the control knob to 60 minutes, then turn it back to the desired length of time. (60 minutes maximum). A signal is sounded when the set time has elapsed. To change your setting, just turn the knob to the desired duration. To stop the timer before the set time has elapsed, simply turn the knob back to OFF.
electrolux operating the oven Inserting the Oven Shelf and the Roasting Pan Shelf runner safety and anti-tip device As a shelf runner safety device all insertable components have a small curved indentation at the bottom on the right and left-hand edge. Always insert insertable components so that this indentation is at the back of the oven interior. This indentation is also important for preventing the insertable components from tipping.
operating the oven electrolux 15 Inserting the oven shelf: Insert the oven shelf so that the feet point downwards. Push the oven shelf between the guide bars of the selected oven level. The high rim around the oven shelf is an additional device to prevent cookware from slipping. Inserting the oven shelf and the roasting pan together: Lay the oven shelf on the roasting pan. Push the roasting pan between the guide bars of the selected oven level.
electrolux operating the oven Grill set The grill set consists of grill and roasting pan. The grill can used on both sides. Warning: There is a risk of burning when removing the rosting pan from the hot oven! Inserting the grill tray underneath: The grill tray rests in the roasting pan. Push the roasting pan between the guide bars of the selected oven level. For roasting larger joints of meat or poultry on one oven shelf. Inserting the grill tray on top: The grill tray rests on the roasting pan.
usage, tables and tips electrolux 17 Usage, Tables and Tips Baking Oven function: Convection with ring heating element Oven levels • With Convection with ring heating element you can bake on up to 3 baking trays at the same time: 1 baking tray: for example, oven level 3 1 baking tin: for example, oven level 1 2 baking trays: for example, oven level 1 and 3 3 baking trays: oven level 1, 3 and 5 Baking tins • For Convection with ring heating element bright metal tins are suitable.
electrolux usage, tables and tips General instructions With Convection with ring heating element you can also bake two cakes at the same time in tins placed next to each other on the shelf. This does not significantly increase baking time. When frozen foods are used the trays inserted may distort during cooking. This is due to the large difference in temperature between the freezing temperature and the temperature in the oven. Once the trays have cooled the distortion will disappear again.
usage, tables and tips electrolux 19 How to use the Baking Tables The tables give the required temperature settings, baking times and oven shelf levels for a selection of typical dishes. • Temperatures and baking times are for guidance only, as these will depend on the consistency of pastry, mixture or dough, the number and the type of baking tin. • We recommend setting the lower temperature when baking for the first time, and if required, e.g.
electrolux usage, tables and tips Baking Tables Convection with ring heating element Cakes, Biscuits, Bread, Pies Time Shelfposition Temperature ºC Hr. : Min.
usage, tables and tips electrolux 21 Baking on more than one oven level Type of baking Convection with ring heating element Convection with ring heating element Shelf positions from bottom 2 levels 3 levels Temperature in °C Time Hours: Mins.
electrolux usage, tables and tips Tips on Baking Baking results Possible cause Remedy The cake is not browned Wrong shelf level enough at the bottom Place cake on a lower shelf The cake sinks (becomes soggy, lumpy, streaky) Oven temperature too high Use a slightly lower temperature setting Baking time too short Increase baking time Baking times cannot be reduced by setting higher temperatures Too much liquid in the dough/mix- Use less liquid ture Pay attention to mixing times, especially if us
usage, tables and tips electrolux 23 Table: Desserts Convection with ring heating element Time Desserts Shelf position Temperature °C Hr. : Min.
electrolux usage, tables and tips Roasting Oven function: Convection with ring heating element Roasting dishes • Any heat-resistant ovenware is suitable for roasting. (Please read the manufacturer's instructions.) • Large roasting joints can be cooked directly in the tray or on the shelf with the tray placed below • For all lean meat, we recommend roasting these in a roasting tray with a lid. This makes the meat more succulent.
usage, tables and tips electrolux 25 Table: Meat, roasting, casseroles Convection with ring heating element Time Meat Shelf position Temperature ºC Hrs. : Min.
electrolux usage, tables and tips Table: Roasting, casseroles, au gratin Poultry, Game, Fish, Vegetables Convection with ring heating element Time Quantity approx. Shelf TemperaHrs. : Min. position ture °C Casseroles, miscellaneous Casseroles 1 kg/2 lbs 1 150 2:30-3:00 Lancashire, Hot Pot 1 kg/2 lbs 1 150-160 2:15-2:30 Moussaka 1 kg/2 lbs 1 170-180 0:40-0:50 Meat Loaf 675 g/1.5 lbs 1 170-180 1:00-1:10 Chicken 1 kg/2 lbs 1 170-180 0:50-1:10 Chicken 1.
usage, tables and tips electrolux 27 Defrosting Oven function: Defrost perature setting) (no tem- • Unpack the food and place it on a plate on the oven shelf. • Do not cover with a plate or bowl, as these can substantially lengthen the defrosting time. • For defrosting, place the shelf on the 1st oven level from the bottom. Defrosting table Defrosting time Min. Further defrosting time (mins.) Comments Chicken, 1000 g 100-140 20-30 Place the chicken on an upturned saucer placed on a large plate.
electrolux usage, tables and tips Grill sizes Oven function: Dual grill with maximum temperature setting Important: Always grill with the oven door closed. The empty oven should always be pre-heated with the grill functions for 5 minutes. • For grilling, place the shelf in the recommended shelf position. • Always insert the tray for collecting the fat into the first shelf position from the bottom. • The grilling times are for guidance only.
usage, tables and tips electrolux 29 Drying Oven function: Convection with ring heating element • Use oven shelves covered with greaseproof paper or baking parchment. • You get a better result if you switch the oven off halfway through the drying time, open the door and leave the oven to cool down overnight. • After this finish drying the food to be dried.
electrolux cleaning and care Cleaning and care Warning: If using an oven spray, please follow the manufacturer's instructions exactly. Warning: For cleaning, the appliance must be switched off and cooled down. Warning: For safety reasons, do not clean the appliance with steam jet or high-pressure cleaning equipment. Important: Do not use any abrasive cleaners, sharp scrapers or abrasive items.
cleaning and care electrolux 31 Shelf Support Rails The shelf support rails on the left and right hand sides of the oven can be removed for cleaning the side walls. Removing the shelf support rails First pull the front of the rail away from the oven wall (1) and then unhook at the back (2).
electrolux cleaning and care Oven Lighting Warning: Risk of electric shock! Prior to changing the oven light bulb: – Switch off the oven! – Disconnect from the electricity supply. Place a cloth on the oven floor to protect the oven light and glass cover. Changing the oven light bulb/cleaning the glass cover 1. Remove the glass cover by turning it anti-clockwise and then clean it. 2. If necessary: replace with 25 watt, 230 V, 300 °C heat-resistant oven lighting. 3. Refit the glass cover.
cleaning and care electrolux 33 Oven Roof The upper heating element can be folded down to make it easier to clean the oven roof. Folding down the heating element Warning: Only fold down the heating element when the oven is switched off and there is no risk of being burnt! 1. Remove the side shelf support rails. 2. Grip the heating element at the front and pull it forwards and out over the support lug on the inner wall of the oven. 3. The heating element will now fold down.
electrolux cleaning and care Repositioning the heating element 1. Move the heating element back up towards the oven roof. 2. Pull the heating element forwards against the spring pressure and guide it over the oven support lug. 3. Settle it onto the support. 4. Insert shelf support rail. Important: The heating element must be positioned correctly and securely on both sides above the support lug on the inner wall of the oven.
cleaning and care electrolux 35 Oven door For easier cleaning of the oven interior the oven door of your appliance can be taken off its hinges. Removing the oven door from its hinges 1. Open the oven door as far as it will go. 2. Undo the clamping levers (A) on both door hinges fully. 3. Close the oven door as far as the first position (approx. 45°). 4. Take hold of the oven door with a hand on each side and pull it away from the oven at an upwards angle (Take care: It is heavy).
electrolux cleaning and care Hanging the oven door back on its hinges 1. From the handle side take hold of the oven door with a hand on each side and hold at an angle of approx. 45°. Position the recesses on the bottom of the oven door on the hinges on the oven. Let the door slide down as far as it will go. 2. Open the oven door as far as it will go. 3. Fold up the clamping levers (A) on both door hinges back into their original positions. 4. Close the oven door.
cleaning and care electrolux 37 Oven door glass The oven door is fitted with two panels of glass mounted one behind the other. The inner panel can be removed for cleaning. Important Rough handling, especially around the edges of the front panel, can cause the glass to break. Removing the door glass 1. Open the oven door as far as it will go. 2. Undo the clamping levers (A) on both door hinges fully. 3. Close the oven door as far as the first position (approx. 45°).
electrolux cleaning and care 4. Take hold of the door trim (B) on the upper edge of the door at both sides and press inwards to release the clip seal. Then remove the door trim by pulling upwards. 5. Take hold of the door glass on its upper edge and take it out of the guide by pulling it upwards. Cleaning the door glass Clean the door glass thoroughly with a solution of water and washing up liquid. Then dry it carefully. Putting the door glass back 1.
cleaning and care electrolux 39 2. Take hold of the door trim (B) at each side, position it on the inside edge of the door and plug the door trim(B) into the upper edge of the door. On the open side of the door trim (B) there is a guide bar (C). This must be pushed between the outer door panel and the guide corner(D). The clip seal (E) must be snapped in.
electrolux cleaning and care 3. Open the oven door as far as it will go. 4. Fold up the clamping levers (A) on both door hinges back into their original positions. 5. Close the oven door.
what to do if … electrolux 41 What to do if … Fault The oven does not heat. Possible cause The oven has not been switched on. Remedy Switch the oven on. The required settings have not Check the settings. been made. The domestic electrical proCheck the fuses or protection tection device (fuse) has been devices. tripped. If these are tripped repeatedly, you should call a qualified electrician. The oven light does not come The bulb has blown. on.
electrolux electrical connection Electrical Connection The oven is designed to be connected to 230-240V~(50Hz) electricity supply. The oven has an easily accessible terminal block which is marked as follows: Letter L Letter N E - Live terminal Neutral terminal Earth terminal This oven must be earthed! The cable used to connect the oven to the electrical supply must comply to the specifications given below. For UK use only Connection via Cooker Control Circuit Min.
installation instructions electrolux 43 Installation Instructions Attention: The new appliance may only be installed and connected by a registered expert. Please comply with this. If you do not, any damage resulting is not covered by the warranty. Safety information for the installer • The electrical installation is to be set up so that the appliance can be isolated from the mains with a minimum 3mm all-pole contact separation. Suitable separation devices include e.g.
electrolux installation instructions
installation instructions electrolux 45
electrolux installation instructions
installation instructions electrolux 47
electrolux disposal Disposal Packaging material The packaging materials are environmentally friendly and can be recycled. The plastic components are identified by markings, e.g. >PE<, >PS<, etc. Please dispose of the packaging materials in the appropriate container at your local waste disposal facilities. Old appliance W on the product or on The symbol its packaging indicates that this product may not be treated as household waste.
guarantee/customer service electrolux 49 Guarantee/Customer Service Standard guarantee conditions We, Electrolux, undertake that if within 12 months of the date of the purchase this Electrolux appliance or any part thereof is proved to be defective by reason only of faulty workmanship or materials, we will, at our option repair or replace the same FREE OF CHARGE for labour, materials or carriage on condition that: • The appliance has been correctly installed and used only on the electricity supply stated o
electrolux guarantee/customer service European Guarantee This appliance is guaranteed by Electrolux in each of the countries listed at the back of this user manual, for the period specified in the appliance guarantee or otherwise by law.
guarantee/customer service electrolux 51 www.electrolux.com p t b Albania +35 5 4 261 450 Rr. Pjeter Bogdani Nr. 7 Tirane Belgique/België/ Belgien +32 2 363 04 44 Bergensesteenweg 719, 1502 Lembeek Èeská republika +420 2 61 12 61 12 Budìjovická 3, Praha 4, 140 21 Danmark +45 70 11 74 00 Sjællandsgade 2, 7000 Fredericia Deutschland +49 180 32 26 622 Muggenhofer Str. 135, 90429 Nürnberg Eesti +37 2 66 50 030 Mustamäe tee 24, 10621 Tallinn España +34 902 11 63 88 Carretera M-300, Km.
electrolux guarantee/customer service p t b Slovensko +421 2 43 33 43 22 Electrolux Slovakia s.r.o., Electrolux Domáce spotrebièe SK, Seberíniho 1, 821 03 Bratislava Suomi www.electrolux.
service and spare parts electrolux 53 Service and Spare Parts If the event of your appliance requiring service, or if you wish to purchase spare parts, please contact Service Force by telephoning: 0870 5 929 929 Your telephone call will be automatically routed to the Service Force Centre covering your post code area. For the address of your local Service Force Centre and further information about Service Force, please visit the website at www. serviceforce.co.
electrolux service and spare parts Customer Care Department Major Appliances Electrolux Addington Way Luton Bedfordshire, LU4 9QQ Tel: 08705 350350 (*) For Customer Service in the Republic of Ireland please contact us at the address below: AEG/ Electrolux Group (Ire) Ltd Long Mile Road/ Dublin 12 Republic of Ireland Tel: +353 (0) 1 4090753 Email: service.eid@electrolux.
www.electrolux.com www.electrolux.co.