user manual Built-in oven EOB53103
electrolux Electrolux. Thinking of you. Share more of our thinking at www.electrolux.com Contents Safety information Product description Before first use Daily use Helpful hints and tips Cooking tables 2 3 4 4 6 8 Care and cleaning What to do if… Installation Electrical connection Environment concerns After sales service 9 13 13 14 14 15 Subject to change without notice Safety information For your safety and correct operation of the appliance, read this manual carefully before installation and use.
electrolux 3 • Only an authorised service engineer can repair this appliance. Use only original spare parts. • Built-in appliances can only be used after they are built-in to suitable built-in units and work surfaces that meet standards. • Do not change the specifications or modify this product. Risk of injury and damage to the appliance.
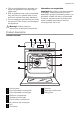
electrolux Accessories Oven shelf Dripping pan Baking tray Before first use Remove all packaging, both inside and outside the oven, before using the appliance. Do not remove the rating plate. When you connect the appliance to the electrical supply or in case of a power cut, the Time function indicator flashes automatically. You have to set the time of the day. If the time of the day is not set the appliance does not work. Important! To open the oven door, always catch the handle in the centre.
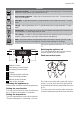
electrolux 5 Symbols Fan forced cooking - to cook several different dishes at the same time. To cook homemade fruit in syrup, and to dry mushrooms or fruit. Bottom heating element - heats only from the bottom of the oven. To bake cakes with crispy or crusty bases. Inner grill - to grill flat food items in small quantities in the middle of the shelf. To make toasts. Full grill - the full grill element is on. To grill flat food items in large quantities. To make toasts.
electrolux Clock functions Function Description Cooking duration To set how long the oven is to be in use. When the time elapses, an audible signal sounds. The oven switches off automatically. End of cooking To set when the oven is to switch off. When the time elapses, an audible signal sounds. The oven switches off automatically. Cooking duration and End of cooking combined . To set delayed start of the appliance.
electrolux 7 • You can cook different dishes on two levels at the same time. Place the shelves on level 1 and 3. • The oven is supplied with a special system which circulates the air and constantly recycles the steam. This system allows to cook in a steamy environment and keep the food soft inside and crusty outside. It reduces the cooking time and energy consumption to a minimum. • Moisture can condense in the appliance or on the glass doors. This is normal.
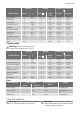
electrolux • To avoid too much steam in the oven during roasting, add a little bit more after the original amount dries up. Cooking times Cooking times depend on the type of food, its consistency, and volume. Initially, monitor the performance when you cook. Find the best settings (heat setting, cooking time, etc.) for your cookware, recipes and quantities when you use this appliance.
electrolux 9 Quantity TYPE OF DISH Grilling Pieces g Beef steaks 4 600 Sausages 8 / Pork chops 4 Chicken (cut in 2) 2 Kebabs 4 Breast of chicken 4 Hamburger 6 Fish Fillet Cooking time in minutes Temp.
electrolux Warning! Keep the appliance clean at all times. A build-up of fats or other foodstuffs can cause a fire, especially in the dripping pan. Outside of the appliance • Clean the front of the appliance with a soft cloth and warm water with soap. • For metal fronts, use normal cleaning agents. • Do not use scouring agents and abrasive sponges. Oven interior • Turn the oven lamp on before cleaning. • Clean the oven with a soft cloth with warm water and soap and leave it to dry . glass door.
electrolux 11 4. Place the door on a stable surface protected by a soft cloth. 7. Carefully lift and remove the panel of glass. 5. Release the locking system to remove the internal panel of glass. Clean the glass panel with water and soap. Dry it carefully. Warning! Only clean the glass panel with water and a soap. Abrasive cleaning agents, stain removers and sharp objects (e.g. knives or scrapers) can cause damage to the glass. 6. Turn 2 fasteners by 90° and remove them from their seats.
electrolux 2. Hold the shelf runners and catalytic panel in place and at the same time unhook the shelf runners at the back. 2 1 Models in stainless steel or aluminium Clean the oven door and control panel in stainless steel or aluminium only with a moist sponge. After that dry it carefully with a soft cloth. Do not use steel wool, acids or cleaning agents as they can damage the surface.
electrolux 13 What to do if… Problem Solution of the problem The oven does not operate. Check if: • the oven function and temperature are set. • the appliance is correctly connected and the mains supply to the oven is ON. • the time of day is set.. The oven temperature light does not come on. Set: • the temperature with the temperature control knob. • the oven function with the control knob for oven function. The oven light is not working. • Set a function with the control knob for oven function .
electrolux 50 in 560 580 550 m ÷57 0 A B 593 in 550 m 00 ÷1 80 560 -570 Electrical connection Warning! Only a qualified and competent person must do the electrical installation. • The manufacturer is not responsible if you do not follow these safety precautions. • Ground the appliance according to safety precautions. • Make sure that the rated voltage and type of power on the rating plate agree with the voltage and the power of the local power supply.
electrolux 15 collection point for the recycling of electrical and electronic equipment. By ensuring this product is disposed of correctly, you will help prevent potential negative consequences for the environment and human health, which could otherwise be caused by inappropriate waste handling of this product. For more detailed information about recycling of this product, please contact your local council, your household waste disposal service or the shop where you purchased the product.
www.electrolux.