EOB5554AAX EN Oven User Manual
www.electrolux.com CONTENTS 1. SAFETY INFORMATION....................................................................................2 2. SAFETY INSTRUCTIONS..................................................................................4 3. PRODUCT DESCRIPTION................................................................................ 6 4. BEFORE FIRST USE......................................................................................... 7 5. DAILY USE.......................................
ENGLISH 3 responsible for any injuries or damages that are the result of incorrect installation or usage. Always keep the instructions in a safe and accessible location for future reference. 1.
www.electrolux.com • • • • • • Before carrying out any maintenance, disconnect the appliance from the power supply. Ensure that the appliance is switched off before replacing the lamp to avoid the possibility of electric shock. Do not use a steam cleaner to clean the appliance. Do not use harsh abrasive cleaners or sharp metal scrapers to clean the glass door since they can scratch the surface, which may result in shattering of the glass.
ENGLISH • • • • • • • • Do not let mains cables touch or come near the appliance door, especially when the door is hot. The shock protection of live and insulated parts must be fastened in such a way that it cannot be removed without tools. Connect the mains plug to the mains socket only at the end of the installation. Make sure that there is access to the mains plug after the installation. If the mains socket is loose, do not connect the mains plug.
www.electrolux.com 2.4 Care and cleaning • WARNING! Risk of injury, fire, or damage to the appliance. • • • • • • • • Before maintenance, deactivate the appliance and disconnect the mains plug from the mains socket. Make sure the appliance is cold. There is the risk that the glass panels can break. Replace immediately the door glass panels when they are damaged. Contact the Authorised Service Centre. Be careful when you remove the door from the appliance.
ENGLISH 12 Cavity embossment 13 Shelf positions 3.2 Accessories Grill- / Roasting pan Wire shelf For cookware, cake tins, roasts. Baking tray For cakes and biscuits. To bake and roast or as a pan to collect fat. Telescopic runners For shelves and trays. 4. BEFORE FIRST USE WARNING! Refer to Safety chapters. To set the Time of day refer to "Clock functions" chapter. 4.1 Initial Cleaning Refer to "Care and cleaning" chapter. Clean the oven and the accessories before first use.
www.electrolux.com 5.3 Heating functions Oven func‐ tion Application Oven func‐ tion To roast larger meat joints or poultry with Turbo Grilling bones on one shelf po‐ sition. Also to make gra‐ tins and to brown. The oven is off. Off position Light To turn on the lamp without a cooking func‐ tion. True Fan Cooking PLUS To add humidity during the cooking. To get the right colour and crispy crust during baking. To give more juiciness dur‐ ing reheating.
ENGLISH 6. To turn off the oven, press the Plus Steam button , turn the knobs to the off position. The indicator of the Plus Steam button turns off. 7. Remove water from the cavity embossment. 9 WARNING! Make sure that the oven is cold before you remove the remaining water from the cavity embossment. 5.5 Display A B C A. Function indicators B. Time display C. Function indicator 5.6 Buttons Sensor field / Button Function Description MINUS To set the time. CLOCK To set a clock function.
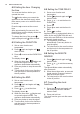
www.electrolux.com 6.2 Setting the time. Changing the time 6.5 Setting the TIME DELAY You must set the time before you operate the oven. 1. Set an oven function and temperature. flashes when you connect the The appliance to the electrical supply, when there was a power cut or when the timer is not set. or 3. Press DURATION. or to set the correct Press the time. After approximately five seconds, the flashing stops and the display shows the time of day you set.
ENGLISH 11 7. USING THE ACCESSORIES WARNING! Refer to Safety chapters. 7.1 Inserting the accessories Wire shelf: Push the shelf between the guide bars of the shelf support and make sure that the feet point down. Small indentation at the top increase safety. The indentations are also anti-tip devices. The high rim around the shelf prevents cookware from slipping of the shelf. 7.
www.electrolux.com Wire shelf and deep pan together: Place the wire shelf and the deep pan together on the telescopic runner. Deep pan: Put the deep pan on the telescopic runners. 8. ADDITIONAL FUNCTIONS 8.1 Cooling fan When the oven operates, the cooling fan turns on automatically to keep the surfaces of the oven cool. If you turn off the oven, the cooling fan can continue to operate until the oven cools down. 9. HINTS AND TIPS WARNING! Refer to Safety chapters.
ENGLISH 13 Use the second shelf position. Food Water in the cavity embossment (ml) Temperature (°C) Time (min) Cookies, scones, croissants 100 150 - 180 10 - 20 Focaccia 100 200 - 210 10 - 20 Pizza 100 230 10 - 20 Bread rolls 100 200 20 - 25 Bread 100 180 35 - 40 Plum cake, apple pie, cinnamon rolls baked in a cake mould. 100 - 150 160 - 180 30 - 60 Frozen ready meals Preheat the empty oven for 10 minutes. Use the second shelf position.
www.electrolux.com • • You can extend baking times by 10 – 15 minutes if you bake cakes on more than one shelf position. Cakes and pastries at different heights do not always brown equally. There is no need to change the temperature setting if an unequal • browning occurs. The differences equalize during baking. Trays in the oven can twist during baking. When the trays become cold again, the distortions disappear. 9.
ENGLISH 15 Food Function Temperature (°C) Time (min) Shelf position Flan base short pastry True Fan Cooking 170 - 1801) 10 - 25 2 Flan base True Fan sponge mixture Cooking 150 - 170 20 - 25 2 Cheesecake 170 - 190 60 - 90 1 Top / Bottom Heat 1) Preheat the oven.
www.electrolux.
ENGLISH Food Function Temperature (°C) Stuffed vegeta‐ True Fan Cook‐ 160 - 170 bles ing Time (min) Shelf position 30 - 60 1 1) Preheat the oven. 9.8 Multilevel Baking Use the function True Fan Cooking. Cakes / pastries / breads on baking trays Food Temperature (°C) Time (min) Cream puffs / Eclairs 160 - 1801) Dry streusel cake 150 - 160 Shelf position 2 positions 3 positions 25 - 45 1/4 - 30 - 45 1/4 - 1) Preheat the oven.
www.electrolux.com 9.
ENGLISH 19 9.11 Roasting tables Beef Food Quantity Function Tempera‐ ture (°C) Time (min) Shelf posi‐ tion Pot roast 1 - 1.5 kg Top / Bot‐ tom Heat 230 120 - 150 1 Roast beef or fillet: rare per cm of thickness Turbo Grill‐ ing 190 - 2001) 5-6 1 Roast beef or fillet: medium per cm of thickness Turbo Grill‐ ing 180 - 1901) 6-8 1 Roast beef or fillet: well done per cm of thickness Turbo Grill‐ ing 170 - 1801) 8 - 10 1 1) Preheat the oven.
www.electrolux.com Food Quantity (kg) Function Tempera‐ ture (°C) Time (min) Shelf posi‐ tion Saddle of lamb 1 - 1.5 Turbo Grill‐ ing 160 - 180 40 - 60 1 Quantity (kg) Function Tempera‐ ture (°C) Time (min) Shelf posi‐ tion Game Food Saddle / Leg up to 1 of hare Top / Bottom 2301) Heat 30 - 40 1 Saddle of venison 1.5 - 2 Top / Bottom 210 - 220 Heat 35 - 40 1 Haunch of venison 1.5 - 2 Top / Bottom 180 - 200 Heat 60 - 90 1 1) Preheat the oven.
ENGLISH • • Grill only flat pieces of meat or fish. Always preheat the empty oven with the grill functions for 5 minutes. 21 CAUTION! Always grill with the oven door closed.
www.electrolux.com Food Temperature (°C) Time (min) Shelf position Wedges / Cro‐ quettes 220 - 230 20 - 35 3 Hash Browns 210 - 230 20 - 30 3 Lasagne / Cannel‐ loni, fresh 170 - 190 35 - 45 2 Lasagne / Cannel‐ loni, frozen 160 - 180 40 - 60 2 Oven baked cheese 170 - 190 20 - 30 3 Chicken Wings 20 - 30 2 190 - 210 9.14 Defrost • • • • Remove the food packaging and put the food on a plate. Use the first shelf position from the bottom.
ENGLISH • When the liquid in the jars starts to simmer (after approximately 35 - 60 minutes with one-litre jars), stop the Soft fruit Food Temperature (°C) Strawberries / Blue‐ 160 - 170 berries / Raspber‐ ries / Ripe goose‐ berries Cooking time until Continue to cook simmering (min) at 100 °C (min) 35 - 45 - Stone fruit Food Temperature (°C) Cooking time until Continue to cook simmering (min) at 100 °C (min) Pears / Quinces / Plums 160 - 170 35 - 45 Food Temperature (°C) Cooking time until
www.electrolux.com Food Temperature (°C) Time (h) 40 - 50 Shelf position 1 position 2 positions 2-3 3 1/4 Temperature (°C) Time (h) Shelf position Plums 60 - 70 Apricots Herbs Fruit Food 1 position 2 positions 8 - 10 3 1/4 60 - 70 8 - 10 3 1/4 Apple slices 60 - 70 6-8 3 1/4 Pears 60 - 70 6-9 3 1/4 9.17 Information for test institutes Tests according to EN 60350-1:2013 and IEC 60350-1:2011. Baking on one level.
ENGLISH Food Function Temperature (°C) Time (min) Shelf posi‐ tion Small cakes (20 per tray) Top / Bottom Heat 1701) 20 - 30 3 Temperature (°C) Time (min) 25 1) Preheat the oven. Multilevel Baking. Biscuits Food Function Shelf posi‐ tion 2 po‐ si‐ tions 3 po‐ si‐ tions Short bread / Pastry True Fan Cooking 140 Stripes 25 - 45 1/4 1/3/ 5 Small cakes (20 per tray) 23 - 40 1/4 - True Fan Cooking 1501) 1) Preheat the oven. Grilling Preheat the empty oven for 5 minutes.
www.electrolux.com Clean the oven interior after each use. Fat accumulation or other food remains may result in a fire. The risk is higher for the grill pan. Clean all accessories after each use and let them dry. Use a soft cloth with warm water and a cleaning agent. Clean stubborn dirt with a special oven cleaner. If you have nonstick accessories, do not clean them using aggressive agents, sharp-edged objects or a dishwasher. It can cause damage to the nonstick coating.
ENGLISH 27 6. Hold the door trim (B) on the top edge of the door at the two sides and push inwards to release the clip seal. 2 B 1 The heating element folds down. 3. Clean the oven ceiling. 4. Install the heating element in the opposite sequence. 7. Pull the door trim to the front to remove it. 8. Hold the door glass panels on their top edge one by one and pull them up out of the guide. Install the heating element correctly above the supports on the inner walls of the appliance. 5.
www.electrolux.com The top lamp 1. Turn the lamp glass cover to remove it. 2. Clean the glass cover. 3. Replace the lamp with a suitable 300 °C heat-resistant lamp. 4. Install the glass cover. 11. TROUBLESHOOTING WARNING! Refer to Safety chapters. 11.1 What to do if... Problem Possible cause Remedy You cannot activate or op‐ The oven is incorrectly erate the oven. The display connected to an electrical shows “400” and an acous‐ supply. tic signal sounds.
ENGLISH Problem Possible cause Remedy There is no good cooking performance using the True Fan Cooking PLUS function. You did not activate the True Fan Cooking PLUS function. Refer to "Activating the True Fan Cooking PLUS function". There is no good cooking performance using the True Fan Cooking PLUS function. You did not fill the cavity embossment with water. Refer to "Activating the True Fan Cooking PLUS function". There is no good cooking performance using the True Fan Cooking PLUS function.
www.electrolux.com 12. ENERGY EFFICIENCY 12.1 Energy saving to minimum 3 - 10 minutes before the end of the cooking time, depending on the duration of the cooking. The residual heat inside the oven will continue to cook. The oven contains features which help you save energy during everyday cooking. General hints Make sure that the oven door is closed properly when the oven operates. Do not open the door too often during cooking.
ENGLISH 31
867335575-E-462017 www.electrolux.