user manual Oven EOB63000
electrolux Electrolux. Thinking of you. Share more of our thinking at www.electrolux.com Contents Safety instructions.................................. 3 Description of the Appliance .................. 4 Before using for the first time ................. 6 Operating the Oven................................ 7 Usage, Tables and Tips.......................... 14 Cleaning and care .................................. 22 What to do if …..................................... Electrical Connection................
electrolux 3 1 Safety instructions Electrical safety • This appliance must be connected by a qualified electrician only. • In the event of a fault or damage to the appliance: take the fuses out or switch off. • Repairs to the appliance must only be carried out by qualified service engineers. Considerable danger may result from improper repairs. If repairs become necessary, please contact your local Service Force Centre. Child Safety • Never leave children unsupervised when the appliance is in use.
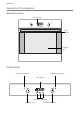
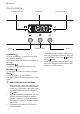
electrolux Description of the Appliance General Overview Control panel Door handle Full glass door Control Panel Oven power indicator Temperature Pilot Light Time display Clock function buttons Oven Functions Temperature selector
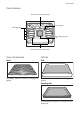
electrolux 5 Oven Features Top heat and heating elements Oven lighting Shelf positions Fan heating element Fan Oven shelf runners, removable Oven Accessories Grill set Shelf Grill For dishes, cake tins, items for roasting and grilling. Insert for the roasting pan for roasting and grilling. Roasting Pan For baking and roasting or as a pan for collecting fat.
electrolux Before using for the first time Setting and changing the current time After approx. 5 seconds, the flashing stops and the clock displays the time of day set. 3 The oven only operates when the time has been set. When the appliance has been connected to the electrical supply or when there has been a power cut, the function indicator Time flashes automatically. The appliance is now ready to use.
electrolux 7 Operating the Oven Switching the Oven On and Off Oven power indicator Oven Functions 1. Turn the oven functions control knob to the desired function. 2. Turn the temperature control knob to the desired temperature. The power indicator is lit while the oven is on. The temperature power indicator is lit while the oven is heating up. 3. To turn the oven off, turn the oven functions and temperature control knob back to the Off position.
electrolux Oven function Use Grill For grilling flat food items arranged in the middle of the grill and for toasting. Dual grill For grilling flat food items in large quantities and for toasting. Convection grilling For roasting larger joints of meat or poultry on one oven shelf. The function is also suitable for browning and gratinbaking.
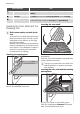
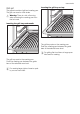
electrolux 9 Grill set Inserting the grill tray on top: The grill set consists of grill and roasting pan. The grill can used on both sides. 1 Warning: There is a risk of burning when removing the roasting pan from the hot oven! Inserting the grill tray underneath: The grill tray rests on the roasting pan. Push the roasting pan between the guide bars of the selected oven level. 3 For grilling flat food items in large quantities and for toasting. The grill tray rests in the roasting pan.
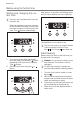
electrolux Clock Functions Function Indicators Time display Button Selector Button Countdown To set a countdown. A signal sounds after the time has elapsed. This function does not affect the operation of the oven. Cook time To set how long the oven is to be in use. End time To set when the oven is to switch off again. Time To set, change or check the time (See also section “Before Using for the First Time”).
electrolux 11 Countdown 1. Press Selection button repeatedly, until the function indicator Countdown flashes. 2. Using the or button, set the required Countdown (max. 2 hours 30 minutes). After approx. 5 seconds, the display shows the remaining time. The function indicator Countdown up. will light When the time has elapsed, the function indicator flashes and an acoustic signal sounds for 2 minutes. Press any button to switch off the signal. Cook time 1.
electrolux After approx. 5 seconds, the display returns to the current time. The function indicator Cook time will light up. When the time has elapsed, the function indicator will flash, an acoustic signal will sound for 2 minutes and the oven will switch itself off. 3. Press any button to switch off the signal and the programme. End time 1. Press Selection button repeatedly, until the function indicator End time flashes. 2. Using the or button, set the required switch-off time. After approx.
electrolux 13 Cook time bined and End time com- 3 Cook time and End time can be used simultaneously, if the oven is to be automatically switched on and off at a later time. 1. The function indicators Cook time and End time light up and the time is shown in the display. Using the function Cook time set the period of time that the dish requires to cook. In this example, 12:05. The oven will automatically switch itself on at the appropriate time as calculated. In this example, at 13:05.
electrolux Usage, Tables and Tips Baking 3 baking trays: Oven function: Convection with ring heating element Baking tins • For Convection with ring heating element bright metal tins are suitable. Oven levels • With Convection with ring heating element you can bake on up to 3 baking trays at the same time: 1 baking tray: oven level 1, 3 and 5 General instructions With Convection with ring heating element you can also bake two cakes at the same time in tins placed next to each other on the shelf.
electrolux 15 • temperature setting. Different rates of browning even out as baking progresses. Your new oven may bake or roast differently to your previous appliance. So adapt your normal settings (temperature, cooking times) and oven shelf levels to the recommendations in the following tables. 2 With longer baking times, you can switch the oven off about 10 minutes before the end of the baking time, in order to utilise the residual heat.
electrolux Baking on more than one oven level Convection with ring heating element Type of baking Convection with ring heating element Shelf positions from bottom 2 levels 3 levels Time Hours: Mins.
electrolux 17 Baking results Cake browns unevenly Cake is not cooked within the baking time set Possible cause Remedy Oven temperature too high and baking Set a lower temperature and intime too short crease baking time Dough/mixture is unevenly distributed Spread the dough/mixture evenly on the baking tray Temperature too low Use a slightly higher temperature setting Table: Desserts Convection with ring heating element Time Desserts Shelf position Temperature °C Hr. : Min.
electrolux Table: Meat, roasting, casseroles Shelf position Temperature °C Convection grilling 1 170-180 0:30-0:35 per 450 g/1 lb plus 30-35 mins Convection grilling 1 160-170 0:35-0:40 per 450 g/1 lb plus 15-20 mins -rare Convection grilling 1 150-1601) 0:15-0:20 per 450 g/1 lb plus 15-20 mins -medium Convection grilling 1 150-160 0:20-0:25 per 450 g/1 lb plus 25-25 mins -well done Convection grilling 1 150-160 0:30-0:35 per 450 g/1 lb plus 25-30 mins - small Convection with r
electrolux 19 Poultry, Game, Quantity apFish, Vegetables prox. Oven function Shelf position Temperature °C Time Hr. : Min. Lancashire Hot Pot 1 kg/2 lbs Convection with ring heating element 1 150-160 2:15-2:30 Moussaka 1 kg/2 lbs Convection with ring heating element 1 170-180 0:40-0:50 Meat Loaf 675 g/1.5 lbs Convection grilling 1 160-170 1:00-1:10 Chicken 1 kg/2 lbs Convection grilling 3 190-210 0:50-1:10 Chicken 1.
electrolux Grill sizes Oven function: Grill or Dual grill with maximum temperature setting • 1 Important: Always grill with the oven • 3 The empty oven should always be pre- • • door closed. heated with the grill functions for 5 minutes. For grilling, place the shelf in the recommended shelf position. Always insert the tray for collecting the fat into the first shelf position from the bottom. The grilling times are for guidance only.
electrolux 21 Food Defrosting Further detime frosting time Min. (mins.) Comments Butter, 250g 30-40 10-15 --- Cream, 2 x 200g 80-100 10-15 Cream that is still slightly frozen in part can still be whipped 60 60 Flan/gateau, 1400g --- Drying Oven function: Convection with ring heating element • • • Use oven shelves covered with greaseproof paper or baking parchment.
electrolux Cleaning and care 1 Warning: First switch off the appliance and let it cool down before carrying out any cleaning. Warning: For safety reasons, do not clean the appliance with steam blasters or highpressure cleaners. Shelf Support Rails The shelf support rails on the left and right hand sides of the oven can be removed for cleaning the side walls. Removing the shelf support rails Attention: Do not use any corrosive cleaning fluids, sharp objects or stain removers.
electrolux 23 To re-insert, first hook the rail into place at the back (1) and then insert the front and press into place (2). Oven Roof The upper heating element can be folded down to make it easier to clean the oven roof. Folding down the heating element Oven Lighting 1 Warning: Risk of electric shock! Prior to changing the oven light bulb: Switch off the oven! Disconnect from the electricity supply. 3 Place a cloth on the oven floor to protect the oven light and glass cover.
electrolux Repositioning the heating element Oven door For easier cleaning of the oven interior, the oven door can be taken off its hinges. Removing the oven door from its hinges 1. Open the oven door as far as it will go. 1. 2. 3. 4. Move the heating element back up towards the oven roof. Pull the heating element forwards against the spring pressure and guide it over the oven support lug. Settle it onto the support. Insert shelf support rail. 2.
electrolux 25 oven at an upwards angle (Take care: It is heavy). 2. Open the oven door as far as it will go. 3. Fold up the clamping levers (A) on both door hinges back into their original positions. 4. Close the oven door. 3 Lay the oven door with the outer side facing downwards on something soft and level, for example, a blanket in order to prevent scratches. Hanging the oven door back on its hinges 1.
electrolux Removing the door glass panels 1. Open the oven door as far as it will go. 2. Undo the clamping levers (A) on both door hinges fully 3. Close the oven door as far as the first position (approx. 45°). 4. Take hold of the door trim(B) on the upper edge of the door at both sides and press inwards to release the clip seal. Then remove the door trim by pulling it 5. upwards.
electrolux 27 pushedThis must be pushed between the outer door panel and the guide corner (D). 3. Open the oven door as far as it will go 4. Fold up theclamping levers (A) on both door hinges back into their original positions 5. Close the oven door. The clip seal (E) must be snapped in.
electrolux 1 Warning! Repairs to the appliance are 3 only to be carried out by qualified service engineers. Considerable danger to the user may result from improper repairs. If the appliance has been operated incorrectly, the engineer's visit will be chargeable, even during the warranty period. 3 Advice on cookers with metal fronts: Because of the cooler surface at the front of the cooker, opening the oven door during (or just after) baking or roasting may cause the glass to steam up.
electrolux 29 Installation Instructions 1 Attention: The new appliance may only be installed and connected by a registered expert. Please comply with this. If you do not, any damage resulting is not covered by the warranty. 1 Safety information for the installer • The electrical installation is to be set up so that the appliance can be isolated from the mains with a minimum 3mm allpole contact separation. • • • Suitable separation devices include e.g.
electrolux
electrolux 31
electrolux Disposal 2 Packaging material The packaging materials are environmentally friendly and can be recycled. The plastic components are identified by markings, e.g. >PE<, >PS<, etc. Please dispose of the packaging materials in the appropriate container at your local waste disposal facilities. 2 Old appliance W 1 The symbol on the product or on its packaging indicates that this product may not be treated as household waste.
electrolux 33 Guarantee/Customer Service Standard guarantee conditions We, Electrolux, undertake that if within 12 months of the date of the purchase this Electrolux appliance or any part thereof is proved to be defective by reason only of faulty workmanship or materials, we will, at our option repair or replace the same FREE OF CHARGE for labour, materials or carriage on condition that: • The appliance has been correctly installed and used only on the electricity supply stated on the rating plate.
electrolux p t b France www.electrolux.fr Great Britain +44 8705 929 929 Addington Way, Luton, Bedfordshire LU4 9QQ Hellas +30 23 10 56 19 70 4 Limnou Str., 54627 Thessaloniki Hrvatska +385 1 63 23 338 Slavonska avenija 3, 10000 Zagreb Ireland +353 1 40 90 753 Long Mile Road Dublin 12 Italia +39 (0) 434 558500 C.so Lino Zanussi, 26 - 33080 Porcia (PN) Latvija +37 17 84 59 34 Kr.
electrolux 35 Service and Spare Parts In the event of technical faults, please first check whether you can remedy the problem yourself with the help of the operating instructions (section “What to do if…”). If you were not able to remedy the problem yourself, please contact the Customer Care Department or one of our service partners. In order to be able to assist you quickly, we require the following information: – – – Model description Product number (PNC) Serial number (S No.
www.electrolux.com www.electrolux.co.