EOB6611AOX EN Steam oven User Manual
www.electrolux.com CONTENTS 1. SAFETY INFORMATION....................................................................................3 2. SAFETY INSTRUCTIONS..................................................................................4 3. PRODUCT DESCRIPTION................................................................................ 7 4. CONTROL PANEL............................................................................................. 7 5. BEFORE FIRST USE...............................
ENGLISH 1. 3 SAFETY INFORMATION Before the installation and use of the appliance, carefully read the supplied instructions. The manufacturer is not responsible for any injuries or damages that are the result of incorrect installation or usage. Always keep the instructions in a safe and accessible location for future reference. 1.
www.electrolux.com • • • • • • • Always use oven gloves to remove or put in accessories or ovenware. Before carrying out any maintenance, disconnect the appliance from the power supply. Ensure that the appliance is switched off before replacing the lamp to avoid the possibility of electric shock. Do not use a steam cleaner to clean the appliance.
ENGLISH • • • • • • • • • • Do not use multi-plug adapters and extension cables. Make sure not to cause damage to the mains plug and to the mains cable. Should the mains cable need to be replaced, this must be carried out by our Authorised Service Centre. Do not let mains cables touch or come near the appliance door, especially when the door is hot. The shock protection of live and insulated parts must be fastened in such a way that it cannot be removed without tools.
www.electrolux.com the housing unit or the floor. Do not close the furniture panel until the appliance has cooled down completely after use. 2.4 Steam Cooking WARNING! Risk of burns and damage to the appliance. • Released Steam can cause burns: – Do not open the appliance door during the steam cooking operation. – Open the appliance door with care after the steam cooking operation. 2.5 Care and cleaning WARNING! Risk of injury, fire, or damage to the appliance.
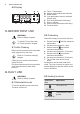
ENGLISH 7 3. PRODUCT DESCRIPTION 3.1 General overview 1 2 3 4 5 13 6 5 12 4 7 3 8 2 1 11 10 9 3.2 Accessories • • 1 2 3 4 5 6 7 8 9 10 11 12 13 • Wire shelf For cookware, cake tins, roasts. Baking tray For cakes and biscuits.
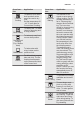
www.electrolux.com 4.2 Display A H G F B E C D A. B. C. D. E. F. G. H. Timer / Temperature Heat-up and residual heat indicator Water drawer Core temperature sensor (selected models only) Door lock (selected models only) Hours / minutes Demo mode (selected models only) Clock functions 5. BEFORE FIRST USE WARNING! Refer to Safety chapters. To set the Time of day refer to "Clock functions" chapter. 5.1 Initial Cleaning Remove all accessories and removable shelf supports from the oven.
ENGLISH Oven func‐ tion True Fan Cooking Application To bake on up to three shelf positions at the same time and to dry food. Set the temperature 20 - 40 °C lower than for Conventional Cooking. Oven func‐ tion Moist Fan Baking To bake pizza. To make intensive browning and Pizza Setting a crispy bottom. To bake and roast food on one shelf position. Conventional Cooking (Top / Bottom Heat) Bottom Heat Defrost To bake cakes with crispy bottom and to preserve food.
www.electrolux.com 6.3 Setting a heating function 1. Turn the knob for the heating functions to select a heating function. 2. Turn the control knob to select the temperature. The lamp turns on when the oven operates. 3. To turn off the oven, turn the knobs to the off position. 5. Set the temperature between 130 °C and 230 °C. Steam cooking gives good results with this temperature range. 6. Empty the water tank after the steam cooking is completed.
ENGLISH 11 4. Push the connector again and again to empty the water tank. A B C The water may remain inside after the display shows: Wait until the water flow from the water outlet valve stops. 5. Remove the connector from the valve when the water stops flowing. Do not use the drained water to fill the water tank again. 3. Open the oven door and put the connector (B) into the outlet valve (A). 7. CLOCK FUNCTIONS 7.
www.electrolux.com 4. Press to confirm or the set time of day will be saved automatically after 5 seconds. The display shows the new time. To change the time of day press again and again until the indicator for the time of day flashes in the display. 7.3 Setting the DURATION function 1. Set a heating function. again and again until 2. Press starts to flash. 3. Press or to set the minutes and then the hours. Press to confirm. When the set Duration time ends the and signal sounds for 2 minutes.
ENGLISH Push the shelf between the guide bars of the shelf support and make sure that the feet point down. 13 8.2 Telescopic Runners Keep the installation instructions for the telescopic runners for future use. With telescopic runners you can put in and remove the shelves more easily. CAUTION! Do not clean the telescopic runners in the dishwasher. Do not lubricate the telescopic runners. Baking tray/ Deep pan: Push the baking tray / deep pan between the guide bars of the shelf support. 1.
www.electrolux.com 8.3 Accessories for steam cooking Injector tube (C) The dietary baking dish for steam cooking functions The dish consists of a glass bowl, a lid with a hole for the injector tube (C) and a steel grill to put at the bottom of the baking dish. Glass bowl (A) Injector for direct steam cooking (D) Lid (B) Steel grill (E) The injector and the injector tube • Do not put the hot baking dish on cold / wet surfaces. • Do not put cold liquids in the baking dish when it is hot.
ENGLISH 15 C • Do not use the baking dish on a hot cooking surface. 2. Put the baking dish onto the second shelf position from the bottom. 3. Put the other end of the injector tube into the steam inlet. • Do not clean the baking dish with abrasives, scourers and powders. 8.4 Steam cooking in a dietary baking dish Put the food onto the steel grill in the baking dish and put the lid on it. 1. Put the injector tube into the special hole in the lid of the dietary baking dish.
www.electrolux.com WARNING! Be careful when you use the injector when the oven operates. Always use oven gloves to touch the injector when the oven is hot. Always remove the injector from the oven when you do not use a steam function. The injector tube is specially made for cooking and does not contain dangerous materials. 2. Put the baking dish onto the first or second shelf position from the bottom.
ENGLISH When you turn the knob for the oven functions, the oven stops. When you turn off the oven while the Function Lock is on, the Function Lock switches automatically to the Child Lock. Refer to "Using the Child Lock". To turn off the Function Lock, repeat step 2. 9.3 Residual heat indicator When you turn off the oven, the display if shows the residual heat indicator the temperature in the oven is more than 40 °C. 9.
www.electrolux.com Cooking meat and fish Use a deep pan for very fatty food to prevent the oven from stains that can be permanent. Leave the meat for approximately 15 minutes before carving so that the juice does not seep out. To prevent too much smoke in the oven during roasting, add some water into the deep pan. To prevent the smoke condensation, add water each time after it dries up. Cooking times Cooking times depend on the type of food, its consistency, and volume.
ENGLISH Food Top / Bottom Heat True Fan Cooking Tempera‐ ture (°C) Shelf po‐ sition Tempera‐ Shelf po‐ ture (°C) sition Plum cake1) 175 1 160 Small cakes one level 170 3 Small cakes two levels Small cakes three lev‐ els Biscuits / pastry stripes one level 19 Time (min) Com‐ ments 2 50 - 60 In a bread tin 140 - 150 3 20 - 30 In a baking tray - 140 - 150 2 and 4 25 - 35 In a baking tray - - 140 - 150 1, 3 and 5 30 - 45 In a baking tray 140 3 140 - 150 3 30 - 35 In a bak
www.electrolux.com Food Top / Bottom Heat True Fan Cooking Time (min) Com‐ ments Tempera‐ ture (°C) Shelf po‐ sition Tempera‐ Shelf po‐ ture (°C) sition Rich fruit cake 160 1 150 2 110 - 120 In a 24 cm cake mould Victoria sandwich 170 1 160 2 (left and 50 - 60 right) In a 20 cm cake mould 1) Preheat the oven for 10 minutes.
ENGLISH Food Cannello‐ ni1) Top / Bottom Heat True Fan Cooking Tempera‐ Shelf po‐ ture (°C) sition Tempera‐ Shelf po‐ ture (°C) sition 180 - 190 180 - 190 2 2 21 Time (min) Com‐ ments 25 - 40 In a mould Time (min) Com‐ ments 1) Preheat the oven for 10 minutes.
www.electrolux.com Food Pheasant Top / Bottom Heat True Fan Cooking Tempera‐ Shelf po‐ ture (°C) sition Tempera‐ Shelf po‐ ture (°C) sition 190 175 2 2 Time (min) Com‐ ments 90 - 120 Whole Time (min) Com‐ ments Fish Food Top / Bottom Heat True Fan Cooking Tempera‐ Shelf po‐ ture (°C) sition Tempera‐ Shelf po‐ ture (°C) sition 190 2 175 2 40 - 55 3 - 4 fish Tuna fish / 190 Salmon 2 175 2 35 - 60 4 - 6 fillets Trout / Sea bream 10.3 Grilling Set the maximum temperature.
ENGLISH Food Tempera‐ ture (°C) Time (min) Food Roast beef or fillet, rare 190 - 200 5-6 Roast beef or fillet, me‐ dium 180 - 190 6-8 Saddle of 160 - 180 lamb, 1 - 1.5 kg Roast beef or fillet, well done 170 - 180 Tempera‐ ture (°C) Time (min) 40 - 60 Poultry 8 - 10 Pork Food Tempera‐ ture (°C) Time (min) Shoulder, neck, ham joint, 1 - 1.5 kg 160 - 180 90 - 120 Food Tempera‐ ture (°C) Time (min) Poultry por‐ tions, 0.2 0.25 kg each 200 - 220 30 - 50 Chicken, half, 0.4 0.
www.electrolux.com Food Accessories Temperature Shelf po‐ (°C) sition Time (min) Sweet rolls, 12 pieces baking tray or dripping pan 180 2 20 - 30 Rolls, 9 pieces baking tray or dripping pan 180 2 30 - 40 Pizza, frozen, 0.
ENGLISH Food Accessories Temperature Shelf po‐ (°C) sition Time (min) Poached vege‐ baking tray or dripping tables, 0.4 kg pan 180 3 35 - 45 Vegetarian omelette pizza pan on wire shelf 200 3 25 - 30 Vegetables, mediterrean 0.7 kg baking tray or dripping pan 180 4 25 - 30 25 10.6 Defrost Food Quantity (kg) Defrosting time (min) Further defrost‐ Comments ing time (min) Chicken 1.0 100 - 140 20 - 30 Place the chicken on an upturned saucer placed on a large plate.
www.electrolux.com Food Temperature (°C) Time (h) Vegetables for sour 60 - 70 5-6 Mushrooms 50 - 60 6-8 Herbs 40 - 50 2-3 Fruit Food Temperature (°C) Time (h) Plums 60 - 70 Apricots Apple slices Pears Shelf position 1 position 2 positions 8 - 10 3 1/4 60 - 70 8 - 10 3 1/4 60 - 70 6-8 3 1/4 60 - 70 6-9 3 1/4 10.
ENGLISH Food Temper‐ ature (°C) White bread, 2x 0.5 kg each Rolls, 6 - 8, 0.5 kg Time (min) Shelf posi‐ tion Food Temper‐ ature (°C) Time (min) 180 - 190 45 - 60 2 Pizza 200 - 220 20 - 30 190 - 210 20 - 30 2 (2 and 4) Shelf posi‐ tion 2 Flans Prepare in the cake mould. Food Temperature (°C) Time (min) Shelf position Vegetables filled 170 - 180 30 - 40 1 Lasagne 170 - 180 40 - 50 2 Potato gratin 160 - 170 50 - 60 1 (2 and 4) Meat Use the second shelf position.
www.electrolux.com Food Tempera‐ ture (°C) Time (min) Food Tempera‐ ture (°C) Time (min) Trout, 3 - 4 fish, 1.5 kg 180 25 - 35 Pasta and sauce 130 10 - 15 Tuna, 4 - 6 fillets, 1.2 kg 175 35 - 50 10 - 15 Hake 200 20 - 30 Side dishes 130 (e.g. rice, potatoes, pasta) One-plate dishes 130 10 - 15 Meat 130 10 - 15 Vegetables 130 10 - 15 Steam reheating Reheat your dish on the plate. Preheat the oven for 10 minutes. Use the second shelf position.
ENGLISH 29 Food Function Acces‐ sories Shelf posi‐ tion Tem‐ pera‐ ture (°C) Time (min) Comments Fatless‐ ponge cake True Fan Cooking Wire shelf 2 160 40 - 50 Use a cake mould (26 cm di‐ ameter). Preheat the oven for 10 minutes. Fatless‐ ponge cake True Fan Cooking Wire shelf 2 and 4 160 40 - 60 Use a cake mould (26 cm di‐ ameter). Diago‐ nally shifted. Preheat the oven for 10 minutes.
www.electrolux.com water and a cleaning agent. Do not clean the accessories in the dishwasher. Clean stubborn dirt with a special oven cleaner. If you have nonstick accessories, do not clean them using aggressive agents, sharp-edged objects or a dishwasher. It can cause damage to the nonstick coating. Moisture can condense in the oven or on the door glass panels. To decrease the condensation, operate the oven for 10 minutes before cooking. Clean the moisture from the cavity after each use. 2.
ENGLISH • • Tap water - you can use it if your domestic water supply has purifier or water sweetener. Hard water with high lime content it does not have an effect on the 31 performance of the oven but it increases the quantity of cleaning procedures. CALCIUM QUANTITY TABLE INDICATED FROM W.H.O. (World Health Organization) Calcium de‐ posit Water hardness (French de‐ grees) (German de‐ grees) 0 - 60 mg/l 0-6 0-3 Sweet of soft 75 cycles - 2.
www.electrolux.com 5. Hold the door trim (B) on the top edge of the door at the two sides and push inwards to release the clip seal. 2 B 1 2. Lift and turn the levers fully on both hinges. 3. Close the oven door halfway to the first opening position. Then lift and pull forward and remove the door from its seat. 6. Pull the door trim to the front to remove it. 7. Hold the door glass panels by their top edge and carefully pull them out one by one. Start from the top panel.
ENGLISH A 33 1. Turn off the oven. Wait until the oven is cooled down. 2. Disconnect the oven from the mains. 3. Put a cloth on the bottom of the cavity. B CAUTION! Always hold the halogen lamp with a cloth to prevent grease residue from burning on the lamp. The back lamp Make sure that you install the middle panel of glass in the seats correctly. A 1. Turn the lamp glass cover to remove it. 2. Clean the glass cover. 3. Replace the lamp with a suitable 300 °C heat-resistant lamp. 4.
www.electrolux.com Problem Possible cause Remedy The oven does not heat up. The automatic switch-off is Refer to "Automatic switchactivated. off". The oven does not heat up. The Child Lock is on. Refer to "Using the Child Lock". The oven does not heat up. The fuse is blown. Make sure that the fuse is the cause of the malfunc‐ tion. If the fuse is blown again and again, contact a qualified electrician. The lamp does not oper‐ ate. The lamp is defective. Replace the lamp.
ENGLISH Problem Possible cause 35 Remedy It takes more than three There are lime deposits in minutes to empty the water the oven. tank or the water leaks from the steam inlet open‐ ing. Clean the water tank. Re‐ fer to "Cleaning the water tank". The appliance is activated and does not heat up. The fan does not operate. The display shows "Demo". 1. Deactivate the oven. 2. Press and hold the but‐ The demo mode is activa‐ ted. ton . 3.
www.electrolux.com 13.1 Building In 60 80 60 520 20 548 21 min. 550 114 18 20 600 min. 560 6 589 595±1 6 3 70 60 520 548 21 min. 550 20 580 114 18 min.
ENGLISH 13.2 Securing the appliance to the cabinet A B 13.3 Electrical installation The manufacturer is not responsible if you do not follow the safety precautions from the Safety chapters. 13.4 Cable Cable types applicable for installation or replacement: H07 RN-F, H05 RN-F, H05 RRF, H05 VV-F, H05 V2V2-F (T90), H05 BB-F For the section of the cable refer to the total power on the rating plate. You can also refer to the table: Total power (W) Section of the ca‐ ble (mm²) maximum 1380 3 x 0.
www.electrolux.com 14.2 Energy saving The oven contains features which help you save energy during everyday cooking. General hints Make sure that the oven door is closed properly when the oven operates. Do not open the door too often during cooking. Keep the door gasket clean and make sure it is well fixed in its position. Use metal dishes to improve energy saving. When possible, do not preheat the oven before you put the food inside.
ENGLISH 39
867341996-A-162018 www.electrolux.