
User manual


14
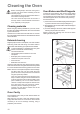
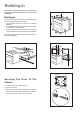
7. release the locking system to remove the internal
pane of glass (Fig. 5);
8. turn the 2 fasteners 90° and extract it from its seat
(Fig. 6);
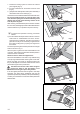
9. gently lift and carefully take off the pane marked by a
decorative frame on four sides (Fig. 7).
Clean the oven door with lukewarm water and a soft cloth.
Do not use products such as scouring pads, steel
wool, abrasive sponges or acids because they could
damage the special heat-reflecting surface of the
internal panes of glass.
After cleaning, reassemble the pane in the door and then
the oven door, following the procedure described above in
reverse. Make sure you reposition the pane correctly.
To perform this operation correctly, proceed as
follows:
a) the decorated internal pane with a frame on the four
sides must be reassembled so that the screen-
printing is facing outwards. The side of the pane of
glass is correct if you do not feel any roughness near
the screen printing when you pass your fingers over
the surface.
The internal pane of glass must be put back into the right
seats as shown in Fig. 8.
After the pane of glass has been reassembled in the
oven door, perform the procedure described in point 8. in
reverse to ensure it is locked.
Stainless steel or aluminium appliances:
We recommend that the oven door is only cleaned using
a wet sponge and dried after cleaning with a soft cloth.
Never use steel wool, acids or abrasive products as
they can damage the oven surface. Clean the oven control
panel following the same precautions.
DO NOT clean the oven door while the glass
panels are warm. If this precaution is not
observed the glass panel may shatter.
If the door glass panel becomes chipped or has deep
scratches, the glass will be weakened and must be
replaced to prevent the possibility of the panel shattering.
Contact your local Service Centre who will be pleased to
advise further.
Fig. 5
Fig. 6
90°
1
2
Fig. 7
)
Fig. 8