user manual Oven EOB68000
electrolux Electrolux. Thinking of you. Share more of our thinking at www.electrolux.com CONTENTS Safety information Product description Daily use 2 4 5 Care and cleaning 14 What to do if… 17 Environment concerns 18 Subject to change without notice Before the installation and use, read this manual carefully: • For your personal safety and the safety of your property • For the respect of the environment • For the correct operation of the appliance.
electrolux 3 • Built in ovens and built in cooking surfaces are attached with special connection system. To prevent damage to the appliance, only use an appliance with the appliances from the same manufacturer. Electrical connection • The appliance must be earthed. • Make sure that the electrical data on the rating plate agree with your domestic power supply. • Information on the voltage is on the rating plate. • Always use a correctly installed shockproof socket.
electrolux • Do not clean catalytic enamel (if applicable). specifically designed for household appliances only. • Disconnect the appliance from the power supply before the replacement of the oven lamp. There is the risk of electrical shock. Risk of fire • Open the door carefully. The use of ingredients with alcohol can cause a mixture of alcohol and air. There is the risk of fire. • Do not let sparks or open flames come near the appliance when you open the door.
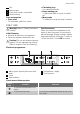
electrolux 5 7 8 9 10 Fan Bottom heat Oven shelf runners, removable Shelf positions Oven accessories • Oven shelf For cookware, cake tins, roasts. • Flat baking tray For cakes and biscuits. • Deep roasting pan To bake and roast or as pan to collect fat. • Meat probe To measure how far the food is cooked. DAILY USE Warning! Refer to "Safety information" chapter. Initial Cleaning • Remove all parts from the appliance. • Clean the appliance before first use.
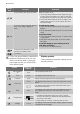
electrolux Sensor field Function Comment To move down and up in the menu. When a function is on: • Touch the sensor field one time: Open the higher menu (function remains on). After 5 seconds the appliance switches to the initial menu option • Touch the sensor field two time: Change to the higher menu and move up and down (the function deactivates) To set the values (example: temperature, time, weight, degree to cook).
electrolux 7 Display (examples) Symbol Function Meatprobe 75°C • The meatprobe is installed. • The Meatprobe Automatic is on. • You can change the core temperature. Heat+Hold 80°C The display shows the function is active. Smell filter The smell filter is on. The menus in overview Main menu Sy mb ol Menu item Application Assisted Cooking Contains list of automatic cooking programmes. Heating Functions Contains list of oven heating functions.
electrolux Oven function Application Pizza Setting For baking on one oven level dishes that require more intensive browning and a crispy base. Set the oven temperatures 20-40 °C lower than when using conventional. Turbo Grill For roasting larger joints of meat or poultry on one level. The function is also suitable for gratinating and browning. Economy Grill For grilling flat foodstuffs placed in the middle of the grill and for toasting.
electrolux 9 Sy mb ol Submenu Description Smell Filter Activates and deactivates the smell filter. Service Shows the software version and configuration. Factory Settings Reset all settings to factory settings (including My Programmes ). Activating and deactivating the appliance to activate or deactivate the apTouch pliance. Operation of the menus: 1. Activate the appliance. 2. Touch or to select the menu option. 3. Touch OK to move to submenu or accept setting.
electrolux Automatic programmes These 3 automatic programmes give optimum settings for each type of meat or other recipes: • Meat programmes with Weight Automatic ( Assisted Cooking menu) • Meat programmes with Meatprobe Automatic ( Assisted Cooking menu) • Recipe Automatic ( Assisted Cooking menu) Assisted Cooking with Weight Automatic This function automatically calculates the roasting time. To use the function, It is necessary to input the food weight. Activating the function: 1.
electrolux 11 5. Set the oven function and, if necessary, the oven temperature. The appliance calculates the provisional end time for the set temperature (at least 120°C) again and again. This procedure can take approximately 30 minutes. The display constantly shows the new provisional end time. The meatprobe must stay in the meat and in the meatprobe socket during the cooking process. 6. When the meat reaches set core temperature, an acoustic signal sounds. The appliance deactivates automatically.
electrolux If you use the clock functions Duration and End Time , the appliance deactivates the heating elements after 90 % of the set time. The appliance uses the residual heat to continue the cooking process until the time ends (3-20 minutes). Setting the clock functions 1. Touch again and again until the display shows the necessary clock function and the related symbol. 2. Touch + or - to set the necessary time. Touch OK to confirm. After 90 % of the set time, an acoustic signal sounds.
electrolux 13 If you deactivate the Smell Filter , it switches on automatically after 100 hours of work, in order to clean itself. Key Lock The Key Lock prevents an accidental change of the oven function . Activating the Key Lock 1. Activate the appliance. 2. Set the oven function. 3. Touch again and again until the display shows Key Lock 4. Touch OK to confirm. The Key Lock is active. Deactivating the Key Lock 1. Touch . 2. Touch OK to confirm. The Key Lock is not active.
electrolux Close the door without pressing the lever. Deactivating the door lock Do the above procedure again and move the lever back to the right. You can also fully remove the door lock: 1. Remove the door trim. Refer to "Activating the door lock". 2. Remove the lever (1). B 1 Important! There is a guide bar (C) on the open side of the door trim (B). Push the guide bar between the outer door panel and the guide corner (D). Make sure that the seal (E) engages. 3.
electrolux 15 • If you have nonstick accessories, do not clean them using an aggressive agents, sharp edged objects or dishwasher. It can destroy nonstick coating! Shelf Support Rails Removing the shelf support rails 1. Pull the front of the shelf support rail away from the side wall. 3. Replace the oven light bulb with applicable 300°C heat-resistant oven light bulb. New oven light bulb must have the same parameters as your previous one. 4. Install the glass cover.
electrolux Folding down the heating element 1. Remove the shelf support rails. 3. Close the oven door until the first position (angle approx. 45°). 45° 2. Hold the heating element with the two hands at the front 3. Pull it forwards against the spring pressure and out along the support on both sides. 4. The heating element folds down. The oven ceiling is ready to clean. Installing the heating element 1. Install the heating element in opposite sequence.
electrolux 17 2. Pull the door trim to the front to remove it. 3. Hold the door glass panels on their top edge one by one and pull them upwards out of the guide 4. Clean the door glass panels. To install panels follow the procedure in reverse. Insert the smaller panel first, then the larger. WHAT TO DO IF… Warning! Refer to "Safety information" chapter.
electrolux Product number (PNC) ......................................... Serial number (S.N.) ......................................... ENVIRONMENT CONCERNS The symbol on the product or on its packaging indicates that this product may not be treated as household waste. Instead it should be taken to the appropriate collection point for the recycling of electrical and electronic equipment.
electrolux 19
www.electrolux.