EOB8741AO ................................................ .............................................
www.electrolux.com CONTENTS 1. 2. 3. 4. 5. 6. 7. 8. 9. 10. 11. 12. 13. 14. 15. 16. SAFETY INFORMATION . . . . . . . . . . . . . . . . . . . . . . . . . . . . . . . . . . . . . . . . . . . . . . . . . . . 3 SAFETY INSTRUCTIONS . . . . . . . . . . . . . . . . . . . . . . . . . . . . . . . . . . . . . . . . . . . . . . . . . . 4 PRODUCT DESCRIPTION . . . . . . . . . . . . . . . . . . . . . . . . . . . . . . . . . . . . . . . . . . . . . . . . . 6 BEFORE FIRST USE . . . . . . . . . . . . . . . . . . . . .
ENGLISH 3 1. SAFETY INFORMATION Before the installation and use of the appliance, carefully read the supplied instructions. The manufacturer is not responsible if an incorrect installation and use causes injuries and damages. Always keep the instructions with the appliance for future reference. 1.1 Children and vulnerable people safety WARNING! Risk of suffocation, injury or permanent disability.
www.electrolux.com • Do not use harsh abrasive cleaners or sharp metal scrapers to clean the glass door since they can scratch the surface, which may result in shattering of the glass. • Only use the core temperature sensor recommended for this appliance. • To remove the shelf supports first pull the front of the shelf support and then the rear end away from the side walls. Install the shelf supports in the opposite sequence. 2. SAFETY INSTRUCTIONS 2.
ENGLISH 2.2 Use WARNING! Risk of injury, burns or electric shock or explosion. • Use this appliance in a household environment. • Do not change the specification of this appliance. • Make sure that the ventilation openings are not blocked. • Do not let the appliance stay unattended during operation. • Deactivate the appliance after each use. • Be careful, when you open the appliance door while the appliance is in operation. Hot air can release.
www.electrolux.com WARNING! Risk of electrical shock. • Before replacing the lamp, disconnect the appliance from the power supply. • Only use lamps with the same specifications. • Disconnect the appliance from the mains supply. • Cut off the mains cable and discard it. • Remove the door catch to prevent children and pets to get closed in the appliance. 2.5 Disposal WARNING! Risk of injury or suffocation. 3.
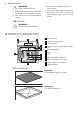
ENGLISH 7 Grill- / Roasting pan To bake and roast or as a pan to collect fat. Trivet • For roasting and grilling. Use the trivet only with the Grill- / roasting pan. Patisserie tray For rolls, brezels and small pastries. Suitable for steam functions. The discolouration of the surface has no effect on the functions. Core temperature sensor To measure how far the food is cooked. Sponge For absorbing the remaining water from the steam generator. 4. BEFORE FIRST USE WARNING! Refer to the Safety chapters.
www.electrolux.com 4.2 Setting and changing the time 2. Touch . 3. Touch or After the first connection to the mains, all symbols in the display are on for some seconds. For the subsequent few seconds the display shows the software version. After the software version goes off, the display shows h and 12:00. 4. Changing the time of day You can change the time of day only when the appliance is off. Touch . flashes in the display. To set the new time of day, use the above procedure.
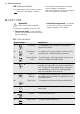
ENGLISH Sensor Field Function Description 7 UP 8 DOWN To move down in the menu. 9 CLOCK To set the clock functions. 10 MINUTE MINDER To set the Minute Minder. 11 OK To confirm the selection or setting. To move down in the menu. C A) Oven function symbol B) Number of the oven function / pro- To move up in the menu. 5.
www.electrolux.com 5.4 Heat up indicator If you activate an oven function, the bars come on in the display. The bars show that the temperature in the appliance increases or decreases. When the appliance is at the set temperature, the bars go off the display. 6. DAILY USE WARNING! Refer to the Safety chapters. To operate the appliance you can use: • The manual mode - to set a heating function, the temperature and the cooking time manually.
ENGLISH Oven function 11 Application 10 Grilling To grill flat food in the middle of the shelf. To make toast. 11 Fast Grilling To grill flat food in large quantities. To make toast. 12 Turbo Grilling To roast larger meat joints or poultry with bones on one shelf position. Also to make gratins and to brown. 13 Conventional Cooking To bake and roast food on one shelf position. 14 Pizza Setting To bake food on one shelf position for a more intensive browning and a crispy bottom.
www.electrolux.com 2. 3. 4. Fill the water drawer with 800 ml of water. The water supply is sufficient for approximately 50 minutes. Do not put water directly into the steam generator! Use only water as the liquid. Do not use filtered (demineralised) or distilled water. Activate the appliance. Set the Steam function (refer to the "Oven functions" table) and the temperature. 5. Touch to set the DURATION or END function (refer to "Setting the END" or "Setting the DURATION").
ENGLISH SYMBOL FUNCTION DESCRIPTION END To set when the appliance deactivates. You can use the Duration and End functions at the same time (Time delay), if the appliance is to be activated and deactivated automatically later. 7.1 Count Up Timer Use the Count Up Timer to monitor how long the appliance operates. It is on immediately when the appliance starts to heat. Reset the Count Up Timer: touch and at the same time until the display shows "00:00" and the Count Up Timer starts to count up again.
www.electrolux.com function (refer to "Setting the DURATION" and "Setting the END" ). When the Time delay function is activated, the display shows a static symbol of the with a dot and . The oven function, dot shows which clock function is on in the Clock / residual heat display. 7.6 Setting the Time delay function The DURATION and END functions can be used at the same time, if the oven is to be activated and deactivated automatically later. In this case, first set the and then the END DURATION 8.
ENGLISH You can find the recipes for the automatic programmes specified for this appliance on our website. To find the proper Recipe Book check the PNC number on the rating plate on the front frame of the appliance cavity. 8.3 Automatic recipes Setting an automatic recipe: 1. Activate the appliance. 2. Touch . The display shows the number of the automatic programme (P1 – P9). 3. Touch or matic recipe. 4. Touch or the automatic recipe activates automatically after five seconds.
www.electrolux.com • The core temperature: refer to the table for the core temperature sensor in the recipe book. Only use the core temperature sensor supplied or the correct replacement parts. 1. 2. Activate the appliance. 7. 8. 3. Put the tip of the core temperature sensor (with on the handle) into the centre of the meat. Put the plug of the core temperature sensor into the socket at the front of the appliance. and the deThe display shows fault set core temperature.
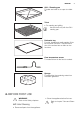
ENGLISH 17 9.2 Inserting the oven accessories The deep pan and the wire shelf have side edges. These edges and the shape of the guide-bars are a special device to prevent the cookware from slipping. Inserting the wire shelf and the deep pan together Put the wire shelf on the deep pan. Push the deep pan between the guide-bars of one of the oven levels. 9.3 Trivet and Grill- / Roasting pan WARNING! Be careful when you remove the accessories from a hot appliance. There is a risk of burns.
www.electrolux.com You can use the trivet to grill flat dishes in large quantities and to toast: • Put the trivet into the deep pan so that the supports of the wire shelf point down. • Put the deep pan into the oven on the necessary shelf position. 10. ADDITIONAL FUNCTIONS 10.1 My Favourite Programme function Use this function to save your favourite temperature and time settings for an oven function or programme. 1. Set the temperature and time for an oven function or programme. 2. 3.
ENGLISH 19 Settings menu Indicator of the setting menu Description Value to set SET1 RESIDUAL HEAT INDICATOR ON / OFF SET21) KEY TONE CLICK / BEEP / OFF SET3 FAULTY TONE ON / OFF SET4 SERVICE --- SET5 RESTORE SETTINGS YES / NO SET62) TIME EXTENSION ON / OFF 1) It is not possible to deactivate the tone of the ON / OFF sensor field. 2) Selected models only You can set the settings menu only when the appliance is deactivated. Activating the settings menu: 1.
www.electrolux.com continue to operate until the appliance cools down. 11. HELPFUL HINTS AND TIPS 11.1 Inner side of the door In some models, on the inner side of the door you can find: • The numbers of the shelf positions. • Information about the heating functions, recommended shelf positions and temperatures for typical dishes. The temperature and baking times in the tables are guidelines only. They depend on the recipes and the quality and quantity of the ingredients used. 11.
ENGLISH which are almost the same. Add the largest quantity of water necessary for one of the dishes in the operation. Put the dishes into the correct cookware and then on the oven shelves. Adjust the distance between the cookware to let the steam circulate. 21 • Put the clean containers in the middle of the shelf on the 1st shelf position. Make sure that the opening is down at a small angle. • Fill the drawer with the maximum quantity of water and set the time to 40 min.
www.electrolux.com Shelf position Temperature (ºC) Water in the water drawer (ml) Time1) (min.) Asparagus, white 2 96 600 35 - 45 Spinach 2 96 350 15 Peeling tomatoes 2 96 350 15 White haricot beans 2 96 500 30 - 40 Savoy cabbage 2 96 400 20 - 25 Courgette, slices 2 96 350 15 - 20 Shelf position Temperature (ºC) Water in the water drawer (ml) Time1) (min.
ENGLISH 23 Fish Food Shelf position Temperature (ºC) Water in the water drawer (ml) Time 1) (min.) Trout, approx. 250 g 2 85 550 30 - 40 Prawns, fresh 2 85 450 20 - 25 Prawns, frozen 2 85 550 30 - 40 Salmon fillets 2 85 500 25 - 35 Salmon trout, approx. 1000 g 2 85 600 40 - 45 Mussels 2 96 500 20 - 30 Flat fish fillet 2 80 350 15 1) The times are for guidance only. Meat Food Shelf position Temperature (ºC) Water in the water drawer (ml) Time 1) (min.
www.electrolux.com Food Shelf position Temperature (ºC) Water in the water drawer (ml) Time 1) (min.) Eggs, mediumboiled 2 96 450 13 - 16 Eggs, softboiled 2 96 400 11 - 12 1) The times are for guidance only. 11.5 Turbo Grilling and Full Steam in succession When you combine functions, you can cook meat, vegetables and accompaniments one after the other. All dishes are ready to serve at the same time. • Use the turbo grilling function to initially roast the food.
ENGLISH Type of Food 25 Half Steam + Heat (Water amount: about 300 ml) Shelf position Temperature (°C) Time (min.) Thin fish fillet 2 85 15 - 25 Thick fish fillet 2 90 25 - 35 Small fish up to 350 g 2 90 25 - 35 Whole fish up to 1000 g 2 90 35 - 45 1) continue for a further half an hour with the door closed. Reheating Type of Food Half Steam + Heat (Water amount: about 300 ml) Shelf position Temperature (°C) Time (min.
www.electrolux.com Quarter Steam + Heat 1) Type of Food Shelf position Temperature (°C) Time (min.) Ready-to-bake rolls 2 200 10 - 20 Ready-to-bake baguettes 40 - 50 g 2 200 20 - 30 Ready-to-bake baguettes 40 - 50 g, frozen 2 200 25 - 35 1) Amount of water to be added will depend on the length of the cooking time. 11.8 Baking General instructions • Your new oven can bake or roast differently to the appliance you had before.
ENGLISH 27 Baking results Possible cause Remedy The cake browns unevenly. The oven temperature is too high and the baking time is too short. Set a lower oven temperature and a longer baking time. The cake browns unevenly. The mixture is unevenly distributed. Spread the mixture evenly on the baking tray. The cake is not ready in the baking time given. The oven temperature is too low. The next time you bake, set a slightly higher oven temperature. 11.
www.electrolux.com Cakes / pastries / breads on baking trays Type of baking Oven function Shelf position Temperature (°C) Time (min) Plaited bread / Bread crown Conventional Cooking 3 170 - 190 30 - 40 Christmas stollen Conventional Cooking 2 160 - 180 1) 50 - 70 Bread (rye bread): 1. First part of baking procedure. 2. Second part of baking procedure.
ENGLISH Type of baking Oven function Shelf position Temperature (°C) Time (min) Yeast cakes with delicate toppings (e.g.
www.electrolux.
ENGLISH 31 11.11 Multileveled Baking Cakes / pastries / breads on baking trays True Fan Cooking Type of baking Shelf position Temperature (°C) Time (min) 2 shelf positions 3 shelf positions Cream puffs / Eclairs 1/4 - 160 - 180 1) 25 - 45 Dry streusel cake 1/4 - 150 - 160 30 - 45 1) Preheat the oven.
www.electrolux.com 1. that the meat has the correct core temperature (see table for the Core Temperature Sensor). In the first 10 minutes you can set an oven temperature between 80 °C and 150 °C. The default is 90 °C. After the temperature is set, the oven continues to cook at 80 °C. Do not use the automatic slow cook function for poultry. Sear the meat in a pan on the hob on a very high setting for 1 - 2 minutes on each side.
ENGLISH • Roast lean meats in the roasting tin with the lid. This keeps the meat more succulent. • All types of meat that can be browned or have crackling can be roasted in the roasting tin without the lid. • We recommend that you cook meat and fish weighing 1 kg and above in the oven. • To prevent the meat juices or fat from burning onto the pan, put some liquid into the deep pan. 33 • If necessary, turn the roast (after 1 / 2 2 / 3 of the cooking time).
www.electrolux.com Type of meat Quantity Oven function Shelf position Temperature °C Time (min.) Knuckle of veal 1.5 - 2 kg Turbo Grilling 1 160 - 180 120 - 150 Type of meat Quantity Oven function Shelf position Temperature °C Time (min.) Leg of lamb / Roast lamb 1 - 1.5 kg Turbo Grilling 1 150 - 170 100 - 120 Saddle of lamb 1 - 1.5 kg Turbo Grilling 1 160 - 180 40 - 60 Type of meat Quantity Oven function Shelf position Temperature °C Time (min.
ENGLISH 35 Fish (steamed) Type of meat Quantity Oven function Shelf position Temperature °C Time (min.) Whole fish 1 - 1.5 kg Conventional Cooking 1 210 - 220 40 - 60 11.16 Grilling Always grill with the maximum temperature setting. Set the shelf into the shelf position as recommended in the grilling table. Always set the pan to collect the fat into the first shelf position. Grill only flat pieces of meat or fish. Always preheat the empty oven with the grill functions for 5 minutes.
www.electrolux.com 11.17 Convenience food True Fan Cooking Convenience food Shelf position Temperature (°C) Time (min.
ENGLISH Dish Defrosting time (min.) Further defrosting time (min.) Comment 37 Chicken, 1000 g 100 - 140 20 - 30 Put the chicken on an upturned saucer placed on a large plate. Turn halfway through. Meat, 1000 g 100 - 140 20 - 30 Turn halfway through. Meat, 500 g 90 - 120 20 - 30 Turn halfway through.
www.electrolux.com Vegetables Temperature in °C Cooking time until simmering (min.) Continue to cook at 100°C (min.) Carrots 1) 160 - 170 50 - 60 5 - 10 Cucumbers 160 - 170 50 - 60 - Mixed pickles 160 - 170 50 - 60 5 - 10 Kohlrabi / Peas / Asparagus 160 - 170 50 - 60 15 - 20 Preserve 1) Leave standing in the oven after it’s deactivated. For best results, deactivate the appliance halfway through the operation. Open the appliance door and let the appliance cool down.
ENGLISH 39 Pork Food Food Core Temperature °C Shoulder / Ham / Neck joint of pork 80 - 82 Chop (saddle) / Smoked pork loin 75 - 80 Meatloaf 75 - 80 Veal Food Food Core Temperature °C Roast veal 75 - 80 Knuckle of veal 85 - 90 Mutton / lamb Food Food Core Temperature °C Leg of mutton 80 - 85 Saddle of mutton 80 - 85 Roast lamb / Leg of lamb 70 - 75 Game Food Food Core Temperature °C Saddle of hare 70 - 75 Leg of hare 70 - 75 Whole hare 70 - 75 Saddle of venison 70 - 75 Leg o
www.electrolux.com • If you have nonstick accessories, do not clean them using aggressive agents, sharp-edged objects or a dishwasher. It can cause damage to the nonstick coating. 12.1 Steam cleaning 1. 2. 3. 4. 5. 6. Remove the worst of the dirt manually. Put approximately 250 ml of water and 3 tablespoons of vinegar directly into the steam generator. Touch again and again until the display shows . The display shows the duration (15 minutes) and the default temperature.
ENGLISH CAUTION! Put a cloth on the bottom of the interior of the appliance. It prevents damage to the lamp glass cover and the cavity. Always use the same lamp type. Replacing the lamp at the cavity ceiling: 1. Turn the lamp glass cover counterclockwise to remove it. 2. Remove the metal ring and clean the glass cover. 3. Replace the lamp with a suitable 300 °C heat-resistant lamp. 4. Attach the metal ring to the glass cover. 5. 41 Install the glass cover.
www.electrolux.com 8. 9. Installing the door and the glass panels Hold the door glass panels on their top edge one by one and pull them up out of the guide. Clean the glass panel with water and soap. Dry the glass panel carefully. the above steps in the opposite sequence. Install the smaller panel first, then the larger. When the cleaning is completed, install the glass panels and the oven door. Do 13. WHAT TO DO IF… WARNING! Refer to the Safety chapters.
ENGLISH 43 Problem Possible cause Remedy The lamp does not operate. You have selected an ECO function or Moist Fan Baking. In these functions the light cannot be activated. The light cannot be activated because these functions help to save energy. If you cannot find a solution to the problem yourself, contact your dealer or the service centre. The necessary data for the service centre is on the rating plate. The rating plate is on the front frame of the appliance cavity.
www.electrolux.com min. 3 mm min.
ENGLISH 560 min. 600 45 548 20 min. ! 546 114 530 min. 594 572 30 579 5 567 594 21 200 cm2 548 546 590 560 min. 20 530 min. 572 114 594 579 5 590 min. 567 594 21 30 max. R1200 mm alternativ 100 130 140 H05VV-F H05RR-F min.
www.electrolux.com 90° 2x3,5x25 15. GB IE GREAT BRITAIN & IRELAND - GUARANTEE/ CUSTOMER SERVICE 15.
ENGLISH Exclusions • Damage, calls resulting from transport, improper use, neglect, light bulbs, removable parts of glass, plastic. • Costs for calls to put right appliance which is improperly installed, calls to appliances outside United Kingdom. • Appliances found to be in use within a commercial environment, plus those which are subject to rental agreements. • Products of Electrolux manufacturer that are not marketed by Electrolux Service and Spare Parts.
www.electrolux.com 17. WWW.ELECTROLUX.COM Albania +355 4 261 450 Rruga “Kavajës”, ish-parku autobuzëve, Tiranë Belgique/België/Belgien +32 2 7162444 Raketstraat 40, 1130 Brussel/ Bruxelles Česká Republika +420 261 302 261 Budějovická 3, Praha 4, 140 21 Danmark +45 70 11 74 00 Strevelinsvej 38-40, 7000 Fredericia Deutschland +49 180 32 26 622 Fürther Str. 246, 90429 Nürnberg Eesti +37 2 66 50 030 Pärnu mnt. 153, 11624 Tallinn España +34 902 11 63 88 Carretera M-300, Km.
ENGLISH 49 Schweiz - Suisse Svizzera 0848 848 111 Industriestrasse 10, CH-5506 Mägenwil Slovenija +38 61 24 25 731 Gerbičeva ulica 110, 1000 Ljubljana Slovensko +421 2 32 14 13 34-5 Electrolux Slovakia s.r.o.
www.electrolux.
ENGLISH 51
892960189-A-072013 www.electrolux.