EOB8711AO EN Steam oven User Manual
www.electrolux.com CONTENTS 1. SAFETY INFORMATION....................................................................................3 2. SAFETY INSTRUCTIONS..................................................................................4 3. PRODUCT DESCRIPTION................................................................................ 7 4. CONTROL PANEL............................................................................................. 8 5. BEFORE FIRST USE...............................
ENGLISH 1. 3 SAFETY INFORMATION Before the installation and use of the appliance, carefully read the supplied instructions. The manufacturer is not responsible if an incorrect installation and use causes injuries and damages. Always keep the instructions with the appliance for future reference. 1.
www.electrolux.com • • • • • Do not use a steam cleaner to clean the appliance. Do not use harsh abrasive cleaners or sharp metal scrapers to clean the glass door since they can scratch the surface, which may result in shattering of the glass. If the supply cord is damaged, it must be replaced by the manufacturer, its Authorised Service Centre or similarly qualified persons in order to avoid a hazard.
ENGLISH • • • • Do not pull the mains cable to disconnect the appliance. Always pull the mains plug. Use only correct isolation devices: line protecting cut-outs, fuses (screw type fuses removed from the holder), earth leakage trips and contactors. The electrical installation must have an isolation device which lets you disconnect the appliance from the mains at all poles. The isolation device must have a contact opening width of minimum 3 mm. This appliance complies with the E.E.C. Directives.
www.electrolux.com – Open the appliance door with care after the steam cooking operation. 2.5 Care and cleaning • 2.6 Internal light • WARNING! Risk of injury, fire, or damage to the appliance. • • • • • • • • Before maintenance, deactivate the appliance and disconnect the mains plug from the mains socket. Make sure the appliance is cold. There is the risk that the glass panels can break. Replace immediately the door glass panels when they are damaged. Contact the Authorised Service Centre.
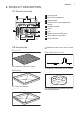
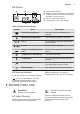
ENGLISH 3. PRODUCT DESCRIPTION 3.1 General overview 1 2 3 4 5 6 5 4 10 3 7 2 1 8 1 2 3 4 5 6 7 8 9 10 Control panel Electronic programmer Water drawer Socket for the core temperature sensor Heating element Lamp Fan Steam generator with cover Shelf support, removable Shelf positions 9 3.2 Accessories Wire shelf For cookware, cake tins, roasts. Baking tray For cakes and biscuits. Grill- / Roasting pan To bake and roast or as a pan to collect fat.
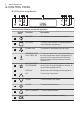
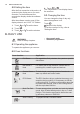
www.electrolux.com 4. CONTROL PANEL 4.1 Electronic programmer 1 2 3 4 5 6 7 8 9 10 11 Use the sensor fields to operate the appliance. Sensor Field 1 2 3 4 5 6 7 8 9 10 11 - Function Description ON / OFF To activate and deactivate the appliance. OPTIONS To set an oven function, a cleaning function or an automatic programme. OVEN LIGHT To activate or deactivate the oven lamp.
ENGLISH 9 4.2 Display A B C E A) Oven function symbol B) Number of the oven function / programme C) Indicators for the clock functions (refer to the table "Clock functions") D) Clock / residual heat display E) Temperature / time of day display D Other indicators of the display: Symbol / / Name Description Automatic programme You can choose an automatic pro‐ gramme. My favourite programme The favourite programme operates. kg / g An automatic programme with weight input operates.
www.electrolux.com 5.2 Setting the time After the first connection to the mains, all symbols in the display are on for some seconds. For the subsequent few seconds the display shows the software version. After the software version goes off, the display shows h and 12:00. "12" flashes. 1. Touch or 2. Touch . 3. Touch or to set the hours. to set the minutes. 4. Touch or . The Temperature / Time display shows the new time. 5.
ENGLISH Oven function 11 Application Bottom Heat To bake cakes with crispy bottom and to preserve food. Defrost To defrost frozen food. Keep Warm To keep food warm. Grilling To grill flat food and to toast bread. Fast Grilling To grill flat food in large quantities and to toast bread. Turbo Grilling To roast larger meat joints or poultry with bones on 1 shelf position. Also to make gratins and to brown. Top / Bottom Heat To bake and roast food on 1 shelf position.
www.electrolux.com The Temperature / Time display shows the temperature in the appliance. 2. Touch to go back to the set temperature or the display shows it automatically after five seconds. 6.6 Fast heat up function Do not put food in the oven when the Fast heat up function operates. The Fast heat up function is not available with every oven function. An acoustic signal sounds if the Fast heat up function is not available for the set function if Faulty tone is activated in the "Settings menu".
ENGLISH Clock function Application END To set when the appliance deactivates. You can use Duration and End at the same time (Time delay) if you want the appliance to activate and deactivate au‐ tomatically later. 7.2 Count Up Timer The Count Up Timer is not activated if Duration and End are set. The Count Up Timer starts to count when the appliance starts to heat. To reset the Count Up Timer, touch and at the same time until the display shows "00:00" and the Count Up Timer starts to count up again. 7.
www.electrolux.com 7.6 Setting the Time delay function When the Time delay function is activated, the display shows a static symbol of the oven function, The DURATION and END can be used at the same time, if the appliance is to be switched on and off automatically later. In this case, first set the with a dot and . The dot shows which clock function is on in the Clock / residual heat display. DURATION and then the END function (refer to "Setting the DURATION" and "Setting the END" ). 8.
ENGLISH 8.4 Automatic programmes with weight input If you set the weight of the meat, the appliance calculates the roasting time. 1. Activate the appliance. 2. Touch . 15 core temperature sensor. The programme ends when the appliance is at the set core temperature. 1. Activate the appliance. 2. Touch . 3. Install the core temperature sensor. Refer to "Core temperature sensor". 3. Touch or to set the weight programme. The display shows: the cooking time, the 4.
www.electrolux.com When you cook with the core temperature sensor, you can change the temperature shown in the display. After you put the core temperature sensor in the socket and set an oven function and temperature, the display shows the current core temperature. The display shows flashing and the default set core temperature. The temperature is 60 °C for the first operation, and the last set value for each subsequent operation.
ENGLISH 17 Wire shelf and the deep pan together: Push the deep pan between the guide bars of the shelf support and the wire shelf on the guide bars above. Deep pan: Push the deep pan between the guide bars of the shelf support. • • All accessories have small indentations at the top of the right and left side to increase safety. The indentations are also anti-tip devices. The high rim around the shelf is a device which prevents cookware from slipping. 10. ADDITIONAL FUNCTIONS 10.
www.electrolux.com The Function Lock prevents an accidental change of the oven function. 1. To activate the function activate the appliance. 2. Activate an oven function or setting. 3. Touch and hold and at the same time for 2 seconds. An acoustic signal sounds. Loc comes on in the display. To deactivate the Function Lock repeat step 3. 10.4 Using the settings menu You can set the settings menu only when the appliance is deactivated.
ENGLISH • • Night brightness - when the appliance is deactivated, the brightness of the display is lower between 10 PM and 6 AM. Day brightness: – when the appliance is activated. – if you touch a sensor field during the night brightness (apart from ON / OFF), the display goes back to the day brightness mode for the next 10 seconds. – if the appliance is deactivated and you set the Minute Minder. When 19 the Minute Minder function ends, the display goes back to the night brightness. 10.
www.electrolux.com 11.4 Full Steam / Eco Steam quantity of water necessary for one of the dishes in the operation. Put the dishes into the correct cookware and then on the wire shelves. Adjust the distance between the cookware to let the steam circulate. WARNING! Do not open the appliance door when the function is activated. There is a risk of burns. Sterilisation The function is applicable for all types of food, fresh or frozen.
ENGLISH 21 Food Temperature (°C) Time (min) Shelf position Water in the wa‐ ter drawer (ml) Green beans 96 35 - 45 2 550 Lamb’s let‐ tuce, florets 96 20 - 25 2 450 Brussels sprouts 96 30 - 40 2 550 Beetroot 96 70 - 90 2 800 + 400 Black salsify 96 35 - 45 2 600 Celery, cubed 96 25 - 35 2 500 Asparagus, green 96 25 - 35 2 500 Asparagus, white 96 35 - 45 2 600 Spinach 96 15 2 350 Peeling toma‐ 96 toes 15 2 350 White haricot beans 96 30 - 40 2 500 Savoy
www.electrolux.com Food Temperature (°C) Time (min) Shelf position Water in the water drawer (ml) Rice (water / rice ratio 1.5:1) 96 35 - 40 2 600 Boiled pota‐ toes, quar‐ tered 96 35 - 40 2 600 Bread dump‐ 96 ling 35 - 45 2 600 Tagliatelle, fresh 96 20 - 25 2 450 Polenta (liq‐ uid ratio 3:1) 96 45 - 50 2 750 Food Temperature (°C) Time (min) Shelf position Water in the water drawer (ml) Trout, ap‐ prox.
ENGLISH 23 Food Temperature (°C) Time (min) Shelf position Water in the water drawer (ml) Chicken, poach‐ ed, 1000 - 1200 g 96 60 - 70 2 800 + 150 Veal / pork loin 90 without leg, 800 1000 g 80 - 90 2 800 + 300 Kasseler (smoked loin of pork), poached 90 90 - 110 2 800 + 300 Tafelspitz (prime boiled beef) 96 110 - 120 2 800 + 700 Chipolatas 80 15 - 20 2 400 Eggs Food Temperature (°C) Time (min) Shelf position Water in the water drawer (ml) Eggs, hardboiled 96 18 - 21 2 5
www.electrolux.
ENGLISH Food Temperature (°C) Time (min) Shelf position Rice 85 20 - 25 2 One-plate dishes 85 20 - 25 2 25 11.7 Quarter Steam + Heat Add about 300 ml of water.
www.electrolux.com • • You can extend baking times by 10 – 15 minutes if you bake cakes on more than one shelf position. Cakes and pastries at different heights do not always brown equally at first. If this occurs, do not change the temperature setting. The differences equalize during the baking procedure. • With longer baking times, you can deactivate the oven approximately 10 minutes before the end of the baking time and then use the residual heat.
ENGLISH 27 11.
www.electrolux.com Food Function Temperature (°C) Time (min) Shelf position Bread (rye Top / Bottom bread): Heat 1. First part of baking pro‐ cedure. 2. Second part of bak‐ ing proce‐ dure. 1. 2301) 2. 160 - 180 1. 20 2.
ENGLISH 29 Biscuits Food Function Short pastry biscuits Temperature (°C) Time (min) Shelf position True Fan Cook‐ 150 - 160 ing 10 - 20 3 Short bread / Short bread / Pastry stripes True Fan Cook‐ 140 ing 20 - 35 3 Short bread / Short bread / Pastry stripes Top / Bottom Heat 20 - 30 3 Biscuits made with sponge mixture True Fan Cook‐ 150 - 160 ing 15 - 20 3 Pastries made True Fan Cook‐ 80 - 100 with egg white / ing Meringues 120 - 150 3 Macaroons True Fan Cook‐ 100 - 120 ing 30 - 5
www.electrolux.com Food Function Temperature (°C) Time (min) Shelf position Lasagne Top / Bottom Heat 180 - 200 25 - 40 1 Vegetables au gratin1) Turbo Grilling 160 - 170 15 - 30 1 Baguettes top‐ ped with mel‐ ted cheese True Fan Cook‐ 160 - 170 ing 15 - 30 1 Sweet bakes Top / Bottom Heat 180 - 200 40 - 60 1 Fish bakes Top / Bottom Heat 180 - 200 30 - 60 1 Stuffed vegeta‐ True Fan Cook‐ 160 - 170 bles ing 30 - 60 1 1) Preheat the oven. 11.
ENGLISH 31 Cakes / pastries / breads on baking trays Food Temperature (°C) Time (min) Cream puffs / Eclairs 160 - 1801) Dry streusel cake 150 - 160 Shelf position 2 positions 3 positions 25 - 45 1/4 - 30 - 45 1/4 - 1) Preheat the oven.
www.electrolux.com Always cook without a lid when you use this function. 1. Sear the meat in a pan on the hob on a very high setting for 1 - 2 minutes on each side. 2. Put the meat together with the hot roasting pan into the oven on the wire shelf. 3. Put the core temperature sensor into the meat. 4. Select the function Slow Cooking and set the correct end core temperature.
ENGLISH 11.16 Roasting • • • • • • Use heat-resistant ovenware to roast (refer to the instructions of the manufacturer). You can roast large roasting joints directly in the deep pan (if present) or on the wire shelf above the deep pan. Roast lean meats in the roasting tin with the lid. This keeps the meat more succulent. All types of meat that can be browned or have crackling can be roasted in the roasting tin without the lid.
www.electrolux.com Veal Food Quantity (kg) Function Tempera‐ ture (°C) Time (min) Shelf posi‐ tion Roast veal 1 Turbo Grill‐ ing 160 - 180 90 - 120 1 Knuckle of veal 1.5 - 2 Turbo Grill‐ ing 160 - 180 120 - 150 1 Quantity (kg) Function Tempera‐ ture (°C) Shelf posi‐ tion Time (min) Shelf posi‐ tion Leg of 1 - 1.5 lamb / Roast lamb Turbo Grill‐ ing 150 - 170 100 - 120 1 Saddle of lamb 1 - 1.
ENGLISH Food Quantity Function Tempera‐ ture (°C) Time (min) Shelf posi‐ tion Turkey 2.5 - 3.5 kg Turbo Grill‐ ing 160 - 180 120 - 150 1 Turkey 4 - 6 kg Turbo Grill‐ ing 140 - 160 150 - 240 1 Tempera‐ ture (°C) Time (min) Shelf posi‐ tion 40 - 60 1 35 Fish (steamed) Food Quantity (kg) Function Whole fish 1 - 1.5 Top / Bottom 210 - 220 Heat 11.18 Grilling • • • Always grill with the maximum temperature setting.
www.electrolux.com Food Time (min) Shelf position 1st side 2nd side Toast / Toast 1-3 1-3 5 Toast with topping 6-8 - 4 11.
ENGLISH 37 Food Function Temperature (°C) Time (min) Shelf position Fruit flans Top / Bottom Heat as per manu‐ facturer’s in‐ structions as per manu‐ facturer’s in‐ structions 3 1) Turn the French fries 2 or 3 times during cooking. 11.20 Defrost • • • Remove the food packaging and put the food on a plate. Use the first shelf position from the bottom. Do not cover the food with a bowl or a plate, as this can extend the defrost time.
www.electrolux.
ENGLISH Fruit Food Temperature (°C) Time (h) Plums 60 - 70 Apricots Shelf position 1 position 2 positions 8 - 10 3 1/4 60 - 70 8 - 10 3 1/4 Apple slices 60 - 70 6-8 3 1/4 Pears 60 - 70 6-9 3 1/4 11.
www.electrolux.com Food Food core temperature (°C) Saddle of venison 70 - 75 Leg of venison 70 - 75 Fish Food Food core temperature (°C) Salmon 65 - 70 Trouts 65 - 70 12. CARE AND CLEANING WARNING! Refer to Safety chapters. 1 12.1 Notes on cleaning • • • • • • Clean the front of the appliance with a soft cloth with warm water and a cleaning agent. To clean metal surfaces, use a usual cleaning agent. Clean the appliance interior after each use.
ENGLISH An acoustic signal sounds when the steam cleaning is completed. Touch a sensor field to stop the signal. 4. Wipe out the appliance with a soft cloth. Remove the water from the steam generator with the sponge and rub it dry. Keep the door open for approximately 1 hour to let the appliance dry fully. 41 WARNING! Be careful when you remove the door from the appliance. The door is heavy. 1. Open the door fully. 2. Fully press the clamping levers (A) on the two door hinges. 12.
www.electrolux.com When the cleaning is completed, install the glass panels and the door. Do the above steps in the opposite sequence. Install the smaller panel first, then the larger. 12.6 Replacing the lamp Put a cloth on the bottom of the interior of the appliance. It prevents damage to the lamp glass cover and the cavity. WARNING! Danger of electrocution! Disconnect the fuse before you replace the lamp. The lamp and the lamp glass cover can be hot. 1. Deactivate the appliance. 2.
ENGLISH 43 Problem Possible cause Remedy The oven does not heat up. The clock is not set. Set the clock. The oven does not heat up. The necessary settings are Make sure that the settings not set. are correct. The oven does not heat up. The automatic switch-off is Refer to "Automatic switchactivated. off". The oven does not heat up. The Child Lock is on. Refer to "Using the Child Lock". The oven does not heat up. The fuse is released.
www.electrolux.com 13.2 Service data If you cannot find a solution to the problem yourself, contact your dealer or an Authorised Service Centre. plate is on the front frame of the appliance cavity. Do not remove the rating plate from the appliance cavity. The necessary data for the service centre is on the rating plate. The rating We recommend that you write the data here: Model (MOD.) ......................................... Product number (PNC) .........................................
ENGLISH • • • • depending on the duration of the cooking. The residual heat inside the oven will continue to cook. – Use the residual heat to warm up other foods. Cooking with fan - when possible, use the cooking functions with fan to save energy. Residual heat – In some oven functions if a programme with time selection (Duration, End, Time Delay) is activated and the cooking time is longer than 30 minutes, the heating elements deactivate automatically 10% earlier. The fan and lamp continue to operate.
www.electrolux.
ENGLISH 47
867316739-A-172015 www.electrolux.