EOB8741AO EN STEAM OVEN USER MANUAL
www.electrolux.com CONTENTS 1. SAFETY INFORMATION............................................................................................ 3 2. SAFETY INSTRUCTIONS.......................................................................................... 4 3. PRODUCT DESCRIPTION.........................................................................................6 4. CONTROL PANEL.....................................................................................................8 5.
ENGLISH 1. 3 SAFETY INFORMATION Before the installation and use of the appliance, carefully read the supplied instructions. The manufacturer is not responsible if an incorrect installation and use causes injuries and damages. Always keep the instructions with the appliance for future reference. 1.
www.electrolux.com • • • • • • Do not use a steam cleaner to clean the appliance. Do not use harsh abrasive cleaners or sharp metal scrapers to clean the glass door since they can scratch the surface, which may result in shattering of the glass. If the supply cord is damaged, it must be replaced by the manufacturer, its Authorised Service Centre or similarly qualified persons in order to avoid a hazard.
ENGLISH • Do not pull the mains cable to disconnect the appliance. Always pull the mains plug. • Use only correct isolation devices: line protecting cut-outs, fuses (screw type fuses removed from the holder), earth leakage trips and contactors. • The electrical installation must have an isolation device which lets you disconnect the appliance from the mains at all poles. The isolation device must have a contact opening width of minimum 3 mm. • This appliance complies with the E.E.C. Directives. 2.
www.electrolux.com • Be careful when you remove the door from the appliance. The door is heavy! • Clean regularly the appliance to prevent the deterioration of the surface material. • Remaining fat or food in the appliance can cause fire. • Clean the appliance with a moist soft cloth. Only use neutral detergents. Do not use abrasive products, abrasive cleaning pads, solvents or metal objects. • If you use an oven spray, obey the safety instructions on the packaging.
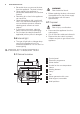
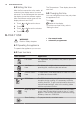
ENGLISH 3.2 Accessories Wire shelf 7 For roasting and grilling. Use the trivet only with the Grill- / Roasting pan. Patisserie tray For cookware, cake tins, roasts. Baking tray For rolls, brezels and small pastries. Suitable for steam functions. The discolouration of the surface has no effect on the functions. Core temperature sensor For cakes and biscuits. Grill- / Roasting pan To measure how far the food is cooked. Sponge To bake and roast or as a pan to collect fat.
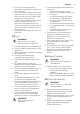
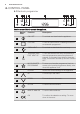
www.electrolux.com 4. CONTROL PANEL 4.1 Electronic programmer 1 2 3 4 5 6 7 8 9 10 11 Use the sensor fields to operate the appliance. Sensor Field 1 2 3 4 5 6 7 8 9 10 11 - Function Description ON / OFF To activate and deactivate the appliance. OPTIONS To set an oven function, a cleaning function or an automatic programme. OVEN LIGHT To activate or deactivate the oven lamp.
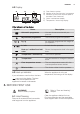
ENGLISH 9 4.2 Display A B C E A) Oven function symbol B) Number of the oven function / programme C) Indicators for the clock functions (refer to the table "Clock functions") D) Clock / residual heat display E) Temperature / time of day display D Other indicators of the display: Symbol / / Name Description Automatic programme You can choose an automatic programme. My favourite programme The favourite programme operates. kg / g An automatic programme with weight input operates.
www.electrolux.com 5.2 Setting the time After the first connection to the mains, all symbols in the display are on for some seconds. For the subsequent few seconds the display shows the software version. After the software version goes off, the display shows h and 12:00. 1. Touch or 2. Touch . 3. Touch or 4. Touch or to set the hours. to set the minutes. The Temperature / Time display shows the new time. 5.3 Changing the time You can change the time of day only when the appliance is off.
ENGLISH Oven function Application Bottom Heat To bake cakes with crispy bottom and to preserve food. Defrost To defrost frozen food. Keep Warm To keep food warm. Grilling To grill flat food and to toast bread. Fast Grilling To grill flat food in large quantities and to toast bread. Turbo Grilling To roast larger meat joints or poultry with bones on 1 shelf position. Also to make gratins and to brown. Conventional Cooking To bake and roast food on 1 shelf position.
www.electrolux.com The Temperature / Time display shows the temperature in the appliance. 2. Touch to go back to the set temperature or the display shows it automatically after five seconds. 6.6 Fast heat up function Do not put food in the oven when the Fast heat up function operates. The Fast heat up function is not available with every oven function. An acoustic signal sounds if the Fast heat up function is not available for the set function if Faulty tone is activated in the "Settings menu".
ENGLISH Clock function Application DURATION To set how long the appliance operates. END To set when the appliance deactivates. You can use Duration and End at the same time (Time delay) if you want the appliance to activate and deactivate automatically later. 7.2 Count Up Timer The Count Up Timer is not activated if Duration and End are set. The Count Up Timer starts to count when the appliance starts to heat.
www.electrolux.com 7.6 Setting the Time delay function When the Time delay function is activated, the display shows a static symbol of the and END can be The DURATION used at the same time, if the appliance is to be switched on and off automatically later. In this case, first set the DURATION oven function, with a dot . The dot shows and which clock function is on in the Clock / residual heat display. and then the END function (refer to "Setting the DURATION" and "Setting the END" ). 8.
ENGLISH 15 8.4 Automatic programmes with weight input core temperature sensor. The programme ends when the appliance is at the set core temperature. If you set the weight of the meat, the appliance calculates the roasting time. 1. Activate the appliance. 1. Activate the appliance. 2. Touch . 2. Touch . 3. Install the core temperature sensor. Refer to "Core temperature sensor". 3. Touch or to set the weight programme. The display shows: the cooking time, the or to set the 4.
www.electrolux.com When you cook with the core temperature sensor, you can change the temperature shown in the display. After you put the core temperature sensor in the socket and set an oven function and temperature, the display shows the current core temperature. The display shows flashing and the default set core temperature. The temperature is 60 °C for the first operation, and the last set value for each subsequent operation.
ENGLISH 17 • All accessories have small indentations at the top of the right and left side to increase safety. The indentations are also antitip devices. • The high rim around the shelf is a device which prevents cookware from slipping. Deep pan: Push the deep pan between the guide bars of the shelf support. 9.3 Trivet and Grill- / Roasting pan WARNING! Be careful when you remove the accessories from a hot appliance. There is a risk of burns.
www.electrolux.com 2. Put the deep pan into the oven on the necessary shelf position. 10. ADDITIONAL FUNCTIONS 10.1 Using My Favourite Programme function SAFE comes on in the display. To deactivate the Child Lock function repeat step 2. Use this function to save your favourite temperature and time settings for an oven function or programme. 10.3 Using the Function Lock You can activate the function only when the appliance operates. 1. Set the temperature and time for an oven function or programme.
ENGLISH Description Value to set 1 RESIDUAL HEAT INDICATOR ON / OFF 2 KEY TONE1) CLICK / BEEP / OFF 3 FAULTY TONE ON / OFF 4 SERVICE MENU - 5 RESTORE SETTINGS ON / OFF 19 1) It is not possible to deactivate the tone of the ON / OFF sensor field. 1. When the appliance is deactivated, 10.6 Brightness of the display touch and hold for three seconds. The display shows SET1 and "1" flashes. There are two modes of display brightness: 2. Touch or 3. Touch . or 4. Touch of the setting.
www.electrolux.com The temperature and baking times in the tables are guidelines only. They depend on the recipes and the quality and quantity of the ingredients used. 11.1 Inner side of the door In some models, on the inner side of the door you can find: • the numbers of the shelf positions. • information about the oven functions, recommended shelf positions and temperatures for typical dishes. 11.
ENGLISH 21 Vegetables Food Temperature (°C) Time (min) Shelf position Water in the water drawer (ml) Artichokes 96 50 - 60 2 800 Auberginen 96 15 - 25 2 450 Cauliflower, whole 96 35 - 45 2 600 Cauliflower, florets 96 25 - 30 2 500 Broccoli, whole 96 30 - 40 2 550 Broccoli, florets 96 20 - 25 2 400 Mushroom sli- 96 ces 15 - 20 2 400 Peas 96 20 - 25 2 450 Fennel 96 35 - 45 2 600 Carrots 96 35 - 45 2 600 Kohlrabi, strips 96 30 - 40 2 550 Peppers, str
www.electrolux.
ENGLISH 23 Fish Food Temperature (°C) Time (min) Shelf position Water in the water drawer (ml) Trout, approx. 250 g 85 30 - 40 2 550 Prawns, fresh 85 20 - 25 2 450 Prawns, frozen 85 30 - 40 2 550 Salmon fillets 85 25 - 35 2 500 Salmon trout, 85 approx.
www.electrolux.com Eggs Food Temperature (°C) Time (min) Shelf position Water in the water drawer (ml) Eggs, hardboiled 96 18 - 21 2 500 Eggs, medium-boiled 96 13 - 16 2 450 Eggs, softboiled 96 11 - 12 2 400 11.5 Turbo Grilling and Full Steam in succession When you combine the functions, you can cook meat, vegetables and accompaniments one after the other. All dishes are ready to be served at the same time. • To initially roast the food use the function Turbo Grilling.
ENGLISH Food Temperature (°C) Time (min) Shelf position Custard / flan in individual dishes1) 90 35 - 40 2 Baked eggs1) 90 30 - 40 2 Terrine1) 90 40 - 50 2 Thin fish fillet 85 15 - 25 2 Thick fish fillet 90 25 - 35 2 Small fish up to 350 g 90 25 - 35 2 Whole fish up to 1000 g 90 35 - 45 2 1) Continue for a further half an hour with the door closed.
www.electrolux.com Food Temperature (°C) Time (min) Shelf position Potato gratin 160 - 170 50 - 60 2 Pasta bake 190 40 - 50 2 Lasagne 180 45 - 55 2 Misc. types of bread 180 - 190 500 - 1000 g 45 - 50 2 Rolls 40 - 60 g 180 - 210 30 - 40 2 Ready-to-bake rolls 200 20 - 30 2 Ready-to-bake baguettes 40 - 50 g 200 20 - 30 2 Ready-to-bake baguettes 40 - 50 g, frozen 200 25 - 35 2 11.8 Baking • Your oven can bake or roast differently to the appliance you had before.
ENGLISH 27 Baking results Possible cause Remedy The cake sinks and becomes soggy, lumpy or streaky. There is too much liquid in the mixture. Use less liquid. Be careful with mixing times, especially if you use a mixing machine. The cake is too dry. The oven temperature is too The next time you bake, set low. a higher oven temperature. The cake is too dry. The baking time is too long. The next time you bake, set a shorter baking time. The cake browns unevenly.
www.electrolux.com Food Function Temperature (°C) Time (min) Shelf position Apple pie / Ap- Conventional ple pie (2 tins Cooking Ø20 cm, diagonally off set) 180 70 - 90 1 Cheesecake 170 - 190 60 - 90 1 Conventional Cooking 1) Preheat the oven.
ENGLISH 29 Food Function Temperature (°C) Time (min) Shelf position Fruit flans (made with yeast dough / sponge mixture)2) Conventional Cooking 170 35 - 55 3 Fruit flans made True Fan Cook- 160 - 170 with short pas- ing try 40 - 80 3 Yeast cakes with delicate toppings (e.g. quark, cream, custard) 160 - 1801) 40 - 80 3 Temperature (°C) Time (min) Shelf position Conventional Cooking 1) Preheat the oven. 2) Use a deep pan.
www.electrolux.com Food Function Rolls Rolls Temperature (°C) Time (min) Shelf position True Fan Cook- 1601) ing 10 - 25 3 Conventional Cooking 10 - 25 3 Small cakes / True Fan Cook- 1501) Small cakes (20 ing per tray) 20 - 35 3 Small cakes / Conventional Small cakes (20 Cooking per tray) 1701) 20 - 30 3 190 - 2101) 1) Preheat the oven. 11.
ENGLISH Food Type of food Temperature (°C) Time (min) Shelf position Potato gratin 190 - 210 55 - 80 2 Sweet dishes 180 - 200 45 - 60 2 Ring cake or brioche 160 - 170 50 - 70 1 Plaited bread / bread crown 170 - 190 40 - 50 2 Cake with crumble topping (dry) 160 - 170 20 - 40 3 Biscuits made with yeast dough 160 - 170 20 - 40 2 11.13 Multilevel Baking Use the function True Fan Cooking.
www.electrolux.com Food Temperature (°C) Time (min) Biscuits made with yeast dough 160 - 170 Puff pastries Rolls Shelf position 2 positions 3 positions 30 - 60 1/4 - 170 - 1801) 30 - 50 1/4 - 180 20 - 30 1/4 - 23 - 40 1/4 - Small cakes / 1501) Small cakes (20 per tray) 1) Preheat the oven. 11.14 Slow Cooking Use this function to prepare lean, tender pieces of meat and fish with core temperatures no more than 65 °C.
ENGLISH Food Temperature (°C) Time (min) Shelf position Tarts 180 - 200 40 - 55 1 Spinach flan 160 - 180 45 - 60 1 Quiche Lorraine 170 - 190 45 - 55 1 Swiss Flan 170 - 190 45 - 55 1 Cheesecake 140 - 160 60 - 90 1 Apple cake, covered 150 - 170 50 - 60 1 Vegetable pie 160 - 180 50 - 60 1 Unleavened bread 2301) 10 - 20 2 Puff pastry flan 160 - 1801) 45 - 55 2 Flammekuchen (Piz- 2301) za-like dish from Alsace) 12 - 20 2 Piroggen (Russian version of calzone) 15 - 25 2
www.electrolux.com Food Quantity Function Temperature (°C) Time (min) Shelf position Roast beef or fillet: rare per cm of thickness Turbo Grilling 190 - 2001) 5-6 1 Roast beef or fillet: medium per cm of thickness Turbo Grilling 180 - 1901) 6-8 1 Roast beef or fillet: well done per cm of thickness Turbo Grilling 170 - 1801) 8 - 10 1 1) Preheat the oven. Pork Food Quantity Function Temperature (°C) Time (min) Shelf position Shoulder / Neck / Ham joint 1 - 1.
ENGLISH Game Food Quantity Function Temperature (°C) Time (min) Shelf position Saddle / Leg up to 1 kg of hare Conventional 2301) Cooking 30 - 40 1 Saddle of venison 1.5 - 2 kg Conventional 210 - 220 Cooking 35 - 40 1 Haunch of venison 1.5 - 2 kg Conventional 180 - 200 Cooking 60 - 90 1 Time (min) Shelf position 1) Preheat the oven.
www.electrolux.
ENGLISH Food Temperature (°C) Time (min) Shelf position Lasagne / Cannello- 170 - 190 ni, fresh 35 - 45 2 Lasagne / Cannello- 160 - 180 ni, frozen 40 - 60 2 Oven baked cheese 170 - 190 20 - 30 3 Chicken Wings 20 - 30 2 190 - 210 37 Frozen ready meals Food Function Temperature (°C) Time (min) Temperature (°C) Frozen pizza Conventional Cooking as per manufacturer’s instructions as per manufacturer’s instructions 3 French fries1) (300 - 600 g) Conventional 200 - 220 Cooking or Tur
www.electrolux.com Food Quantity Defrosting time (min) Further defrosting time (min) Comments Strawberries 300 g 30 - 40 10 - 20 - Butter 250 g 30 - 40 10 - 15 - Cream 2 x 200 g 80 - 100 10 - 15 Whip the cream when still slightly frozen in places. Gateau 1.4 kg 60 60 - 11.21 Preserving - Bottom Heat • Use only preserve jars of the same dimensions available on the market. • Do not use jars with twist-off and bayonet type lids or metal tins.
ENGLISH Food Temperature (°C) Cooking time until Continue to cook simmering (min) at 100 °C (min) Kohlrabi / Peas / Asparagus 160 - 170 50 - 60 15 - 20 1) Leave standing in the oven after it is deactivated. 11.22 Drying - True Fan Cooking the door and let it cool down for one night to complete the drying. • Cover trays with grease proof paper or baking parchment.
www.electrolux.
ENGLISH • If you have nonstick accessories, do not clean them using aggressive agents, sharp-edged objects or a dishwasher. It can cause damage to the nonstick coating. 12.2 Removing the shelf supports Before maintenance, make sure that the appliance is cool. There is a risk of burns. To clean the appliance, remove the shelf supports. 1. Pull carefully the supports up and out of the front catch. 41 An acoustic signal sounds when the steam cleaning is completed. Touch a sensor field to stop the signal.
www.electrolux.com WARNING! Be careful when you remove the door from the appliance. The door is heavy. 1. Open the door fully. 2. Fully press the clamping levers (A) on the two door hinges. A A 3. Close the oven door to the first opening position (approximately 70° angle). 4. Hold the door with one hand on each side and pull it away from the appliance at an upwards angle. 5. Put the door with the outer side down on a soft cloth on a stable surface. This is to prevent scratches. 6.
ENGLISH 43 13. TROUBLESHOOTING WARNING! Refer to Safety chapters. 13.1 What to do if... Problem Possible cause Remedy The oven does not heat up. The oven is deactivated. Activate the oven. The oven does not heat up. The clock is not set. Set the clock. The oven does not heat up. The necessary settings are not set. Make sure that the settings are correct. The oven does not heat up. The automatic switch-off is activated. Refer to "Automatic switchoff". The oven does not heat up.
www.electrolux.com Problem Possible cause Remedy The display shows an error code that is not in this table. There is an electrical fault. • Deactivate the oven with the house fuse or the safety switch in the fuse box and activate it again. • If the display shows the error code again, contact the Customer Care Department. 13.2 Service data If you cannot find a solution to the problem yourself, contact your dealer or an Authorised Service Centre. the front frame of the appliance cavity.
ENGLISH EN 60350-1 - Household electric cooking appliances - Part 1: Ranges, ovens, steam ovens and grills - Methods for measuring performance. 14.2 Energy saving The appliance contains features which help you save energy during everyday cooking. • General hints – Make sure that the oven door is closed properly when the appliance operates and keep it closed as much as possible during the cooking. – Use metal dishes to improve the energy saving.
www.electrolux.
ENGLISH 47
867309453-A-282014 www.electrolux.