EN User Manual CombiSteam Deluxe Steam oven EOB8857AA
www.electrolux.com CONTENTS 1. SAFETY INFORMATION....................................................................................3 2. SAFETY INSTRUCTIONS..................................................................................4 3. PRODUCT DESCRIPTION................................................................................ 7 4. CONTROL PANEL............................................................................................. 8 5. BEFORE FIRST USE...............................
ENGLISH 1. 3 SAFETY INFORMATION Before the installation and use of the appliance, carefully read the supplied instructions. The manufacturer is not responsible for any injuries or damages that are the result of incorrect installation or usage. Always keep the instructions in a safe and accessible location for future reference. 1.
www.electrolux.com • • • • • • • • Always use oven gloves to remove or put in accessories or ovenware. Before carrying out any maintenance, disconnect the appliance from the power supply. Ensure that the appliance is switched off before replacing the lamp to avoid the possibility of electric shock. Do not use a steam cleaner to clean the appliance.
ENGLISH • • • • • • • • • • • electrical ratings of the mains power supply. Always use a correctly installed shockproof socket. Do not use multi-plug adapters and extension cables. Make sure not to cause damage to the mains plug and to the mains cable. Should the mains cable need to be replaced, this must be carried out by our Authorised Service Centre. Do not let mains cables touch or come near the appliance door, especially when the door is hot.
www.electrolux.com sure the door is never closed when the appliance is in operation. Heat and moisture can build up behind a closed furniture panel and cause subsequent damage to the appliance, the housing unit or the floor. Do not close the furniture panel until the appliance has cooled down completely after use. 2.4 Steam Cooking WARNING! Risk of burns and damage to the appliance. • Released Steam can cause burns: – Be careful when you open the appliance door when the function is activated.
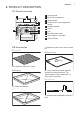
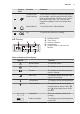
ENGLISH 3. PRODUCT DESCRIPTION 3.1 General overview 1 2 3 4 5 5 6 4 10 3 7 2 8 1 1 2 3 4 5 6 7 8 9 10 Control panel Electronic programmer Water drawer Socket for the core temperature sensor Heating element Lamp Fan Descaling pipe outlet Shelf support, removable Shelf positions 9 3.2 Accessories Wire shelf To bake and roast or as a pan to collect fat. Patisserie tray ≤ 5 kg For cookware, cake tins, roasts. Baking tray For rolls, pretzels and small pastries. Suitable for steam functions.
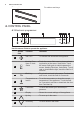
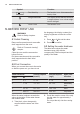
www.electrolux.com For shelves and trays. Telescopic runners 4. CONTROL PANEL 4.1 Electronic programmer 1 2 3 4 5 6 7 8 9 10 11 Use the sensor fields to operate the appliance. Sensor field 1 2 3 5 7 8 Comment ON / OFF To activate and deactivate the appliance. Heating Func‐ tions or Vario‐ Guide Touch the sensor field once to choose a heat‐ ing function or the menu: VarioGuide. Touch the sensor field again to switch between the menus: Heating Functions, VarioGuide.
ENGLISH Sensor field Function Comment Time and addi‐ tional functions To set different functions. When a heating func‐ tion operates, touch the sensor field to set the timer or the functions: Function Lock, Favour‐ ites, Heat + Hold, Set + Go. You can also change the settings of the core temperature sensor. Minute Minder To set the function: Minute Minder. OK To confirm the selection or setting. 9 10 11 4.2 Display A 9 B C E D A. B. C. D. E.
www.electrolux.com Symbol Function Fast Heat Up The function is on. It decreases the heat up time. Weight Automatic The display shows that the automat‐ ic weight system is on or that weight can be changed. Heat + Hold The function is on. 5. BEFORE FIRST USE WARNING! Refer to Safety chapters. the language, the display contrast, the display brightness and the time of the day. 5.1 Initial Cleaning 1. Press or Remove all accessories and removable shelf supports from the oven. 2.
ENGLISH 3. Shake the strip to remove the excess of the water. 4. Wait 1 minute and check the water hardness with the table below. The colours of the reaction zones continue to change. Do not check the water hardness later than 1 minute after test. 5. Set the water hardness: menu: Basic Settings. Test strip Water hardness Test strip 11 Water hardness 2 3 4 You can change the water hardness in the menu: Basic Settings / Water hardness. 1 6. DAILY USE WARNING! Refer to Safety chapters.
www.electrolux.com Submenu for: Basic Settings Symbol / Menu Description item Symbol / Menu Description item Sets the current time Set Time of Day on the clock. Adjusts the volume of Buzzer Volume press-tones and sig‐ nals by degrees. When ON, the dis‐ Time Indication play shows the cur‐ rent time when you deactivate the appli‐ ance. Activates and deacti‐ vates the tone of the touch fields. It is not possible to deactivate the tone of the ON / OFF touch field.
ENGLISH Symbol 13 Menu item Description Descaling Procedure for cleaning the steam gener‐ ation circuit from residual limestone. Rinsing Procedure for rinsing and cleaning the steam generation circuit after frequent use of the steam functions. 6.4 Heating Functions Heating func‐ tion True Fan Cooking Pizza Setting Application To bake on up to three shelf positions at the same time and to dry food. Set the tempera‐ ture 20 - 40 °C lower than for the function: Conventional Cooking.
www.electrolux.com Heating func‐ tion Application This function is de‐ signed to save energy Moist Fan Bak‐ during cooking. For the cooking instruc‐ ing tions refer to "Hints and tips" chapter, Moist Fan Baking. The oven door should be closed during cooking so that the function is not interrupted and to ensure that the oven operates with the high‐ est energy efficiency possible. When you use this function, the temperature in the cavity may differ from the set temperature. The residual heat is used.
ENGLISH Heating func‐ tion Steam Regen‐ erating Application Food reheating with steam prevents sur‐ face drying. Heat is distributed in a gentle and even way, which allows to recover taste and aroma of food as just prepared. This function can be used to reheat food directly on a plate. You can reheat more than one plate at the same time, using dif‐ ferent shelf positions.
www.electrolux.
ENGLISH Dish Dish Swiss Tarte, sa‐ voury - Quiche Lorraine - Savory Flan - Food Category: Cake/Pastry Brownies - Swiss Roll - Yeast Cake - Crumble Cake - Sugar Cake - Dish Ring Cake - Apple Cake, cov‐ ered - Sponge Cake - Apple Pie - Cheese Cake, Tin - Brioche - Madeira Cake - Tarte - Flan Base Short Pastry Flan Base Sponge Mixture Flan Base Short Pastry Fruit Flan Fruit Flan Sponge Mixture Fruit Flan Yeast Dough Food Category: Bread/Rolls Dish Swiss Tarte, sweet - R
www.electrolux.
ENGLISH 6.7 Setting a heating function 1. Turn on the oven. to confirm. 2. Press 3. Set the temperature. 4. Press to confirm. 6.8 Steam cooking The water drawer cover is in the control panel. WARNING! Use only cold tap water. Do not use filtered (demineralised) or distilled water. Do not use other liquids. Do not put flammable or alcoholic liquids into the water drawer. 1. Press the cover of the water drawer to open it. 2.
www.electrolux.com 7. CLOCK FUNCTIONS 7.1 Clock functions table Clock func‐ tion Minute Minder 7.2 Setting the clock functions Before you use the functions: Duration, End Time, you must set a heating function and temperature first. The oven turns off automatically. You can use the functions: Duration and End Time at the same time if you want to automatically turn on and turn off the oven on a given time later. The functions: Duration and End Time do not work when you use the core temperature sensor.
ENGLISH 21 When the function ends, a signal sounds. The function stays on if you change the heating function. 1. When the cooking time ends, a signal sounds. Press any symbol. The display shows the message. 7.4 Time Extension 2. Press to turn on or to cancel. 3. Set the length of the function. The function: Time Extension makes the heating function continue after the end of Duration. 4. Press . Not applicable to heating functions with the core temperature sensor. 8.
www.electrolux.com 2. Insert the tip of the core temperature sensor into the centre of meat or fish, in the thickest part if possible. Make sure that at least 3/4 of the core temperature sensor is inside of the dish. 3. Put the plug of the core temperature sensor into the socket located in the front frame of the appliance. WARNING! There is a risk of burns as the core temperature sensor becomes hot. Be careful when you unplug it and remove it from the food. Food category: casserole 1.
ENGLISH 23 Baking tray/ Deep pan: The display shows the core temperature sensor symbol. Push the baking tray / deep pan between the guide bars of the shelf support. 6. Press or in less than 5 seconds to set the food core temperature. 7. Set a heating function and, if necessary, the oven temperature. 8. To change the food core temperature, press . When the dish is at the set temperature, an acoustic signal sounds. The appliance deactivates automatically. 9. Touch any symbol to stop the signal. 10.
www.electrolux.com 9.3 Telescopic runners inserting the accessories With the telescopic runners you can put in and remove the shelves more easily. Deep pan: Put the deep pan on the telescopic runners. CAUTION! Do not clean the telescopic runners in the dishwasher. Do not lubricate the telescopic runners. CAUTION! Make sure you push back the telescopic runners fully in the oven before you close the oven door.
ENGLISH 10. Press and hold to save. You can overwrite a memory position. When the display shows the first free memory position, press or and 10.4 Set + Go The function lets you set a heating function (or a programme) and use it later with one press of any symbol. press to overwrite an existing programme. 1. Turn on the oven. 2. Set a heating function. You can change the name of a programme in the menu: Edit Programme Name. again and again until the 3. Press display shows: Duration. 4. Set the time.
www.electrolux.com • display is lower between 10 PM and 6 AM. Day brightness: – when the oven is turned on. – if you touch a symbol during the night brightness (apart from ON / OFF), the display goes back to the day brightness mode for the next 10 seconds. – if the oven is turned off and you set the function: Minute Minder. When the function ends, the display goes back to the night brightness. 10.
ENGLISH use it to cook, warm, defrost, poach or blanch vegetables, meat, fish, pasta, rice, semolina and eggs. You can prepare a full meal at one time. Cook together dishes with similar cooking times. Use the largest quantity of water required when you cook dishes at one time. Use the second shelf position. Set the temperature to 99 °C unless the below table recommends different setting.
www.electrolux.com Food Time (min) Food Time (min) Bread dumpling 35 - 45 55 - 60 Potato dumplings 35 - 45 Lentils, brown and green (water / lentils ratio 2:1) Rice (water / rice ratio 1:1)1) 35 - 45 Polenta (liquid ratio 3:1) 40 - 50 Rice pudding (milk / rice ra‐ tio 2.5:1) 40 - 55 1) The ratio of water to rice can change ac‐ cording to the type of rice.
ENGLISH Food Temperature (°C) Time (min) Tafelspitz (prime boiled beef) 99 110 - 120 Eggs • Food Time (min) Eggs, soft-boiled 10 - 11 Eggs, mediumboiled 12 - 13 Eggs, hard-boiled 18 - 21 • • • 11.5 Turbo Grilling and Full Steam combined 29 Set the function: Turbo Grilling to roast meet. Add the prepared vegetables and side dishes. Cool down the oven to a temperature of around 90 °C. You can open the oven door to the first position for approximately 15 minutes.
www.electrolux.com Food Tempera‐ ture (°C) Time (min) Food Tempera‐ ture (°C) Time (min) Terrine 90 40 - 50 90 30 - 40 Thin fish fillet 85 15 - 25 Whole fish up to 1 kg Thick fish fillet 90 25 - 35 Oven dump‐ lings 120 - 130 40 - 50 Small fish up to 0.35 kg 90 20 - 30 11.
ENGLISH 31 11.8 Steam Regenerating Food Temperature (°C) Time (min) Shelf position One-plate dishes 110 10 - 15 2 Pasta 110 10 - 15 2 Rice 110 10 - 15 2 Dumplings 110 15 - 25 2 11.9 Baking • • • Use the lower temperature the first time. You can extend baking times by 10 – 15 minutes if you bake cakes on more than one shelf position. Cakes and pastries at different heights do not always brown equally. • There is no need to change the temperature setting if an unequal browning occurs.
www.electrolux.com 11.11 Baking on one level Baking in tins Food Function Temperature (°C) Time (min) Shelf position Ring cake / Brioche True Fan Cooking 150 - 160 50 - 70 1 Madeira cake / Fruit cakes True Fan Cooking 140 - 160 70 - 90 1 Flan base short pastry True Fan Cooking 150 - 1601) 20 - 30 2 Flan base True Fan sponge mixture Cooking 150 - 170 20 - 25 2 Cheesecake 170 - 190 60 - 90 1 Conventional Cooking 1) Preheat the oven.
ENGLISH Food Function 33 Temperature (°C) Time (min) Shelf position 160 - 1801) 40 - 60 3 Temperature (°C) Time (min) Shelf position Short pastry / True Fan Cook‐ 150 - 160 sponge mixture ing 15 - 25 3 Meringues True Fan Cook‐ 80 - 100 ing 120 - 150 3 Macaroons True Fan Cook‐ 100 - 120 ing 30 - 50 3 Yeast dough biscuits True Fan Cook‐ 150 - 160 ing 20 - 40 3 Puff pastries True Fan Cook‐ 170 - 1801) ing 20 - 30 3 Rolls Conventional Cooking 190 - 2101) 10 - 25 3 Yeast cake
www.electrolux.com Food Function Temperature (°C) Stuffed vegeta‐ True Fan Cook‐ 160 - 170 bles ing Time (min) Shelf position 30 - 60 1 1) Preheat the oven. 11.
ENGLISH 35 Biscuits Food Temperature (°C) Time (min) Shelf position 2 positions 3 positions Short pastry / 150 - 160 sponge mixture biscuits 20 - 40 1/4 1/3/5 Meringues 80 - 100 130 - 170 1/4 - Macaroons 100 - 120 40 - 80 1/4 - Yeast dough biscuits 160 - 170 30 - 60 1/4 - Puff pastries 170 - 1801) 30 - 50 1/4 - Rolls 180 20 - 30 1/4 - 1) Preheat the oven. 11.
www.electrolux.com Turn the roast after 1/2 - 2/3 of the cooking time. • To keep meat more succulent: • roast lean meat in the roasting tin with the lid or use roasting bag. • roast meat and fish in large pieces (1 kg or more). baste large roasts and poultry with their juices several times during roasting. 11.17 Roasting Beef Food Quantity (kg) Function Temperature (°C) Time (min) Braised meet 1 - 1.
ENGLISH 37 Game Food Quantity (kg) Function Temperature (°C) Time (min) Saddle / Leg of 1 hare Turbo Grilling 180 - 2001) 35 - 55 Saddle of veni‐ son 1.5 - 2 Conventional Cooking 180 - 200 60 - 90 Haunch of ven‐ 1.5 - 2 ison Conventional Cooking 180 - 200 60 - 90 Function Temperature (°C) Time (min) Poultry portions 0.2 - 0.25 Turbo Grilling 200 - 220 30 - 50 Half chicken 0.4 - 0.5 Turbo Grilling 190 - 210 40 - 50 Chicken, pou‐ lard 1 - 1.
www.electrolux.com Food Temperature (°C) Time (min) 1st side 2nd side 210 - 230 25 - 35 20 - 25 3 Whole Fish, 0.5 210 - 230 - 1 kg 15 - 30 15 - 30 3/4 Back of lamb Shelf position Fast Grilling Preheat the empty oven for 3 minutes. Grill with the maximum temperature setting. Food Time (min) Shelf position 1st side 2nd side Pork fillet 10 - 12 6 - 10 4 Sausages 10 - 12 6-8 4 Fillet / Veal steaks 7 - 10 6-8 4 Toast with topping 6-8 - 4 11.
ENGLISH 39 Frozen ready meals Food Function Temperature (°C) Time (min) Shelf position Frozen pizza Conventional Cooking as per manu‐ facturer’s in‐ structions as per manu‐ facturer’s in‐ structions 3 French fries1) (300 - 600 g) Conventional 200 - 220 Cooking or Tur‐ bo Grilling as per manu‐ facturer’s in‐ structions 3 Baguettes Conventional Cooking as per manu‐ facturer’s in‐ structions as per manu‐ facturer’s in‐ structions 3 Fruit flans Conventional Cooking as per manu‐ facturer’s
www.electrolux.com When the liquid in the jars starts to simmer (after approximately 35 - 60 minutes with one-litre jars), stop the oven or decrease the temperature to 100 °C (see the table).
ENGLISH Food Temperature (°C) Time (h) 40 - 50 Shelf position 1 position 2 positions 2-3 3 1/4 Temperature (°C) Time (h) Shelf position Plums 60 - 70 Apricots Herbs Fruit Food 1 position 2 positions 8 - 10 3 1/4 60 - 70 8 - 10 3 1/4 Apple slices 60 - 70 6-8 3 1/4 Pears 60 - 70 6-9 3 1/4 11.23 Bread Baking Preheating is not recommended.
www.electrolux.
ENGLISH Fish (salmon, trout, zander) Fish (whole / large / steamed), Fish (whole / large / roasted) Food core temperature (°C) Less Medium More 60 64 68 Casseroles - Precooked vege‐ Food core temperature (°C) tables Less Medium Zucchini Casserole, Broccoli Casserole, Fennel Casserole 85 Casseroles - Savoury Food core temperature (°C) 88 More 91 Less Medium More Cannelloni, Lasagne, Pasta bake 85 88 91 Casseroles - Sweet Food core temperature (°C) White bread casserole with / without f
www.electrolux.com Baking on one level. Biscuits Use the third shelf position. Food Function Temperature (°C) Time (min) Short bread / Pastry stripes True Fan Cooking 140 25 - 40 Short bread / Pastry stripes Top / Bottom Heat 1601) 20 - 30 Small cakes (20 per tray) True Fan Cooking 1501) 20 - 35 Small cakes (20 per tray) Top / Bottom Heat 1701) 20 - 30 1) Preheat the oven. Multilevel Baking.
ENGLISH 11.26 Information for test institutes 45 Tests according to IEC 60350-1. Tests for the function: Full Steam. Food Container (Gastro‐ norm) Broccoli1) Quantity (g) Shelf po‐ Temper‐ Time sition ature (min) (°C) Comments 1 x 1/2 per‐ 300 forated 3 99 13 - 15 Put the bak‐ ing tray on the first shelf posi‐ tion. Broccoli1) 2 x 1/2 per‐ 2 x 300 forated 2 and 4 99 13 - 15 Put the bak‐ ing tray on the first shelf posi‐ tion. Broccoli1) 1 x 1/2 per‐ max.
www.electrolux.com 12.2 Recommended cleaning products Do not use abrasive sponges or aggressive detergents. It can cause damage to the enamel and the stainless steel parts. You can buy our products at www.electrolux.com/shop and at the best retailer shops. 12.3 Removing the shelf supports Before maintenance, make sure that the oven is cool. There is a risk of burns. To clean the oven, remove the shelf supports. 1. Pull carefully the supports up and out of the front catch. 1 3 2 2.
ENGLISH 12.6 Steam generation system - Descaling When the steam generator operates, limestone accumulates inside it (because of calcium contents in the water). This can have a negative effect on the steam quality, on the performance of the steam generator and on the food quality. To prevent limestone accumulation, clean the steam generation circuit. 47 Remove the grill- / roasting pan after the end of the procedure.
www.electrolux.com 2. Remove the water and vinegar with the sponge. 3. Put clean water (100 - 200 ml) into the water drawer to flush the steam generation system. 4. Remove the water from the steam generator with the sponge and rub it dry. 5. Keep the door open to let the appliance dry fully. 12.11 Removing and installing the door 12.9 Steam generation system - Rinsing 1. Open the door fully. 2. Fully press the clamping levers (A) on the two door hinges.
ENGLISH 49 The top lamp 1. Turn the lamp glass cover to remove it. 9. Clean the glass panel with water and soap. Dry the glass panel carefully. When the cleaning is completed, do the above steps in the opposite sequence. Install the smaller panel first, then the larger and the door. WARNING! Make sure that the glasses are inserted in the correct position otherwise the surface of the door may overheat. 12.12 Replacing the lamp WARNING! Risk of electric shock. The lamp can be hot. 1. Turn off the oven.
www.electrolux.com Problem Possible cause Remedy The oven does not heat up. The clock is not set. Set the clock. The oven does not heat up. The necessary settings are Make sure that the settings not set. are correct. The oven does not heat up. The automatic switch-off is Refer to "Automatic switchon. off". The oven does not heat up. The Child Lock is on. The oven does not heat up. The door is not closed cor‐ Fully close the door. rectly. The oven does not heat up. The fuse is blown.
ENGLISH 51 Problem Possible cause Remedy There is no water inside the grill- / roasting pan af‐ ter the descaling proce‐ dure. You did not fill the water drawer to the maximum level. Check if the a descaling agent / water is present in the water drawer body. Repeat the procedure. There is dirty water on the bottom of the cavity after the descaling cycle. The grill- / roasting pan is on a wrong shelf position. Remove the residual water and the descaling agent from the bottom of the oven.
www.electrolux.com We recommend that you write the data here: Model (MOD.) ......................................... Product number (PNC) ......................................... Serial number (S.N.) ......................................... 14. ENERGY EFFICIENCY 14.1 Product Fiche and information according to EU 65-66/2014 Supplier's name Electrolux Model identification EOB8857AAX Energy Efficiency Index 81.
ENGLISH Residual heat If a programme with the Duration or End Time selection is activated and the cooking time is longer than 30 minutes, the heating elements automatically deactivate earlier in some oven functions. The fan and lamp continue to operate. Keep food warm Choose the lowest possible temperature setting to use residual heat and keep a meal warm. The residual heat indicator or temperature appears on the display. 53 Cooking with the lamp off Turn off the lamp during cooking.
www.electrolux.
ENGLISH 55
867314666-E-342018 www.electrolux.