I N F O EOB 854 Built-in Oven DEJ-K/RD-SD - 970505 Instruction and Installation Manual GB 319 2881-01
This manual will also be printed in the ITALIAN language.
Contents Important hints on safety . . . . . . . . . . . . . . . . . . . . . . . . . . . . . . . . . . . . . . . . . . . . . . . . . . . . . . . . . . . . . . . . . . . .
Important hints on safety The oven bottom must not be covered with alu-foil. The heat will accumulate and may cause damage to the material. Prior to first use of the appliance do make yourself familiar with the instruction manual. Pay special attention to the hints on safety marked with a . This will prevent from damages to persons as well as to the appliance itself. When taking out the hot items do absolutely make use of pot or thermo-gloves.
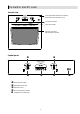
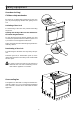
The built-in electric oven Overall view control panel with switches for function, temperature and electronic clock locking mechanism oven-door handle full glass oven door with inspection window Control panel Ë Ê Ë Ì Ê Oven function switch Ë Illuminated scale discs Ì Electronic clock Í Oven temperature selector Î Temperature control lamp 5 Í Î
Safety equipment Oven door locking / Children safety mechanism By means of an interlocking mechanism for the oven you can prevent playing children from getting access to it. Activating of door lock For interlocking of the oven door pull the interlocking tongue out. Opening and closing of the oven door with activated interlocking mechanism. To open the door push the tongue upwards, the door can easily be opened. Make use of thermo-gloves or of a pot cloth in case the appliance will be hot.
Prior to the first use Daytime setting When the oven has been connected to the mains and after failure of electricity, the time display of the electronic autotimer flashes 0.00 and AUTO. The present daytime has to be set. Without this, the oven cannot be used. The time display covers the range from 0.01 to 24.00 hours. . Push buttons hold it. . At a time set the present daytime by pushing button forwards or button backwards.
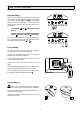
Oven switches Oven function switch The function switch can be turned to the left and to the right to the desired position. The oven illumination ist switched on with position and at a time with all oven functions. Oven illumination Hot-air Pizza function Turbo grill Infrared grill Infrared large surface grill Top heat Bottom heat Top and bottom heat Oven temperature selector 275 The temperature selector knob is switched on by turning to the right from 50 to 275 oC.
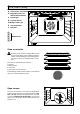
The oven cavity A Oven runners, removable B Separation panel, rear D element and fan behind C C Infrared grill E D Top heat element 5 C+D Large surface grill E oven illumination 4 E A F type plate B A 5 4 3 3 2 1 Runner level 2 1 F Oven accessories Besides the accessories supplied with the unit do exclusively make use of suitable and temperature--resistant baking tins and roasting dishes. Do please follow the manufacturers’ instructions.
Application of the oven functions Top- and bottom heat Heating elementes installed under the oven bottom and at the oven ceiling respectiveley give off radiant heat to the food. Any temperature between 50 and 275 oC can be set. Baking and roasting using top and bottom heat is only possible at one level. Top heat The radiant heat from the element at the oven ceiling is used for follow-up baking, overbaking and gratinating. 180 oC can be reached at maximum.
Grilling During grill operation the oven always has to be closed. When grilling, do not leave the appliance unsupervised. Set the function switch to the selected grilling function. Which grilling function is to select depends on the amount and the height of the grill food. The temperature can be adapted to the particular food, as the oven thermostat holds the temperature within the set range also during grill operations.
Turbo grill For high roasts such as pork loin, leg or poultry it is advisable to select the function turbo grill with temperature settings of about 150 to 190 oC. The infra--red grill operates along with the fan. In this way, not only the surface of the grill food is browned and grilled, but the grill heat is led intensively to all sides of the grill food. Insert the drip pan into runner level 1 or 2 and the wire shelf with the grilling food into the runner above.
Temperature selection For this purpose and before insertion of the items the oven is heated up until the temperature signal lamp goes out. The hot air function is faster than ordinary functions in supplying the food with heat. Therefore, set the temperature by about 25 oC lower than recommended in reciepes for top and bottom heat. Baking with hot air and top-/ bottom heat Hint: The household appliance dealer is offering baking / roasting thermometers for the indication of the state of cooking.
Electronic clock Electronic clock functions D Daytime The adjustment is described on page 7 D Short--term alarm D Switch--off automatism D Switch--on/off automatism STOP The clock is manipulated by 3 program buttons, two setting buttons and the changeover button. program buttons setting buttons changeover button Start-up phase After pushing of a programming button the next setting may be made within 5 seconds. Afterwards the daytime appears on the display again.
Switch--off automatism = terminates the cooking duration set by automatic switch--off of the oven . Items to be cooked to be put into the oven. . Set function and temperature switch . Push program button . and set the desired duration of cooking by setting buttons and . STOP During the sequence of the duration of cooking symbols and AUTO are lighting up.
The oven illumination and the function are switched off, symbol AUTO is on from the start to the end of the duration of cooking. After actuation of button the duration of cooking set and after actuation of button a switch--off time adjusted can be checked in the display and if need varied with setting buttons and . STOP After expiration of the duration of cooking the oven is automatically swithced off. The signal resounds, symgoes out and AUTO flashes. bol .
Roasting Hot-air Kind of roast Temperature °C wire shelve level drip pan level roasting time minutes 160 2 1 14 -- 17 180 2 1 10 -- 12 170 160 2 2 1 1 60 18 200 2 1 200 2 1 180 2 1 6 - 8 rare 8 - 10 medium 8 -- 10 rare 10 - 12 medium 14 -- 17 160 2 1 11 -- 13 1 1 1 1 90 55 -- 60 90 -- 120 150 -- 180 ----------------------------------------- 12 -- 13 Roasts 1 kg pork, per cm of height, well done smoked pork loin per cm of height, well done Mince meat Beaf, per cm of heigh
Baking Top- and bottom heat Hot-air Kind of pastry temperature °C using levels 1 level 2 levels baking time minutes temperature °C using level 3 levels Batter in tins or on sheet High ring cake Frankfurt ring, meddle high Plain cake, loaf tin Fruit cake, on sheet Apple cake, round tin Batter with fruit coating Blitzkuchen Honey cake, on sheet 160 150 150-160 160 160 160 160-170 150 1 2 3 3 2 3 3 3 ----------------------------------------- ----------------------------------------- 70--75 45-55
Top- and bottom heat Hot-air Kind of pastry temperature °C using levels 1 level 2 levels baking time minutes temperature °C using level 3 levels Small pastry Puff pastries Rolls with curd/caraway or poppy seed (aperitif pastries) Yeast dough pastries - with apples Sponge pastries - with fruit T180 ------ 4+2 ------ 20 T190 3 T190 T170 4+2 4+2 4+2 4+2 4+2 5.3.
Infraread and large surface grilling Kind of grilling food for all dishes the oven has to be preheated for 3 minutes 4 -- 8 pork chops Temperature °C Drip pan 275 1 2 -- 4 pork chops 275 1 pork medaillons 270 1 fillet steak 250 1 4 fillet steaks 250 2 half chickens Function in level Wire shelve Minutes side 1 side 2 15 10 12 12 12 12 5 5 4 1 5 6 5 250 1 4 16 16 4 hals chickens 250 1 4 25 18 1 -- 4 chicken tights 250 1 4 15 15 4 -- 6 chicken tights 250 1 4
Useful hints on practical problems practical problem possible cause remedy Items to be baked or roasted would Wrong temperature setting not really rise Check the temperature set with the indications of the chart Items to be baked or roasted would Too low a temperature not become brown Increase the temperature setting, look into the state of cooking, possibly shorten the time Wrong material of tins/moulds With top and bottom heat make use of dark oven tins only.
Cleaning of oven, accessories and fascia No heating element must be switched on during the cleaning procedure. Make sure that the oven has cooled down in a way that one may get in touch with interior parts without any danger. Only the function switch may be switched on for oven lighting. Steam and high--pressure cleaning units are not suitable for cleaning because of the requirements of electrical safety. D Clean enamelled cavity Carefully and regularly clean the appliance in lukewarm or cold state.
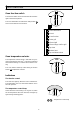
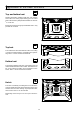
Removal and Installation of the runners For easier cleaning you may remove the entire shelving parts from the oven inside. For this purpose grip the oven runners in the middle, draw off towards the oven center and remove from the oven, lift slightly, if need be. b a Hang in again: Insert the clevis hook and firmly press down. Fold down top heat element For easier cleaning the heating elements under the oven ceiling can be folded down at a slant.
Installation instructions The appliance must exclusively be connected to the mains by an expert electrician. With the installation and in case of a service failure the appliance has to be isolated from the mains. Fuselage to be switched off or removed. The general rules for the operation of electric appliances, the provisions by the competent electricity supply board and the specifications of these instructions for installation have to be strictly adhered to.
With built--in furniture the plastic coating or the veneer respectively and the glue used must be temperature-resistant up to 95°C. Unsuitable plastic coating and non--heat--resistant glues are the reason for possible deformation and loosening of the coating. When in doubt check with the manufacturer of the built--in furniture. With regard to the protection against overheating of surrounding furniture surfaces this appliance corresponds to type Y.
After completion of the mains connection the built--in or --under oven is located in the cupboard and aligned. The screws and plastic sleeves supplied in a bag are to be inserted at the right and left side of the oven frame and the appliance is to be screwed down in the cupboard. Prior to first use remove any possibly existing labels and protective foils from the front of the appliance.
Electric built-in oven EOB 854 Technical data: : Outer dimensions Connected load: Width . . . . . . . . . . . . . . . . . . . . . . 592/540 mm Height . . . . . . . . . . . . . . . . . . . . . 594/579 mm Depth . . . . . . . . . . . . . . . . . . . . . . 567/547 mm Depth with open door . . . . . . . . 1010 mm Top heat . . . . . . . . . . . . . . . . . . . 1000 W Bottom heat . . . . . . . . . . . . . . . . 1000 W Top and bottom heat . . . . . . . . 2000 W Infra-red grill . . . . . . . . . . . . . . . .