Electric ovens INSTRUCTION BOOKLET Please read this instruction booklet before using the appliance Mod.
Important Safety Information You MUST read these warnings carefully before installing or using the oven. If you need assistance, contact our Customer Care Department on 08705 950950 Installation This oven must be installed by qualified personnel to the relevant British Standards. This oven is heavy. Take care when moving it. Remove all packaging, both inside and outside the oven, before using the oven. Do not attempt to modify the oven in any way.
Contents For the User For the Installer Important Safety Information 2 Technical Data 22 Description of the Appliance 4 Electrical Connection 22 Controls 5 Building In 23 Before the First Use 8 Using the Oven 8 Using the Fan Oven 10 Cooking Chart 11 Defrosting 13 Grilling 14 Cleaning the Oven 16 Something not working 18 Service and Spare Parts 19 Guarantee conditions 19 Guide to Use the instructions The following symbols will be found in the text to guide you throughout the
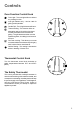
Description of the Appliance Electronic timer Mains on Light Thermostat Control Light Oven Function Control Knob Thermostat Control Knob Control Panel Grill Element Rating Plate Oven door Accessories Grill/ Roasting pan Grill trivet Removable handles Anti-tip shelf (x 2) 4
Controls Oven Function Control Knob Oven Light - The oven light will be on without any cooking function. Inner grill element only - can be used for grilling small quantities. Double Grill - The full grill element will be on. Thermal Grilling - This function offers an alternative method of cooking food items, normally associated with conventional grilling. The grill element and the oven fan operate together, circulating hot air around the food.
24 hour Clock and Timer Minute minder Cookpot symbol Cooking duration A U T O End of cooking time Manual function A U T O - + Cookpot symbol - This will be displayed when a program is in operation. Auto symbol - This will be displayed when the oven has been programmed for automatic operation. Time setting knob - + Programming controls The electronic timer can indicate the time of day, operate as a minute minder and automatically operate the oven.
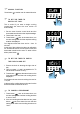
F MANUAL FUNCTION Press button to set the oven for manual function. - + F TO SET THE TIMER TO SWITCH OFF ONLY This is useful if you want to begin cooking immediately but have the oven switch off automatically. 1. Set the oven function control knob and the thermostat control knob on the required settings. 2. Place food in the oven. 3. Press button and, at the same time, turn the time setting knob until the required cooking duration is displayed. Our diagram shows the timer set for 1 hour 10 minutes.
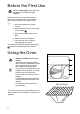
Before the First Use Remove all packaging, both inside and outside the oven, before using the appliance. Before first use, the oven should be heated without food. During this time, an unpleasant odour may be emitted. This is quite normal. F 1. Set the programmer to manual function. 2. Switch the oven function control knob to fan cooking . 3. Set the thermostat control knob to MAX. 4. Open a window for ventilation. 5. Allow the oven to run empty for approximately 45 minutes.
Hints and Tips Condensation and steam When food is heated it produces steam in the same way as a boiling kettle. The oven vents allow some of this steam to escape. However, always stand back from the oven when opening the oven door to allow any build up of steam or heat to release. If the steam comes into contact with a cool surface on the outside of the oven, e.g. a trim, it will condense and produce water droplets. This is quite normal and is not a fault with the oven.
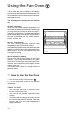
Using the Fan Oven The air inside the oven is heated by the element around the fan situated behind the back panel. The fan circulates hot air to maintain an even temperature inside the oven. The advantages of cooking with this function are: lFaster Preheating As the fan oven quickly reaches temperature, it is not usually necessary to preheat the oven although you may find that you need to allow an extra 5-7 minutes on cooking times.
Cooking Chart This chart is intended as a guide only. It may be necessary to increase or decrease the temperature to suit your individual requirements. Only experience will enable you to determine the correct setting for your personal requirements.
Hints and Tips Runner positions are not critical, but make sure the shelves are evenly spread. When cooking more than one dish in the fan oven, place dishes centrally on the shelves rather than several dishes on one shelf. When the oven is full, you may need to allow slightly longer cooking time. A shelf may be placed on the floor of the oven. Place dishes on a shelf in this position rather than on the oven base, to allow air circulation around the food. When the oven is full of the same food, e.g.
Defrosting Hints and Tips The oven fan operates without heat and circulates the air, at room temperature, inside the oven. This increases the speed of defrosting. However, please note that the temperature of the kitchen will influence the speed of defrosting. This function is particularly suitable for delicate food which could be damaged by heat, e.g. cream filled gateaux, iced cakes, pastries, bread and other yeast products.
Grilling Grilling must be carried out with the oven door closed. The grill pan handles must be removed from the pan. F How to Use the Grill 1. Turn the oven control function knob on . 2. Turn the thermostat control knob on the required temperature. 3. Adjust the grid and grill pan runner position to allow for different thicknesses of food. Position the food close to the element for faster cooking and further away for more gentle cooking.
Hints and Tips Prepare foods in the same way as for conventional grilling. Brush lean meats and fish lightly with little oil or butter to keep them moist during cooking. A general guide to cooking times is given below but these times may vary slightly depending on the thickness and quantity of food being cooked.
Cleaning the Oven Before cleaning always allow the cooling fan to cool the cooker down before switching off at the electricity supply. The oven should be kept clean at all times. A build-up of fats or other foodstuffs could result in a fire, especially in the grill pan. Cleaning materials Before using any cleaning materials on your oven, check that they are suitable and that their use is recommended by the manufacturer. Cleaners that contain bleach should NOT be used as they may dull the surface finishes.
Replacing The Oven Light If the oven bulb needs replacing, it must comply with the following specifications: - Electric power: 15W, - Electric rate: 230-240 V (50 Hz), - Resistant to temperatures of 300°C, - Connection type: E14 These bulbs are available from your local Service Force Centre. To replace the faulty bulb: 1. Ensure the oven is disconnected from the electrical supply. 2. Push in and turn the glass cover anticlockwise. 3. Remove the faulty bulb and replace with the new one. 4.
Something not working If the appliance is not working correctly, please carry out the following checks, before contacting your local Electrolux Service Force Centre. IMPORTANT: If you call out an engineer to a fault listed below, or to repair a fault caused by incorrect use or installation, a charge will be made even if the appliance is under guarantee. SYMPTOM n The oven does not come on SOLUTION u Check the oven is in manual operation and that both a cooking function and temperature have been selected.
Service and Spare Parts If you require spare parts or an engineer contact your local Service Force Centre by telephoning: 08705-929929 Your call will be routed to the Service Centre covering your post code area. The addresses of Electrolux Service Force Centres are detailed on the following pages.
ELECTROLUX SERVICE FORCE To contact your local Electrolux Service Force Centre telephone 08705 929 929 CHANNEL ISLANDS GUERNSEY Guernsey Electricity PO Box 4 Vale, Guernsey Channel Islands JERSEY Jersey Electricity Company PO Box 45 Queens Road St Helier Jersey Channel Islands JE4 8NY SCOTLAND ABERDEEN (M05) 54 Claremont Street Aberdeen AB10 6RA AUCHTERMUCHY (M03) 33A Burnside Auchtermuchy Fife KY14 7AJ BLANTYRE (M07) Unit 5 Block 2 Auchenraith Industrial Estate Rosendale Way Blantyre G72 0NJ DUMF
ELECTROLUX SERVICE FORCE To contact your local Electrolux Service Force Centre telephone 08705 929 929 MIDLANDS BIRMINGHAM (M18) BOURNE (M44) BRIDGNORTH (M72) 66 Birch Road East, Wyrley Road Industrial Estate Witton Birmingham B67DB Manning Road Ind Estate Pinfold Road Bourne PE10 9HT 65 St.
Technical Data DIMENSIONS OF RECESS DIMENSIONS OF THE OVEN CAVITY Height Width Depth 580 mm. 560-570 mm. 550 mm. Height Width Depth Oven capacity 320 mm. 420 mm. 390 mm. 53.2 litres Heating elements rating Circular heating element 2.08 kW Inner Grill element 1.82 kW Double Grill element 2.66 kW Oven Light 15 W Cooling Fan 25 W Convection Fan 30 W Total Rating 2.70 kW Electrical Connection The oven is designed to be connected to 230-240V (50Hz) electricity supply.
Building In Please ensure that when the oven is installed it is easily accessible for the engineer in the event of a breakdown. BUILDING IN The surround or cabinet into which the oven will be built must comply with these specifications: l the dimensions must be as shown in the relevant diagrams; l the materials must withstand a temperature increase of at least 60°C above the ambient temperature; l proper arrangements must be made for a continuous supply of air to the oven to prevent the oven overheating.
Grafiche MDM - Forlì CUSTOMER CARE Electrolux 55-77 High Street Slough Berkshire, SL1 1DZ Tel: 08705 950950 © Electrolux Household Appliances Limited 2000 The Electrolux Group. The worlds No.1 choice. The Electrolux Group is the worlds largest producer of powered appliances for kitchen, cleaning and outdoor use. More than 55 Group products (such as refrigerators, cookers, washing machines, vacuum cleaners, chain saws and lawn mowers) are sold each year to a value of approx.