EOC5951AAX EOC5951AOX ................................................ .............................................
www.electrolux.com CONTENTS 1. 2. 3. 4. 5. 6. 7. 8. 9. 10. 11. 12. 13. 14. 15. SAFETY INFORMATION . . . . . . . . . . . . . . . . . . . . . . . . . . . . . . . . . . . . . . . . . . . . . . . . . . . 3 SAFETY INSTRUCTIONS . . . . . . . . . . . . . . . . . . . . . . . . . . . . . . . . . . . . . . . . . . . . . . . . . . 4 PRODUCT DESCRIPTION . . . . . . . . . . . . . . . . . . . . . . . . . . . . . . . . . . . . . . . . . . . . . . . . . 7 BEFORE FIRST USE . . . . . . . . . . . . . . . . . . . . . . .
ENGLISH 3 1. SAFETY INFORMATION Before the installation and use of the appliance, carefully read the supplied instructions. The manufacturer is not responsible if an incorrect installation and use causes injuries and damages. Always keep the instructions with the appliance for future reference. 1.1 Children and vulnerable people safety WARNING! Risk of suffocation, injury or permanent disability.
www.electrolux.com • Before maintenance cut the power supply. • Do not use harsh abrasive cleaners or sharp metal scrapers to clean the glass door since they can scratch the surface, which may result in shattering of the glass. • Excess spillage must be removed before the pyrolytic cleaning. Remove all parts from the oven. • Only use the core temperature sensor recommended for this appliance.
ENGLISH • Do not let mains cables to come in touch with the appliance door, specially when the door is hot. • The shock protection of live and insulated parts must be fastened in such a way that it cannot be removed without tools. • Connect the mains plug to the mains socket only at the end of the installation. Make sure that there is access to the mains plug after the installation. • If the mains socket is loose, do not connect the mains plug. • Do not pull the mains cable to disconnect the appliance.
www.electrolux.com • Clean regularly the appliance to prevent the deterioration of the surface material. • Remaining fat or food in the appliance can cause fire. • Clean the appliance with a moist soft cloth. Only use neutral detergents. Do not use abrasive products, abrasive cleaning pads, solvents or metal objects. • If you use an oven spray, obey the safety instructions on the packaging. • Do not clean the catalytic enamel (if applicable) with any kind of detergent.
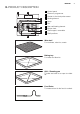
ENGLISH 3. PRODUCT DESCRIPTION 1 1 Control panel 2 2 Electronic programmer 3 4 5 5 4 10 3 6 2 1 7 8 3 Socket for the food probe sensor 4 Heating element 5 Lamp 6 Fan 7 Rear wall heating element 8 Bottom heat 9 Shelf support, removable 10 Shelf positions 9 Wire shelf For cookware, cake tins, roasts. Baking tray For cakes and biscuits. Grill- / Roasting pan To bake and roast or as a pan to collect fat. Food Probe To measure how far the food is cooked.
www.electrolux.com Telescopic runners For shelves and trays. 4. BEFORE FIRST USE WARNING! Refer to the Safety chapters. 4.2 First Connection When you connect the appliance to the mains the display shows a welcome text. You have to set the language (for the first connection only), date and time of the or to adjust the setday. Touch tings. Touch OK to confirm. 4.1 Initial Cleaning • Remove all parts from the appliance. • Clean the appliance before first use. Refer to chapter "Care and Cleaning". 5.
ENGLISH Use the sensor field to operate the appliance. Nu Sensor mb field er Function 1 Right, Left 2 OK Comment To move within the main menu. To confirm or start the set function. To move within the submenus and set the settings in them. 3 4 Down, Up - To set the values: • Slowly: Touch the sensor field one time. • Fast: Hold down the sensor field. Display It shows the current settings of the appliance. 5 Home To cancel the selection and go back to the main menu.
www.electrolux.com Area Comment Can show: • Heating function name and symbol • Automatic programme name and symbol • Temperature(s) • Food Probe status • Help text • Name of the day (only when the appliance is deactivated) • Date 2 Main content area 3 Clock functions area Can show: • Time related information for Clock functions • Time progress indicator 4 Time of day area It shows the time of day.
ENGLISH Symbol Menu item 11 Description My Programmes It contains a list of favourite cooking programmes made by the user. Recipes It contains a list of automatic cooking programmes. Temperature It shows the settings of the appliance. Submenu for: Heating Functions Heating function Description True Fan Cooking To bake maximum on 3 shelf positions at the same time. When you use this function, decrease the appliance temperature by 20 40 °C from the standard temperatures.
www.electrolux.com Heating function Plate Warming Description To preheat a plate for serving. Submenus for: Timers Symbol Submenu Set duration Set start time Set end time Set+Go Count up timer Set reminder Submenus for: Food Probe Symbol Submenu Core temp. 60° Submenus for: Cleaning Symbol Submenu Description Pyrolytic It starts the pyrolytic cleaning procedure. Cleaning reminder It reminds you when to clean the appliance.
ENGLISH Symbol Submenu Description Up key goes To set if the is to scroll up the list or to go to the upper item. Factory settings To set all settings back to factory settings (also My programmes ).
www.electrolux.
ENGLISH 15 7. CLOCK FUNCTIONS Symbol Function Description Set duration To set a count down. Set start time To set when the appliance activates. Set end time To set when the appliance deactivates. Set+Go To set the settings for the heating function and activate it later. Count up timer To set a count up. It shows how long the appliance operates. This function has no effect on the operation of the appliance. Set reminder To set a countdown.
www.electrolux.com 8. AUTOMATIC PROGRAMMES WARNING! Refer to the Safety chapters. The automatic programmes give the optimum settings for each type of meat or other recipes. • Meat programmes with Weight automatic function ( Recipes menu) • Meat programmes with Food Probe automatic function ( Recipes menu) • Recipe automatic function ( Recipes menu) 8.1 Recipes with Weight automatic function This function automatically calculates the roasting time.
ENGLISH The display shows the oven temperature and the core temperature of the food. 1 2 3 6 3. Put the plug of the Food Probe into the socket, which is in the front wall of the appliance. The display shows the Food Probe menu. 4. Touch or to set the core temperature of the food in less than 5 seconds. Go to the Functions menu. 4 5 5. 6. 1 Heating function 2 Food Probe indicator 3 The core temperature of the food 4 The set core temperature of the food 7.
www.electrolux.com 9.2 Inserting the accessories Wire shelf and deep pan together: The deep pan and the wire shelf have side edges. These edges and the shape of the guide-bars are a special device to prevent the cookware from slipping. Wire shelf: Push the shelf between the guide bars of the shelf support and make sure that the feet point down. • All accessories have small indentations at the top of the right and left side to increase safety. The indentations are also anti-tip devices.
ENGLISH 19 Put the wire shelf on the telescopic runners so that the feet point downwards. The high rim around the wire shelf is a special device to prevent the cookware from slipping. 9.4 Inserting the wire shelf and the deep pan together Put the wire shelf on the deep pan. Put the wire shelf and the deep pan on the telescopic runners. 10. ADDITIONAL FUNCTIONS If the memory is full, remove some entries from the menu. 10.
www.electrolux.com 3. Touch and OK at the same time. The display shows a message. The Key lock is active. Deactivating the Key Lock function 1. Touch and OK at the same time. The Key lock is not active. If you deactivate the appliance, the Key lock function deactivates. 10.3 Child lock The Child lock function prevents an accidental operation of the appliance. Activating and deactivating the Child lock function 1. Deactivate the appliance. 2.
ENGLISH 11.3 Baking General instructions • Your new appliance can bake or roast differently to the appliance you had before. Adapt your usual settings (temperature, cooking times) and shelf positions to the values in the tables. • With longer baking times, you can deactivate the appliance approximately 10 minutes before the end of the baking time and then use the residual heat. When you cook frozen food, the trays in the oven can twist during baking.
www.electrolux.com Baking results Possible cause Remedy The cake browns unevenly. The mixture is unevenly distributed. Spread the mixture evenly on the baking tray. The cake is not ready in the baking time given. The temperature in the appliance is too low. The next time you bake, set a slightly higher temperature in the appliance. 11.6 Baking on one level: Baking in tins Type of baking Oven function Shelf position Temperature °C Time (min.
ENGLISH 23 Cakes / pastries / breads on baking trays Type of baking Oven function Shelf position Temperature °C Time (min.) Plaited bread / Bread crown Conventional 3 160 - 180 40 - 60 Christmas stollen Conventional 2 160 - 180 1) 50 - 70 Bread (rye bread): 1. First part of baking procedure. 2. Second part of baking procedure.
www.electrolux.com Type of baking Oven function Shelf position Temperature °C Time (min.) Yeast cakes with delicate toppings (e.g. quark, cream, custard) Conventional 3 160 - 180 1) 40 - 80 Oven function Shelf position Temperature °C Time (min.
ENGLISH 25 Bakes and gratins Oven function Shelf position Temperature °C Time (min.
www.electrolux.com True Fan Cooking Type of baking Shelf position Temperature in °C Time (min.) 2 levels 3 levels Biscuits made with egg white / Meringues 1/4 - 80 - 100 130 - 170 Macaroons 1/4 - 100 - 120 40 - 80 Biscuits made with yeast dough 1/4 - 160 - 170 30 - 60 Puff pastries 1/4 - 170 - 180 1) 30 - 50 Rolls 1/4 - 180 30 - 55 Small cakes / Small cakes (20 per tray) 1/4 - 1501) 25 - 40 1) Preheat the oven. 11.8 Cooking meat and fish 11.
ENGLISH Food to be cooked 27 Weight (g) Shelf position Temperature °C Time in min. Roast beef 1000 - 1500 1 120 120 - 150 Fillet of beef 1000 - 1500 3 120 90 - 150 Roast veal 1000 - 1500 1 120 120 - 150 200 - 300 3 120 20 - 40 Steaks 11.11 Pizza Shelf position Temperature °C Time (min.
www.electrolux.com 11.13 Roasting with Turbo Grill Beef Type of meat Quantity Oven function Shelf position Temperature °C Time (min.) Pot roast 1 - 1.5 kg Conventional 1 230 120 - 150 Roast beef or fillet: rare per cm of thickness Turbo Grill 1 Roast beef or fillet: medium per cm of thickness Turbo Grill 1 Roast beef or fillet: well done per cm of thickness Turbo Grill 1 Type of meat Quantity Oven function Shoulder / Neck / Ham joint 1 - 1.
ENGLISH 29 Game Type of meat Quantity Oven function Shelf position Temperature °C Time (min.) Saddle / Leg of hare up to 1 kg Conventional 1 230 1) 30 - 40 Saddle of venison 1.5 - 2 kg Conventional 1 210 - 220 35 - 40 Haunch of venison 1.5 - 2 kg Conventional 1 180 - 200 60 - 90 Oven function Shelf position Temperature °C Time (min.
www.electrolux.com Food to be grilled Shelf position Temperature Back of pork 2 Back of veal Back of lamb Whole Fish, 500 - 1000 g Time (min.) 1st side 2nd side 210 - 230 30 - 40 30 - 40 2 210 - 230 30 - 40 30 - 40 3 210 - 230 25 - 35 20 - 25 3/4 210 - 230 15 - 30 15 - 30 Fast Grilling Time (min.
ENGLISH 31 11.16 Convenience food True Fan Cooking Convenience food Shelf position Temperature (°C) Time (min.
www.electrolux.com down. After that, complete the drying process.
ENGLISH Stone fruit Temperature in °C Cooking time until simmering (min.) Continue to cook at 100°C (min.) 160 - 170 35 - 45 10 - 15 Temperature in °C Cooking time until simmering (min.) Continue to cook at 100°C (min.) Carrots 1) 160 - 170 50 - 60 5 - 10 Cucumbers 160 - 170 50 - 60 - Mixed pickles 160 - 170 50 - 60 5 - 10 Kohlrabi / Peas / Asparagus 160 - 170 50 - 60 15 - 20 Preserve Pears / Quinces / Plums Vegetables Preserve 1) Leave standing in the oven after it’s deactivated.
www.electrolux.com Food Food Core Temperature °C Roast lamb / Leg of lamb 70 - 75 Game Food Food Core Temperature °C Saddle of hare 70 - 75 Leg of hare 70 - 75 Whole hare 70 - 75 Saddle of venison 70 - 75 Leg of venison 70 - 75 Fish Food Food Core Temperature °C Salmon 65 - 70 Trouts 65 - 70 12. CARE AND CLEANING WARNING! Refer to the Safety chapters. Notes on cleaning: • Clean the front of the appliance with a soft cloth with warm water and a cleaning agent.
ENGLISH When the appliance operates at the preset temperature, the door locks. When the pyrolytic cycle starts, the lamp does not work and the cooling fan works at a higher speed. Do not open the door during the heating up time. If you open the door, you will cancel the pyrolytic cleaning cycle. To stop the pyrolytic cleaning cycle, touch . Do not use the appliance until the door lock symbol is off. 35 12.2 Cleaning reminder It shows you when to do the cleaning.
www.electrolux.com CAUTION! Put a cloth on the bottom of the interior of the appliance. It prevents damage to the lamp glass cover and the cavity. Always use the same lamp type. Replacing the lamp at the cavity ceiling: 1. Turn the lamp glass cover counterclockwise to remove it. 2. Clean the glass cover. 3. Replace the lamp with a suitable 300 °C heat-resistant lamp. 4. Install the glass cover. Replacing the lamp on the left side of the cavity. 1. Remove the left shelf support. 2.
ENGLISH 6. 2 7. B 37 Hold the door trim (B) on the top edge of the door at the two sides and push inwards to release the clip seal. Pull the door trim to the front to remove it. 1 8. 9. Installing the door and the glass panels Hold the door glass panels on their top edge one by one and pull them up out of the guide. Clean the glass panel with water and soap. Dry the glass panel carefully. the above steps in the opposite sequence. Install the smaller panel first, then the larger.
www.electrolux.com Problem Steam and condensation settle on the food and in the appliance. Possible cause Remedy You left the dish in the appli- Do not leave the dishes in ance for too long. the appliance for longer than 15 - 20 minutes after the cooking ends. If you cannot find a solution to the problem yourself, contact your dealer or the service centre. The necessary data for the service centre is on the rating plate. The rating plate is on the front frame of the appliance cavity.
ENGLISH EN 60350-1 - Household electric cooking appliances - Part 1: Ranges, ovens, steam ovens and grills - Methods for measuring performance. 15.2 Energy saving • The appliance contains features which help you save energy during everyday cooking. • • General hints – Make sure that the oven door is closed properly when the appliance operates and keep it closed as much as possible during the cooking. – Use metal dishes to improve the energy saving.
867314803-A-442014 www.electrolux.