user manual Built-In Electric Oven EOC65101
We were thinking of you when we made this product
electrolux 3 Welcome to the world of Electrolux Thank you for choosing a first class product from Electrolux, which hopefully will provide you with lots of pleasure in the future. The Electrolux ambition is to offer a wide variety of quality products that make your life more comfortable. You will find some examples on the cover in this manual. Please take a few minutes to study this manual so that you can take advantage of the benefits of your new machine.
electrolux contents Contents Safety instructions Description of the Appliance Before Using for the first time Using the Oven Uses, Tables and Tips Cleaning and Care What to do if … Installation Instructions Disposal Guarantee/Customer Service Service 5 7 10 12 27 42 52 54 59 60 62 The following symbols are used in this user manual: 1 3 2 Important information concerning your personal safety and information on how to avoid damaging the appliance.
safety instructions electrolux 5 Safety instructions 5 This appliance conforms with the following EU Directives: – 73/23/EEC dated 19.02.1973 Low Voltage Directive – 89/336/EEC dated 03.05.1989 EMC Directive inclusive of Amending Directive 92/31/EEC – 93/68/EEC dated 22.07.1993 CE Marking Directive Electrical safety • This appliance must be only connected by a registered electrician. • In the event of a fault or damage to the appliance: Take the fuses out or switch off.
electrolux safety instructions How to avoid damage to the appliance • Do not line the oven with aluminium foil and do not place baking trays, pots, etc. on the oven floor, as the heat that builds up will damage the oven enamel. • Fruit juices dripping from the baking tray will leave stains, which you will not be able to remove. For very moist cakes, use a deep tray. • Do not put any strain on the oven door when open. • Never pour water directly into the oven when it is hot.
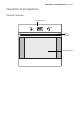
description of the appliance electrolux 7 Description of the Appliance General Overview Control panel Door handle Full glass door
electrolux description of the appliance Control Panel Oven Power Indicator Oven Power Indicator Temperature / Time Display Temperature / Time Selection Oven Functions Clock function buttons Oven Features Top heat and heating elements Oven lighting Shelf positions Fat Filter Fan heating element Fan Bottom Heat Oven shelf runners, removable
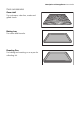
description of the appliance electrolux 9 Oven accessories Oven shelf For cookware, cake tins, roasts and grilled foods. Baking tray For cakes and biscuits. Roasting Pan For baking and roasting or as a pan for collecting fat.
electrolux before using for the first time Before Using for the first time Setting and changing the time The oven only operates when the time has been set. When the appliance has been connected to the electrical supply or when there has been a power cut, the function indicator Time flashes automatically. 1. To change a time that has already been set, press the Selection button repeatedly until the function indicator Time flashes. 2. Using the / current time. control knob, set the After approx.
before using for the first time electrolux 11 Initial Cleaning Before using the oven for the first time you should clean it thoroughly. Caution: Do not use any caustic or abrasive cleaners. The surface could be damaged. To clean metal fronts use commercially available cleaning agents. 1. Set the oven functions dial to Light . 2. Remove all accessories and the shelf support rails and wash them with warm water and washing up liquid. 3. Then wash out the oven with warm water and washing-up liquid, and dry.
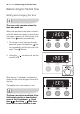
electrolux using the oven Using the Oven Switching the Oven On and Off Oven Power Indicator Temperature / Time Display Oven Power Indicator Heat indicator Pyrolyse time Oven Functions Selection button Change display Temperature / Time Selection
using the oven electrolux 13 Switching the oven on Turn the oven functions selector to the desired function. The power indicator light lights up. The temperature display shows the suggested temperature for the oven function selected. The oven starts to heat up. When the temperature set is reached, an audible signal sounds. Changing the oven temperature Turn the / knob to raise or lower the temperature. The setting changes in 5 °C steps.
electrolux using the oven Cooling fan The fan switches on automatically in order to keep the appliance’s surfaces cool. When the oven is switched off, the fan continues to run to cool the appliance down, then switches itself off automatically. Heat indicator Warming up indicator When the oven function has been switched on the bars that slowly light up one after the other indicate how far the oven has heated up.
using the oven electrolux 15 Oven Functions The oven has the following functions: Oven function Application Heating element/ fan Light Using this function you can light up the oven interior, e.g. for cleaning. --- Convection with ring heating element For roasting and baking on up to three levels at the same time. Set the oven temperatures 20-40 °C lower than when using upper/lower heat. Rear heating element, fan Conventional For baking and roasting on one oven level.
electrolux using the oven Inserting the Oven Shelf, Baking Tray and Roasting Pan Shelf runner safety and anti-tip device As a shelf runner safety device, all insertable components have a small curved indentation at the bottom on the right and left-hand edge. Always insert insertable components so that this indentation is at the back of the oven interior. This indentation is also important for preventing the insertable components from tipping.
using the oven electrolux 17 Inserting the oven shelf and roasting pan together Lay the oven shelf on the roasting pan. Push the roasting pan between the guide bars of the selected oven level. Inserting/Removing the Grease Filter Only use the grease filter when roasting to protect the rear heating elements from fat splashes. Inserting the grease filter Hold the grease filter by the grip and insert the two mounts downwards into the opening on the rear wall of the oven (fan opening).
electrolux using the oven Clock Functions Temperature / Time Display Pyrolyse time Selector Button Change display Cook time To set how long the oven is to be in use. End time To set when the oven is to switch off again. Countdown To set a countdown. A signal sounds after the time has elapsed. This function does not affect the functioning of the oven. Time To set, change or check the time (See also section “Before Using for the First Time”).
using the oven electrolux 19 How to use the clock functions • After a clock function has been selected, the corresponding function indicator flashes for about 5 seconds. During this period, the desired times can be set or modified using the / dial. • When the desired time has been set, the function indicator continues to flash for approx. 5 seconds. After that the function indicator is then lit. The set time begins to run in the background.
electrolux using the oven Countdown 1. Press the Selection button repeatedly until the function indicator Countdown flashes. 2. Using the / control knob set the desired countdown (max. 99.00minutes). The function indicator Countdown lights up. When 90% of the time set has elapsed, an audible signal sounds. When the time has elapsed, ”0.00“ and the function indicator flash. An audible signal sounds. To stop the flashing and the audible signal: Press any button.
using the oven electrolux 21 Cook time 1. Select the oven function and temperature. 2. Press the Selection button repeatedly until the function indicator Cook time flashes. 3. Using the / control knob set the desired cooking time. The function indicator Cook time lights up and the oven comes on immediately. When the time has elapsed, ”0.00“ and the function indicator flash. An audible signal sounds for 2 minutes. The oven switches itself off.
electrolux using the oven End time 1. Select the oven function and temperature. 2. Press the Selection button repeatedly until the End time function indicator flashes. 3. Using the / control knob set the desired switch-off time. The function indicator End time lights up and the oven comes on immediately. When the time has elapsed, ”0.00“ and the function indicator flash. An audible signal sounds for 2 minutes. The ovenswitches itself off.
using the oven electrolux 23 Cook time bined and End time com- Cook time and End time can be used simultaneously, if the oven is to be switched on and off automatically at a later time. 1. Select the oven function and temperature. 2. Using the Cook time function, set the time that the dish needs to cook, In this example, 1 hour. 3. Using the End time function, set the time at which the dish should be ready. In this case, 14:05.
electrolux using the oven Other Functions Switching off the display You can save energy by switching off the clock display. Switching off the clock display 1. Turn the / control knob to the right and hold it. 2. In addition press the Selection button until the display goes out. As soon as the appliance is switched on again, the display comes on automatically. When the appliance is next switched off, the clock display goes out again.
using the oven electrolux 25 Ovenís child safety device The oven is fitted with a child safety device. As soon as the child safety device is activated, the oven cannot be switched on. • The child safety device works only for the oven, not for the cooking rings. • For the child safety device to be activated, none of the oven functions must be selected. Activating the child safety device 1. Turn the / dial to the left and hold it. 2.
electrolux using the oven Oven safety cut-out If not switched off after a certain time, or if the temperature is not modified, the oven switches off automatically. The last temperature set flashes in the temperature display. The oven switches off when the oven temperature is: 30 - 120°C 120 - 200°C 200 - 250°C 250 - max°C after after after after 12.5 hours 8.5 hours 5.5 hours 3.0 hours Switching on after a safety cut-out Switch the oven off completely. It can then be switched on again.
uses, tables and tips electrolux 27 Uses, Tables and Tips Baking Oven function: Convection with ring heating element or Conventional Oven levels • Baking with Conventional is possible on one oven level. • With Convection with ring heating element you can bake on up to 3 baking trays at the same time: 1 baking tray: e.g. oven level 3 1 cake tin: e.g. oven level 1 2 baking trays: z. g.
electrolux uses, tables and tips General Instructions • Insert the tray with the bevel at the front. • With Conventional or Convection with ring heating element you can also bake with two tins next to one another on the oven shelf at the same time. This does not significantly increase baking time. When frozen foods are used the trays inserted may distort during cooking. This is due to the large difference in temperature between the freezing temperature and the temperature in the oven.
uses, tables and tips electrolux 29 Baking table Baking on one oven level Type of baking Oven function Oven Temperature Time level °C Hr: Mins.
electrolux uses, tables and tips Type of baking Oven function Oven Temperature Time level °C Hr: Mins.
uses, tables and tips electrolux 31 Type of baking Oven function Oven Temperature Time level °C Hr: Mins.
electrolux uses, tables and tips Baking on more than one oven level Type of baking Convection with ring heating element Convection with ring heating element Shelf positions from bottom 2 levels Time Hours: Mins.
uses, tables and tips electrolux 33 Tips on Baking Baking results Possible cause Remedy The cake is not browned Wrong oven level enough underneath Place cake lower The cake sinks (becomes Oven temperature too high soggy, lumpy, streaky) Baking time too short Use a slightly lower setting Cake is too dry Cake browns unevenly Cake does not cook in the baking time given Set a longer baking time Baking times cannot be reduced by setting higher temperatures Too much liquid in the mixture Use less liqu
electrolux uses, tables and tips Table Pizza setting Shelf position Temperature °C Time Hr: Mins.
uses, tables and tips electrolux 35 Table for Bakes and Gratins Dish Oven function Shelf position Temperature °C Time Hr: Mins.
electrolux uses, tables and tips Roasting Oven function: Conventional Convection grilling or Roasting dishes • Any heat-resistant ovenware is suitable to use for roasting (please read the manufacturer's instructions). • Large roasting joints can be roasted directly in the roasting tray or on the oven shelf with the roasting tray placed below it. • For all lean meats, we recommend roasting these in a roasting tin with a lid. This will keep the meat more succulent.
uses, tables and tips electrolux 37 Roasting table Type of meat Quantity Shelf Ovenfunction position Temperature °C Time Hours mins. 200-250 2:00-2:30 Beef Pot roast 1-1.5 kg Conventional 1 per cm. of thickness Roast beef or fillet - rare per cm. of thickness Convection grilling 1 1902001) 0:05-0:06 - medium per cm. of thickness Convection grilling 1 180-190 0:06-0:08 - well done per cm. of thickness Convection grilling 1 170-180 0:08-0:10 Shoulder, neck, ham joint 1-1.
electrolux uses, tables and tips Type of meat Quantity Shelf Ovenfunction position Temperature °C Time Hours mins. 1.5-2 kg Conventional 1 200-210 1:30-2:15 Poultry portions 200-250g each Convection grilling 1 200-220 0:35-0:50 Half chicken 400-500g each Convection grilling 1 190-210 0:35-0:50 Chicken, poulard 1-1.5 kg Convection grilling 1 190-210 0:45-1:15 Duck 1.5-2 kg Convection grilling 1 180-200 1:15-1:45 Goose 3.
uses, tables and tips electrolux 39 Grill Sizes Oven function: Grill or Dual grill with maximum temperature setting Important: Always grill with the oven door closed. The empty oven should always be pre-heated with the grill functions for 5 minutes. • For grilling, place the shelf in the recommended shelf position. • Always insert the tray for collecting the fat into the first shelf position from the bottom. • The grilling times are guidelines.
electrolux uses, tables and tips Drying Oven function: Convection with ring heating element • Use oven shelves covered with greaseproof paper or baking parchment. • You get a better result if you switch the oven off halfway through the drying time, open the door and leave the oven to cool down overnight. • After this finish drying the food to be dried.
uses, tables and tips electrolux 41 Making Preserves Oven function: Bottom heat • For preserving, use only commercially available preserve jars of the same size. • Jars with twist-off or bayonet type lids and metal tins are not suitable. • When making preserves, the first shelf position from the bottom is the one most used. • Use the shelf for making preserves. There is enough room on this for up to six 1-litre preserving jars. • The jars should all be filled to the same level and clamped shut.
electrolux cleaning and care Cleaning and Care 1. For cleaning, turn the oven light on. 2. After every use, wipe the oven with a solution of washing-up liquid and allow to dry. Warning: For cleaning, the appliance must be switched off and cooled down. In the event of stubborn dirt, clean using Pyroluxe. Warning: For safety reasons, do not clean the appliance with steam jet or high-pressure cleaning equipment. Attention: Do not use any scouring agents, sharp cleaning tools or scourers.
cleaning and care electrolux 43 Pyrolytic cleaning Warning: The oven gets very hot during this process. Keep small children away. Important: Before carrying out the pyrolytic cleaning process, all removable parts, including the side rails, must be removed from the oven. If you use the oven shelf runners that are available as special accessories, these must be removed before pyrolytic cleaning. If the side rails or oven shelf runners are still in place, ‘C1’ appears in the time display.
electrolux cleaning and care Shelf Support Rails The shelf support rails on the left and right hand sides of the oven can be removed for cleaning the side walls. Removing the shelf support rails First pull the front of the rail away from the oven wall (1) and then unhitch at the back (2).
cleaning and care electrolux 45 Oven Lighting Warning: There is a danger of electric shock! Prior to changing the oven light bulb: – Switch off the oven! – Remove the fuses in the fuse box or switch off the circuit breaker. Place a cloth on the oven floor to protect the oven light and glass cover. Replacing the oven light bulb/cleaning the glass cover 1. Remove the glass cover by turning it anti-clockwise and then clean it. 2.
electrolux cleaning and care Oven door For easier cleaning of the oven interior the oven door of your appliance can be taken off its hinges. Removing the oven door from its hinges 1. Open the oven door as far as it will go. 2. Undo the clamping levers (A) on both door hinges fully. 3. Close the oven door as far as the first position (approx. 45°). 4. Take hold of the oven door with a hand on each side and pull it away from the oven at an upwards angle (Take care: It is heavy).
cleaning and care electrolux 47 Hanging the oven door back on its hinges 1. From the handle side take hold of the oven door with a hand on each side and hold at an angle of approx. 45°. Position the recesses on the bottom of the oven door on the hinges on the oven. Let the door slide down as far as it will go. 2. Open the oven door as far as it will go. 3. Fold up the clamping levers (A) on both door hinges back into their original positions. 4. Close the oven door.
electrolux cleaning and care Oven door glass The oven door is fitted with four panels of glass mounted one behind the other. The inner panels can be removed for cleaning. Important Rough handling, especially around the edges of the front panel, can cause the glass to break. Removing door glass panels 1. Open the oven door as far as it will go. 2. Undo the clamping levers (A) on both door hinges fully. 3. Close the oven door as far as the first position (approx. 45°).
cleaning and care electrolux 49 4. Take hold of the door trim (B) on the upper edge of the door at both sides and press inwards to release the clip seal. Then remove the door trim by pulling it upwards. 5. Take hold of the door glass panels on their upper edge one after the other and take them out of the guide by pulling them upwards. Cleaning the door glass panels Clean the door glass panels thoroughly with a solution of water and washing up liquid. Then dry them carefully.
electrolux cleaning and care 2. Take hold of the door trim (B) at each side, position it on the inside edge of the door and plug the door trim (B) into the upper edge of the door. On the open side of the door trim (B) there is a guide bar (C). This must be pushed between the outer door panel and the guide corner (D). The clip seal (E) must be snapped in.
cleaning and care electrolux 51 3. Open the oven door as far as it will go. 4. Fold up the clamping levers (A) on both door hinges back into their original positions. 5. Close the oven door.
electrolux what to do if … What to do if … Problem The oven does not heat up Possible cause The oven has not been switched on Remedy Switch on the oven The clock has not been set to Set the clock to the current the current time time The required settings have not Check the settings been set The ovenís safety cut-out has been triggered See Oven Safety Cut-out The house wiring fuse (in the fuse box) has tripped Check fuse If the fuses trip several times, please call a qualified electrician The oven
what to do if … electrolux 53 If you are unable to remedy the problem by following the above suggestions, please contact your dealer or the Customer Care Department. Warning! Repairs to the appliance are only to be carried out by qualified service engineers. Considerable danger to the user may result from improper repairs. If the appliance has been wrongly operated, the visit from the customer service technician or dealer may not take place free of charge, even during the warranty period.
electrolux installation instructions Installation Instructions Attention: The new appliance may only be installed and connected by a registered expert. Please comply with this. If you do not, any damage resulting is not covered by the warranty. Safety information for the installer • The electrical installation is to be set up so that the appliance can be isolated from the mains with a minimum 3mm all-pole contact separation. Suitable separation devices include e.g.
installation instructions electrolux 55
electrolux installation instructions
installation instructions electrolux 57
electrolux installation instructions
disposal electrolux 59 Disposal Packaging material The packaging materials are environmentally friendly and can be recycled. The plastic components are identified by markings, e.g. >PE<, >PS<, etc. Please dispose of the packaging materials in the appropriate container at the community waste disposal facilities. Old appliance W on the product or on The symbol its packaging indicates that this product may not be treated as household waste.
electrolux guarantee/customer service Guarantee/Customer Service European Guarantee This appliance is guaranteed by Electrolux in each of the countries listed at the back of this user manual, for the period specified in the appliance guarantee or otherwise by law.
guarantee/customer service electrolux 61 p t b España +34 902 11 63 88 Carretera M-300, Km. 29,900 Alcalá de Henares Madrid France www.electrolux.fr Great Britain +44 8705 929 929 Addington Way, Luton, Bedfordshire LU4 9QQ Hellas +30 23 10 56 19 70 4 Limnou Str., 54627 Thessaloniki Hrvatska +385 1 63 23 338 Slavonska avenija 3, 10000 Zagreb Ireland +353 1 40 90 753 Long Mile Road Dublin 12 Italia +39 (0) 434 558500 C.
electrolux service Service In the event of technical faults, please first check whether you can remedy the problem yourself with the help of the operating instructions (section “What to do if…”). If you were not able to remedy the problem yourself, please contact the Customer Care Department or one of our service partners. In order to be able to assist you quickly, we require the following information: – Model description – Product number (PNC) – Serial number (S No.
www.electrolux.