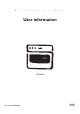
B u i l t - I n E l e c t r i c O v e n User information EOC6630 822 923 239-A-040603-07 g
Dear Customer, Please read this instruction book carefully. Above all, please observe the “safety” section on the first few pages. Please retain this instruction book for later reference. Pass them on to any subsequent owners of the appliance. 1 3 2 The following symbols are used in the text: Safety Instructions Warning: Information concerning your personal safety. Important: Information on how to avoid damaging the appliance. Information and practical tips Environmental information 1.
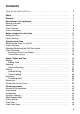
Contents Operating Instructions . . . . . . . . . . . . . . . . . . . . . . . . . . . . . . . . . . . . . 5 Safety . . . . . . . . . . . . . . . . . . . . . . . . . . . . . . . . . . . . . . . . . . . . . . . . . . . . . . . 5 Disposal . . . . . . . . . . . . . . . . . . . . . . . . . . . . . . . . . . . . . . . . . . . . . . . . . . . . . 6 Description of the Appliance . . . . . . . . . . . . . . . . . . . . . . . . . . . . . . . . . . . . General Overview . . . . . . . . . . . . . . . . . . . . . .
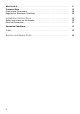
What to do if … . . . . . . . . . . . . . . . . . . . . . . . . . . . . . . . . . . . . . . . . . . . . . . . 47 Technical Data . . . . . . . . . . . . . . . . . . . . . . . . . . . . . . . . . . . . . . . . . . . . . . . . Oven Interior Dimensions . . . . . . . . . . . . . . . . . . . . . . . . . . . . . . . . . . . . . . . . Regulations, Standards, Directives . . . . . . . . . . . . . . . . . . . . . . . . . . . . . . . . . 48 48 48 Installation Instructions . . . . . . . . . . . . . . . . . . . . . .
Operating Instructions 1 Safety Electrical Safety • The appliance may only be connected by a qualified electrican / competent person. • In the event of any faults or damage to the appliance: remove fuses or switch off. • It is not permissible to clean the appliance with a steam or high pressure cleaner for safety reasons! • Repairs to the appliance may only be carried out by specialists. Repairs carried out by inexperienced persons may cause injury or serious malfunctioning.
To Avoid Damaging Your Appliance • Do not line your oven with aluminium foil and do not place a baking tray or dish on the oven floor, otherwise the oven enamel will be damaged by the resulting build up of heat. • Juice from fruit that drips from baking trays will leave marks that cannot be removed. For very moist cakes, use the universal baking tray. • Do not put any weight on the oven door when it is open. • Never pour water directly into the hot oven. The enamel may be damaged.
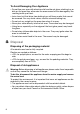
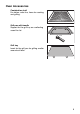
Description of the Appliance General Overview Control panel Door handle Full glass door 7
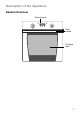
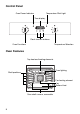
Control Panel Oven Power Indicator Temperature Pilot Light Time display Clock function buttons Temperature Selection Oven Functions Oven Features Top heat and heating elements Oven lighting Shelf positions Fan heating element Fan Bottom Heat Oven shelf runners, removable 8
Oven Accessories Combination shelf For dishes, cake tins, items for roasting and grilling.
Before using for the first time Setting the Time 3 The oven will only function if the time is set. The set time function indicator will flash after the appliance has been connected to the mains or following a power failure. Use the + or - buttons to set the current time. After approx. 5 seconds the function indicator will stop flashing and the clock will show the set time. The appliance is ready for use.
Initial Cleaning 1 3 Before using the oven for the first time you should clean it thoroughly. Caution: Do not use any caustic, abrasive cleaners! The surface could be damaged. To clean any metal front panels use commercially available cleaning agents. 1.Turn the oven function switch to oven lighting L. 2.Remove all accessories and the shelf support rails and wash them with warm water and washing up liquid. 3.Then wash out the oven with warm water and washing-up liquid and dry. 4.
Operating the Oven Switching the Oven On and Off Oven Power Indicator Oven Functions Temperature Pilot Light Temperature Selection 1.Turn the oven functions switch to the required function. 2.Turn the temperature selection switch to the required temperature. The red oven power indicator is illuminated whilst the oven is in use. The red temperature pilot light is only illuminated whilst the oven is heating up. 3.
Oven Functions The oven has the following functions: L Oven lighting With this function you can illuminate the oven interior e.g. for cleaning. The heating element is not in use. ¤ Fan-assisted circulation For roasting and grilling on two shelf positions. Set the oven temperature 20-40 °C lower than for Top/Bottom heat. Top/Bottom heat is on and the fan is also on. ¥ Fan Oven For roasting and baking on up to three levels simultaneously. Set oven temperatures 20-40 °C lower than when using conventional.
A Defrost To begin to thaw and to defrost such items as flan, butter, bread, fruit or other frozen foods. For this function the fan operates without heating. P Pyroluxe For pyrolytic self-cleaning. During this process splashes and deposits are burned in the oven and can be washed off once the oven has cooled. The oven is heated to approx. 500 °C.
Attaching/Removing the Grill Pan Handle The handle is particularly useful for removing the grill pan and tray more easily from the hot oven. 1 Attaching the handle Insert the handle at an angle from above into the recess in the side of the grill pan (1) lift it gently and then lower it (2) until you hear it click into place.
Clock Functions Function Indicators Button - Time Display Function Indicators Selector Button Countdown G To set a countdown. A signal sounds after the time has elapsed. This function does not affect the operation of the oven. Cook time d To set how long the oven is to be in use. End time e To set when the oven is to switch off again. Time W To set, change or check the time (See also section “Before Using for the First Time”).
3 General information • Once a function has been selected the corresponding function indicator will flash for approx. 5 seconds. During this time the required times can be set using the + or - button. • After the required time has been set the function indicator will flash again for approx. 5 seconds. After this the function indicator will stay on. The set time will begin to count down. • The acoustic signal can be deactivated by pressing any button.
Countdown G 1.Press selection button T repeatedly until the countdown function indicator G flashes. 2.Using the + or - button set the required countdown G. (Max. 2 hours and 30 minutes.) After approx. 5 seconds the display will show the remaining time. The countdown function indicator G is illuminated. When the time has expired the function indicator will flash and an acoustic signal will sound for 2 minutes. Press any button to switch off the acoustic signal.
Cook time d 1.Press selection button T repeatedly until the cook time function indicator d flashes. 2.Using buttons + or - set the required cooking time. After approx. 5 seconds the display will revert to the time. The cook time function indicator d is illuminated. When the time has expired the function indicator will flash, an acoustic signal will sound for 2 minutes and the oven will switch off. 3.Switch off the acoustic signal and the programme by pressing any button.
End time e 1.Press selection button T repeatedly until the end time function indicator e flashes. 2.Using buttons + or - set the time at which you want the oven to switch off. After approx. 5 seconds the display will revert to the time. The end time function indicator e is illuminated. When the time has elapsed the function indicator will flash, an acoustic signal will sound for 2 minutes and the oven will switch off. 3.Switch off the acoustic signal and the programme by pressing any button.
3 Cook time d and End time e combined Cook time d and end time e can be used together if the oven is to switch on and off automatically at a later time. 1.Using the cook time d function set the time required for the dish to cook. In this case 1 hour. 2.Using the end time e function set the time at which the dish is to be ready. In this case 14:05. The cook time d and end time e function indicators are illuminated and the time will appear in the display. In this case 12:05.
3 Changing Time W The time can only be changed if neither of the automatic functions (cook time d or end time e) have been set. 1.Press selection button T repeatedly until the time function indicator flashes. 2.Using buttons + or - set the current time. After approx. 5 seconds the function indicator will stop flashing and the clock will show the set time. The appliance is ready for use.
Oven safety cut-out 3 If not switched off after a certain time, or the temperature is not changed, the oven switches off automatically. The red temperature indicator light flashes. The oven switches off at temperatures of: 30 - 120° C 120 - 200° C 200 - 250° C 250 - 275° C after after after after 12,5 hours 8,5 hours 5,5 hours 1,5 hours Switching on again after a safety cut-out Switch the oven off completely. Switch on again and the oven can be operated as normal.
Usage, Tables and Tips Baking For baking use the fan ¥ or conventional oven function ¡. Baking tins • Cake tins made of dark metal and coated tins are suitable for conventional ¡. • Light metal tins, glass and ceramic moulds are also suitable for fan oven ¥. Shelf positions • It is possible to bake on one level using conventional ¡. • Using fan oven ¥ you can bake dry, flat items and biscuits on up to three baking trays simultaneously. 1 Baking tray: e.g., shelf position 3 1 Cake tin: e.g.
General Information • Always count the shelf positions from the bottom upwards. • Insert baking trays with the sloped edge to the front! • Always place cake tins in the middle of the shelf. • Using fan oven ¥ or conventional ¡ you can also bake with two cake tins simultaneously by placing them side by side on the shelf. There is no significant increase in baking time. 3 When frozen foods are used the trays inserted may distort during cooking.
Baking Table The stated baking times are for guidance only. Recommended cooking methods, shelf positions and temperatures are printed in bold type.
Fan Oven ¥ Conventional ¡ Temperature in °C Shelf position Pudding bowl/ringshaped cakes 150-170 1 160-180 1 45-60 Plaited roll/ring, plaited Danish pastry 150-170 3 170-190 3 30-40 Butter cake/sugar cake sugar-topped cakes 160-180 3 190-200* 3 25-30 Sponge cake with crumble topping 150-170 3 180-190 3 20-40 Apple crumble (DIN) 150-170 3 170-190 3 35-50 Cheesecake (tray) 150-170 3 170-190 3 45-50 Fruit loaf (500 g flour) 150-170* 3 160-180* 3 40-70 Pizza 230-250
Fan Oven ¥ Type of pastry or cake Temperature in °C Shelf position Conventional ¡ TemperaShelf ture in °C position Baking time in minutes Shortcrust and rich pastries Swiss apple pie --- --- 210-230* 1 35-50 Swiss cheese pie --- --- 210-230* 1 40-50 Spinach/vegetable quiche, quiche lorraine --- --- 190-210* 1 40-60 Herb bread 170-190* 3 190-210* 3 45-60 Tinned white loaf 170-190* 2 180-200* 1 40-50 --- --- 230-250* 2 15-25 Pasta bake 180-200 1 Potato gratin 180-20
Frozen Foods Fan Oven ¥ + Conventional ¡ Type of pastry Temperature in or cake °C Pizza (frozen) Follow the manufacturer’s instructions as stated on the package Shelf position Baking time in minutes Lay on the grill tray, insert baking tray Follow the manubelow (shelf posifacturer’s instruction in accordance tions as stated on with the manufacthe package turer’s instructions as stated on the package) Also observe the manufacturer’s instructions for all other frozen products.
Roasting Use the rotitherm » or conventional ¡ oven functions for roasting. Ovenware for roasting • Any heat-resistant dish is suitable for roasting (refer to the manufacturer's instructions!). • If the dish has plastic handles, check that they are heat-resistant (refer to manufacturer's instructions!). • Large roasts can be roasted directly on the universal baking tray or on the shelf with the universal baking tray underneath (e.g. turkey, goose, 3-4 chickens, 3-4 knuckles of veal).
Table for Roasting Type of Meat Quantity Conventional ¡ Rotitherm » Time Weight Shelf Position Temperature ºC Shelf Position Temperature ºC Hours: Mins. 1-1.5 kg 1 200-250 - - 2:00-2:30 Beef Pot roast Roast beef or fillet per cm of thickness - red inside per cm of thickness 1 250-270* 1 190-200 0:05-0:06 - pink inside per cm of thickness 1 250-270* 1 180-190 0:06-0:08 - cooked through per cm of thickness 1 210-250* 1 170-180 0:08-0:10 Shoulder, neck ham joint 1-1.
Type of Meat Quantity Conventional ¡ Rotitherm » Time Weight Shelf Position Temperature ºC Shelf Position Leg of lamb, roast lamb 1-1.5 kg 1 210-220 1 150-170 1:15-2:00 Saddle of lamb 1-1.5 kg 1 210-220 1 160-180 1:00-1:30 Whole piece of hare, haunch or jointed hare up to 1 kg 3 220-250* 3 160-170 0:25-0:40 Saddle of venison 1.5-2 kg 1 210-220 1 160-180 1:15-1:45 Haunch of venison 1.
Grilling 1 3 For grilling use the infrared grill ¸ oven function or infrared wide-area grill º with temperature setting. Warning: Always close the oven door when grilling. Always pre-heat the empty oven using the grill functions for 5 minutes! Ovenware for grilling • Use the shelf unit and universal tray together for grilling. Shelf positions • For grilling flat foods you should mostly use the 4th shelf position from the bottom.
Food for grilling Function Temperature in °C Universal tray Grill tray Shelf positions 34 Grilling time in minutes 1st Side 2nd Side 2 Half chicken pieces Infrared grill 250 1 4 15-20 15-20 4 Half chicken pieces Infrared widearea grill 250 1 3 15-20 15-20 1-4 Chicken thighs Infrared widearea grill 250 1 4 20 10 4-6 Chicken thighs Infrared widearea grill 250 1 4 20 15 Grilled sausage, up to 6 items Infrared grill 275 1 4 5-10 5 Grilled sausage, more than 6 items Infr
Thermal grilling Function: Thermal grill ¼ Dish Temperature in °C Universal tray Grill tray Grilling time in minutes Turn after ...
Defrosting To defrost food, use the oven’s defrosting function A without setting a temperature. Defrosting dishes • Put the food on a plate and put the plate on the tray. • Use only parchment paper or film to cover the food. Do not use plates or dishes as they significantly increase the defrosting time. Shelf levels • Insert the shelf in the 1st position from the bottom to defrost. Notes on the defrosting table The table below offers some guidance on defrosting times.
Preserving When preserving use the bottom heat oven function U. Preserving jars • When preserving use only commercially available jars that are the same size. 3 Jars with twist-off tops or with a bayonet fastening and metal containers are not suitable. Shelf positions • Use the 1st shelf position from the bottom for preserving. Notes on preserving • Use the baking tray for preserving. There is room for up to six jars, each with a capacity of 1 litre.
Preserving Table The preserving times and temperatures quoted are for guidance Temperature in °C Preserves Cooking time until bubbles form Mins. Continued cooking at 100 °C Mins.
Drying with the Fan Oven Use trays lined with greaseproof paper or baking paper. You will achieve a better result if you switch the oven off half way through the drying time. Open and leave to cool, preferably overnight. Then finish drying the dried food.
Cleaning and care 1 Warning: For safety reasons cleaning the appliance with a steam jet cleaner or high-pressure water cleaner is not permissible! Exterior of the Appliance • Wipe the front of the appliance with a soft cloth dipped in warm soapy water. • Do not use scourers, caustic cleaners or abrasive items. • Use commercially available cleaners for metal fronts. Oven Interior 1 3 3 1 Warning: The oven must be switched off and cold before cleaning. Clean the appliance after each use.
Pyrolytic cleaning 1 1 3 Caution! The oven becomes very hot during this process. All young children must be kept at a safe distance. Important! All removable parts including the side rails must be removed from the oven before using the pyroluxe function. If you are using any other removable oven accessories, these must be removed before the pyrolytic cleaning process. 1.Remove any large pieces of dirt by hand. 2.Set the Oven Function selector to P Pyrolytic Cleaning. 3.
Shelf Support Rails The shelf support rails on the left and right hand sides of the oven can be removed for cleaning the side walls. Removing the shelf support rails First pull the front of the rail away from the oven wall (1) and then unhook at the back (2). 3 Fitting the shelf support rails Important! The rounded ends of the guide rails must be pointing forwards! To re-insert, first hook the rail into place at the back (1) and then insert the front and press into place (2).
Oven Lighting 1 3 Warning: There is a danger of electric shock! Prior to changing the oven light bulb: – Switch off the oven! – Disconnect from the electricity supply. Place a cloth on the oven floor to protect the oven light and glass cover. Replacing the oven light bulb/cleaning the glass cover 1.Remove the glass cover by turning it anti-clockwise and then clean it. 2.If necessary: Replace bulb with a 40 watt, 230 V, 300 °C heat-resistant oven light bulb. 3.Refit the glass cover.
Oven Door The oven door of your appliance may be removed for cleaning. Removing the oven door 1.Open the oven door completely. 2.Completely fold back the brass-coloured clamping lever on both door hinges. 3.Grip the oven door with both hands on the sides and close it to about 3/4 going past the point of resistance. 4.Pull the door away from the oven (Caution: heavy!). 5.Place the door, with the outer surface downwards, on a soft, flat surface, for example a blanket, to avoid scratches.
Oven Door Glass 1 1 The oven door is fitted with four glass panels mounted one behind the other. The inner panels can be removed for cleaning. Caution: The following steps are to be performed only when the oven door has been removed. If the glass is removed while the door is attached, the lighter weight may cause it to spring up and cause injury. Important! Rough handling of the glass, especially at the edges of the front plate, may cause it to break. Removing the upper-most glass panel 1.
Replacing the centre glass panels 1.Insert the centre panels at an angle from above into the section of the door in which the handle is located, one after the other. 2.Lower the centre panels down and push them towards the lower edge of the door as far under the retaining frame as they will go. Replacing the upper glass panel 1.From above, insert the upper-most panel at an angle into the section of the door in which the handle is located. 2.Lower the panel.
What to do if … Symptom Possible cause The oven does not heat The oven has not been up. switched on. The time has not been set. Remedy Switch on the oven. Set the time. The necessary settings Check the settings. have not been made. The oven lighting does not come on. 1 3 The circuit breaker (at the household fuse box) has tripped or the fuse has blown. Check the circuit breaker or fuse. If the circuit breaker trips or the fuse blows several times, please contact an approved electrician.
Technical Data Oven Interior Dimensions Height x Width x Depth Capacity (usable capacity) 31 cm x 41 cm x 41 cm 52 l Regulations, Standards, Directives This appliance meets the following standards: • EN 60 335-1 and EN 60 335-2-6 relating to the safety of electrical appliances for household use and similar purposes and • EN 60350, or DIN 44546 / 44547 / 44548 relating to the operating features of electric cookers, hobs, ovens, and grills for household use.
Installation Instructions 1 1 Important: The new appliance may only be installed and connected by a qualified electrician / competent person. Please observe this instruction, otherwise the warranty will not cover any damage that may occur. Safety Instructions for the Installer • A device must be provided in the electrical installation which allows the appliance to be disconnected from the mains at all poles with a contact opening width of at least 3 mm.
Electrical Connection The oven is designed to be connected to 230-240V~(50Hz) electricity supply. The oven has an easily accessible terminal block which is marked as follows: Letter L Letter N E 1 - Live terminal Neutral terminal Earth terminal This oven must be earthed! The cable used to connect the oven to the electrical supply must comply to the specifications given below. For UK use only Connection via Cooker Control Circuit Min.
3,5x25 54
Guarantee Conditions Standard guarantee conditions We, Electrolux, undertake that if within 12 months of the date of the purchase this Electrolux appliance or any part thereof is proved to be defective by reason only of faulty workmanship or materials, we will, at our option repair or replace the same FREE OF CHARGE for labour, materials or carriage on condition that: • The appliance has been correctly installed and used only on the electricity supply stated on the rating plate.
European Guarantee If you should move to another country within Europe then your guarantee moves with you to your new home subject to the following qualifications: • The guarantee starts from the date you first purchased your product. • The guarantee is for the same period and to the same extent for labour and parts as exists in the new country of use for this brand or range of products. • This guarantee relates to you and cannot be transferred to another user.
Index A S Accessories . . . . . . . . . . . . . . . . . . . . . . . 9 Safety . . . . . . . . . . . . . . . . . . . . . . . . . . . 5 Shelf support rails . . . . . . . . . . . . . . . . . 42 Switching off the time display . . . . . . . . 17 C Cleaning accessories . . . . . . . . . . . . . . . . . . . . 40 initial cleaning . . . . . . . . . . . . . . . . . . 11 oven interior . . . . . . . . . . . . . . . . . . . 40 Oven light bulb . . . . . . . . . . . . . . . . . 43 Pyrolysis . . . . . . . . . . . . . .
Service and Spare Parts If you wish to purchase spare parts or require an engineer, contact your local Electrolux Service Force Centre by telephoning: 08705 929 929 Your telephone call will be automatically routed to the Service Force Centre covering your post code area. For the address of your local Service Force Centre and further information about Service Force, please visit the website at www.serviceforce.co.uk When you contact the Service Centre they will need the following information: 1.
822 923 239-A-040603-07 © Electrolux plc 2003 Subject to change without notice The Electrolux Group. The world´s No.1 choice. The Electrolux Group is the world´s largest producer of powered appliances for kitchen, cleaning and outdoor use. More than 55 million Electrolux Group products (such as refrigerators, cookers, washing machines, vacuum cleaners, chain saws and lawn mowers) are sold each year to a value of approx. USD 14 billion in more than 150 countries around the world.