EOC6P71X EN Steam oven User Manual
www.electrolux.com CONTENTS 1. SAFETY INFORMATION....................................................................................3 2. SAFETY INSTRUCTIONS..................................................................................4 3. PRODUCT DESCRIPTION................................................................................ 7 4. CONTROL PANEL............................................................................................. 8 5. BEFORE FIRST USE...............................
ENGLISH 1. 3 SAFETY INFORMATION Before the installation and use of the appliance, carefully read the supplied instructions. The manufacturer is not responsible for any injuries or damage that are the result of incorrect installation or usage. Always keep the instructions in a safe and accessible location for future reference. 1.
www.electrolux.com • • • • • • • • • • • WARNING: The appliance and its accessible parts become hot during use. Care should be taken to avoid touching heating elements. Always use oven gloves to remove or put in accessories or ovenware. Before carrying out any maintenance, disconnect the appliance from the power supply. WARNING: Ensure that the appliance is switched off before replacing the lamp to avoid the possibility of electric shock.
ENGLISH • • Install the appliance in a safe and suitable place that meets installation requirements. The appliance is equipped with an electric cooling system. It must be operated with the electric power supply. 2.2 Electrical connection • • 2.3 Use WARNING! Risk of fire and electric shock. • • • • • • • • • • • • • All electrical connections should be made by a qualified electrician. The appliance must be earthed.
www.electrolux.com • • • • • – do not put aluminium foil directly on the bottom of cavity of the appliance. – do not put water directly into the hot appliance. – do not keep moist dishes and food in the appliance after you finish the cooking. – be careful when you remove or install the accessories. Discoloration of the enamel or stainless steel has no effect on the performance of the appliance. Use a deep pan for moist cakes. Fruit juices cause stains that can be permanent.
ENGLISH • • changes in the vicinity of all Pyrolytic Ovens when the Pyrolytic self cleaning program is in operation. Non-stick surfaces on pots, pans, trays, utensils etc., can be damaged by the high temperature Pyrolytic cleaning operation of all Pyrolytic Ovens and can be also a source for low level harmful fumes. Fumes released from all Pyrolytic Ovens / Cooking Residues as described are not harmful to humans, including children, or persons with medical conditions. • • 2.
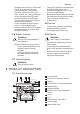
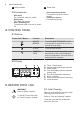
www.electrolux.com 13 Shelf positions 14 Steam inlet 3.2 Accessories • • • • Wire shelf For cookware, cake tins, roasts. Baking tray For cakes and biscuits. Grill- / Roasting pan To bake and roast or as pan to collect fat. Core temperature sensor To measure how far the food is cooked. Telescopic runners For shelves and trays. • 4. CONTROL PANEL 4.1 Buttons Sensor field / Button Function Description MINUTE MINDER To set the MINUTE MINDER.
ENGLISH Put the accessories and the removable shelf supports back to their initial position. 5.2 Preheating Preheat the empty oven before first use. 1. Set the function .Set the maximum temperature. 2. Let the oven operate for 1 hour. 9 3. Set the function . Set the maximum temperature. 4. Let the oven operate for 15 minutes. 5. Turn off the oven and let it cool down. Accessories can become hotter than usual. The oven can emit an odour and smoke. Make sure that the airflow in the room is sufficient. 6.
www.electrolux.com Oven func‐ tion Moist Fan Baking Application This function is de‐ signed to save energy during cooking. For the cooking instructions re‐ fer to "Hints and tips" chapter, Moist Fan Bak‐ ing. The oven door should be closed during cooking so that the function is not interrup‐ ted and to ensure that the oven operates with the highest energy effi‐ ciency possible. When you use this function, the temperature in the cavity may differ from the set temperature. The residual heat is used.
ENGLISH 2. Press the cover of the water drawer to open it. 3. Fill the water drawer with water until the display shows Tank Full indicator. The maximum capacity of the tank is 900 ml. It is sufficient for approximately 55 - 60 minutes of cooking. 4. Push the water drawer to its initial position. 5. Set the temperature between 130 °C and 230 °C. Steam cooking gives good results with this temperature range. 6. Empty the water tank after the steam cooking is completed.
www.electrolux.com 7. CLOCK FUNCTIONS 7.1 Clock functions table Clock func‐ tion TIME OF DAY To change the time of day press again and again until the indicator for the Application time of day To show or change the time of day. You can change the time of day only when the oven is off. DURATION To set how long the oven works. Use only when a heating function is set. END To set when the oven turns off. Use only when a heating function is set.
ENGLISH 3. Turn the knob for the temperature to set the minutes for DURATION time and press to confirm. Turn the knob for the temperature to set the hours for DURATION time and press to confirm. The display shows flashing . 4. Turn the knob for the temperature to set the hours for END time and press to confirm. Turn the knob for the temperature to set the minutes for END time and press to confirm. The display shows and the set temperature.
www.electrolux.com flashes, you can use the knob for the temperature to change the default core temperature. The display shows the symbol of the core temperature sensor and the default core temperature. 4. Press to save the new core temperature, or wait 10 seconds for the setting to be saved automatically. The new default core temperature is displayed during the next use of the core temperature sensor.
ENGLISH 15 °C Small indentation at the top increase safety. The indentations are also anti-tip devices. The high rim around the shelf prevents cookware from slipping of the shelf. 8.3 Telescopic Runners Keep the installation instructions for the telescopic runners for future use. With telescopic runners you can put in and remove the shelves more easily. CAUTION! Do not clean the telescopic runners in the dishwasher. Do not lubricate the telescopic runners. 1.
www.electrolux.com Lid (B) Steel grill (E) The injector and the injector tube • Do not put the hot baking dish on cold / wet surfaces. • Do not put cold liquids in the baking dish when it is hot. • Do not use the baking dish on a hot cooking surface. • Do not clean the baking dish with abrasives, scourers and powders. C D "C" is the injector tube for steam cooking, "D" is the injector for direct steam cooking.
ENGLISH 17 Make sure that you do not crush the injector tube or let it touch a heating element on the top of the oven. 4. Set the oven for the steam cooking function. 8.6 Direct steam cooking Put the food onto the steel grill in the baking dish. Add some water. 8.5 Steam cooking in a dietary baking dish Put the food onto the steel grill in the baking dish and put the lid on it. 1. Put the injector tube into the special hole in the lid of the dietary baking dish.
www.electrolux.com When you cook food such as chicken, duck, turkey, kid or large fish, put the injector (D) directly into the empty part of the meat. Make sure that you do not cause a blockage of the holes. For more information about steam cooking, refer to the cooking tables for steam cooking in the chapter "Hints and Tips". 9. ADDITIONAL FUNCTIONS 9.1 Using the Child Lock When the Child Lock is on the oven cannot be turned on accidentally. 1.
ENGLISH (°C) (h) 30 - 115 12.5 120 - 195 8.5 200 - 245 5.5 250 - maximum 3 Pyrolysis 4.5 19 surfaces of the oven cool. If you turn off the oven, the cooling fan can continue to operate until the oven cools down. 9.6 Safety thermostat Incorrect operation of the oven or defective components can cause dangerous overheating. To prevent this, the oven has a safety thermostat which interrupts the power supply. The oven turns on again automatically when the temperature drops.
www.electrolux.com 10.2 True Fan + Steam Preheat the empty oven.
ENGLISH FISH MEAT (°C) (min) (°C) (min) Roast beef, medium, 1 kg 200 55 - 65 Tuna, 4 - 6 fil‐ lets, 1.2 kg 175 35 - 50 Roast beef, well done, 1 kg 190 65 - 75 Hake 200 20 - 30 Use the second shelf position. Reheat your dish on a plate. Preheat the empty oven. Use the second shelf position. (°C) (min) Lamb leg, 1 kg 175 110 - 130 Whole chick‐ en, 1 kg 200 55 - 65 Whole turkey, 4 kg 170 180 - 240 Whole duck, 2 170 - 180 - 2.
www.electrolux.com MEAT VEGETABLES (min) (min) Tomatoes 15 Cooked ham 55 - 65 Aubergines 15 - 20 Kasseler 80 - 100 Broccoli, florets 20 - 25 Courgette, slices 20 - 25 Pepper, strips 20 - 25 Cauliflower, florets 25 - 30 Kohlrabi 25 - 30 Asparagus, white 25 - 35 Celery, slices 30 - 35 Fennel 30 - 35 Asparagus, green 35 - 45 Carrots 35 - 40 Set the temperature to 130°C. FISH (min) Trout / Salmon fillet 25 - 30 Set the temperature to 130°C.
ENGLISH 23 10.
www.electrolux.com CAKES Conventional True Fan Cooking Cooking (min) (°C) (°C) Meringues, two levels, preheat the empty oven - - 120 2 and 4 80 - 100 Baking tray Buns, preheat the empty oven 190 3 190 3 12 - 20 Baking tray Eclairs 190 3 170 3 25 - 35 Baking tray Eclairs, two lev‐ els - 170 2 and 4 35 - 45 Baking tray Plate tarts 180 2 170 2 45 - 70 Cake mould, Ø 20 cm Rich fruit cake 160 1 150 2 110 120 Cake mould, Ø 24 cm Preheat the empty oven.
ENGLISH Use the cake mould. FLANS Conventional Cook‐ ing True Fan Cooking (min) (°C) (°C) Pasta flan, preheating is not needed 200 2 180 2 40 - 50 Vegetable flan, preheat‐ ing is not needed 200 2 175 2 45 - 60 Quiches 180 1 180 1 50 - 60 Lasagne 180 - 190 2 180 - 190 2 25 - 40 Cannelloni 180 - 190 2 180 - 190 2 25 - 40 Use the second shelf position. Use the wire shelf.
www.electrolux.
ENGLISH 27 LAMB BEEF (°C) (°C) (min) (min) Roast beef or fil‐ let, medium 180 - 190 6 - 8 Lamb leg / Roast 150 - 170 100 - 120 lamb, 1 - 1.5 kg Roast beef or fil‐ let, well done 170 - 180 8 - 10 Lamb saddle, 1 - 160 - 180 40 - 60 1.5 kg POULTRY PORK (°C) (°C) (min) (min) Shoulder / Neck / 160 - 180 90 - 120 Ham joint, 1 - 1.5 kg Poultry, portions, 200 - 220 30 - 50 0.2 - 0.25 kg each Chops / Spare rib, 1 - 1.5 kg Chicken, half, 190 - 210 35 - 50 0.4 - 0.
www.electrolux.com 10.6 Defrost (kg) Defrosting time (min) Further defrost‐ ing time (min) Chicken 1 100 - 140 20 - 30 Place chicken on an upturned saucer placed on a large plate. Turn halfway through. Meat 1 100 - 140 20 - 30 0.5 90 - 120 Turn halfway through. Cream 2 x 0.2 80 - 100 10 - 15 Cream can also be whipped when still slightly frozen in places. Trout 0.15 25 - 35 10 - 15 - Strawberries 0.3 30 - 40 10 - 20 - Butter 0.25 30 - 40 10 - 15 - Gateau 1.
ENGLISH FRUIT (°C) (h) English roast beef, well done Apple slices 6-8 Pork shoulder 80 - 82 Pears 6-9 Pork shin 75 - 80 Lamb 70 - 75 Chicken 98 Hare 70 - 75 Trout / Sea bream 65 - 70 Tuna / Salmon 65 - 70 10.8 Food Sensor (°C) Roast veal 75 - 80 Veal knuckle 85 - 90 English roast beef, rare 45 - 50 English roast beef, medi‐ um 60 - 65 Pizza pan 70 - 75 10.9 Moist Fan Baking recommended accessories Use the dark and non-reflective tins and containers.
www.electrolux.com (°C) (min) Rolls, 9 pieces baking tray or dripping 180 pan 2 30 - 40 Pizza, frozen, 0.35 kg wire shelf 220 2 10 - 15 Swiss roll baking tray or dripping 170 pan 2 25 - 35 Brownie baking tray or dripping 175 pan 3 25 - 30 Soufflè, 6 pieces ceramic ramekins on wire shelf 200 3 25 - 30 Sponge flan base flan base tin on wire shelf 180 2 15 - 25 Victoria sand‐ wich baking dish on wire shelf 170 2 40 - 50 Poached fish, 0.
ENGLISH (°C) 31 (min) Vegetarian ome‐ pizza pan on wire shelf 200 lette 3 25 - 30 Mediterranean vegetables, 0.7 kg 4 25 - 30 baking tray or dripping 180 pan 10.11 Information for test institutes Tests according to IEC 60350-1.
www.electrolux.com (°C) (min) Sponge cake, cake mould Ø26 cm True Fan Cooking Wire shelf 2 160 40 - 50 Preheat the oven for 10 minutes. Sponge cake, cake mould Ø26 cm True Fan Cooking Wire shelf 2 and 4 160 40 - 60 Preheat the oven for 10 minutes.
ENGLISH 33 11.1 Notes on cleaning Clean the front of the oven with a soft cloth with warm water and a mild cleaning agent. To clean metal surfaces, use a dedicated cleaning agent. Cleaning Agents Clean stubborn stains with a special oven cleaner. Clean the oven cavity after each use. Fat accumulation or other food remains may cause fire. The risk is higher for the grill pan. Everyday Use Moisture can condense in the oven or on the door glass panels.
www.electrolux.com 11.4 Pyrolysis CAUTION! Remove all accessories and removable shelf supports. Do not start the Pyrolysis if you did not fully close the oven door. In some models, the display shows "C3" when this error occurs. WARNING! The oven becomes very hot. There is a risk of burns. CAUTION! If there are other appliances installed in the same cabinet, do not use them when the Pyrolysis function operates. It can cause damage to the appliance. 1. Wipe out the cavity with a wet, soft cloth. 2.
ENGLISH • • Soft water with low lime content recommended type. It decreases the quantity of cleaning procedures. Tap water - you can use it if your domestic water supply has purifier or water sweetener. • 35 Hard water with high lime content it does not have an effect on the performance of the oven but it increases the quantity of cleaning procedures. CALCIUM QUANTITY TABLE INDICATED FROM W.H.O.
www.electrolux.com 3. Find the hinge to the left side of the door. 6. Put the door on a soft cloth on a stable surface. 7. Hold the door trim (B) on the top edge of the door at the two sides and push inwards to release the clip seal. 2 B 1 4. Lift and turn the lever fully on the left hinge. 5. Close the oven door halfway to the first opening position. Then lift and pull forward and remove the door from its seat. 8. Pull the door trim to the front to remove it. 9.
ENGLISH Check for the symbol / printing on the side of the glass panel, each of the glass panels looks different to make the disassembly and assembly easier. When installed correctly the door trim clicks. A B 37 11.8 Replacing the lamp WARNING! Risk of electric shock. The lamp can be hot. 1. Turn off the oven. Wait until the oven is cooled down. 2. Disconnect the oven from the mains. 3. Put a cloth on the bottom of the cavity.
www.electrolux.com Problem Possible cause Remedy The oven does not heat up. The necessary settings are Make sure that the settings not set. are correct. The oven does not heat up. The automatic switch-off is Refer to "Automatic switchactivated. off". The oven does not heat up. The Child Lock is on. The oven does not heat up. The door is not closed cor‐ Fully close the door. rectly. The oven does not heat up. The fuse is blown. Make sure that the fuse is the cause of the malfunc‐ tion.
ENGLISH Problem Possible cause The display shows an error There is an electrical fault. code that is not in this ta‐ ble. 39 Remedy • • Deactivate the oven with the house fuse or the safety switch in the fuse box and activate it again. If the display shows the error code again, con‐ tact the Customer Care Department. There is water inside the oven. There is too much water in the tank. Deactivate the oven and wipe the water with a cloth or sponge.
www.electrolux.com Problem Possible cause Remedy The appliance is activated and does not heat up. The fan does not operate. The display shows "Demo". The demo mode is activa‐ ted. 1. Deactivate the oven. 2. Press and hold at the same time . 3. The first digit on the display and Demo indi‐ cator start to blink. 4. Enter the code 2468 by turning the knob for the temperature right or left to change the values to con‐ and press firm. 5. The next digit starts to blink. 6.
ENGLISH 41 13.1 Building In 548 21 min. 550 80 60 520 600 114 18 20 589 594 min. 560 595+-1 198 60 5 3 523 20 548 70 60 21 min. 550 20 520 18 590 114 min. 560 589 594 198 60 595+-1 5 3 523 20 13.2 Securing the appliance to the cabinet A B 13.3 Electrical installation The manufacturer is not responsible if you do not follow the safety precautions from the Safety chapters. This appliance is supplied with a main plug and a main cable. 13.
www.electrolux.com For the section of the cable refer to the total power on the rating plate. You can also refer to the table: Total power (W) Section of the ca‐ ble (mm²) maximum 1380 3 x 0.75 Total power (W) Section of the ca‐ ble (mm²) maximum 2300 3x1 maximum 3680 3 x 1.5 The earth cord (green / yellow cable) must be 2 cm longer than phase and neutral cables (blue and brown cables). 14. ENERGY EFFICIENCY 14.
ENGLISH Residual heat If a programme with the Duration or End Time selection is activated and the cooking time is longer than 30 minutes, the heating elements automatically turn off earlier in some oven functions. The fan and lamp continue to operate. When you turn off the oven, the display shows the residual heat. You can use that heat to keep the food warm. When the cooking duration is longer than 30 minutes, reduce the oven temperature to minimum 3 - 10 minutes before the end of cooking.
867355005-B-122019 www.electrolux.