EOD3410A ................................................ .............................................
www.electrolux.com CONTENTS 1. 2. 3. 4. 5. 6. 7. 8. 9. 10. 11. 12. 13. SAFETY INFORMATION . . . . . . . . . . . . . . . . . . . . . . . . . . . . . . . . . . . . . . . . . . . . . . . . . . . 3 SAFETY INSTRUCTIONS . . . . . . . . . . . . . . . . . . . . . . . . . . . . . . . . . . . . . . . . . . . . . . . . . . 4 PRODUCT DESCRIPTION . . . . . . . . . . . . . . . . . . . . . . . . . . . . . . . . . . . . . . . . . . . . . . . . . 6 BEFORE FIRST USE . . . . . . . . . . . . . . . . . . . . . . . . . . .
ENGLISH 3 1. SAFETY INFORMATION Before the installation and use of the appliance, carefully read the supplied instructions. The manufacturer is not responsible if an incorrect installation and use causes injuries and damages. Always keep the instructions with the appliance for future reference. 1.1 Children and vulnerable people safety WARNING! Risk of suffocation, injury or permanent disability.
www.electrolux.com • Before maintenance cut the power supply. • Do not use harsh abrasive cleaners or sharp metal scrapers to clean the glass door since they can scratch the surface, which may result in shattering of the glass. • To remove the shelf supports first pull the front of the shelf support and then the rear end away from the side walls. Install the shelf supports in the opposite sequence.
ENGLISH • Connect the mains plug to the mains socket only at the end of the installation. Make sure that there is access to the mains plug after the installation. • If the mains socket is loose, do not connect the mains plug. • Do not pull the mains cable to disconnect the appliance. Always pull the mains plug. • Use only correct isolation devices: line protecting cut-outs, fuses (screw type fuses removed from the holder), earth leakage trips and contactors.
www.electrolux.com • If you use an oven spray, obey the safety instructions on the packaging. • Do not clean the catalytic enamel (if applicable) with any kind of detergent. • Only use lamps with the same specifications. 2.5 Disposal WARNING! Risk of injury or suffocation. 2.4 Internal light • The type of light bulb or halogen lamp used for this appliance, is only for household appliances. Do not use it for house lighting. WARNING! Risk of electrical shock.
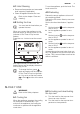
ENGLISH 4.1 Initial Cleaning • Remove all accessories and removable shelf supports (if applicable). • Clean the appliance before first use. Refer to the chapter "Care and cleaning". 4.2 Setting the time You must set the time before you operate the oven. When you connect the appliance to the electrical supply or after a power cut, the indicator for the Time of Day function flashes. Press the + or - button to set the correct time. 7 To use the appliance, push the knob. The knob comes out. 4.
www.electrolux.com 3. The temperature indicator comes on while the temperature in the appliance increases. To deactivate the appliance, turn the knob for the top oven functions and the knob for the top oven temperature to the Off position. 5.3 Activating and deactivating the main oven 1. 2. 3. Turn the knob for the main oven temperature to a temperature. The temperature indicator comes on while the temperature in the appliance increases.
ENGLISH 9 6. CLOCK FUNCTIONS 6.1 Electronic programmer 1 2 1 1 Function indicators 2 Time display 3 Button + 4 Selection button 5 Button - 5 4 3 Clock function Time of day Minute Minder Duration End Application To set, change or check the time of day. To set a countdown time. This function has no effect on the operation of the oven. To set how long the appliance must operate. To set when the appliance must be deactivated.
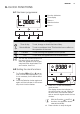
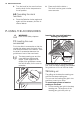
www.electrolux.com 5. Turn the knob for the oven functions and the knob for the temperature to the off position. 2. Press and hold the button -. The clock function goes out after some seconds. 6.3 Cancelling the clock functions 1. Press the Selection button again and again until the necessary function indicator flashes. 7. USING THE ACCESSORIES WARNING! Refer to the Safety chapters. Inserting the oven shelf and deep roasting pan together 7.
ENGLISH 2. Put the deep roasting pan in the appliance and on the necessary shelf level. 2. 11 Put the deep roasting pan in the appliance and on the necessary shelf level. To grill flat dishes in large quantities and to toast: 1. Put the roasting pan grid in the deep roasting pan. The supports of the roasting pan grid must point down. 8. HELPFUL HINTS AND TIPS WARNING! Refer to the Safety chapters. The temperature and baking times in the tables are guidelines only.
www.electrolux.com ature setting. The differences equalize during the baking procedure.
ENGLISH Temperature [°C] Approx Cook Time (mins) Shelf Position - Victoria Sandwich 160 - 170 18 - 25 1 - Madeira 140 - 150 75 - 90 1 - Rich Fruit 140 - 150 120 - 150 1 - Gingerbread 140 - 150 75 - 90 1 - Meringues 90 - 100 150 - 180 1 - Flapjack 160 - 170 25 - 30 1 - Shortbread 130 - 150 45 - 65 1 - Beef/Lamb 150 - 170 150 - 180 1 - Chicken 160 - 180 75 - 90 1 Food Casseroles: Convenience Foods Follow manufacturer´s instructions.
www.electrolux.com Temperature [°C] Approx Cook Time (mins) Shelf Position 180 - 190 60- 90 1 - Large 200 - 210 25 - 40 1 - Individual 210 - 220 15 - 25 1 Food - Roast Potatoes Yorkshire Pudding: Roasting Meat, Poultry See roasting chart. 8.6 Main oven 8.7 Baking Shelf Positions are not critical but ensure that oven shelves are evenly spaced when more than one is used (e.g.
ENGLISH Food Temperature [°C] Approx Cook Time (mins) Roasting: Meat and Poultry 160 - 180 see Roasting Chart 8.8 Roasting Roasting dishes • Use heat-resistant ovenware to roast (please read the instructions of the manufacturer). • Large roasting joints can be roasted directly in the deep roasting pan or on the oven shelf above the deep roasting pan. (If present) 15 • Roast lean meats in a roasting tin with a lid. This well keep the meat more succulent.
www.electrolux.com Always pre-heat the empty oven with the grill functions for 5 minutes. • Set the shelf in the shelf level as recommended in the grilling table. • Always set the pan to collect the fat into the first shelf level. • Grill only flat pieces of meat or fish. Food Bacon Rashers 8.12 Top oven 8.
ENGLISH • Clean stubborn dirt with a special oven cleaner. • Clean all oven accessories (with a soft cloth with warm water and cleaning agent) after each use and let them dry. • If you have nonstick accessories, do not clean them using an aggressive agents, sharp edged objects or dishwasher. It can destroy nonstick coating! 17 9.1 Shelf supports You can remove the shelf supports to clean the side walls. Stainless steel or aluminium appliances: Clean the oven door with a wet sponge only.
www.electrolux.com 2. Install the heating element correctly on the two sides above the support on the inner wall of the oven. Insert shelf support rails. 9.3 Oven door and glass panels You can remove the oven door and the internal glass panels to clean them. The number of glass panels is different for different models. 2. 3. 4. CAUTION! Be careful when you remove the door from the appliance. The door is heavy.
ENGLISH 8. 9. Hold the door glass panels on their top edge one by one and pull them upwards out of the guide Clean the glass panel with water and soap. Dry the glass panel carefully. Put a cloth on the bottom of the oven for protection of the oven light and glass cover. Installing the door and the glass panels When the cleaning is completed, install the glass panels and the oven door. Do the above steps in the opposite sequence. Install the smaller panel first, then the larger. 9.
www.electrolux.com Problem Possible cause Steam and condensation settle on the food and in the oven. Remedy You left the dish in the oven for too long. If you cannot find a solution to the problem yourself, contact your dealer or the service centre. Do not keep the dishes in the oven for longer than 15-20 minutes after the cooking ends. The necessary data for the service centre is on the rating plate. The rating plate is on the front frame of the appliance cavity.
ENGLISH 21 90 0 2x 3,5x25 12. GB IE GREAT BRITAIN & IRELAND - GUARANTEE/ CUSTOMER SERVICE 12.
www.electrolux.com • Appliance has been used for normal domestic purposes only, in accordance with manufacturer's instructions. • Appliance hasn't been serviced, maintained, repaired, taken apart or tampered with by person not authorised by us. • Electrolux Service Force Centre must undertake all service work under this guarantee • Any appliance or defective part replaced shall become the Company's property. • This guarantee is in addition to your statutory and other legal rights.
ENGLISH • The appliance guarantee is personal to the original purchaser of the appliance and cannot be transferred to another user. • The appliance is installed and used in accordance with instructions issued by Electrolux and is only used within the home, i.e. is not used for commercial purposes. 23 • The appliance is installed in accordance with all relevant regulations in force within your new country of residence.
www.electrolux.com Norge +47 81 5 30 222 Risløkkvn. 2 , 0508 Oslo Österreich 0810 955030 Herziggasse 9, 1230 Wien Polska +48 22 43 47 300 ul. Kolejowa 5/7, 01–217 Warszawa Portugal +35 12 14 40 39 39 Quinta da Fonte - Edifício Gonçalves Zarco - Q 35 -2774-518 Paço de Arcos Romania +40 21 451 20 30 Str.
ENGLISH 25
www.electrolux.
ENGLISH 27
892957107-C-392013 www.electrolux.