Model EOD 984
TECHNICAL DETAILS MODEL NO. EOD 984 Voltage: 230-240 Volts AC 50Hz Wattage: 5.3-5.8kW Height: 897mm Width: 592mm Depth: 563mm (excluding handles and knobs) Weight: 55kg This appliance complies with: European Council Directive 73/23/EEC. EMC Directive 89/336/EEC. CE Marking Directive 93/68/EEC.
CONTENTS Technical Details ................................................................................................................................... 2 Contents .................................................................................................................................................. 3 Safety ....................................................................................................................................................... Before Installation ..............
CONTENTS The Main Fan Oven ................................................................................................................................. 20 Uses of the Fan Oven ..................................................................................................................... 20 Selecting the Fan Oven .................................................................................................................. 20 Things to Note ......................................................
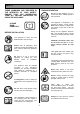
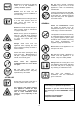
SAFETY DURING OPERATION THESE WARNINGS ARE PROVIDED IN THE INTERESTS OF YOUR SAFETY. ENSURE THAT YOU UNDERSTAND THEM ALL BEFORE INSTALLING OR USING THE APPLIANCE. Do not use this appliance if it is in contact with water. Never operate it with wet hands. PLEASE READ CAREFULLY This appliance is designed to be operated by adults. Young children must not be allowed to tamper with the controls or play near or with the appliance. BEFORE INSTALLATION During use the appliance becomes hot.
Ensure that you support the grill pan when it is in the withdrawn or partially withdrawn position. Do not leave utensils containing foodstuffs, e.g. fat or oil in or on the appliance in case it is inadvertently switched ON. Ensure that all vents are left unobstructed to ensure ventilation of the oven cavity. Cookers and hobs become very hot, and retain their heat for a long period of time after use. Children should be kept well away from the appliance until it has cooled.
INSTALLATION INSTRUCTIONS THINGS YOU NEED TO KNOW a) By connecting the appliance to a cooker point (having a double pole isolating switch with at least 3mm contact separation in all poles and neutral) and protected with a fuse or miniature circuit breaker at your mains fuse box. WARNINGS: · This appliance must be installed by a qualified electrician/competent person. Safety may be impaired if installation is not carried out in accordance with these instructions. · · This appliance must be earthed.
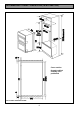
RECOMMENDED CABINET DIMENSIONS (IN MILLIMETRES) Cross section through cabinet showing oven positioned FIG.
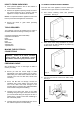
TO REMOVE COVER OF MAINS TERMINAL HOW TO FINISH UNPACKING · Place packed appliance next to the cabinet in which it will be installed. · From the rear of the appliance, remove mains input terminal cover to gain access to terminal block. Remove the appliance packing except for bottom tray which should be left in position until the appliance is ready to be fitted into its cabinet. · First remove retaining screw with pozidrive screwdriver. See Fig. 3.
CONNECTING TO THE MAINS TERMINAL CHECKING ELECTRICAL CONNECTIONS Warning: This appliance must be earthed. · Confirm the appliance is correctly connected by switching on and observing the various oven functions indicators. · The electronic timer will flash on and off. · Make connection as shown in Fig. 6 by proceeding as follows:- NOTE: HOUSE CIRCUIT Earth leakage and continuity tests must be carried out before the appliance is connected to the mains supply and re-checked after fitting. Fig.
FITTING INTO THE CABINET IMPORTANT: Ensure that the oven is switched off at the wall before any further work is carried out. · Using a tape measure establish the internal width of the cabinet. Refer to page 7 if greater than 565mm. · Position the appliance in front of the cabinet. See Fig. 7. · Take out all oven furniture before installation to reduce the weight you need to lift. The oven door should be taped up to keep it closed whilst lifting.
INTRODUCTION WARNING: THIS APPLIANCE MUST BE EARTHED GETTING TO KNOW YOUR OVEN A B C D A - Main Oven Temperature Control B - Main Oven Indicator Neon C - Main Oven Function Control E Fan Oven Conventional Oven Zoned Oven Defrost Oven Clean Thermal Grilling Oven Light D - Electronic Timer E - Top Oven/Grill Temperature Control F - Top Oven Indicator Neon G - Top Oven/Grill Function Control 12 F G
INTRODUCTION RATING PLATE COOKWARE This is situated on the lower front frame of the appliance and can be seen upon opening the door. Alternatively the rating plate may also be found on the back or top of some models (where applicable). Baking trays, oven dishes etc., should not be placed directly against the grid covering the fan at the back of the oven. The appliance must be protected by a suitably rated fuse or circuit breaker. The rating of the appliance is given on the rating plate.
THE COOLING CONTROLS FAN FOR THE GRILL AND OVEN FURNITURE The following items of grill and oven furniture have been supplied with the appliance. If you require replacements of any of the items listed below please contact your local Service Force Centre, quoting the relevant part number. The cooling fan comes on immediately when the grill is switched on and after a short time when either of the ovens are in use and switches off when cooking is completed.
THE DUAL GRILL USES OF THE DUAL GRILL CAUTION – ACCESSIBLE PARTS MAY BECOME HOT WHEN THE GRILL IS IN USE. CHILDREN SHOULD BE KEPT AWAY. The grill is a dual circuit grill which means that the whole area of the grill can be used or, for economy purposes the centre section only can be used when cooking smaller quantities of food. SELECTING THE DUAL GRILL · THINGS TO NOTE Select the Top Oven/Grill Function to Full for full grill. · Select the Top Oven/Grill Function to Half for centre section only.
THE GRILL PAN AND HANDLE HINTS AND TIPS The grill pan is supplied with a removable handle. · To attach the handle, place the wirework under the cut out in the pan so that the metal hooks over the top of the grill pan. In order to become acquainted with the performance of the Dual Grill it is advisable to check food regularly when grilling. · Food should be thoroughly dried before grilling to minimise splashing.
GRILLING CHART FOOD SHELF GRILL TIME (mins) Bacon Rashers 2crk. 2-3 each side Beefburgers 2crk. 6-10 each side Chicken Joints 2crk. 15-20 each side Chops – Lamb Pork 2crk. 2crk. 7-10 each side 10-15 each side Fish - Whole Trout/Mackerel 2crk. 8-12 each side Fillets – Plaice/Cod 2crk. 4-6 each side Kebabs 2crk. 10-15 each side Kidneys – Lamb/Pig 2crk. 4-6 each side Liver Lamb/Pig 2crk 5-10 each side Sausages 2crk. 10-15 each side Steaks – Rare Medium Well Done 2crk. 2crk.
THE TOP OVEN USES OF THE TOP OVEN The top oven is the smaller of the two ovens. It is heated by elements in the top and bottom of the oven. It is designed for cooking smaller quantities of food. It gives especially good results if used to cook fruit cakes, sweet or savoury flans or quiche. The top oven is also ideal for use as a warming compartment to warm dishes and keep food hot. temperature setting of 90°C – 100°C on the top oven temperature control.
HINTS AND TIPS · · · · · There should always be at least 2.5cm (1”) between the top of the food and the element. This gives best cooking results and allows room for rise in yeast mixtures, Yorkshire puddings etc. When cooking cakes, pastry, scones, bread etc., place the tins or baking trays centrally on the shelf centrally below the element. FOOD Stand dishes on suitably sized baking trays on the shelf to prevent spillage onto the oven base and to help reduce cleaning.
THE MAIN FAN OVEN USES OF THE FAN OVEN The oven is heated by an element around the fan situated behind the back panel. The fan draws air from the oven and the element heats the air which is circulated into the oven via the vents in the back panel. The advantages of the fan oven are cooking are: PREHEATING The fan oven quickly reaches its temperature, so it is not usually necessary to preheat the oven.
HINTS AND TIPS · Arrange the shelves in the required positions before switching the oven ON. Shelves are numbered from the bottom upwards. · When cooking more than one dish in the fan oven, place dishes centrally on different shelves rather than cluster several dishes on one shelf, this will allow the heat to circulate freely for the best cooking results. · When batch baking one type of food e.g. Victoria sandwich cakes, those of similar size will be cooked in the same time.
DEFROST FEATURE USES OF DEFROST FEATURE Small or thin fish fillets, frozen peeled prawns, cubed or minced meat, liver, thin chops, steaks etc., can be thawed in 1 – 2 hours. This function enables you to defrost most foods faster than some conventional methods as the oven fan circulates air around the food. It is particularly suitable for delicate frozen foods which are to be served cold e.g. cream filled gateaux, cakes covered with icings or frostings, cheesecakes, biscuits, scones, etc.
THE CONVENTIONAL OVEN USES OF THE CONVENTIONAL OVEN This function uses the top and lower elements to give single level cooking. This is particularly suitable for dishes which require extra base browning such as pizzas, quiches and flans. Gratins, lasagnes and hotpots which require extra top browning also cook well in the conventional oven. This form of cooking gives you the opportunity to cook without the fan oven in operation.
HINTS AND TIPS · The middle shelf allows for the best heat distribution. To increase base browning simply lower the shelf position. To increase top browning, raise the shelf position. · The material and finish of the baking trays and dishes used will affect base browning. Enamelware, dark heavy or non-stick utensils increase base browning, while oven glassware, shiny aluminium or polished steel trays reflect the heat away and give less base browning.
THE ZONED OVEN USES OF THE ZONED OVEN When the Zoned Oven is selected the element at the top of the oven operates in conjunction with the fan with effect that the top of the oven is hotter than the bottom. As there is a difference for up to 30°C between the top and bottom of the oven this feature is especially useful for dishes requiring different temperatures at the same time, making it ideal for cooking a complete meal on two shelves.
HINTS AND TIPS · Remember that the top of the oven is hotter than the bottom. The approximate difference in temperature between the top and the bottom is 30°C. · If a higher shelf position is used than is recommended in the chart on page 27, it may be necessary to lower the cooking temperature by approximately 10°C. · Be prepared to interchange dishes between the higher and lower shelf position during cooking where necessary.
OVEN COOKING CHART The oven temperatures are intended as a guide only. It may be necessary to increase or decrease the temperatures by 10°C to suit individual preferences and requirements. Note: Shelf positions are counted from the bottom of the oven.
THERMAL GRILLING USES OF THERMAL GRILLING Thermal grilling offers an alternative method of cooking food items normally associated with conventional grilling. The grill element and the fan operate together, circulating hot air around the food. The need to check and turn food is reduced. Thermal grilling helps to minimise cooking smells in the kitchen and allows you to grill with the oven door closed.
COOKING TIMES HINTS AND TIPS · Cooking is more gentle, therefore food generally takes a little longer to cook when thermal grilling compared with conventional grilling. One of the advantages is that larger loads can be cooked at the same time. Prepare foods in the same way as for conventional grilling. Brush lean meats and fish lightly with a little oil or butter to keep them moist during cooking.
OVEN CLEAN FEATURE USES OF OVEN CLEAN FEATURE During normal use the Stayclean coating within the oven will become splashed with fats and food residues. When the oven clean feature is selected the Stayclean surfaces burn off any soilage. See Care of Stayclean Surfaces on page 36 for more details. Regular use of the oven clean function will keep the Stayclean panels in good condition. SELECTING OVEN CLEAN · Remove oven shelves and bakeware from the oven.
THE ELECTRONIC TIMER Cookpot symbol Please note that this is a 24 hour clock, for example 2.00 pm is shown as 1400. Bell symbol In the following pages we explain how to set the controls. Read through them a few times until you are familiar with the procedure. If the oven is switched off on the wall, or there is a loss of power, the clock will stop and you will not be able to use the ovens. When you first switch the electricity supply on, the timer display will flash.
AUTOMATIC CONTROL Important: You can only use the automatic control for the main oven. When you use the automatic controls for the first time it’s probably best to choose a time when you are at home. That way you can check to make sure you’ve set everything correctly and you’ll feel much more confident when you are away from home in the future. SETTING THE CONTROLS FOR AUTOMATIC USE This is very easy. All you have to do is work through the steps below. The clock will work out the rest for itself.
HELPFUL HINTS WHEN BUYING AND PREPARING FOOD 10. Cook meat thoroughly – use a meat thermometer if preferred, which penetrates the joint to check that the centre temperature has reached the required temperature (see table below). Care must be taken when handling foods in the home. Always follow the basic rules of food hygiene to prevent bacterial and microbial growth and cross contamination when preparing, reheating, cooking, cooling, defrosting and freezing foods:1.
CARE AND CLEANING CLEANING INSIDE OVENS BEFORE CLEANING THE APPLIANCE ALWAYS ALLOW THE COOLING FAN TO COOL THE APPLIANCE DOWN BEFORE SWITCHING OFF THE ELECTRICITY SUPPLY. The Stayclean surface inside the ovens should not be cleaned manually. See page 36 'Care of Stayclean Surfaces' and the Oven Clean Feature for the main oven on page 30. The vitreous enamel oven base can be cleaned using normal oven cleaners or aerosol oven cleaners with care.
CLEANING BETWEEN THE OUTER AND INNER DOOR GLASS TO REPLACE THE OUTER GLASS 1. Open the oven door with care and place in the park position at an angle of approximately 30°. Under no circumstances should the door assembly be detached from the product for cleaning. Please refer to the cleaning instructions. The outer door glass is removable for cleaning. TO REMOVE THE OUTER GLASS 1. Open the oven door slightly to gain access to the two cross head screws on the top of the oven door. 2.
CARE OF STAYCLEAN SURFACES · Stayclean surfaces destroy splashes of food and fats when the oven temperature is raised to around 220°C. To aid this process it is a good idea to run the Top Oven for an hour or two per week without food. To ensure continued good performance from the Stayclean finish. Use the Oven Clean function for the Main Oven. See page 30. Covering joints during cooking will also prevent splashing onto the interior surfaces.
SOMETHING NOT WORKING? The grill does not work or cuts out after being used for a long period of time. We strongly recommend that you carry out the following checks on your appliance before calling a Service Engineer. It may be that the problem is a simple one which you can solve yourself without the expense of a Service call. * Leave the oven to cool for a couple of hours. Check that the grill operates normally. Ensure that the door is left open during grilling.
SERVICE AND SPARE PARTS In the event of your appliance requiring service, or if you wish to purchase spare parts, please contact your local Service Force Centre by telephoning:- 0870 5 929929 Your telephone call will be automatically routed to the Service Force Centre covering your post code area. For the address of your local Service Force Centre and further information about Service Force, please visit the website at www.serviceforce.co.
GUARANTEE CONDITIONS STANDARD GUARANTEE CONDITIONS We, Electrolux, undertake that if within 12 months of the date of the purchase this Electrolux appliance or any part thereof is proved to be defective by reason only of faulty workmanship or materials, we will, at our option repair or replace the same FREE OF CHARGE for labour, materials or carriage on condition that: · The appliance has been correctly installed and used only on the electricity supply stated on the rating plate.
IMPORTANT NOTICE In line with our continuing policy of research and development, we reserve the right to alter models and specifications without prior notice. This instruction booklet is accurate at the date of printing, but will be superseded if specifications or appearance are changed. ELECTROLUX 55 – 77 HIGH STREET, SLOUGH, BERKSHIRE, SL1 1DZ.