
User manual


If you have nonstick accessories, do not
clean them using aggressive agents,
sharp-edged objects or a dishwasher. It
can cause damage to the nonstick
coating.
Moisture can condense in the oven or on
the door glass panels. To decrease the
condensation, operate the oven for 10
minutes before cooking. Clean the
moisture from the cavity after each use.
11.2 Stainless steel or
aluminium ovens
Clean the oven door with a damp cloth or
sponge only. Dry it with a soft cloth.
Do not use steel wool, acids or abrasive
materials as they can damage the oven
surface. Clean the oven control panel
with the same precautions.
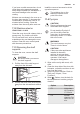
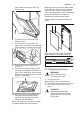
11.3 Removing the shelf
supports
To clean the oven, remove the shelf
supports.
CAUTION!
Be careful when you remove
the shelf supports.
1. Pull the front of the shelf support
away from the side wall.
2. Pull the rear end of the shelf support
away from the side wall and remove
it.
2
1
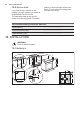
Install the removed accessories in the
opposite sequence.
The retaining pins on the
telescopic runners must
point to the front.
11.4 Pyrolysis
CAUTION!
Remove all accessories and
removable shelf supports.
Do not start the Pyrolysis if
you did not fully close the
oven door. In some models,
the display shows "C3" when
this error occurs.
WARNING!
The oven becomes very hot.
There is a risk of burns.
CAUTION!
If there are other appliances
installed in the same
cabinet, do not use them
when the Pyrolysis function
operates. It can cause
damage to the appliance.
1. Wipe out the cavity with a wet, soft
cloth.
2. Clean the inner side of the door with
hot water, so that the residues do not
burn from the hot air.
3. Set the Pyrolysis function. Refer to
"Daily use" chapter, "Oven
Functions".
4. When flashes, turn the knob for
the temperature to set the pyrolysis
duration:
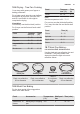
Option Description
P1 Light clean‐
ing. Duration:
1 h 30 min.
P2 Normal
cleaning. Du‐
ration: 2 h 30
min.
ENGLISH 25